I will go over steps on how to export the list of users with their UPN, Object ID, primary SMTP address and Alias email address.
The Get-AzureADUser cmdlet comes in handy to pull all the user details in this scenario. The Mail attribute contains the Primary SMTP address of the user and the Primary SMTP address and Alias email address are stored in the ProxyAddresses attribute in Azure AD. The ProxyAddresses attribute is a multi-value property. The Primary SMTP address can be easily identified as it is in this format, SMTP:user@emaple.com The upper-case SMTP denotes that it the primary email address.
When an object is synced from on-premise Active Directory to Azure AD, the values in the proxyAddresses attribute in AD are compared with Azure AD rules and then populated in Azure AD. So, the values of the proxyAddresses attribute in AD may not match the ProxyAddresses attribute in AzureAD.
Export all users to csv file
The below script will pull all Azure AD users,
Connect-AzureAD

$Output = @() #create an empty array

$AzureADUsers = Get-AzureADUser -All $true | Select DisplayName,UserprincipalName,ObjectId,Mail,ProxyAddresses #Get all Azure AD users

ForEach ($User in $AzureADUsers)
{
	$Output += New-Object PSObject -property $([ordered]@{ #fetch user detail and add to $output
		UserName = $User.DisplayName
		UserprincipalName = $User.UserprincipalName
		UserId = $User.objectId
		SMTPAddress = $User.Mail
		AliasSMTPAddresses = ($User.ProxyAddresses | Where-object {$_ -clike 'smtp:*'} | ForEach-Object {$_ -replace 'smtp:',''}) -join ','

	})
}
$Output | Export-csv "C:\tmp\O365Users_$((Get-Date).ToString("MMddyyyy_HHmmss")).csv" -NoTypeInformation -Encoding UTF8 #Export users to csv file
Microsoft recently announced they will disable basic authentication for all M365 tenants. This deadline has been pushed postponed due to the impact of COVID-19 across the globe.
Latest update: The latest from Microsoft is, effective October 1, 2022 Basic authentication will be disabled in all tenants.
The following components of Exchange Online will be affected,
Exchange Web Services(EWS)
POP
IMAP
Exchange ActiveSync
Remote PowerShell
Why is this a big deal?
Basic authentication uses username and password for client access requests. This used to be the industry standard during the time which organizations didn’t understand the cost of security breaches. It poses a significant security risk as Business Email Compromise (BEC) scams have exposed organizations to billions of dollars in potential losses. Check out this 2019 report from ProofPoint that goes into details.
Disabling Basic Authentication will help protect Exchange Online from brute force or password spray attacks. As the above mentioned report goes into, IMAP-based password-spraying campaigns are very effective in particular.
Beyond all this, Basic Authentication doesn’t enforce MFA and this should be the biggest driver for organizations to move away from it.
Is Basic Authentication enabled in your tenant?
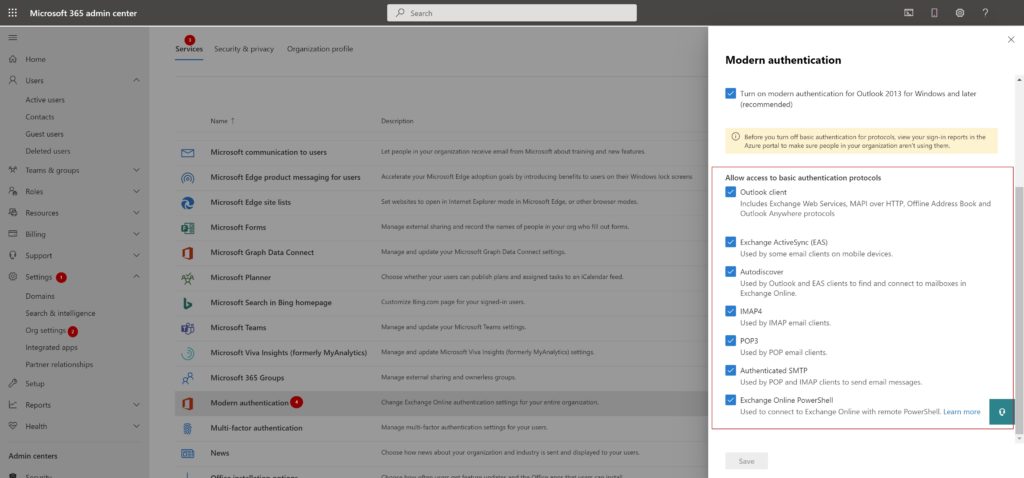
Here is how to check if Basic Authentication is enabled in your tenant,
Settings –> Org Settings –> Services –> Modern Authentication
Screenshot above shows how to check if ‘Basic Auth’ is enabled in tenant
Determine who is using Basic Authentication in your tenant
Before you turn off basic authentication for protocols, view your sign-in reports in the Azure AD portal to determine who is using it in your organization.
This can be determined using sign-in logs in Azure AD.
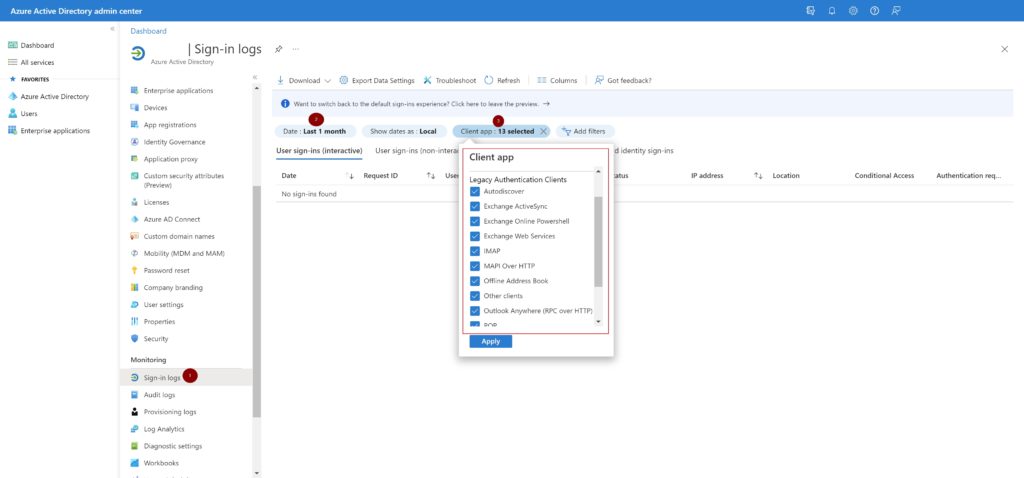
In your Azure AD admin center, Click the ‘Sign-in logs’ blade.,
Select ‘Last 1 month‘ in the Date
Add a ‘Client app‘ as a second filter, choose all options under the ‘Legacy Authentication Clients‘ and click ‘Apply‘
Azure AD sign-ins | Basic Auth filter
With this report information, you can contact the application and account owners to determine why Basic Authentication is still in use. This information will also come in handy later if you are planning to allow exceptions to these accounts/applications. I’ve covered it later in this post.
Disable Basic Authentication
Before you begin,
Verify Modern Authentication is enabled
Verify your email clients are Modern Authentication capable
In this post, I’ve elaborated how to block Basic Authentication using Azure AD conditional access.
IMO, the easiest method to disable Basic Authentication is to use authentication policies.
With Authentication policies you can,
Apply a default organization level policy that blocks Basic Authentication
Apply a per user policy to allow certain protocols. Example: ActiveSync
Create Authentication Policy
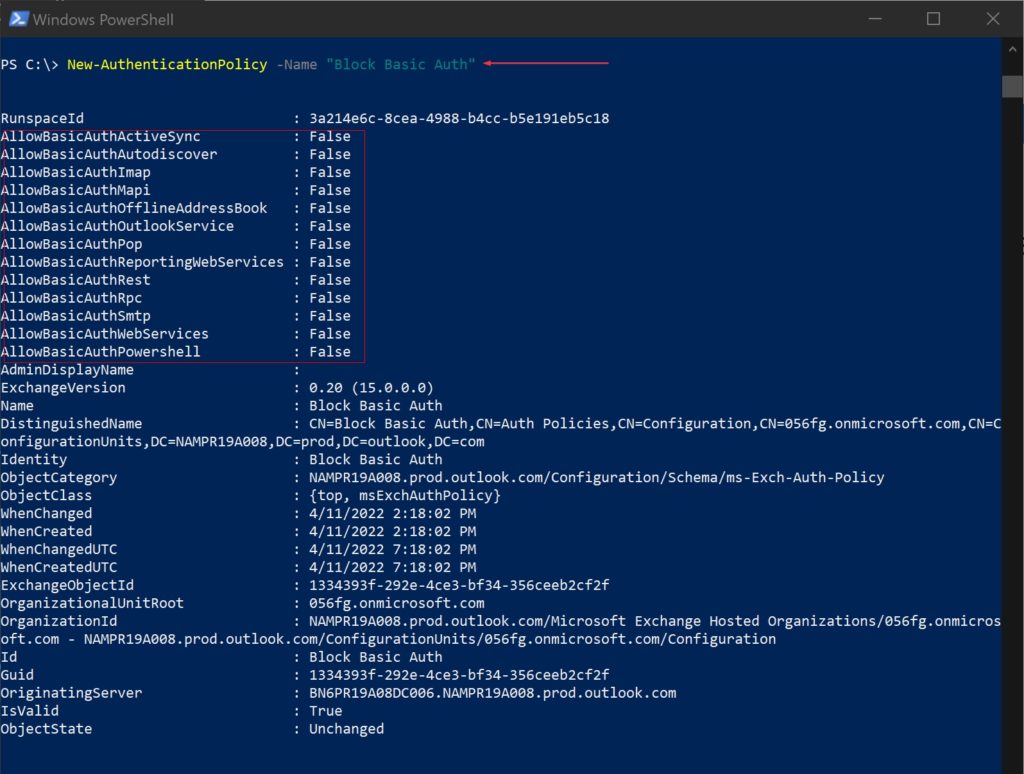
This creates an authentication policy named ‘Block Basic Auth’
New-AuthenticationPolicy -Name "Block Basic Auth"
When you create a new authentication policy without specifying any protocols, Basic Authentication is blocked for all client protocols in Exchange Online.
The default value of the AllowBasicAuth* parameters (switches) is False for all protocols.
Set Default Authentication Policy
The default policy is assigned to all users in the tenant who don’t have a specific policy assigned to them. To configure the default authentication policy for the organization, use this:
Authentication policies assigned to users take precedence over the default organization policy.
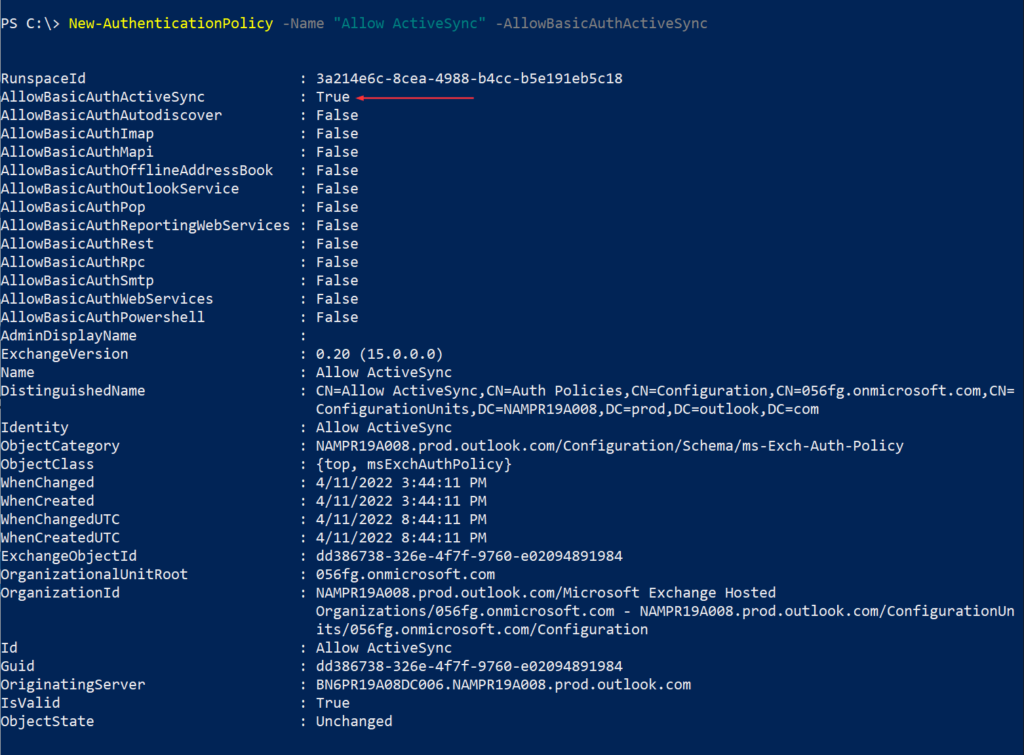
To enable Basic authentication for a specific protocol that’s disabled, specify the switch without a value
To disable Basic authentication for a specific protocol that’s enabled, use the value :$false
In this scenario, I’m creating an authentication policy to allow ActiveSync. This is sometimes typical in organizations where users will have Intune managed devices but would like to add second O365 email from a different tenant. The Outlook app prevents this but the built-in mail app can be used with ActiveSync to fetch email.
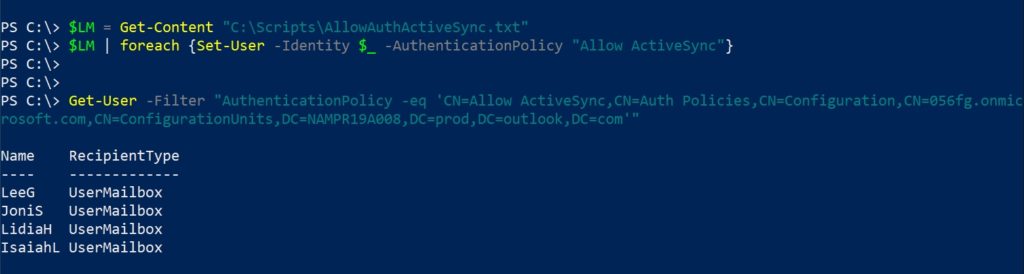
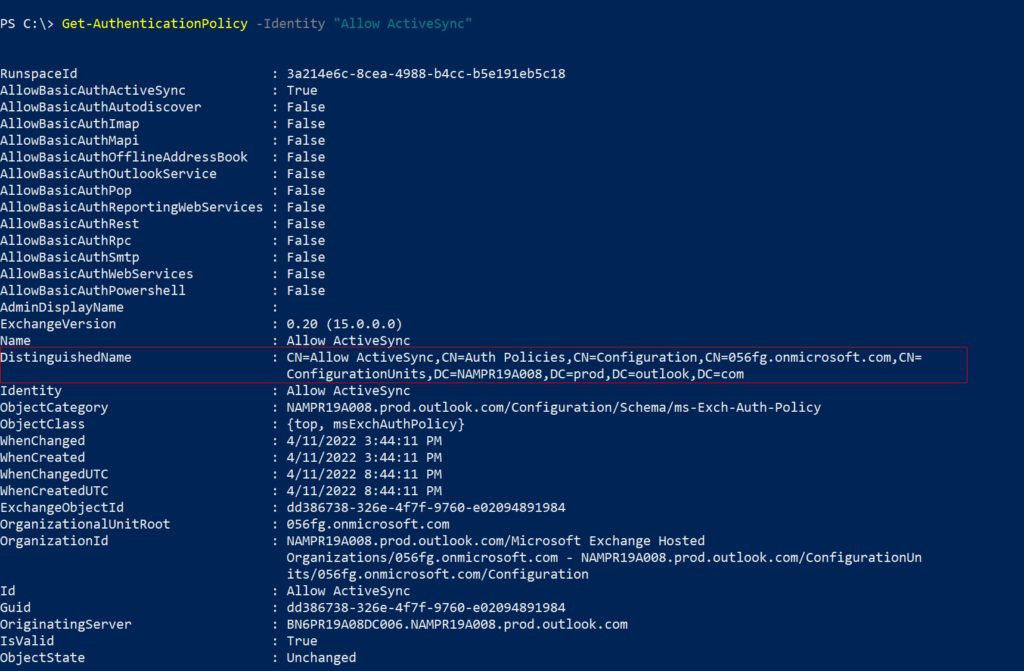
To get all users assigned to a policy you need to get the policy’s DN using the cmdlet Get-AuthenticationPolicy,
$PolicyId = Read-Host "Enter policy ID in distinguished name format"
Get-User -Filter "AuthenticationPolicy -eq '$PolicyId'"
Assign policy to user, confirm and get all users assigned to a policy
Determine policy DN using ‘Get-AuthenticationPolicy’
By default, when you create or change the authentication policy assignment on users or update the policy, the changes take effect within 24 hours. If you want the policy to take effect within 30 minutes, use the following syntax:
This example below immediately applies the authentication policy to multiple users. As I’m in the same PowerShell session and haven’t changed the variables you used to identify the users,
Please checkout Part I if you landed directly on this page.
This post is a continuation how to Forms and Power Automate can be used to create an approval workflow to automatically provision a Team. We will see the user’s experience here.
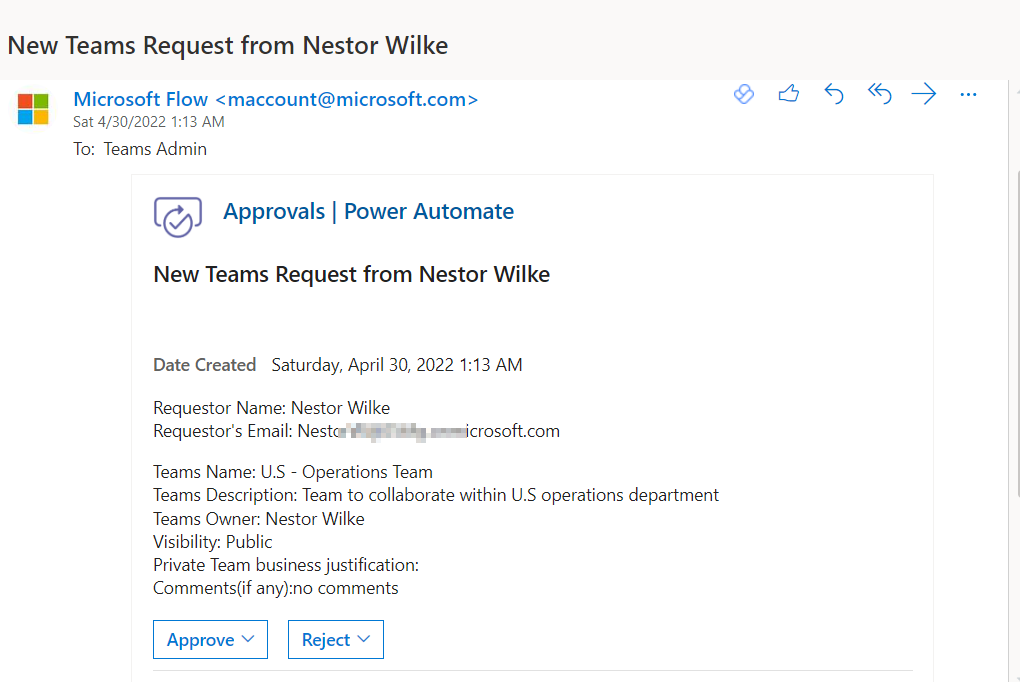
When user submits the Microsoft Form, the approver gets an email.
User’s responses
In my scenario, I’m using a service account called ‘Teams admin’ and I can see the email as below,
Email received by approver
In the Outlook.office.com, the approver can directly click on ‘Approve’ or ‘Reject’ and also add comments if they wish to.
Approver submitting approval in email
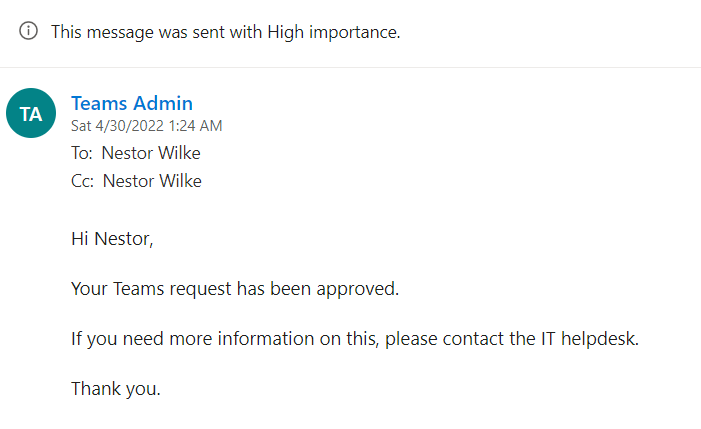
Once approved, the rest of the flow runs and at the end the user gets an email confirming the Team creation.
User receiving confirmation email
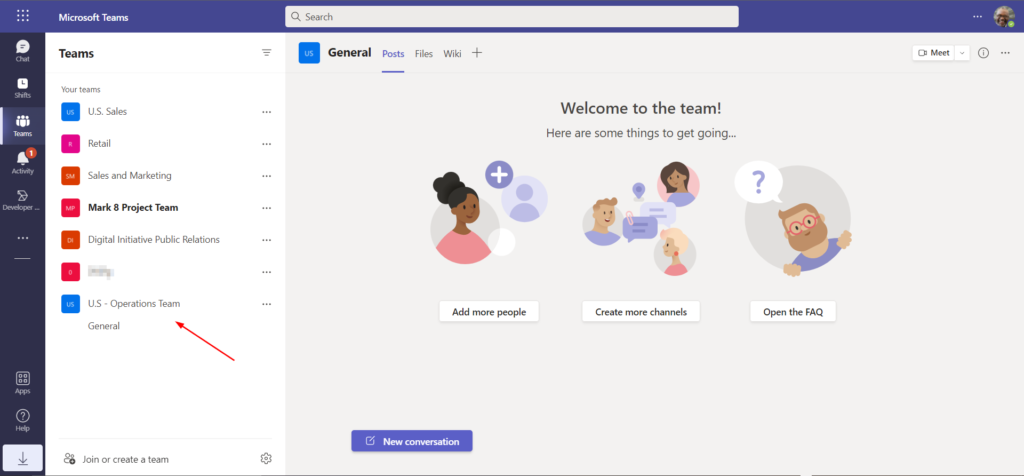
User can also launch Teams and check that he is part of the new Team that was created.
Created Team shows up in user’s Teams
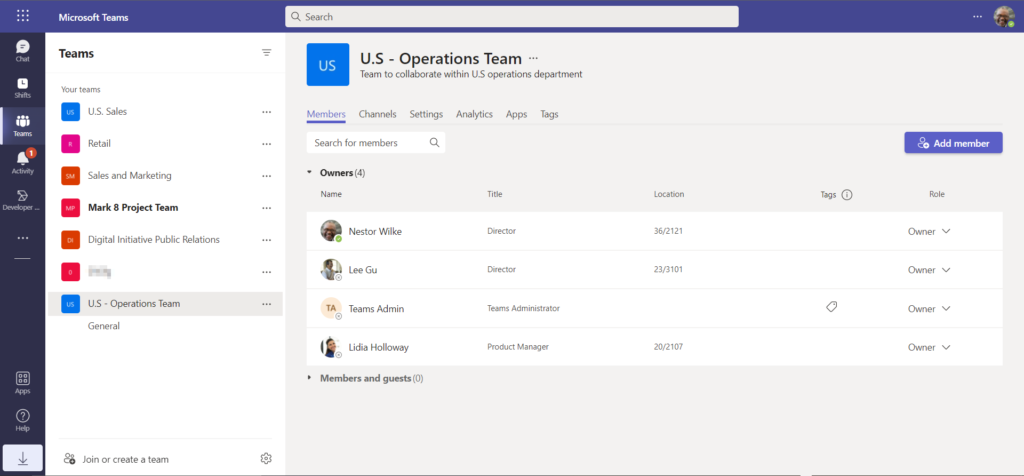
Requested owners
As you can see the ‘Teams admin’ service account is also a owner in the Team it created. This might become an issue during compliance audits and this can be fixed by adding a step in Power Automate with a HTTP request.
The HTTP request option is a premium feature and hence no screenshot here.
Teams has become more popular in the recent work from home era and the list of features it offers are great and no doubt about it. Microsoft keeps adding more appealing features for remote and users working from office locations. As more companies adopt Teams for its collaboration features which help increase productivity, no one wants to lose control of the M365 environment because of what is bein allowed to be created or provisioned by the users.
In this post, I’ll go over a on a high-level of what is a Team and what happens when Team is created. Also I’ll go over steps which I recently used to implement a Teams provisioning with an approval workflow process using Microsoft Forms and Power Automate.
What is a Team?
In Microsoft Teams, Teams are groups of people brought together for work, projects, or common interests. Teams are made up of two types of channels,
Standard
Is open for all members and anything posted is searchable by others
Private
Focused, private conversations with a specific audience. Example: Specific audience for a particular subject
Files shared are only viewable by the members of the channel and are stored in a separate SharePoint site from the rest of the team’s files
Shared channels
For collaborating with people inside and outside your team or organization
Only team owners can create shared channels
Only shared channel owners can add members or share the channel with a team
Can’t be changed to standard or private channel and vice versa
What happens when a Team is created?
When a Team is created, the following also gets provisioned,
A corresponding O365 group
Owner of the O365 Group is the Owner of the team
The members of the Group are the Members of the team, as added by the person who created the Team
An Exchange mailbox with a Group email address
Will appear in everyone’s Outlook client
A new SharePoint site is created
Sharing files via Teams leads to data being stored either in SharePoint or OneDrive
Files uploaded to a Teams channel are automatically saved to the Team’s SharePoint folder
Files uploaded in a 1:1 or group chat are stored in the OneDrive folder and shared only with colleagues in that conversation
A connection to OneNote
Team Creation Options
As I put together above, it is easy to see that adding a Team might seem like a simple task and it is but from a data security and governance point of view, it can easily get out of hands if controls are not put it place. When you role out Microsoft Teams, you get a few options on how to handle Team creation.
Allow all users to create Teams
This will allow users to create their own Teams without any restrictions. This is the easiest option but easy to lose control and will eventually add more burden on the IT admins
Block all users from creating Teams
This is the most restrictive option and users have to reach out to IT to create Teams. There is also a risk of users moving onto more accessible solutions that don’t take compliance and security policies seriously and ending up shadow IT in the process
Limit to a certain security group
With this option, we can limit a certain group of users to be able to create groups/Teams. I like this idea and to add to it, I’ll have someone from the compliance team in charge of this if that was an option. I’ve covered how to limit a certain group in an earlier post
That being said, IMO it is best to have an approval workflow and a controlled provisioning process for Teams creation. This will help any organization to prevent sprawl, uncontrollable growth, help IT admins reduce some unnecessary work and more importantly allow a controlled adoption of Microsoft Teams while helpdesk and IT admins catchup.
Teams Provisioning and Approval Workflow with Power Automate
I’ll detail the steps needed to create a provisioning workflow with the native capabilities in Forms and Power Automate.
Components involved in creating this workflow,
Microsoft Forms
Power Automate
SharePoint (optional)
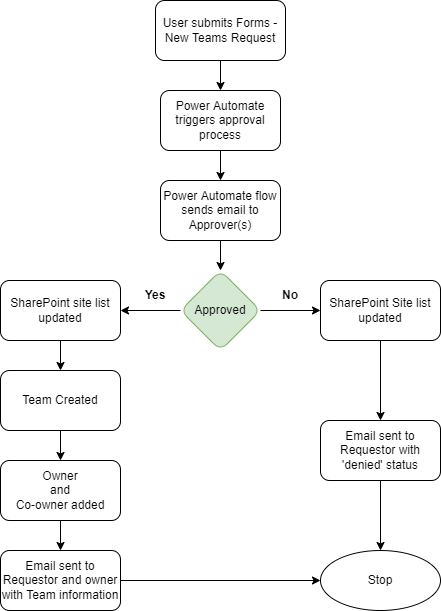
I’ve put together a flowchart of the thought process,
Some considerations to keep in mind,
It is better to create the Microsoft Forms and Power Automate Flow using a service account which has a mailbox enabled and permissions within Teams to create Team. This is usually a good idea because, if this was created under a specific Teams administrator account and if he or she wins a lottery and figures not to show up for work anymore, this process can go on without disruption and is one less thing for you to worry while disabling the administrator’s account.😊
In my scenario, I’m using a service account to setup the components needed.
Microsoft Forms
Microsoft Forms is a great product and I love the simplicity. With enough time and effort, I think organizations can leverage Forms to get rid of most of what their users are doing on paper forms.
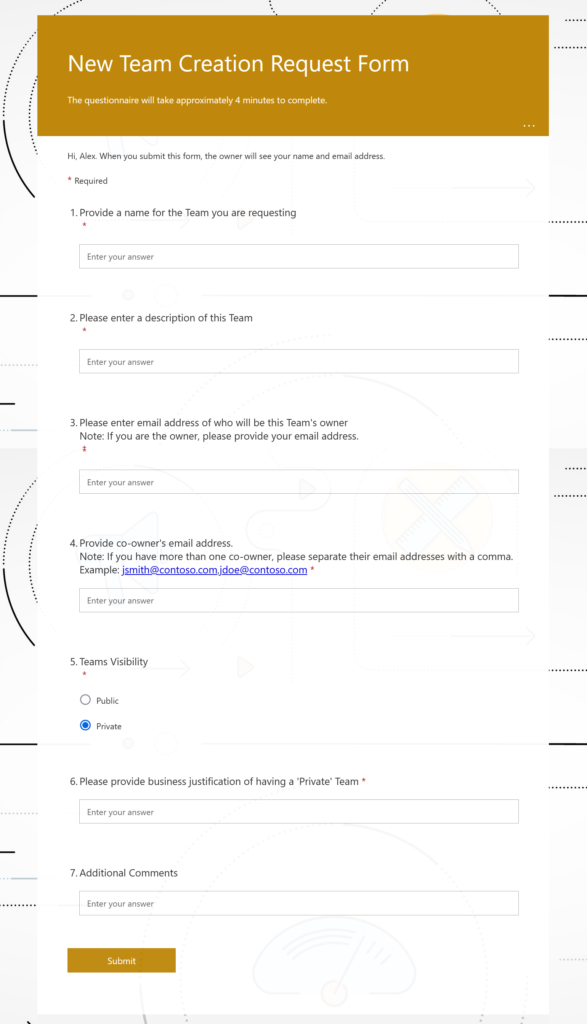
I’ve created a simple form titled ‘New Team Creation Request Form’ to collect the information needed to create a Team. You can also use SharePoint instead of Forms but this approach is much easier.
I’ve added branching to the 6th question.
Logic behind 6th question: If private Team, provide justification. If not, go to question 8
If you’d like to get fancy, there is PowerApps which will require more effort and depends on your knowledge into it.
Power Automate
Open Power Automate
Click My Flows
Click on New Flow and Select Automated cloud flow
Click Skip on the Build an automated cloud flow pop-up window
automated cloud flow
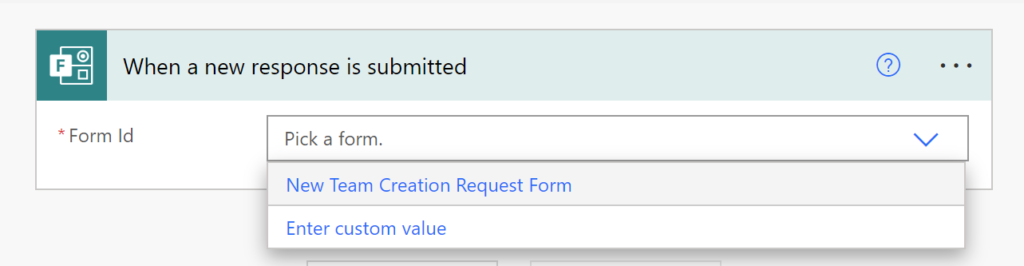
Search for ‘forms’ and select Microsoft Forms and then When a new response is submitted
Note: It is good practice to rename every step while you create it with the purpose of what that step does.
When a new response is submitted
As I created the Form with the same account, it shows up in the drop-down
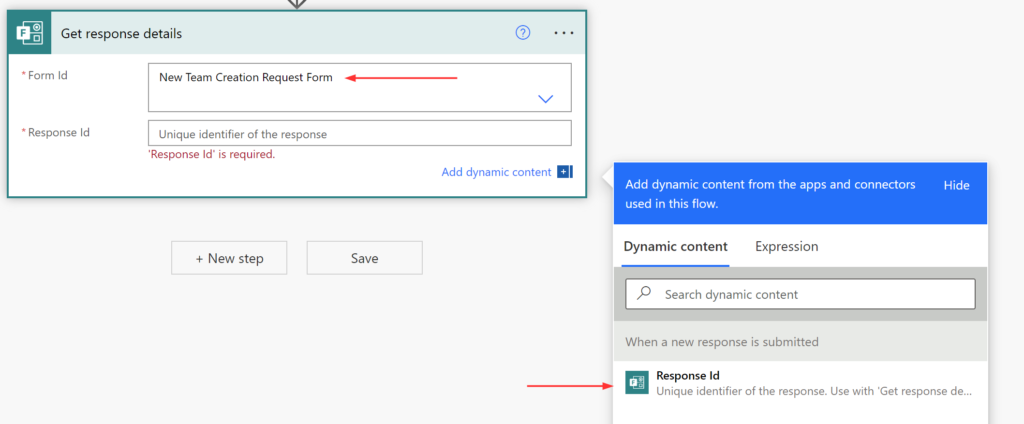
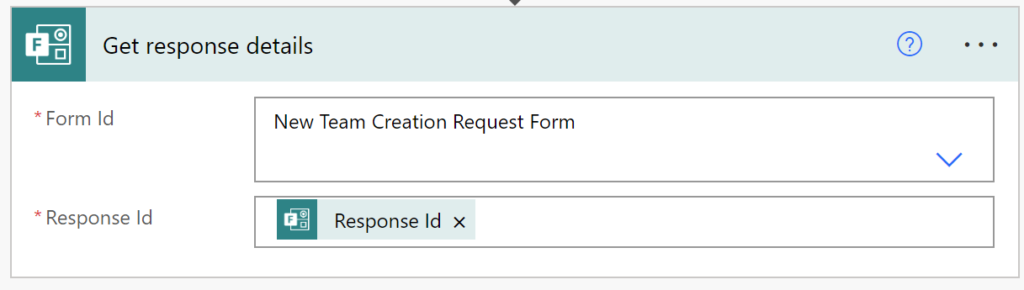
Click New Step, Microsoft Forms –> Get response details
This action retrieves a form response
Select the Form in Form Id and in Response Id, click Add dynamic content and select Response Id
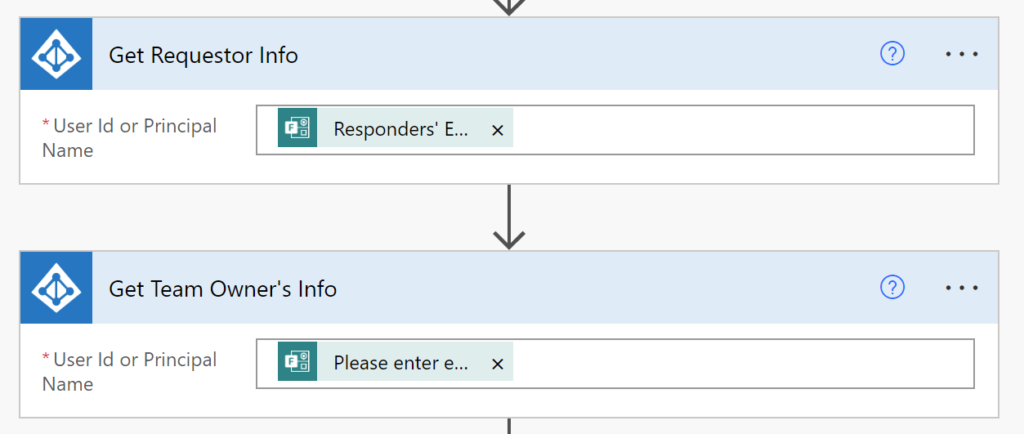
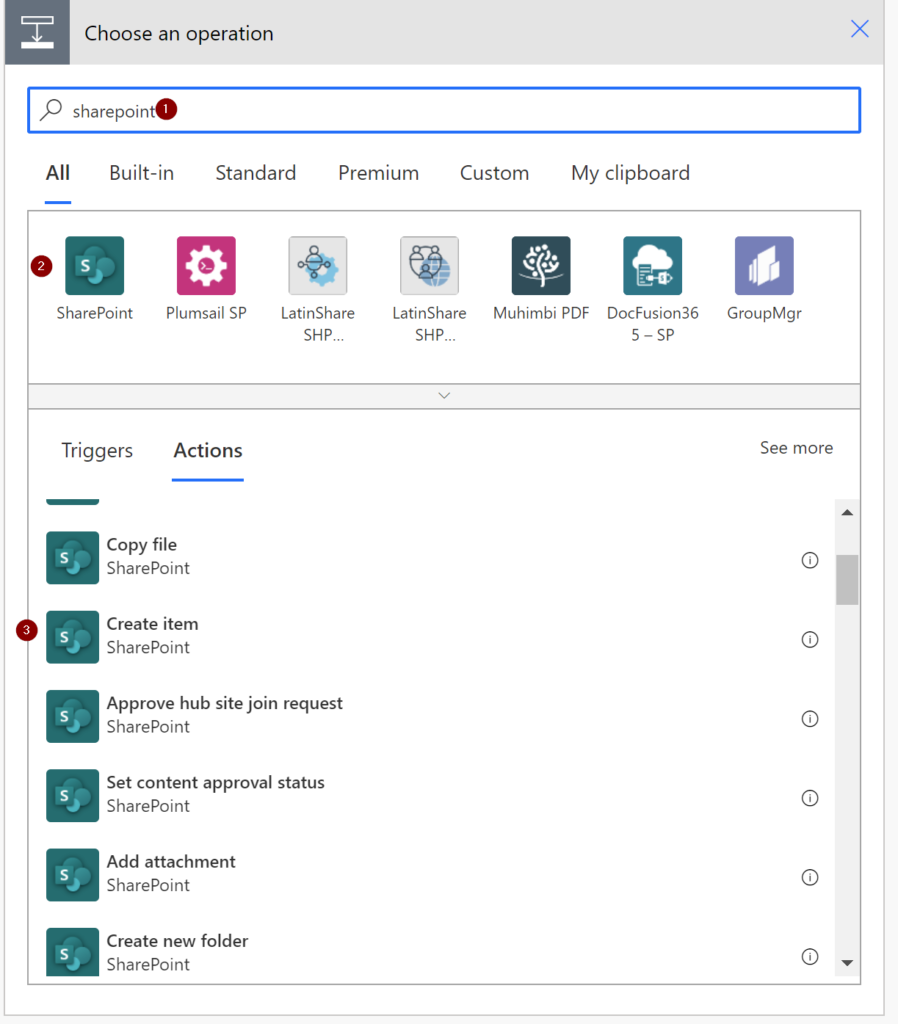
Add step, search for Azure AD and in actions select Get user
The next two steps are to get information about the requestor and the owner from Azure AD
This is useful while sending email to the approver, these values can be used
User Id or Principal Name –> Add dynamic content and select Responder’s Email from the form
Similarly in the second step, User Id or Principal Name –> Add dynamic content and select ‘Please enter email address of who will be this Team’s owner’ in under ‘Get response details’
In the next step, I’m initializing a variable called varCoOwners. And in the step after, I’m using the compose action to do a split based on comma
The reason why we need these two steps is, in the Form we have an entry to input co-owners and if more than one co-owner email address is entered by the user comma-separated, the entire value is considered a string
Power Automate is looking for an array
The split function breaks down a string into an array of strings using a delimiter we define
We are going to use comma
split(variables('varCoOwners'),',')
Compose split
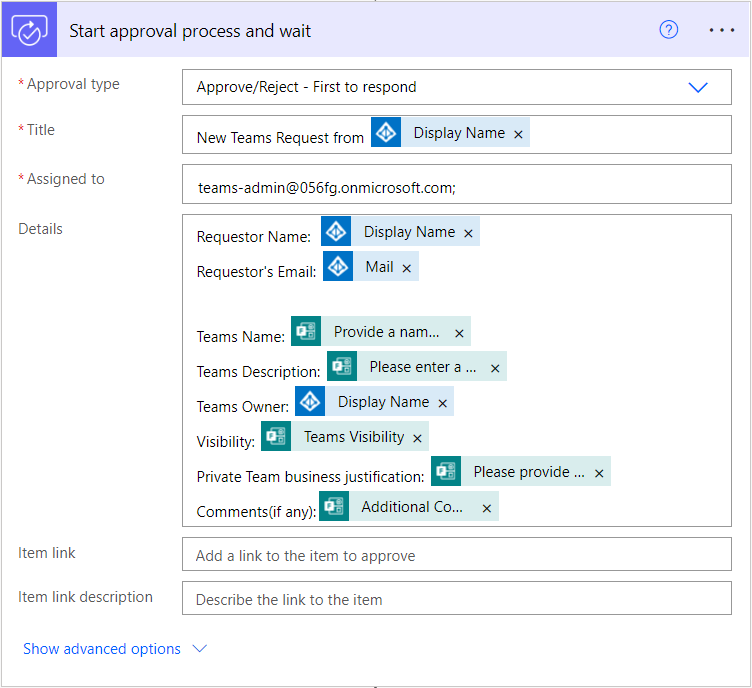
Next step, add Start and wait for an approval
This starts an automated approval process and then waits for it to complete. The approval is cancelable
I’m choosing the Approval type as Approve/Reject – First to respond
Start and wait for an approval
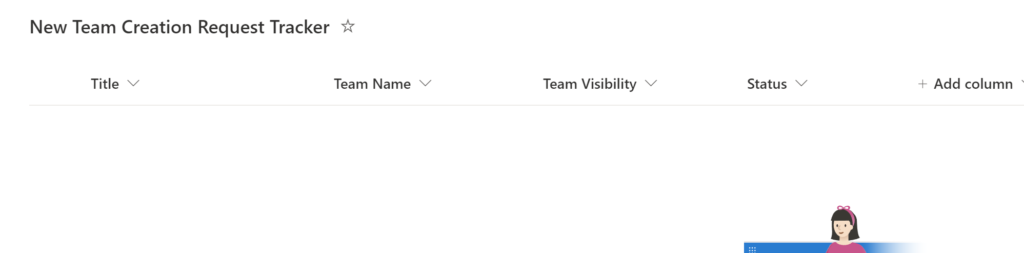
Optional Step. Updating a SharePoint list for tracking.
SharePoint list
SharePoint – Create item
Update SharePoint
We add a condition to see if the request was approved
We add condition control which performs one or more tasks only if a condition is true or false
Outcome = Approve
Add control – Condition
Outcome = Approve
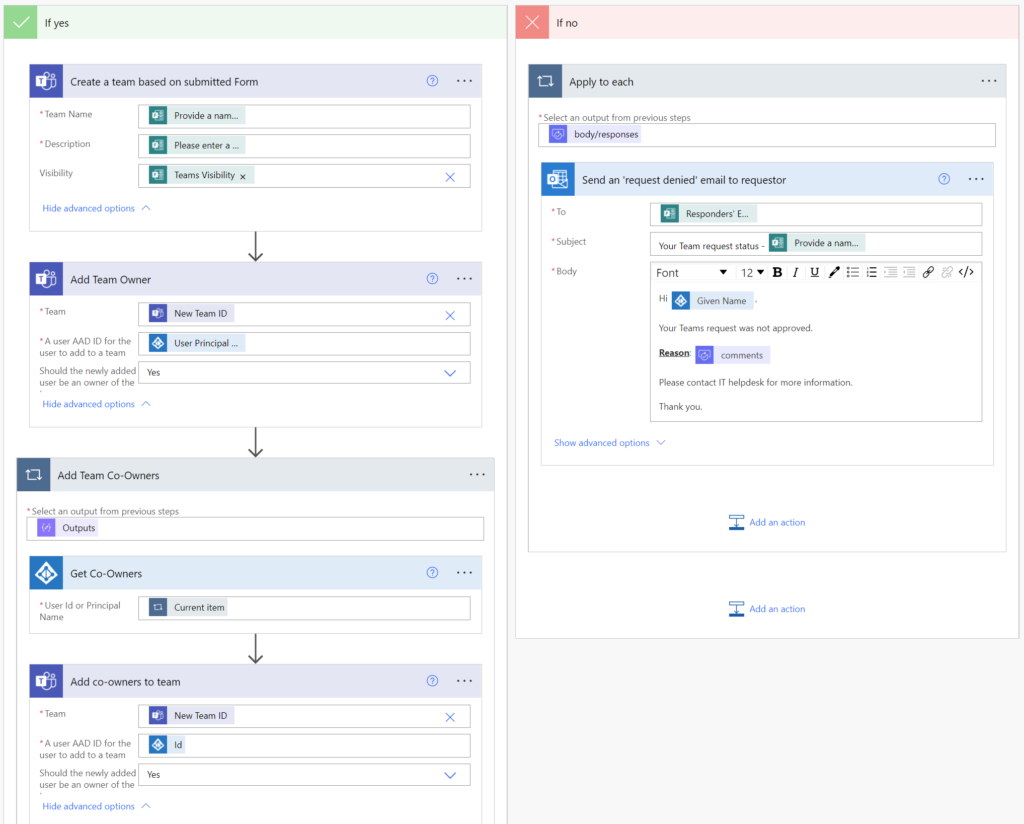
Continuing from the previous condition step,
If yes –> We create a Team, add Team owner, add Team co-owner(s) and send an email to the requestor
Create a Team based on submitted Form
Add Team Owner
Team = New Team ID
A user AAD ID for the user to add to a team = UPN from ‘Get Team owner’s info’ Azure AD step
Should the newly added user be an owner of the team = Yes
Add Team Co-owners
Search Control -> Apply to each -> In Select an output from previous steps, select Output of compose step
Azure AD -> Get User ->In User Id or Principal Name, select Current item
Teams -> Add a member to a team
Team = New Team ID
A user AAD ID for the user to add to a team = UPN from ‘Get Co-Owners’ Azure AD step
Should the newly added user be an owner of the team = Yes
If no –> We send an email to the requestor with comments from the approver
See below on how the steps are done,
If yes and If no
Continuation on ‘If yes’ after ‘Add co-owners to team’ step,
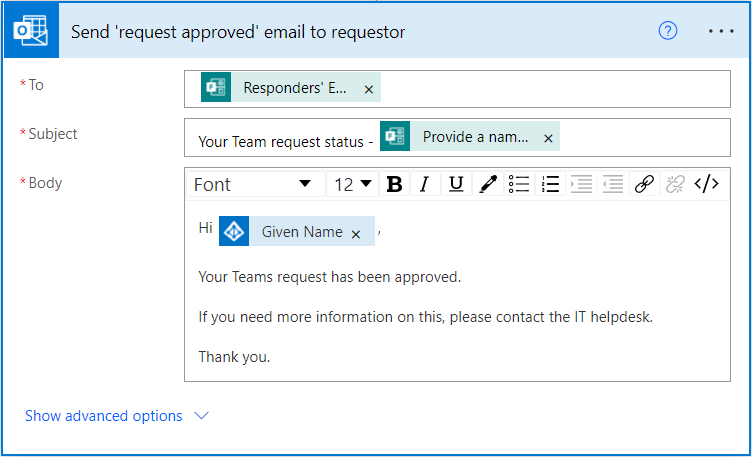
Send ‘request approved’ email to requestor
Final Automated Flow
This is how the final automated flow looks,
New Teams Request Workflow
I added a step to remove a member from group. This is for removing the service account which created the Team from being a member. As Teams are in turn Azure AD security groups, I used a remove member from group action to remove the service account. I noticed that this step failing often and the reason was the Azure AD group was not found and hence I added a delay of a 3 minutes and then run the action.
This might seem a little too overwhelming at first glance but once you understand the power of Microsoft Forms, Power Automate, SharePoint and the potential it brings to organizations, you’ll be complaining about what more features you’d like to have in this in no time.
I’ll cover the user experience of this process in a following post.
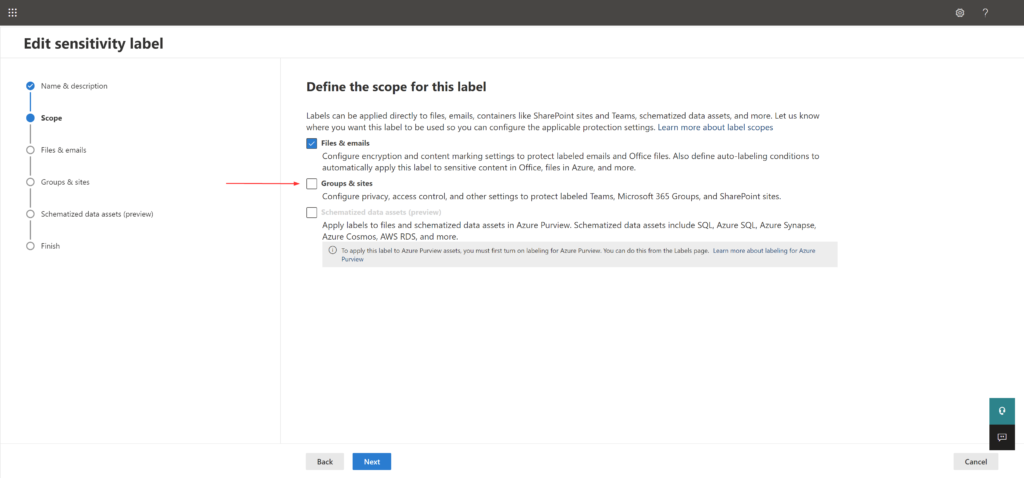
In a O365 tenant I manage, I had rolled out the Azure Information Protection labels from earlier. The recent requirement was to make sure the sensitivity labels will apply to group across services like Outlook, Microsoft Teams and SharePoint online.
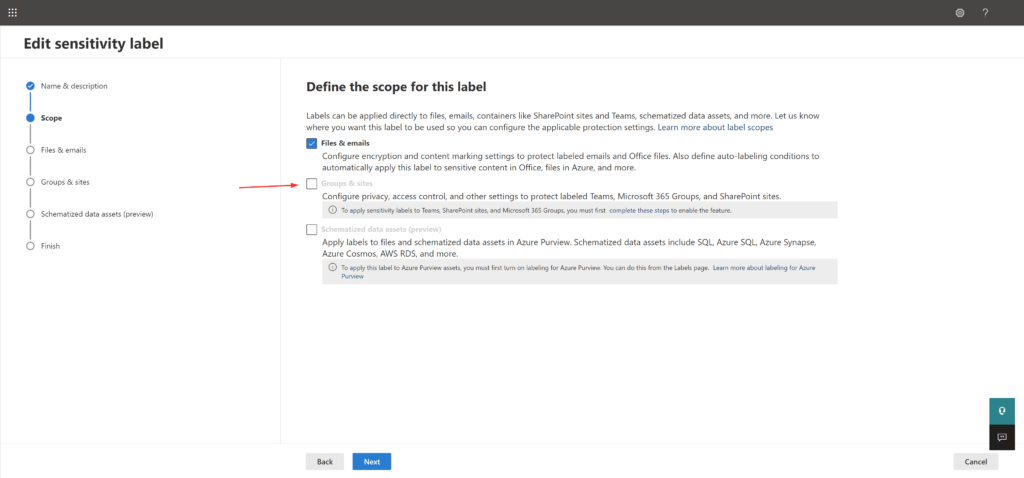
When I checked the sensitivity label, I noticed the ‘Groups and sites’ option greyed out and which lead me to research a bit into this and write my findings below,
Groups & sites greyed out
Enable sensitivity labels for containers in Azure AD
Sensitivity labeling for containers i.e., groups and sites, should enabled before we can configure the settings in the sensitivity labeling wizard. Else, it will be greyed out as in screenshot above.
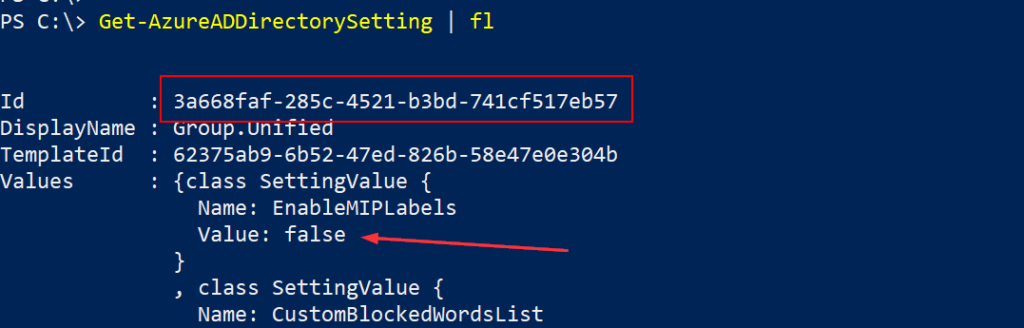
To determine current group settings for your Azure AD organization, use the below cmdlet. If no group settings are defined, this cmdlet won’t return any output value.
Get-AzureADDirectorySetting | fl
In my scenario, I have only one setting and it was easier to see it. But your organization might have more than one setting and in that case, you can use this below cmdlet to search and determine the setting.
Get-AzureADDirectorySetting -Id (Get-AzureADDirectorySetting | where -Property DisplayName -Value "Group.Unified" -EQ).id
EnableMIPLabels = false
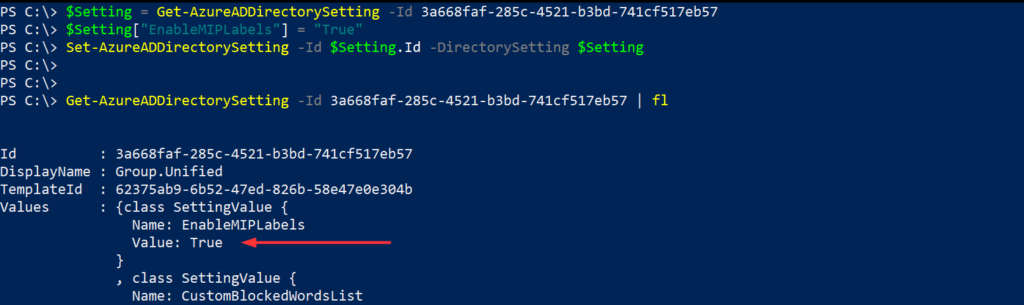
Below, I’m storing the value of the cmdlet’s output into the $Setting variable. And once stored, I’m setting ‘True’ as the value for ‘EnableMIPLabels’. I’m listing out both methods, what I used and what you can potentially use. The second method is much easier.
$Setting = Get-AzureADDirectorySetting -Id <Group.Unified policy's Id from your tenant>
$Setting["EnableMIPLabels"] = "True"
Set-AzureADDirectorySetting -Id $Setting.Id -DirectorySetting $Setting