In the ever-evolving world of cloud security, sometimes it’s not the new, complex exploits that catch us off guard, it’s the overlooked features hiding in plain sight. One such feature in Exchange Online is Direct Send, a capability designed for convenience but now actively exploited by attackers to bypass security controls.
Let’s pull back the curtain and take a deep dive into what Direct Send is, how it’s being misused, and what you can do to shut the door on this attack vector.
What Is Direct Send in Exchange Online?
Direct Send is a feature that allows internal devices or applications (like printers, scanners, or legacy tools) to send emails through Microsoft 365 without authentication.
It works by leveraging the tenant’s smart host, typically in the format:
tenantname.mail.protection.outlook.comOriginally designed to help internal tools send alerts or reports to internal mailboxes, Direct Send does not require credentials or tokens. That’s the convenience. But therein lies the danger.
Key Detail: Direct Send only works for recipients within the same tenant, it won’t deliver mail to external domains.
How Direct Send Becomes a Security Risk
While Direct Send serves a legitimate purpose, it becomes a security liability because anyone with the right tenant domain and smart host format can spoof an internal sender. No login. No breach. Just open SMTP.
All an attacker needs is:
- A valid tenant domain (easy to scrape from public records or previous breaches)
- The smart host address (easily guessable)
- An internal email format (like first.last@company.com)
With that, they can send spoofed emails that appear to come from inside the organization, bypassing both Microsoft’s and third-party email filters that trust internal traffic.
Real-World Abuse: How Attackers Exploit Direct Send
During a recent threat campaign observed across several U.S.-based organizations, attackers used PowerShell to exploit Direct Send, sending emails that looked like internal alerts, complete with subject lines like “New Missed Fax-msg” or “Voicemail received.”
Here’s a sample PowerShell command used:
Send-MailMessage -SmtpServer company-com.mail.protection.outlook.com `
  -To joe@company.com -From joe@company.com `
  -Subject "New Missed Fax-msg" `
  -Body "You have received a call! Click the link to listen." -BodyAsHtml
Since the emails originated from Microsoft’s infrastructure, many filters saw them as internal-to-internal traffic. This allowed them to sneak past SPF, DKIM, and DMARC checks, especially in tenants with lax anti-spoofing policies.
How to Detect Direct Send Abuse
You’ll need to dig into message headers and behavioral signals to spot these threats:
Message Header Indicators
- Received headers showing external IPs sending to your smart host.
- Authentication-Results failing SPF, DKIM, or DMARC checks.
- X-MS-Exchange-CrossTenant-Id not matching your tenant.
- SPF record mismatch or missing smart host entry.
Behavioral Indicators
- A user “emailing themselves.”
- Emails sent via PowerShell or unknown user agents.
- Unusual IP addresses or geolocations.
- Suspicious links, QR codes, or file attachments.
Remember, not all Direct Send traffic is malicious, context matters.
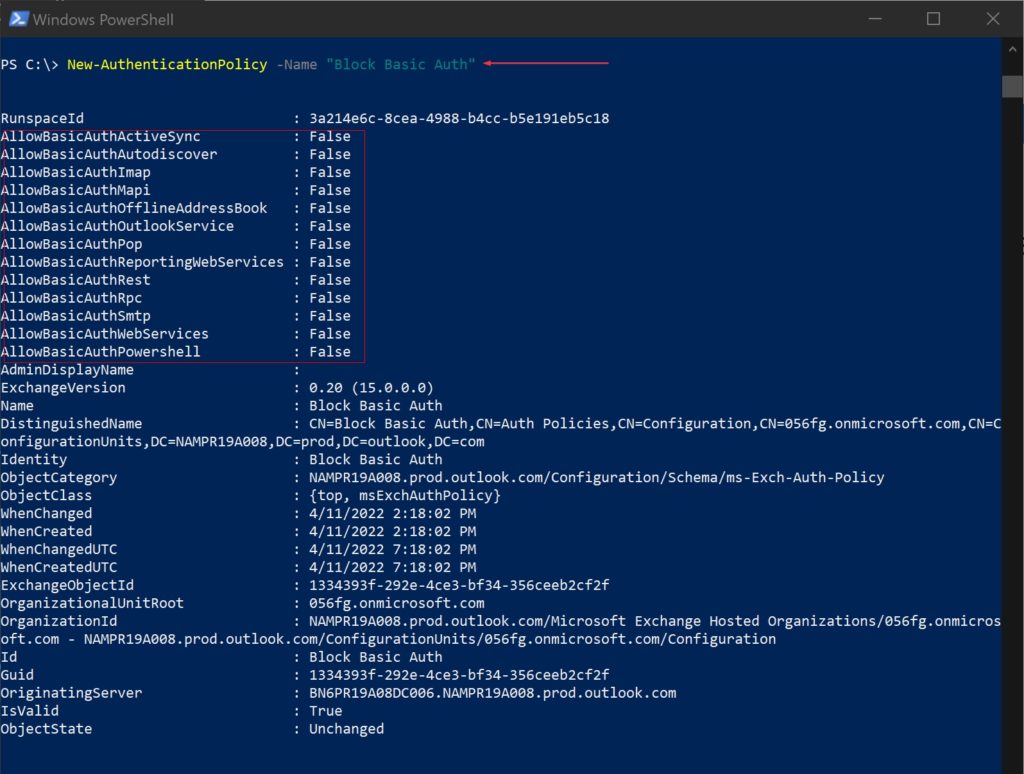
How to Disable or Control Direct Send
Microsoft now allows you to disable Direct Send entirely using a single command in PowerShell:
Connect-ExchangeOnline
Set-OrganizationConfig -RejectDirectSend $true
To verify:
Get-OrganizationConfig | Select-Object Identity, RejectDirectSendPro Tip: Disabling this feature won’t affect authenticated SMTP relay or Microsoft 365 apps, it only blocks unauthenticated Direct Send.
More details here: Microsoft’s announcement on Direct Send controls
Best Practices to Secure Your Tenant
Here’s a checklist to keep Direct Send from becoming your weakest link:
- Disable Direct Send with
RejectDirectSend = $true - Enforce DMARC with a strict policy (
p=reject) - Flag unauthenticated internal emails for review or quarantine
- Enable Anti-Spoofing Policies in Exchange Online Protection (EOP)
- Enforce known IPs in SPF records to reduce spoofing
- Educate users on phishing threats, especially QR code–based quishing
- MFA + Conditional Access for all users
Final Thoughts
Direct Send was designed with good intentions but in the wrong hands, it becomes a fast-track lane for phishing campaigns. The good news? You now have the awareness and the tools to defend against it.
Don’t let this quiet feature become a noisy headline for your security team. Audit your tenant, close the loopholes, and stay vigilant.
Thanks for stopping by. ✌️