When we enable application settings persistence, the users’ Windows settings and application customizations are to a VHD file and is stored in a S3 bucket the same account we created the AppStream 2.0 stack. For every AWS Region, AppStream 2.0 creates a bucket in that account that is unique to the account and the Region. All application settings configured by the users are stored in the bucket for that Region.
There are no special configuration tasks needed to manage these S3 buckets as they are fully managed by the AppStream 2.0 service. The VHD file that is stored in each bucket is encrypted in transit using S3’s SSL endpoints and at rest using AWS Managed keys.
bucket-name = Name of the S3 bucket in which users’ application settings are stored
prefix = Windows version-specific prefix. Example v6 for Server-2016, Server-2019
settings-group = The settings group value from when we create the stack
access-mode = Identity method of the user
custom for the AppStream 2.0 API or CLI
federated for SAML
userpool for user pool users
user-id-SHA-256-hash = The user-specific folder name. Created using a SHA-256 hash hexadecimal string generated from the user ID
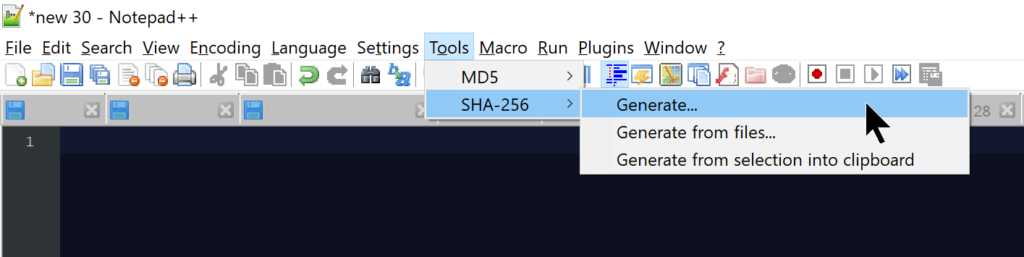
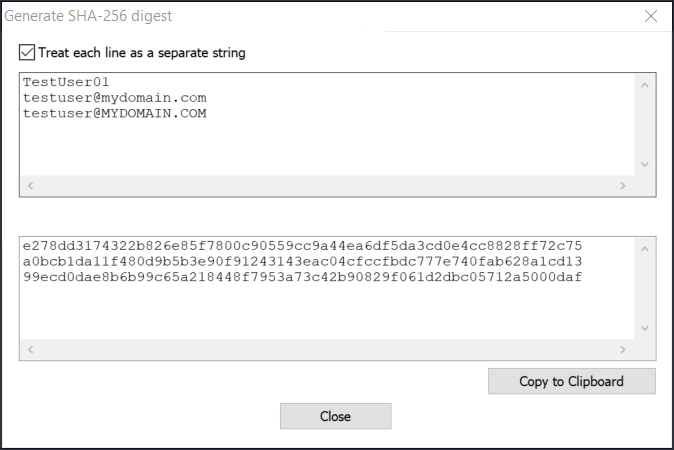
I use Notepad++ to determine the SHA-256 hash for a given user. When you have more than 1 user(😁) you’ll need to determine the user’s folder and this is an extra step that you need to go through.
To determine a user’s SHA-256 Hash using Notepad++:
Click on Tools and SHA-256
Click Generate
I leave the Treat each line as a separate string checked when I add multiple users. For a domain user, make sure the type the user ID in the UPN format, testuser@mydomain.com.
Note: This is case-sensitive. See screenshot for example.
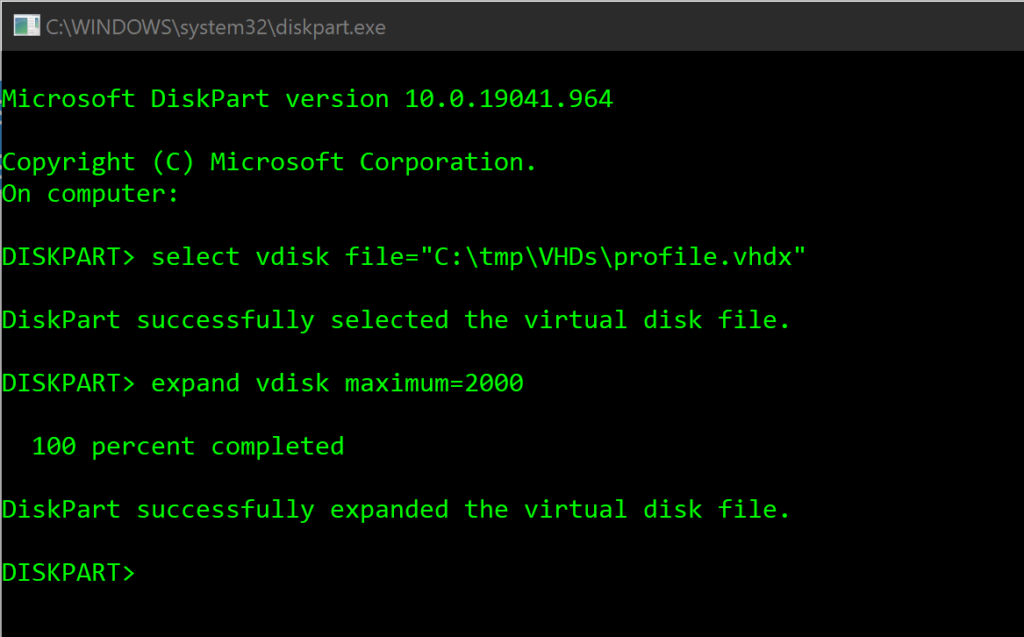
The default VHD maximum size is 1 GB. There will be scenarios where the user requires additional space for application settings, we can download the users’ VHD to a Windows computer to expand it. Then, replace the current VHD in the S3 bucket with the expanded one.
Note: Don’t do this when the user has an active streaming session.
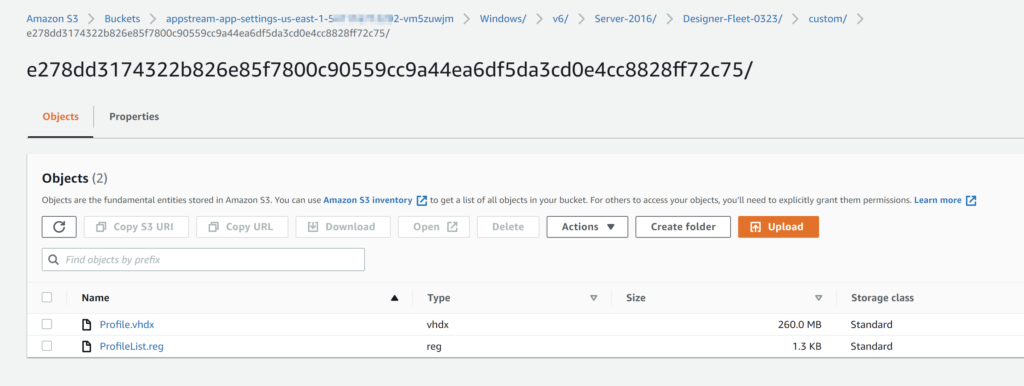
I have the TestUser01’s VHD that I’m going to download, expand and upload back to the S3 bucket.
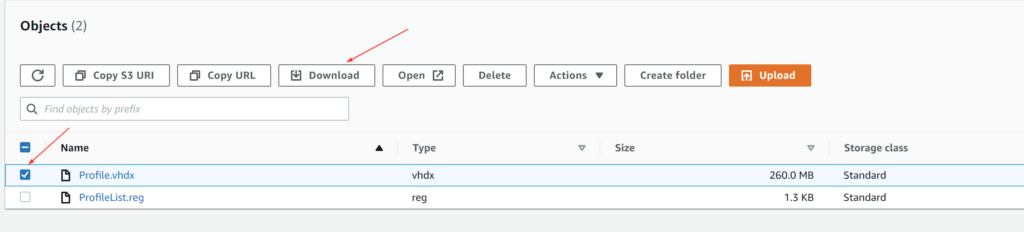
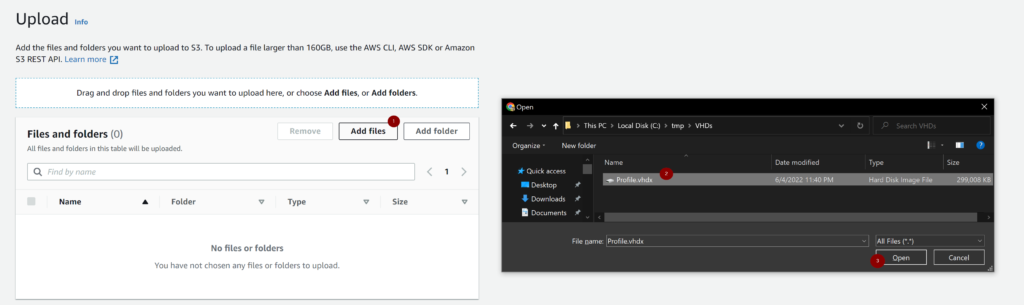
Locate and select the folder that contains the VHD
I used the SHA-256 hash generated earlier, copied it from Notepad++ to my clipboard and while in the S3 folder, I did a search or browser’s ctrl+f also works
Download the Profile.vhdx file to a directory onto a Windows computer
Do not close the browser after the download completes
Easier to use the same session to upload the file back
Open the command prompt as an administrator, and diskpart
Type the following commands to select the vhd file and expand it
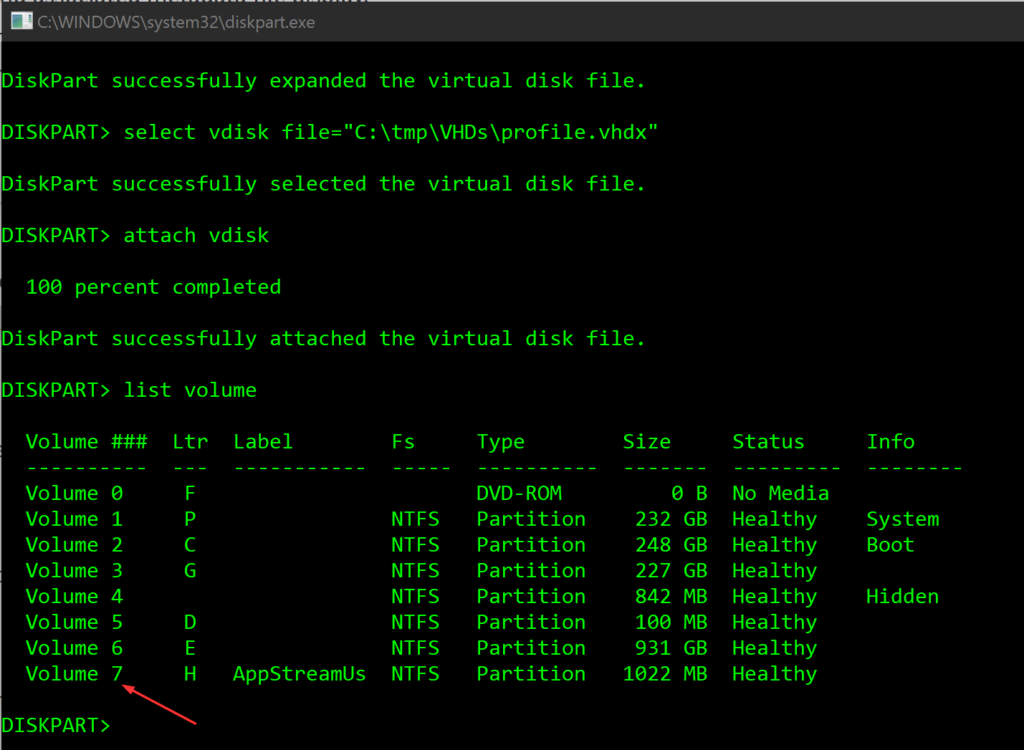
Type the following Diskpart commands to find and attach the VHD, and display the list of volumes:
select vdisk file="C:\tmp\VHDs\profile.vhdx"
attach vdisk
list volume
The volume gets mounted as a drive and as you may notice, it is easier to determine the VHD with the volume label.
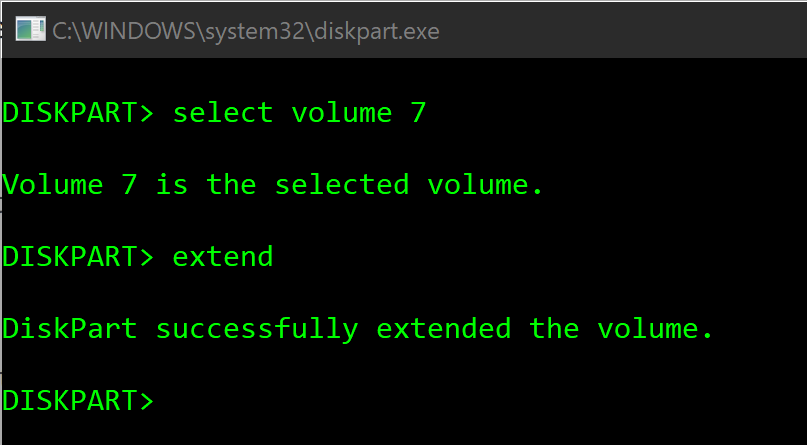
Type the following command:
Corresponds to the number in the list volume output
In my case Volume 7
select volume ##
Type the following command:
extend
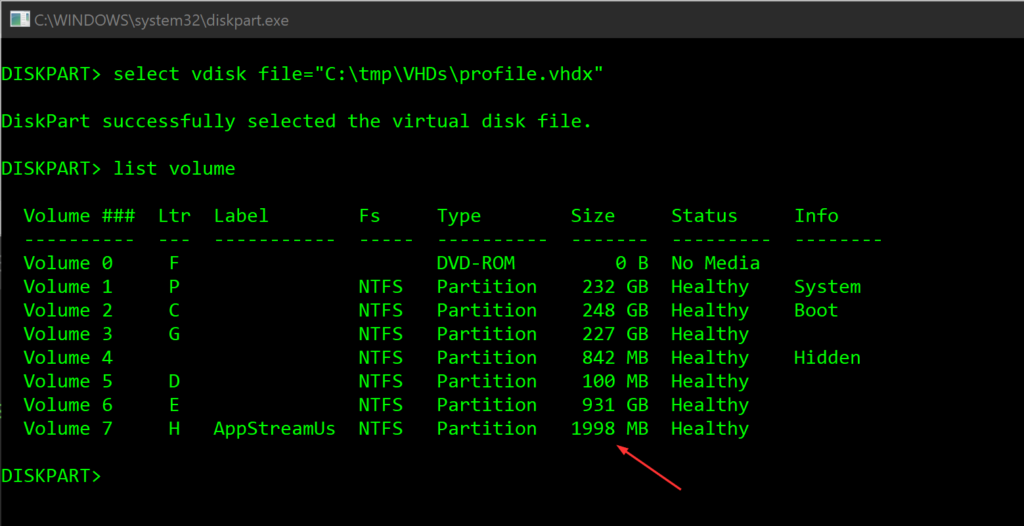
To confirm that the size of the partition on the VHD increased as expected
select vdisk file="C:\tmp\VHDs\profile.vhdx"
list volume
To detach the VHD so that it can be uploaded
detach vdisk
Return to the browser with the Amazon S3 console, choose Upload, Add files, and then select the enlarged VHD in file explorer
Click Upload
The page shows upload progress,
Next time the user starts a streaming session from a fleet on which application settings persistence is enabled with the applicable settings group, the larger application settings VHD is available.
Kind of a related note that I learned while working with application settings persistence is, disabling application settings persistence or deleting the stack does not delete any VHDs stored in the S3 bucket. These VHDs must be deleted manually from the Amazon S3 console or API.
Hope you found this post useful in increasing the size of the application settings VHD in AppStream 2.0.
In this post, I’ll cover the steps that come in after creating an image in AppStream 2.0.
Provision a fleet
A fleet defines the streaming instances which is the underlying hardware, network, Active Directory (if applicable), and scaling configuration for the application streaming infrastructure we are going to deploy.
In the left navigation pane, choose Fleets, Create Fleet
Create Fleet
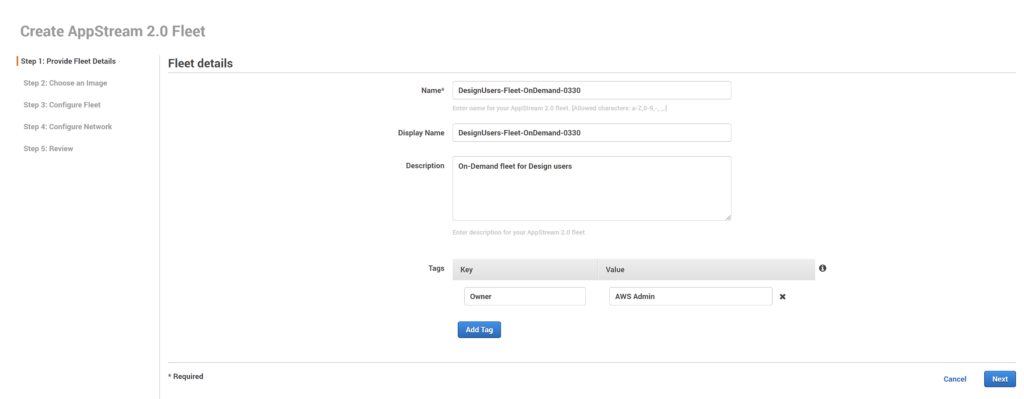
In Step 1: Provide Fleet Details, fill the below information and choose Next
Name = Unique name identifier for the fleet
Display Name = A friendly name displayed in the console
Description = An optional description for the fleet
Tags = Provide necessary tags
Step 1: Provide Fleet Details
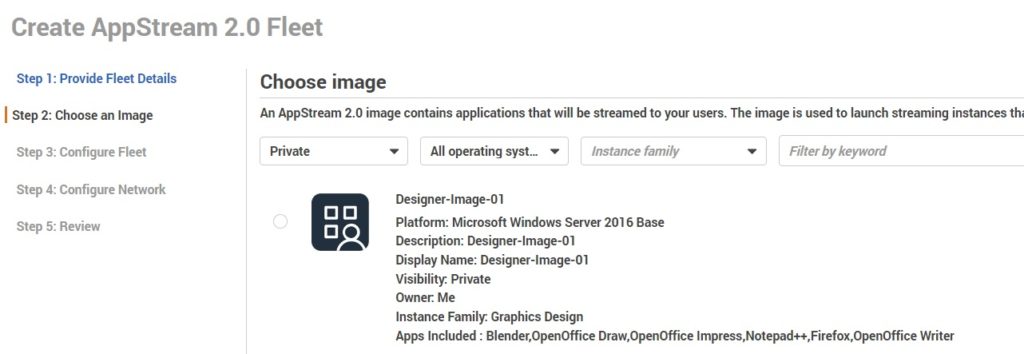
In Step 2: Choose an image, I’m picking the image I created in my earlier post. I filter it by Private to make it easier. and then choose Next
Choose an image – filter by private
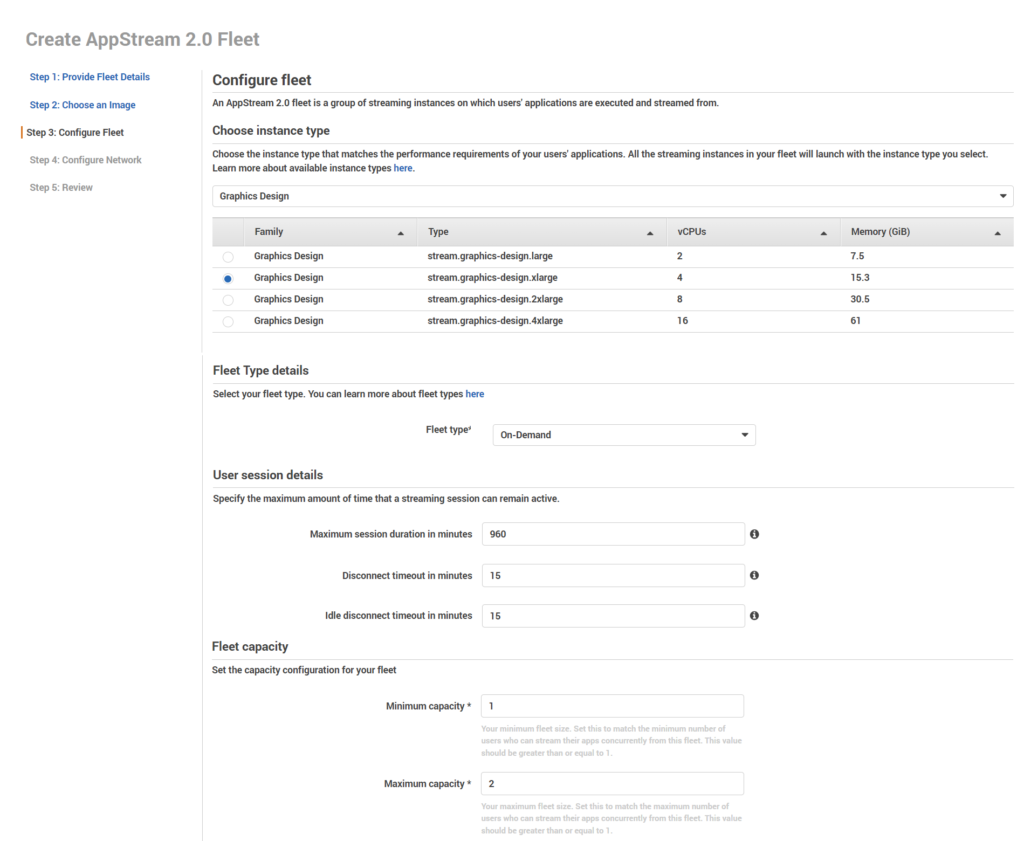
For Step 3: Configure fleet,
In Choose instance type, we define the hardware configuration for each of the instances that make up your fleet. Because I created the image by using the Graphics Design family, that instance type is already populated
Assuming I had picked General Purpose family while creating the image, other instance type options will also be presented
Instance Type = Pick the instance type. I’m picking stream.graphics-design.xlarge for this exercise
Fleet Type details = Always-on or On-Demand. I’m picking On-Demand
Always-on
Instances run all the time, even when no users are streaming applications. When this option is selected, instances are immediately available for the next user to connect to immediately
All instances that are running are charged the applicable running instance fee, based on the instance type and size, even when users aren’t connected
On-Demand: Instances run only when users are streaming applications. Idle instances that are available for streaming are in a stopped state. When this option is selected, a user must wait for one to two minutes for an instance to start up
Instances are charged applicable running instance fee, based on the instance type and size, only when the instances are used for streaming sessions
Instances in On-Demand fleets that are not being used for streaming sessions are charged a small hourly stopped instance fee that is the same for all instance types and sizes
User session details = I’m sticking to the default values but in a production environment, you should determine this after discussing with your IT Security and Compliance team. Or maybe you have a organizational policy defined for this
Maximum session duration = how long user streaming sessions can remain active
Disconnect timeout = how long user streaming sessions can remain active after users are disconnected
Idle disconnect timeout in minutes = how long user can be idle (inactive) before they are disconnected from their streaming session
Fleet Capacity = For this exercise, I’m defining Minimum capacity to 1 and MaximumCapacity to 2
Minimum capacity = The minimum number of users who are expected to be streaming at the same time
Maximum capacity = The maximum number of users who are expected to be streaming at the same time
Step 3: Configure fleet
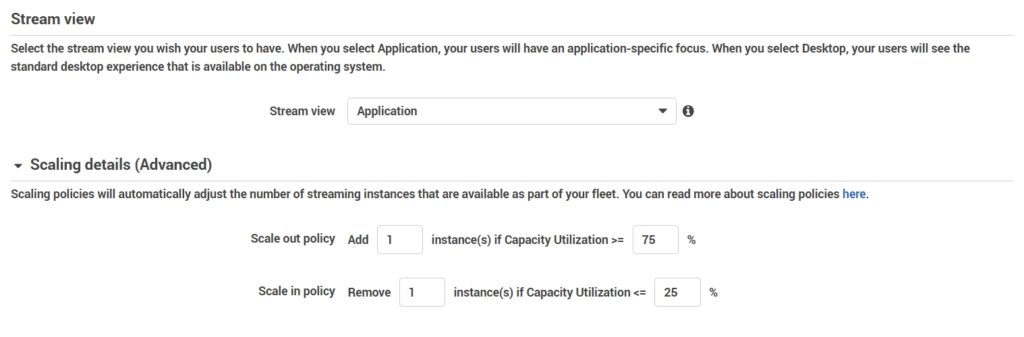
Stream view = I’m choosing Application
Application = Displays only the windows of applications opened by users
Desktop = Displays the standard desktop that is provided by OS
Scaling details (Advanced) = I’m adding 1 instance when the capacity reaches 75% and removing 1 instance when the capacity goes down to 25%
Specify the scaling policies that AppStream 2.0 uses to increase and decrease the capacity of your fleet
Remember that the size of the fleet is limited by the minimum and maximum capacity we’ve specified earlier
Stream view and Scaling details (Advanced)
IAM role (Advanced) = I haven’t created an IAM role and I’m leaving this option as is
Click Next
In Step 4: Configure Network,
Default Internet Access = I’m leaving this option checked for this exercise
Important Note: You wouldn’t want this in a production environment. Depending on how your network infrastructure is configured, it is preferred either to route the traffic via a NAT gateway or through a web filtering system
VPC = I’ve picked the default VPC
Subnet 1 = The first available subnet
Subnet 2 = The second available subnet
Security group(s) = I’ve picked the default
This wouldn’t be recommended in a production environment. You’ll access which resources needs access to which ports and services if you have direct connect or if the resources in this VPC are connecting to resources that live on other VPCs
Active Directory Domain (Optional) = I don’t have an AD domain to integrate but I’m planning to cover this in a later post
Click Next
In Step 5: Review, Confirm the fleet configuration details. To change settings for any section, choose Edit, and make the needed changes. After you finish reviewing the configuration details, choose Create
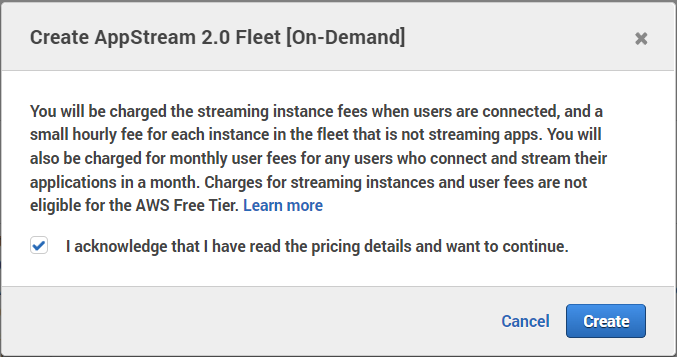
In the pricing acknowledgement dialog box, select the acknowledgement check box, and Click Create to begin provisioning your fleet with the initial set of running instances
pricing acknowledgement dialog box
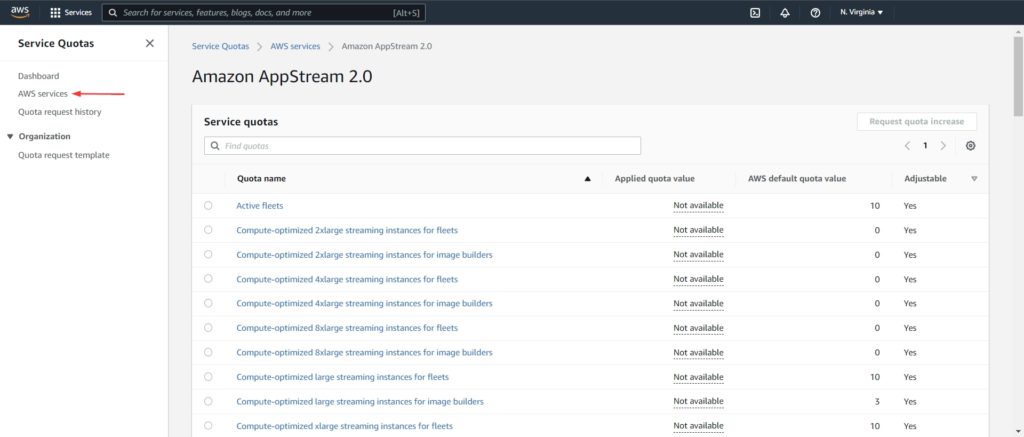
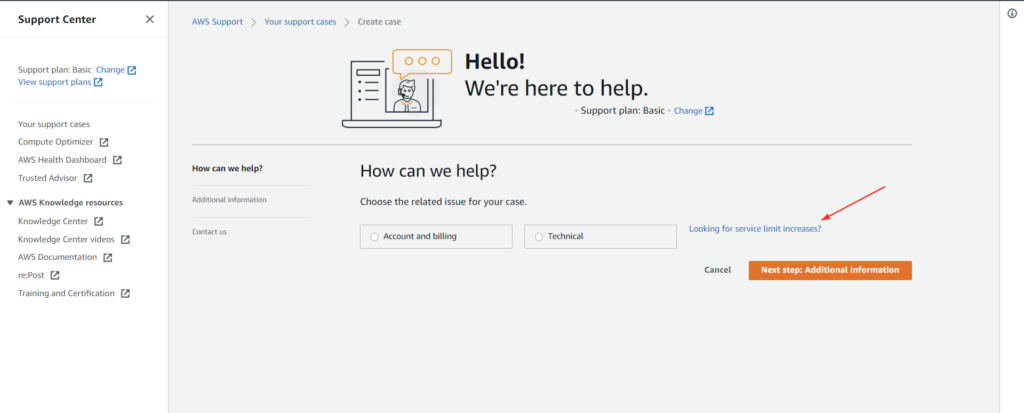
Note: If an error message that you don’t have sufficient limits to create the fleet, don’t panic it’s not you, it’s them. 😁 Submit a limit increase request to the AWS Support Center.
You can check your allocated quota for AppStream of other AWS services in Service Quotas and clicking on AWS Services and searching for the service
AWS services in Service Quotas
In the AWS support center, to request quota increase,
AWS support center
If all goes well, you’ll see a success prompt that your fleet is bein created,
fleet creation success
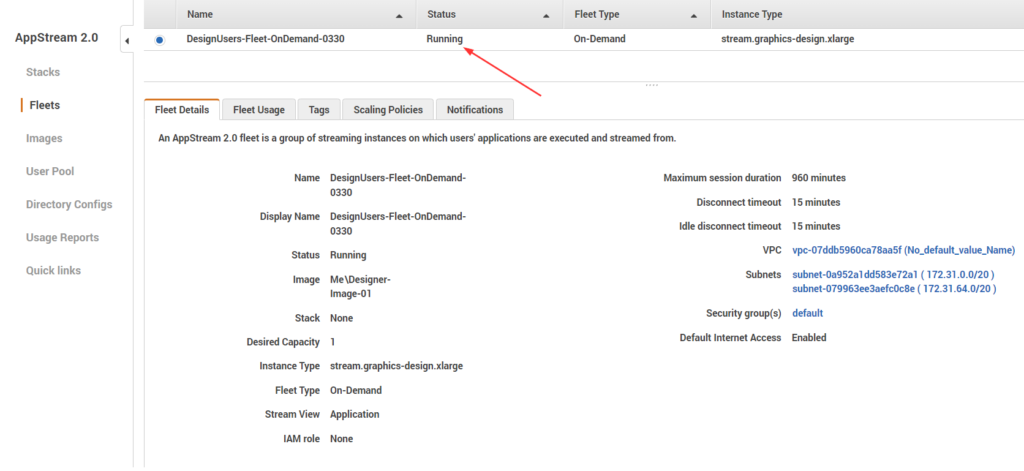
Fleet provisioning usually takes 10 minutes to finish. While your fleet is being created and fleet instances are provisioned, the status of your fleet displays as Starting in the Fleets list. Choose the Refresh icon periodically to update the fleet status until the status is Running
fleet running
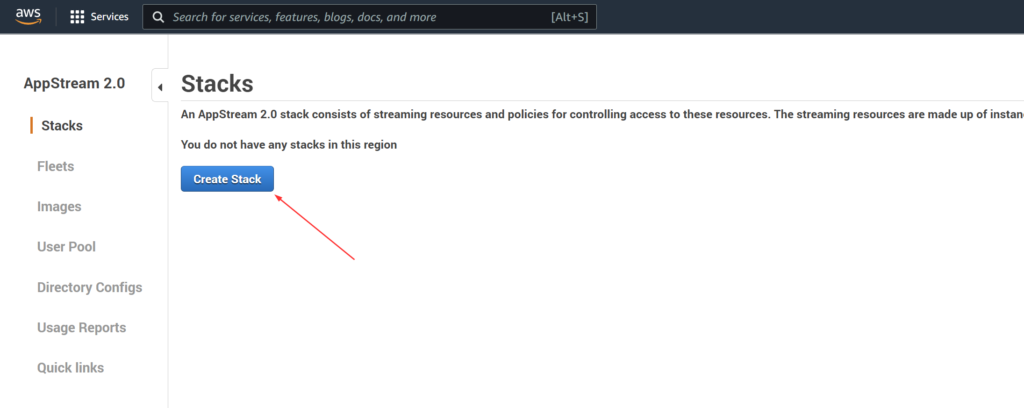
Create a stack and a streaming URL
A stack consists of a fleet, user access policies, and storage configurations. We create a stack to start streaming applications to users.
In Step 2: Enable Storage, pick an option that suits you and click Next
For this exercise I’m not picking any of these options
Persistent storage can be provided for our users by choosing on of these options
Home Folders = A S3 bucket is provisioned where users can save their files to their home folder and access it during application streaming sessions
Google Drive for G Suite = Users can link their Google Drive for G Suite account to AppStream 2.0. During application streaming sessions, they can sign in to their Google Drive account, save files to Google Drive, and access their existing files in Google Drive. Personal Gmail accounts not allowed
OneDrive for Business = Users can link their OneDrive for Business account to AppStream 2.0. During application streaming sessions, they can sign in to their OneDrive account, save files to OneDrive, and access their existing files in OneDrive. Personal OneDrive accounts not allowed
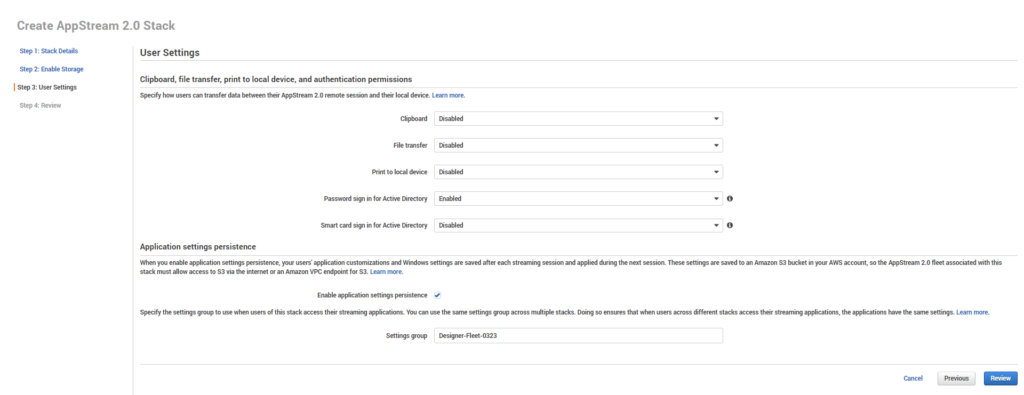
In Step 3: User Settings, configure the following settings. When you’re done, click Review
For this exercise, I’m picking the most restrictive options but these will usually depend on your DLP policies. Would be a good idea to consult with your IT security and compliance team on this
Clipboard, file transfer, print to local device, and authentication permissions
Clipboard = By default, users can copy and paste data between their local device and streaming applications
File transfer = By default, users can upload and download files between their local device and streaming session
Print to local device = By default, users can print to their local device from within a streaming application
Password sign in for Active Directory = Users can enter their AD domain password to sign in to an AppStream 2.0 streaming instance that is joined to an AD domain
Smart card sign in for Active Directory = Users can use a smart card reader and smart card connected to their local computer to sign in to an AppStream 2.0 streaming instance that is joined to an AD domain
Application settings persistence options
Enable Application Settings Persistence = Users’ application customizations and Windows settings are automatically saved after each streaming session and applied during the next session. These settings are saved to an Amazon S3 bucket
Settings Group = The settings group determines which saved application settings are used for a streaming session from this stack. Let’s say we apply this same settings group to another stack, both stacks use the same application settings
User Settings
In Step 4: Review, Confirm the stack configuration details. To change the settings for any section, choose Edit and make the necessary changes. After reviewing the configuration details, Click Create
Create a Streaming URL
To test application streaming without setting up users, we can create a temporary URL that can be pasted into a browser window.
In the left navigation pane, choose Stacks
For Stacks, select the stack we just created
Choose Actions, Create streaming URL
Create Streaming URL
In the Create streaming URL dialog box, provide User id and URL expiration, Click Get URL
This streaming URL is purely for testing purposes
In a production environment, we usually have other authentication and authorization methods to allow access to our users to the designated resources. I’ll cover the steps for enabling Federation with Azure AD Single SSO and AppStream 2.0 in an upcoming post
create test user
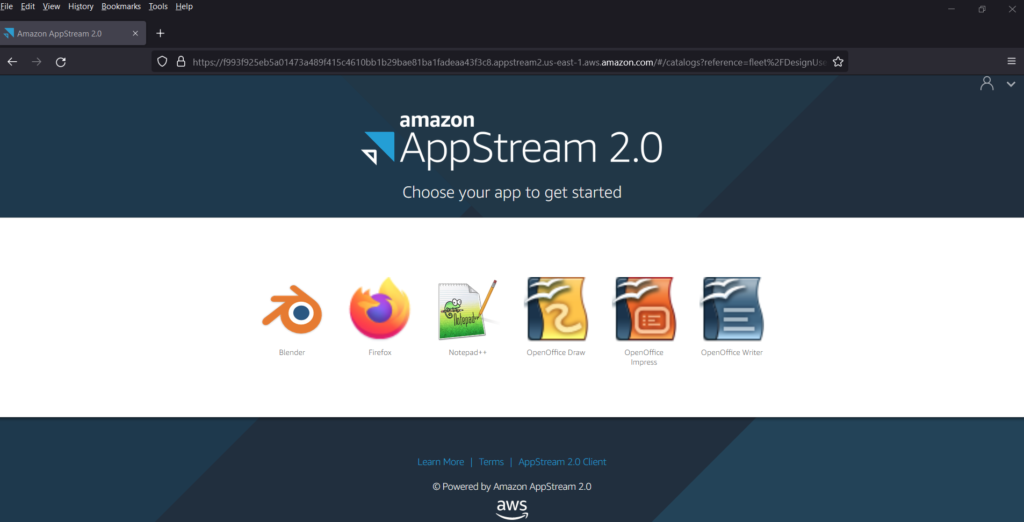
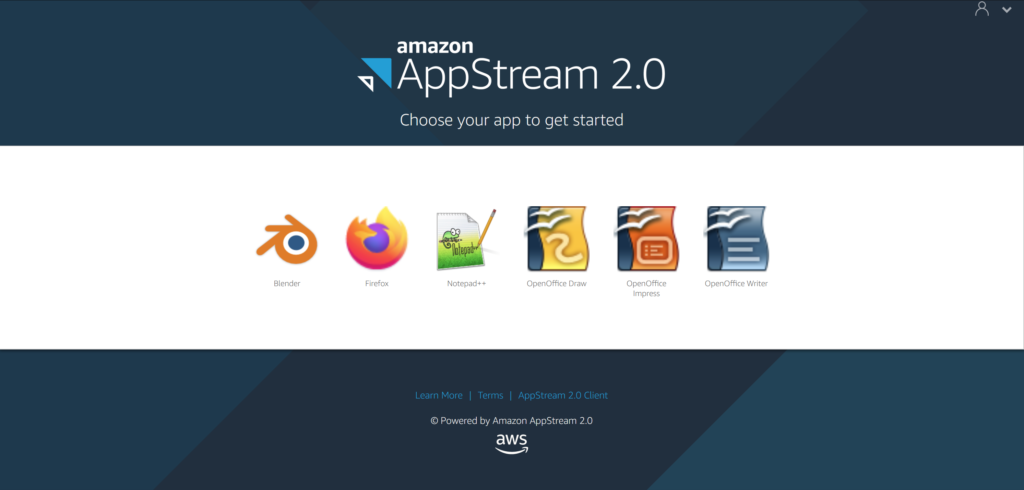
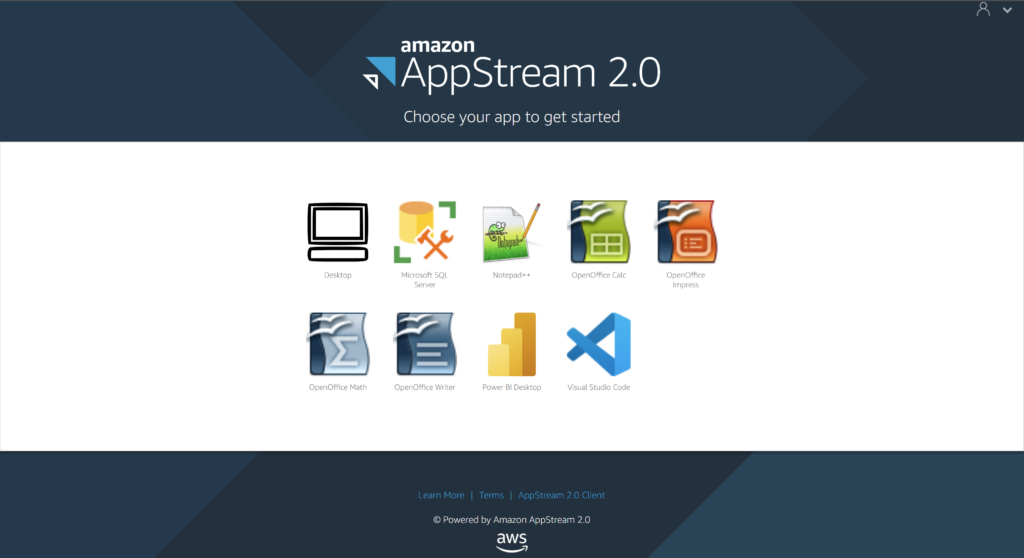
In a browser, browse to the streaming URL. AppStream 2.0 displays an application catalog page that lists the applications that you have configured for streaming
App Catalog in browser
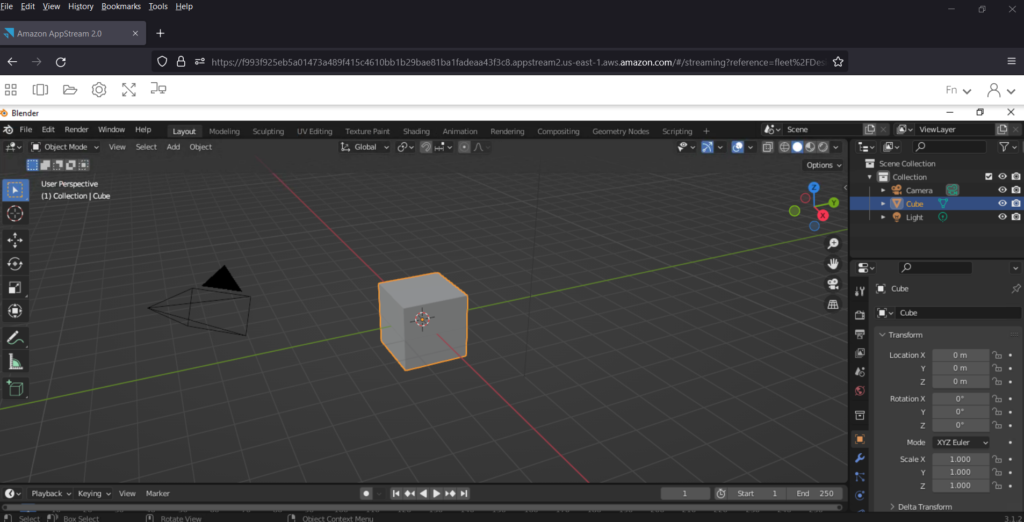
Here is Blender via AppStream in a browser,
Blender via AppStream in a browser
and here is Blender via the AppStream client,
Blender via AppStream client
Manage user access
AppStream 2.0 user pool is a built-in identity management feature that we can use to enable users to access their streamed applications.
Note: Like I mentioned earlier, in a production environment, we’d use SAML 2.0 to federate through AD or any other custom identity solution provider(Example: Azure AD) that supports SAML 2.0
To enable users in the user pool to open applications after they sign in to the AppStream 2.0 user portal, we must assign each user to at least one stack that contains applications. After we assign the user to a stack, AppStream 2.0 sends an optional notification email to the user with instructions about how to access the stack and a URL. The user can access the stack by using the URL until we delete the stack or unassign the user from the stack.
In the left navigation pane, choose User Pool, Create User
Note: Remember, along with fee on the instances, there is an Users fee charged monthly. For each end user who launches a streaming session on a fleet instance there is a fee of $4.19 for the month in which the streaming session occurred.
Create User
In the Create User dialog box, provide Email, First Name & Last Name information and choose Create User
The User Pool list refreshes, and the user we added is listed and enabled
Assign a stack to the user
In the left navigation pane, choose User Pool, and select the user we created
Choose Actions, Assign Stack
In the Assign Stack dialog box, for Stack, I’ve selected the stack that I created earlier
I’m leaving the Send email notification to user option selected
Choose Assign Stack
AppStream 2.0 sends an email to the address we specified for the user
User can open the Login Page link in the notification email to login and access applications via AppStream 2.0
I’m aware this was a lengthy post but I hope this helped you out in your AppStream 2.0 deployment. As I mentioned earlier, I’ll add another post on how to enable federation with Azure AD SSO and Amazon AppStream 2.0.
If you were following along and if it is a test environment, remember to stop your fleet. Else, you’ll incur charges.
Amazon AppStream 2.0 lets us easily add existing desktop applications to AWS and enable users to instantly stream them. AppStream 2.0 offers pay-as-you-go pricing, with no upfront investment and no infrastructure to maintain. Also allows us to scale instantly and given the scenario, globally to our users.
With the expanding global workforce for many organizations, AppStream provides some very useful features which are worth exploring. Windows users can easily connect to AppStream 2.0 applications using any HTML5-capable web browser or the AppStream client.
In the ever expanding work from home/anywhere model, user’s laptops may not connect to enterprise network very often and installing new applications or updating them can be an uphill battle. Updating applications and rolling out changes are easier with AppStream comparing the traditional model.
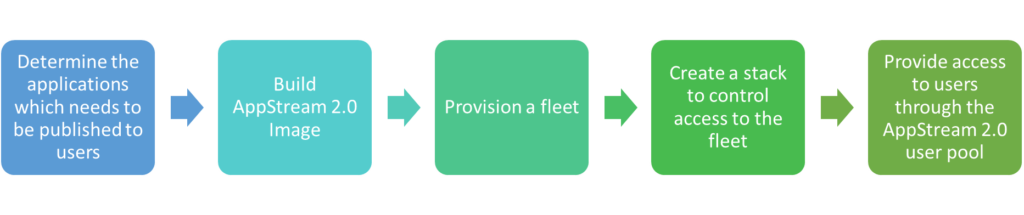
I’ll explore AppStream 2.0 implementation in the next couple blog posts. On a high level, a typical AppStream 2.0 implementation process goes like the process diagram below:
AppStream 2.0 Deployment steps
In this post, I’ll cover the what is involved in the Build AppStream 2.0 Image step,
AppStream Image creation process
Create an image builder
AppStream uses EC2 instances to stream applications to the users. To create a custom image, we need to connect to an image builder, install, configure and customize the applications for streaming and then create a image by creating a snapshot.
If this is the first time you are launching AppStream, ‘The AppStream 2.0 first experience page’ appears, Click Get Started and in the next screen choose skip
We’re just telling AWS, we’ll figure it out and we don’t need their handholding. 😉
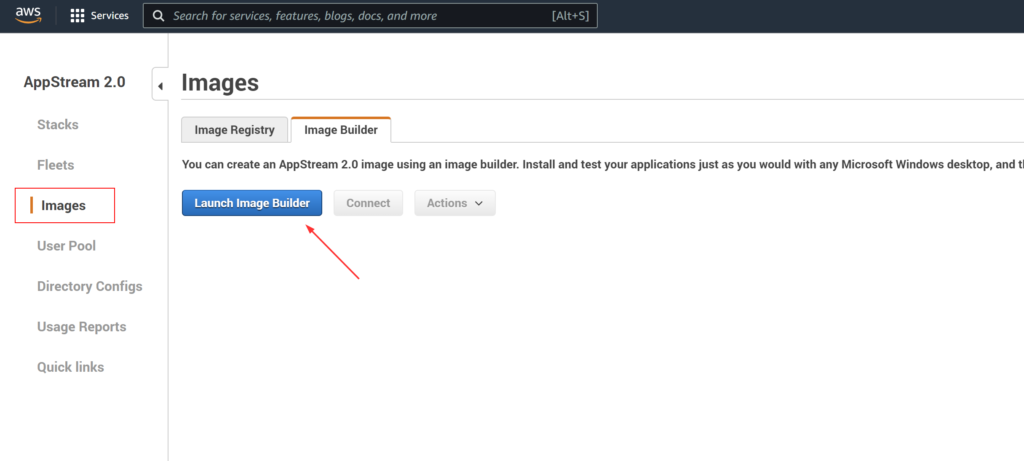
In the navigation pane on the left, choose Images, Image Builder, Launch Image Builder
Launch Image Builder
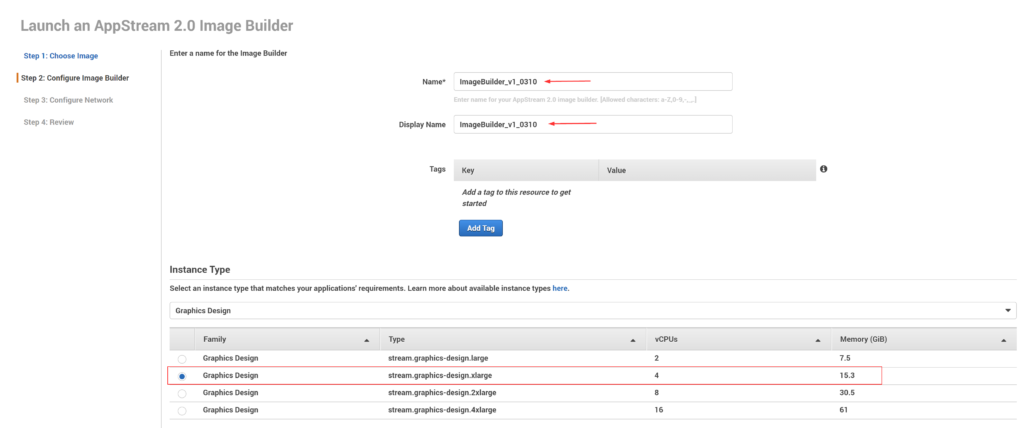
In Step 1: Choose Image window, in the list of images, select the image builder with the name Base-Image-Builder-mm-dd-yyyy, where mm-dd-yyyy represents the most recent date
I’m choosing Windows 2016 and an instance in Graphics design. As I’m planning to publish applications that’ll require GPU. For a full list of instances, the sizes and pricing, refer this link – Amazon AppStream 2.0 Pricing
If you are simply trying out AppStream to get a feel of it, General purpose instances are more than enough
In Step 2: Configure Image Builder, give the instance an unique name depending on your organizational naming conventions and standards, Pick a Instance Type, Streaming Endpoint as Internet and the IAM role need not be created.
The VPC endpoints allows users to stream from AppStream through your VPC. This can be helpful in scenarios where you want to keep the traffic within your VPC. But By default, AppStream uses a streaming endpoint that requires the user to have access to the internet
The IAM role part is a much more comprehensive topic and that’s why I’m leaving it with default value
Configure Image Builder
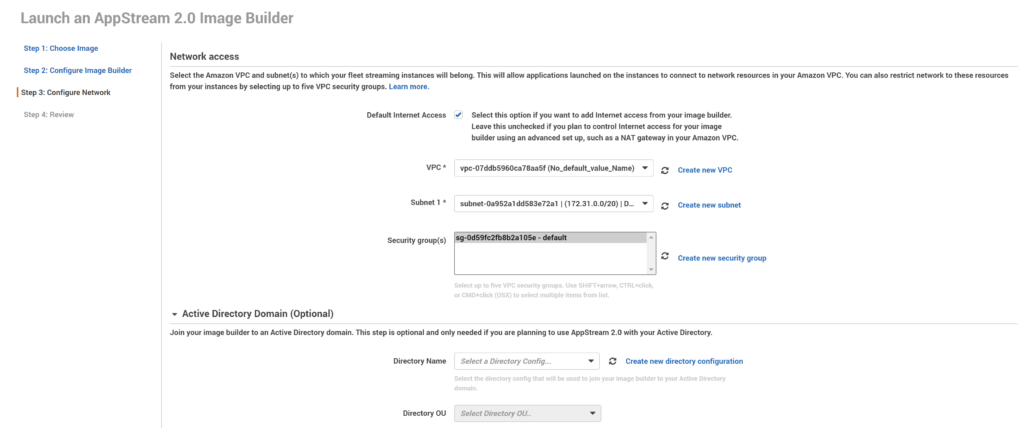
In Step 3: Network access, I’m selecting Default Internet Access, my VPC, the subnet and the default security group
As this is purely for testing here, I’m going through with default options but when you are rolling out this in production, you’ll probably end up creating a separate VPC and if you have services like Direct connect to connect to your on-premise, your network administrator will carve up a segment which you can use to configure
It is not recommended to chose Default Internet Access, here is how you can decide. If your deployment must support,
More than 100 concurrent users, configure a VPC with private subnets and a NAT gateway
Fewer than 100 concurrent users, you can configure a new or existing VPC with a public subnet (the default option does this)
The AD domain configuration is optional
It comes into play when you have AWS Direct Connect and you have a line of sight with your AD domain.
Also is needed when your applications need to be authenticated to your AD domain and/or your application’s backend(file shares, etc) live on-premise. More on Authentication in a later post
Configure Image Builder – Network
Click Review and Launch
It takes around 15-20 minutes for this process to complete and displays pending in the meantime
The image builder instance will accumulate charges even when no one is connected. It ain’t cheap, so please keep an eye on it
In the left navigation pane within AppStream 2.0, choose Images, Image Builder
Select the image builder instance that you created earlier
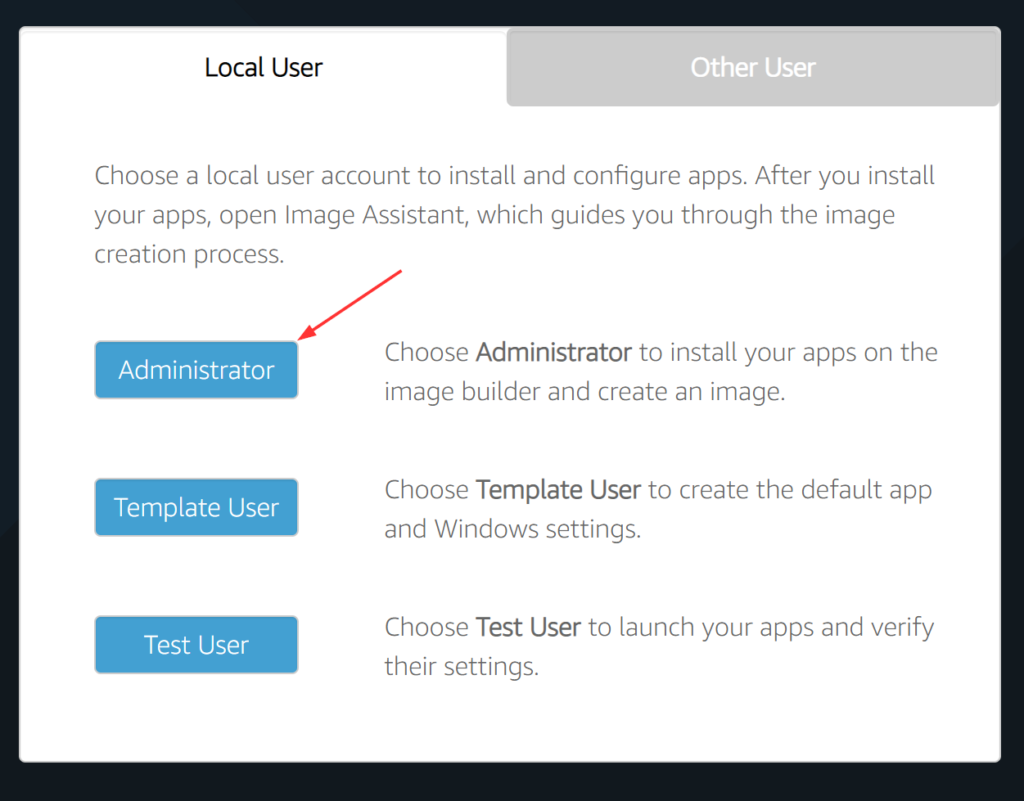
If the status is Stopped, select the instance, and choose Actions, Start
A new browser tab opens, displaying options for logging into the image builder instance. Choose Local User, Administrator
Login to Image Builder as Administrator
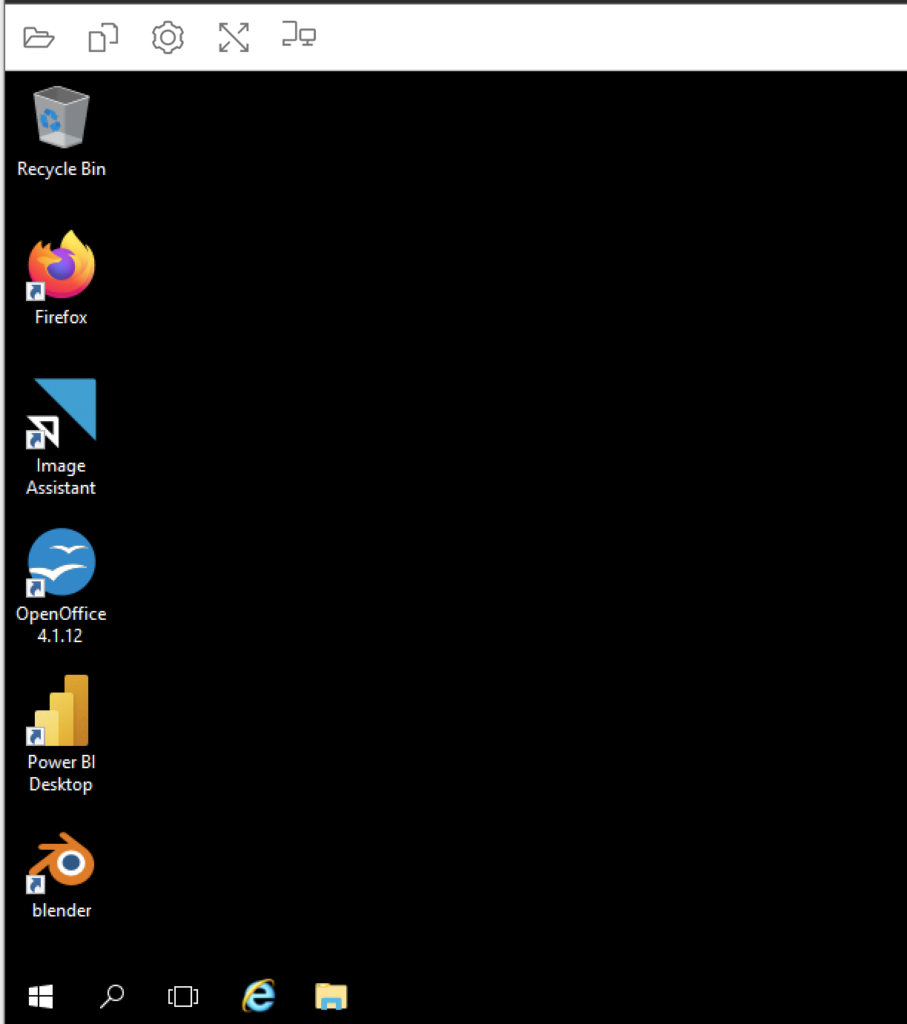
Once connected to Image builder, I used Firefox to download the needed software files and installed them like I would do on a server connected via RDP
Applications I installed on Image Builder Instance
Once the applications are installed, we are ready for the next steps
Configure applications
I’m including this section because as we all know, custom built applications which run on-premise or applications that your organization may have customized will need certain steps to be configured or worked on by your application administrators. This where you bring them in or even in the earlier step while you install the applications.
They’ll know what the customizations are, adding xml files in certain file path, IP addresses of DB servers and so on. Let them do their thing and as an AppStream administrator, we’ll take notes. 😁
Use Image Assistant to create an image
Now that we have installed and configured the applications, we are ready to create an image. The following steps will prepare the application for streaming, optimize it for performance, and create an image:
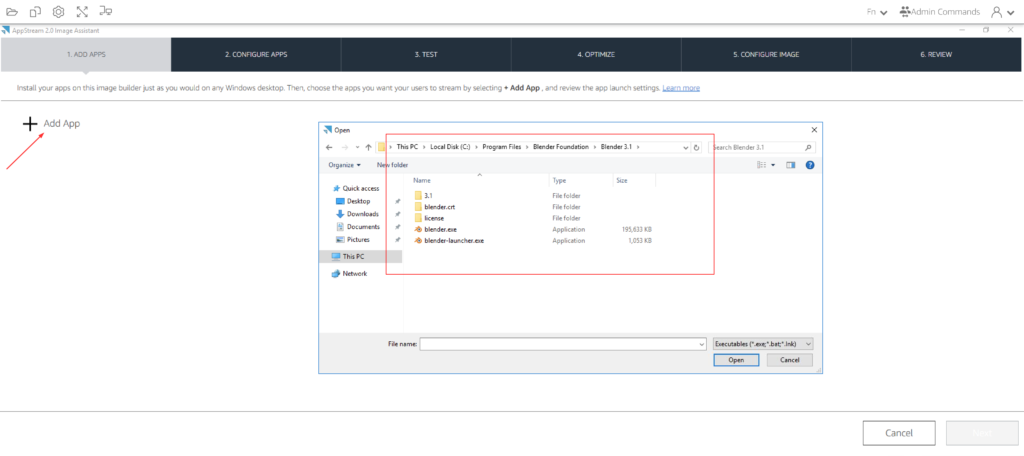
On the image builder desktop, open Image Assistant
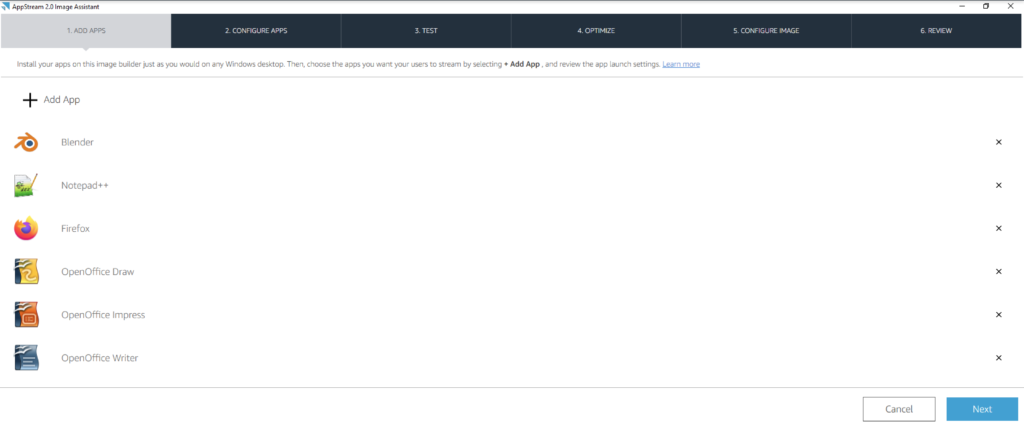
On the Add Apps tab, choose Add App
To add Blender, I’m navigating to the installed path and selecting the exe
Chose the exe and click Open
Image Assistant – ADD APPS
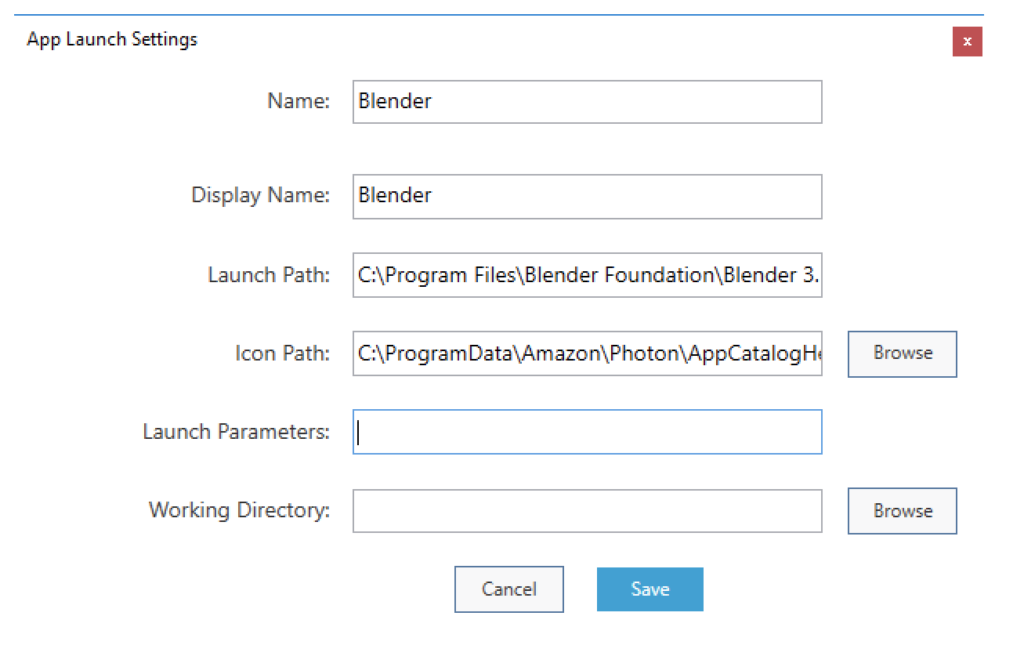
In the next window,
Name = A unique identifier for the app
Display name = Name of the app that is displayed to end users
Launch Path = Location app’s executable (Change it only if your app requires it)
Icon Path = Location of your app’s icon (Your organization might have certain standard on app icons, this is where you pick your icon)
Launch Parameters = Command line arguments that need to be passed to your app (Check with your application’s admin)
Working Directory = Ok to leave blank (Check with your application’s admin)
Click Save
App Launch Settings
Repeat the above steps for other applications you’ll need on the image
Once done adding, click Next
Image Assistant – Apps
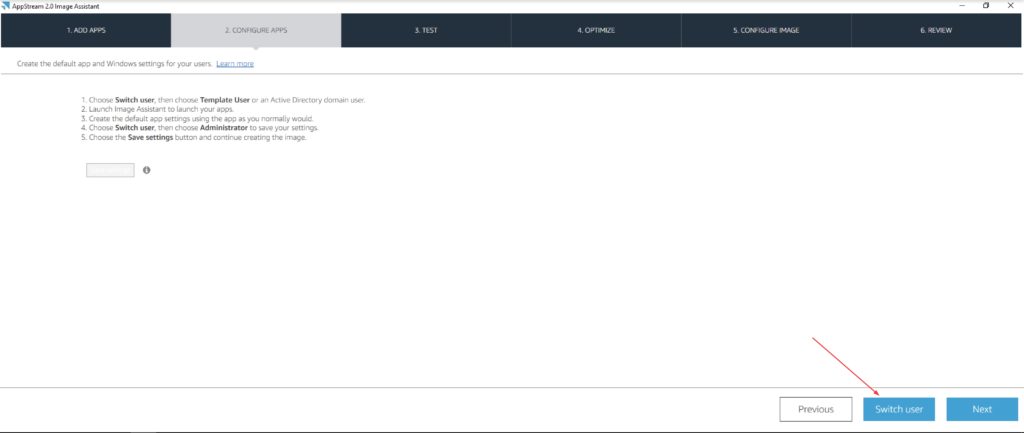
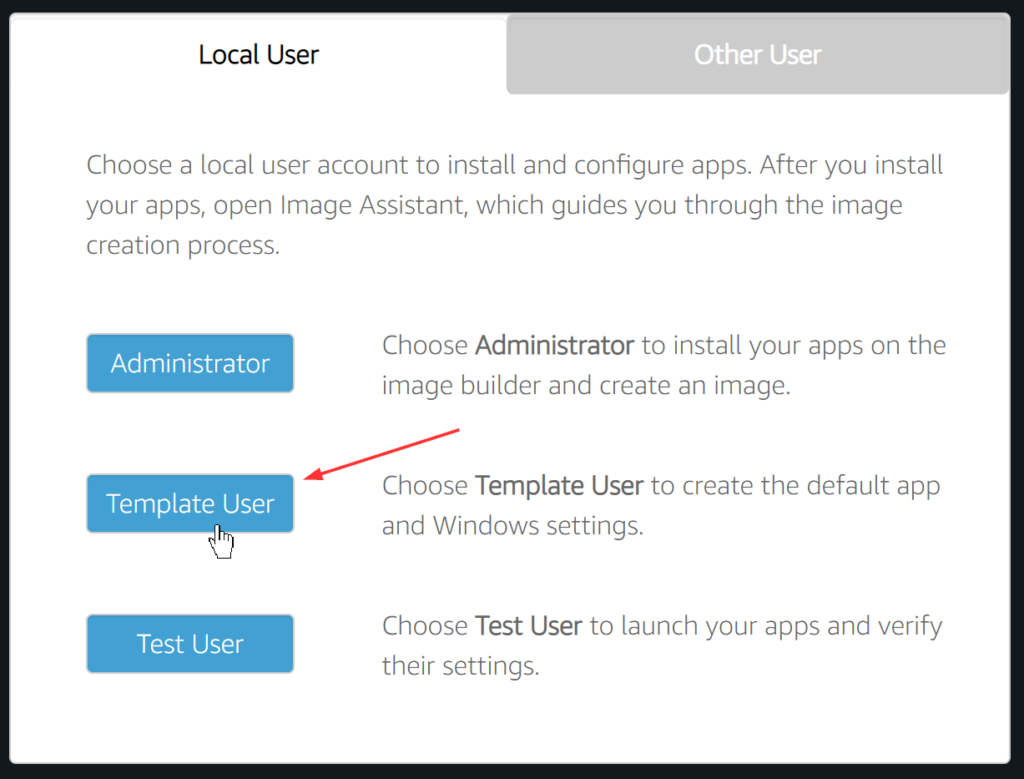
On Configure Apps tab, click on Switch user
Image Assistant – CONFIGURE APPS
and select Template User in the login screen
Login as Template User
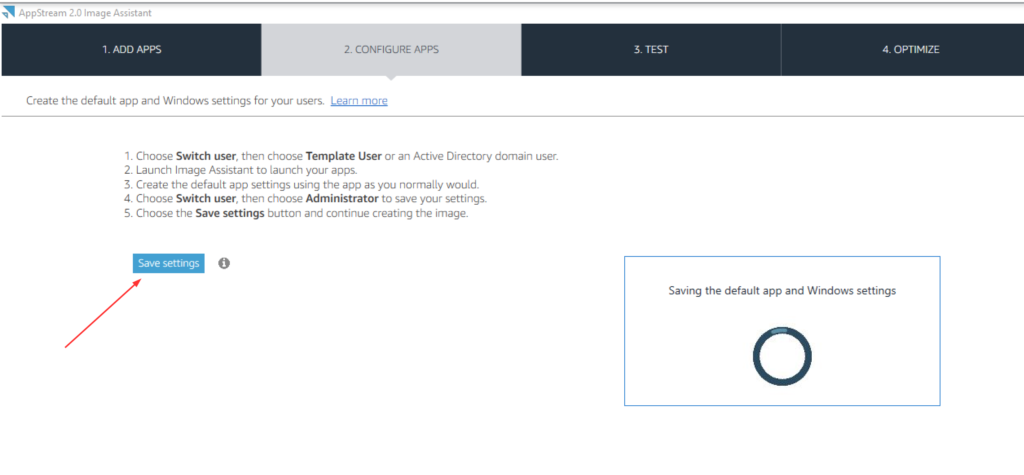
As Template User, launch Image Assistant and click on the applications to make sure they open as desired. Once done, click on Switch User and then choose Administrator to login
In the Administrator login, you’ll be back in the Configure Apps tab, click Save settings
If you need to redo any of the saved settings, you can simply delete the user’s profile and do the steps again
To remove user profile, open Windows System properties(cmd –> sysdm.cpl), Advanced tab, Settings under User profiles and click to select the DefaultProfileUser and click Delete
Image Assistant – CONFIGURE APPS – Save Settings
On the Test tab, Click Switch User and then choose Test User to login
Image builder includes a test user account that enables you to test your applications by using the same policies and permissions as your users
As Test User, launch Image Assistant and click on the applications to make sure they open as desired. Once done, click on Switch User and then choose Administrator to login
In the Administrator login, you’ll be back in the Test tab, click Next
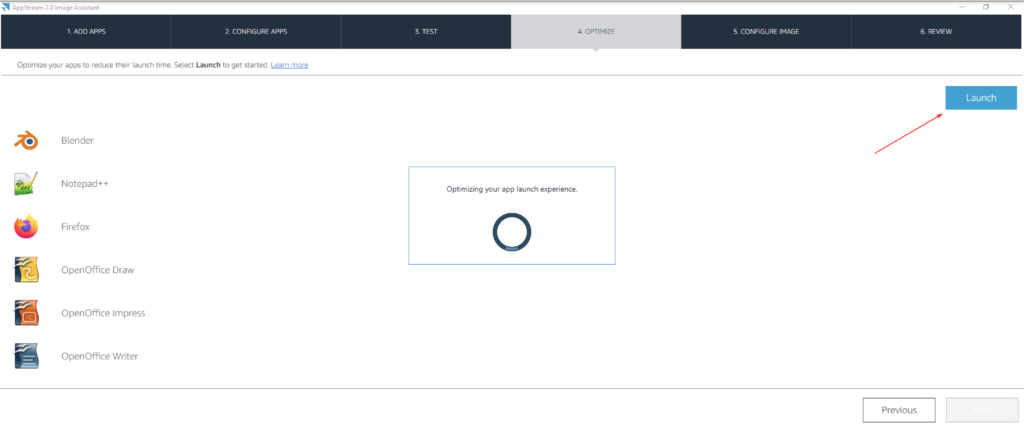
On the Optimize tab, clicking Launch will launch each application and after the application launches, verify that it functions as expected, choose Continue
Image Assistant – OPTIMIZE
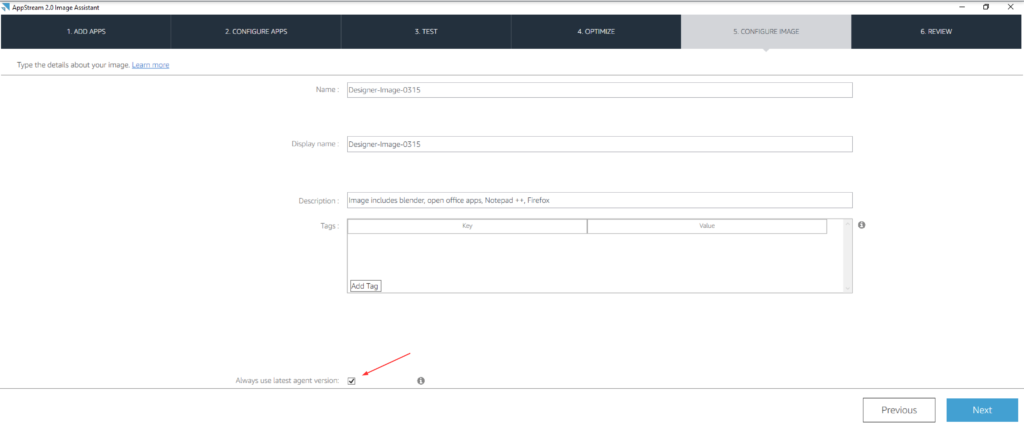
On the Configure Image tab, enter the following information and click Next
Name = Unique name
Display Name = A user friendly name
Description = What’s included in the image and notes that’ll make sense to you and the other admins
Always use latest agent version = I leave this check box selected so that streaming instances launched our image always include the latest AppStream 2.0 features, performance improvements, and security updates
Image Assistant – CONFIGURE IMAGE
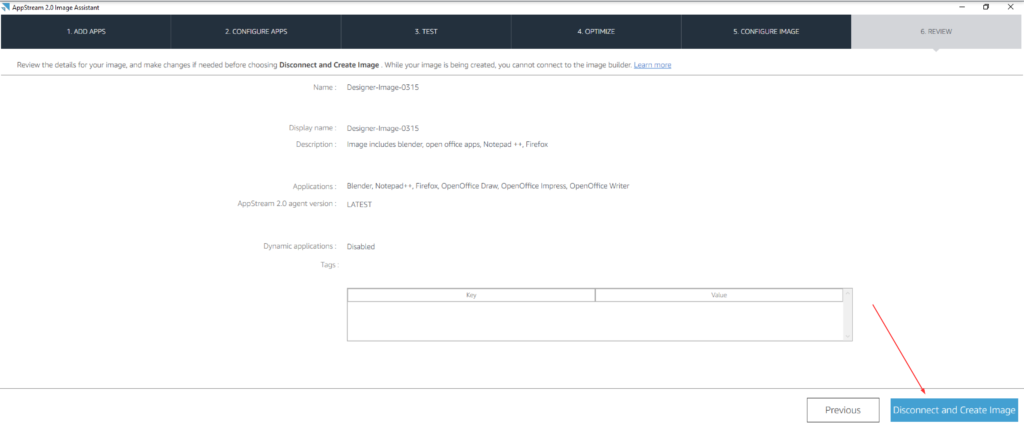
On the Review tab, make sure you got it all correct and then choose Disconnect and Create Image
The remote session disconnects within a few moments. When the Lost Connectivity message appears, it is safe to close the browser tab
Image Assistant – REVIEW
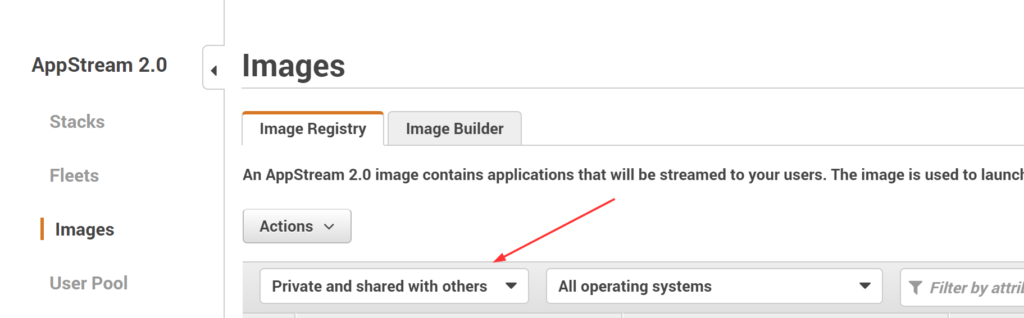
Return to the Amazon AppStream 2.0 console and choose Images, Image Registry
I set the filter to Private and shared with others to make it easier to view the image I created
While the image is being created,
the image status in the image registry of the console appears as Pending
we cannot connect to it
Filter images by ‘Private and shared with others’
The image creation process takes 20-30 minutes to complete.
I’ll update this post with the next steps on I’ve completed them – Link to Part II
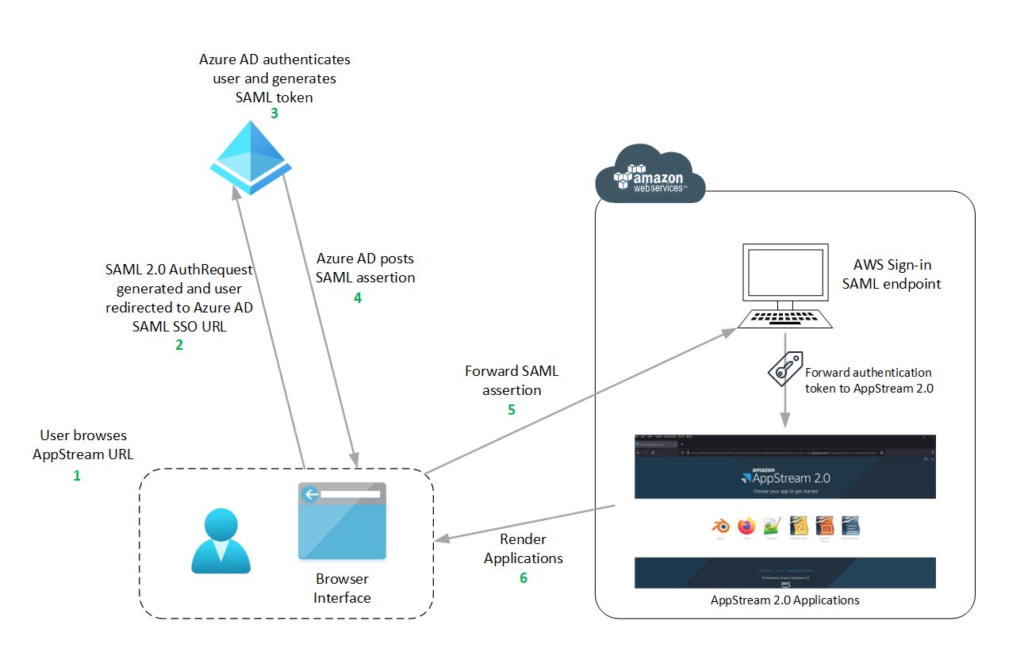
We can enable users to sign in to AppStream 2.0 by using their existing Azure AD credentials, and start streaming applications. To accomplish this, we use an IAM role and a relay state URL to configure Azure AD and enable AWS to permit users to access an AppStream 2.0 stack. The IAM role grants users the permissions to access the stack. The relay state is the stack portal to which users are forwarded after successful authentication by AWS.
In this post, I’ll go over steps on how to configure federated user access for Amazon AppStream 2.0 using Azure AD SSO for Enterprise Apps.
The below diagram illustrates the authentication flow between AppStream 2.0 and Azure AD as identity provider (IdP).
Authentication Workflow
From a user’s perspective, this above process happens seamlessly. The user starts at myapps.microsoft.com and is automatically redirected to an AppStream 2.0 application portal without being required to enter AWS credentials.
The setup process goes like in this diagram below,
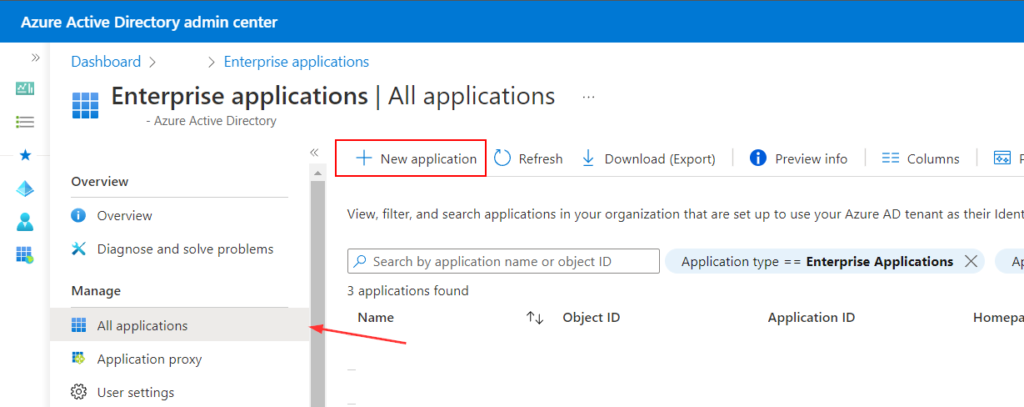
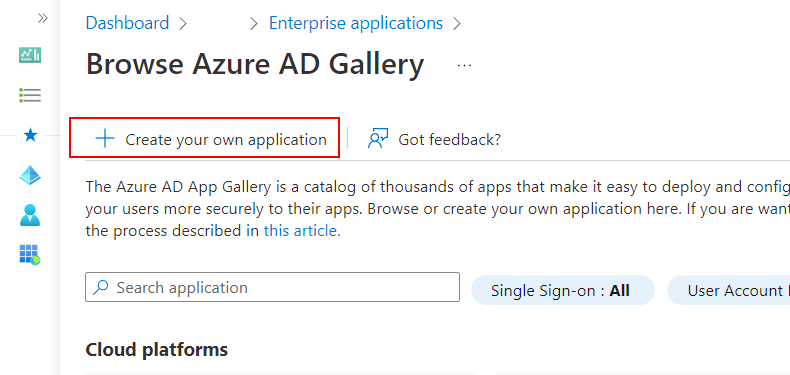
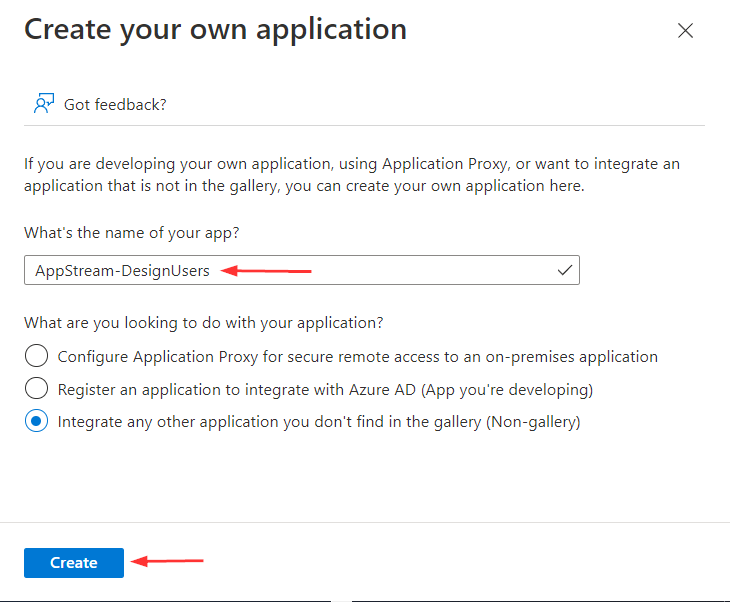
Select Integrate any other application you don’t find in the gallery (Non-gallery) and click Create
Create your own application
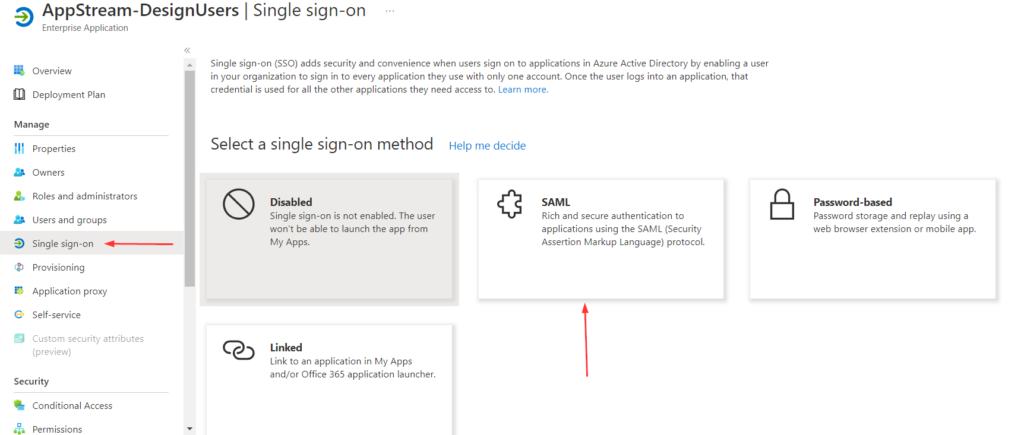
Once the application is added, from the left navigation menu, Click on Single sign-on, and choose SAML
SSO method – SAML
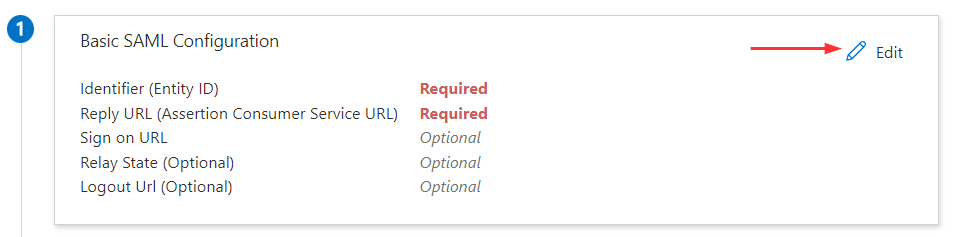
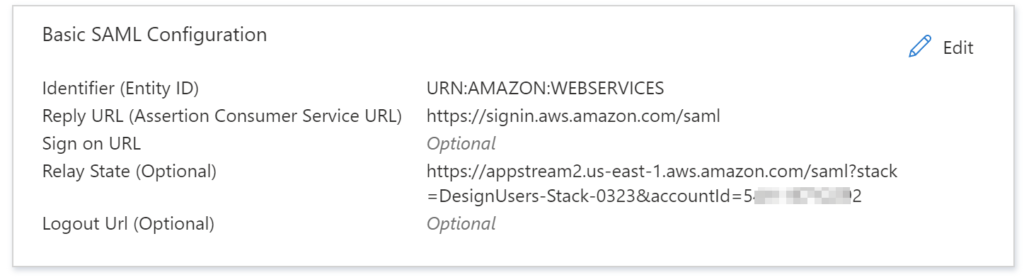
Click Edit in the Basic SAML Configuration
Basic SAML Configuration
Provide the Identifier (Entity ID) and Reply URL (Assertion Consumer Service URL), then click Save
Identifier (Entity ID) = URN:AMAZON:WEBSERVICES
Reply URL (Assertion Consumer Service URL) = https://signin.aws.amazon.com/saml
Sign on URL (Optional) = <leave it blank>
Relay State (Optional) = <leave it blank>, We will revisit this later in this post
The entity ID is passed during the SAML exchange
Azure AD requires this value to be unique for each application
When we add more AppStream 2.0 stacks, we can append a number to the string; for example, URN:AMAZON:WEBSERVICES1,URN:AMAZON:WEBSERVICES2
Basic SAML Configuration – Continued
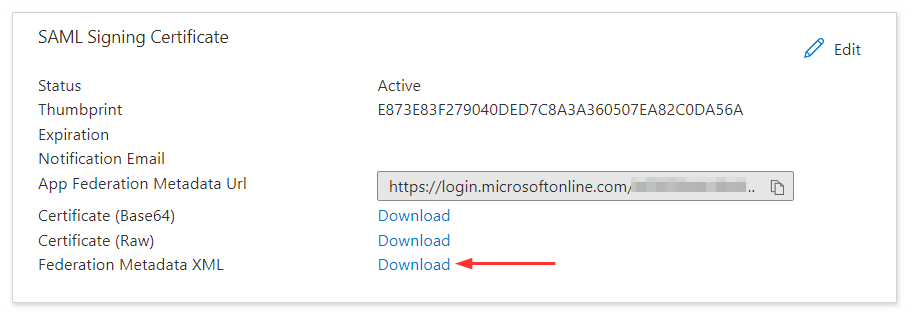
In the SAML Signing Certificate section, click Download next to the Federation Metadata XML and save the .xml file to your computer
Download Federation Metadata XML
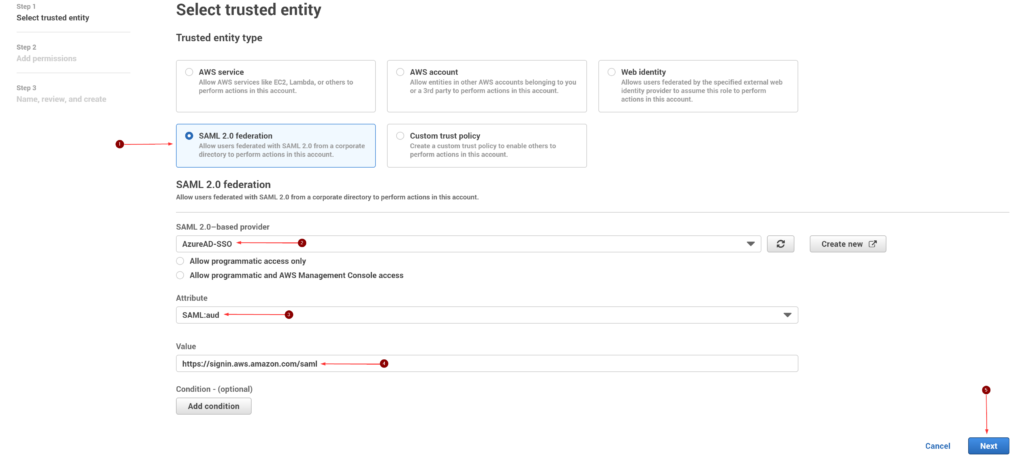
Create the SAML identity provider
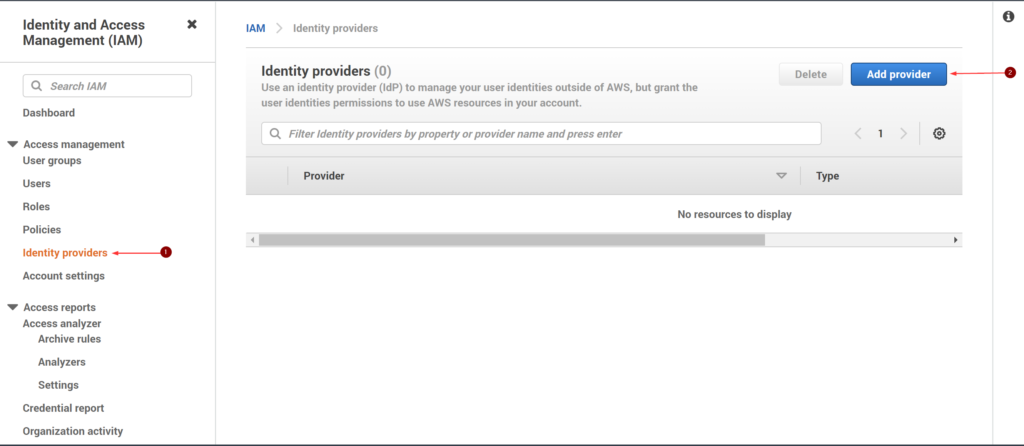
Now, we need to create the SAML provider in AWS IAM console.
In AWS console, search and open IAM
In the left navigation window, click Identity providers, and the Add provider
AWS IAM – Add provider
On the Configure Provider page, for the Provider Type, select SAML
For Provider name, I’ve named it AzureAD-SSO
Click Choose File to upload the metadata document that previously downloaded from Azure AD, and click Add provider
Configure identity provider
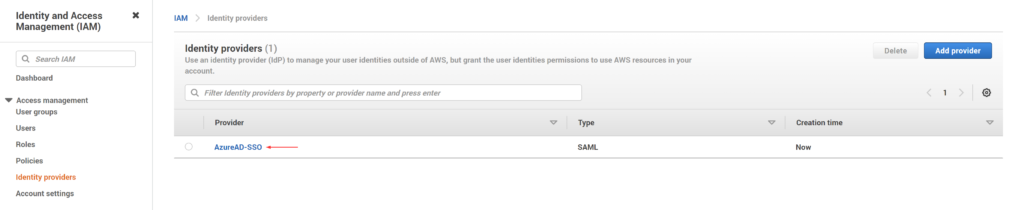
Click on the identity provider we just created
Identity provider added
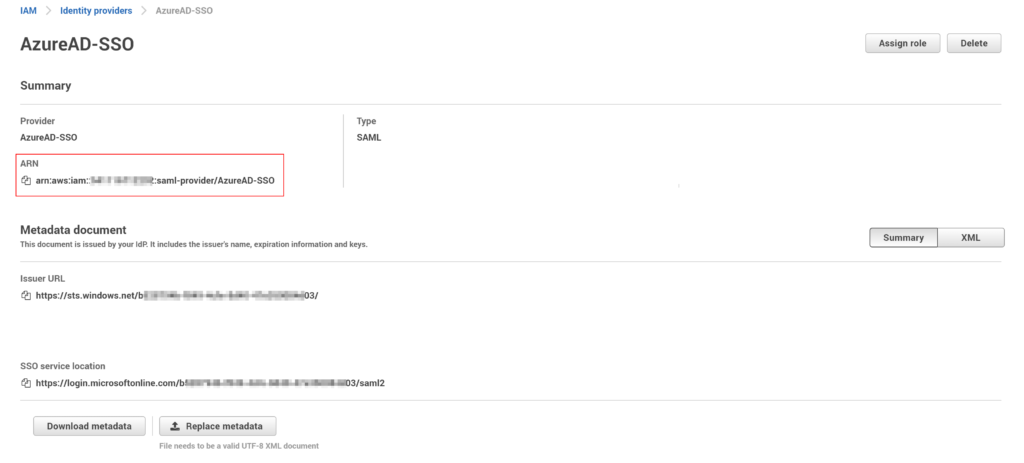
Copy the value for the Provider ARN
The ARN is in the following format: arn:aws:iam::AccountID:saml-provider/Provider Name
Copy Identity provider ARN
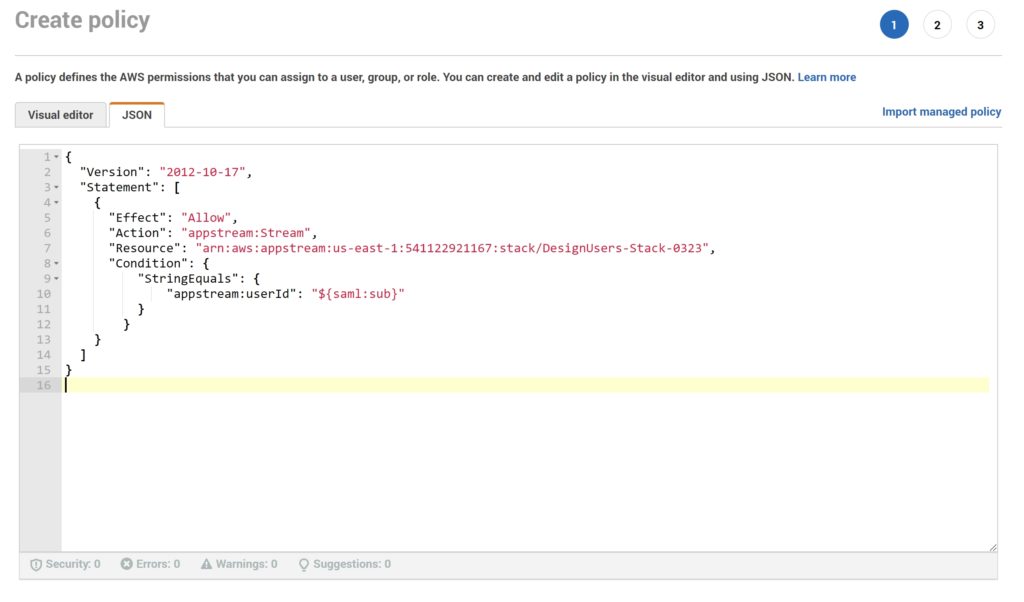
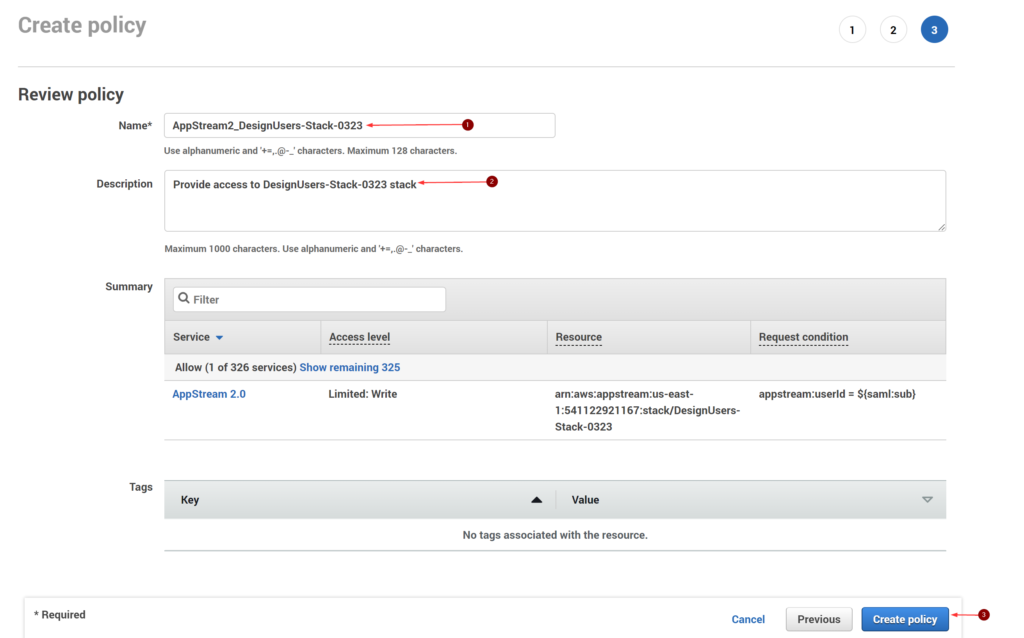
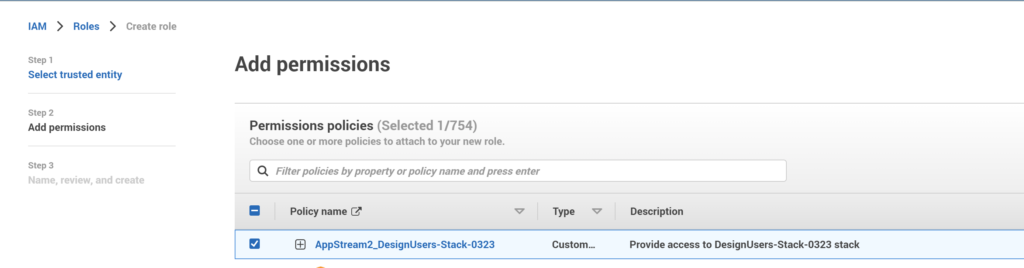
Configure an IAM policy
We need to create a policy with permissions to the AppStream 2.0 stack. This way we can ensure that users have only the permission to stream applications from a specific stack.
In the IAM console, choose Policies, click Create Policy
In Create policy page, choose the JSON tab
Copy and paste the following JSON policy into the JSON window
Modify the resource by entering your AWS Region Code, account ID, and stack name
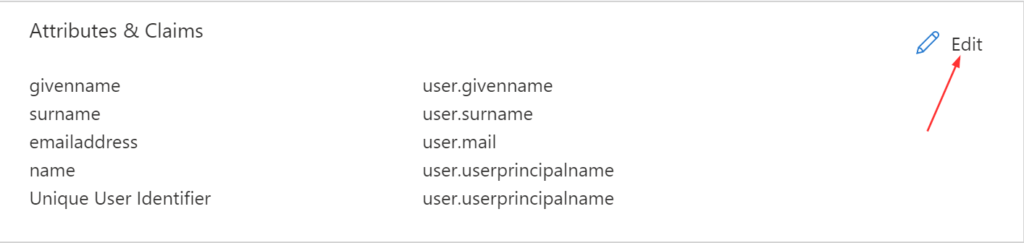
Unique User Identifier (Name ID) = Key used to identify users in the SAML assertion
I generally stick with user.userprincipalname
Usually user.mail or user.userprincipalname works
Click + Add new claim and add the below claims
By default, Azure AD populates several SAML attributes for all new applications
These attributes are not needed for the federation to AppStream 2.0
We can remove them by choosing the three dots next to each, and choosing Delete
If you decide to leave them as is, it doesn’t do any harm
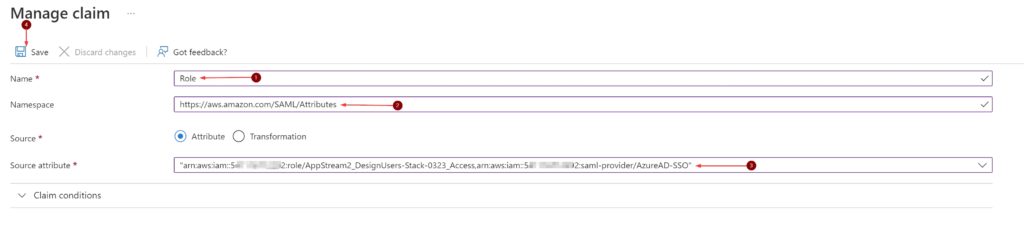
Name = Role Namespace = https://aws.amazon.com/SAML/Attributes Source = Attribute Source Attribute = This is the Role ARN from earlier in this post, followed by a comma and then the Provider ARN
Role attribute
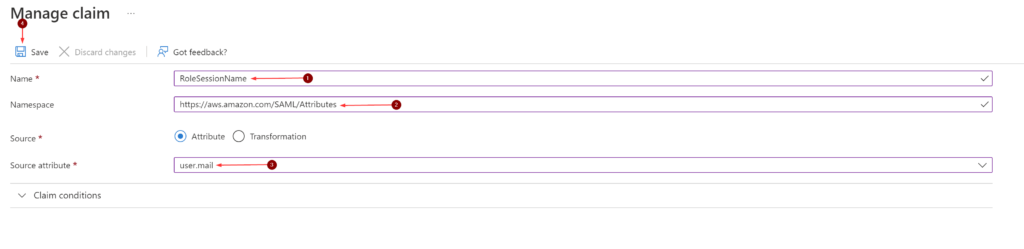
Name = RoleSessionName Namespace = https://aws.amazon.com/SAML/Attributes Source = Attribute Source Attribute = We can provide any string value. I’m going with user.mail
RoleSessionName attribute
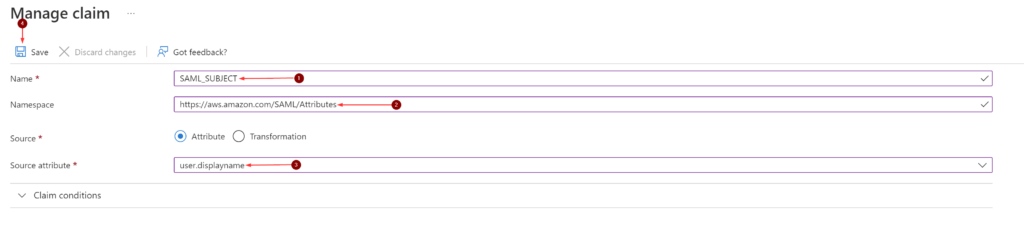
Name = SAML_SUBJECT Namespace = https://aws.amazon.com/SAML/Attributes Source = Attribute Source Attribute = We can provide any string value. I’m going with user.displayname
SAML_SUBJECT attribute
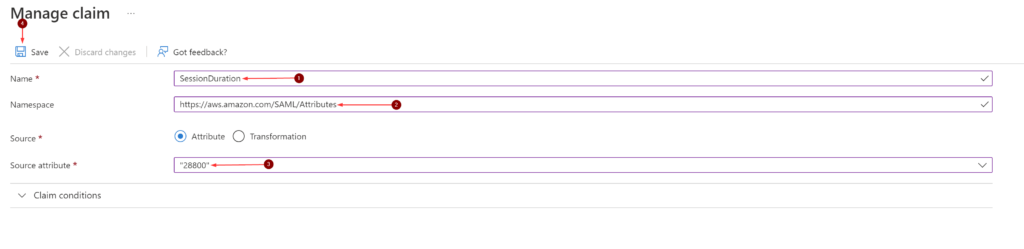
If the user intend to use the AppStream 2.0 client, sessions will default to a 60 minute timeout. This setting will determine the duration.
Name = SessionDuration Namespace = https://aws.amazon.com/SAML/Attributes Source = Attribute Source Attribute = Value in seconds between 900 (15 minutes) and 43200 (12 Hours). I’m going with 28800 (8 Hours)
SessionDuration attribute
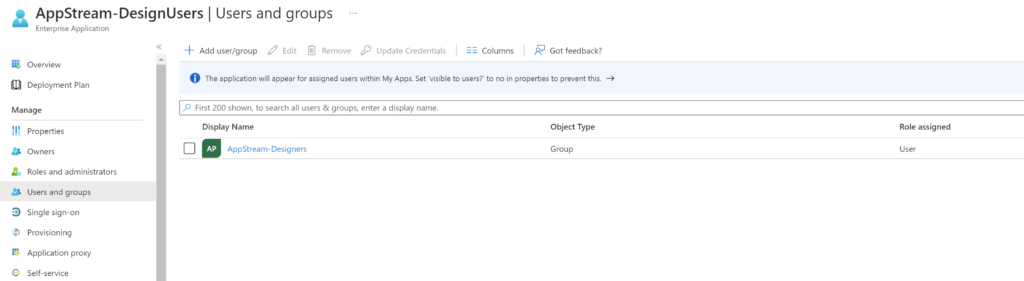
Assign Azure AD groups in Application
In the left navigation menu, click Users and groups, click + Add user/group
In Add Assignment, click Users and groups
In the Users and groups dialog box, select the Azure AD group to provide access the AppStream 2.0 stack
Click Assign
Assign Group
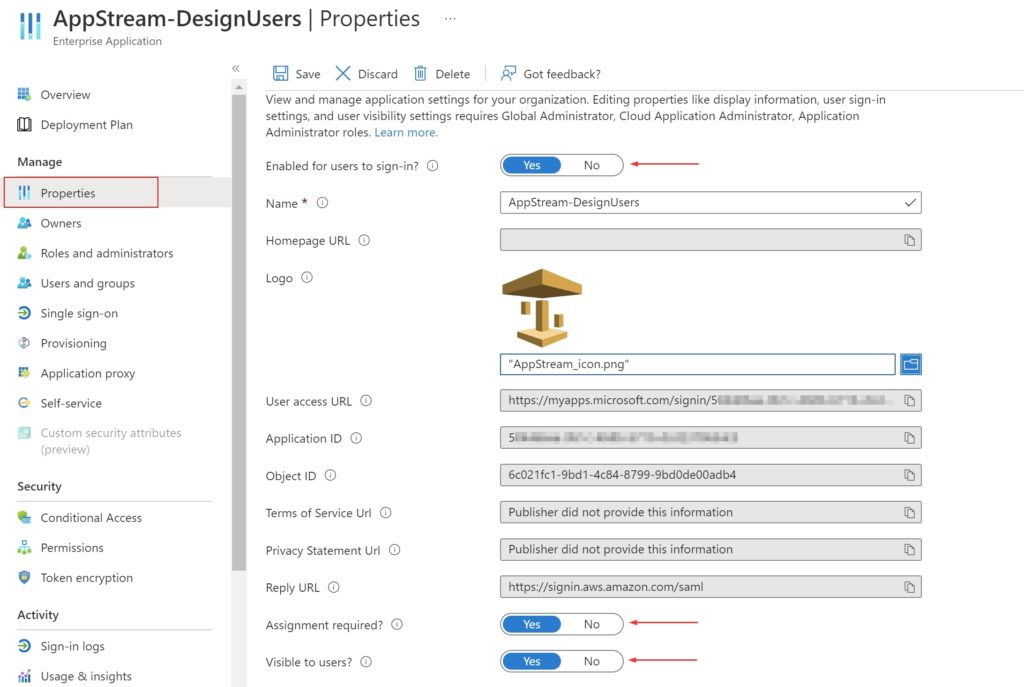
Also click on the Properties tab in the left navigation menu to check the following,
Enabled for users to sign-in? = Yes
Assignment required? = Yes
Visible to users? = Yes
I also uploaded an icon file for the app to look nicer.😉
Test Application
With a Azure AD security group assigned to the application and the other setting configured, we’re ready to test this with a user account. I’ve already added the user account to the assigned Azure AD group. To test this,
I also created a second fleet and stack, associated the fleet to the stack to demonstrate how we can assign different users to stacks. IMO, the myapps portal is a really cool feature and we can it to present AppStream to our users.
As I mentioned earlier in this post, adding more stack will require adding additional Azure AD applications and assigning AD group(s) to it.
All Stacks
All Fleets
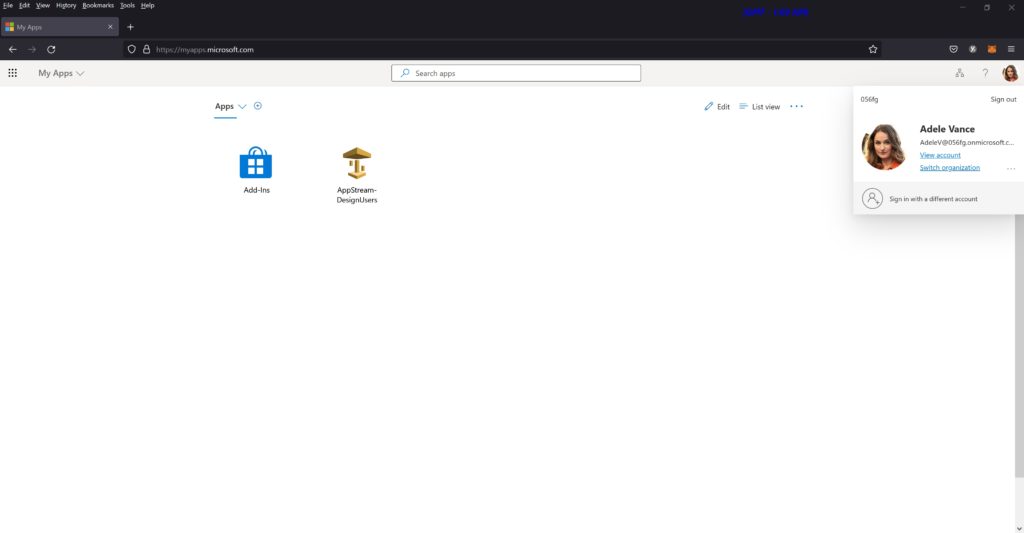
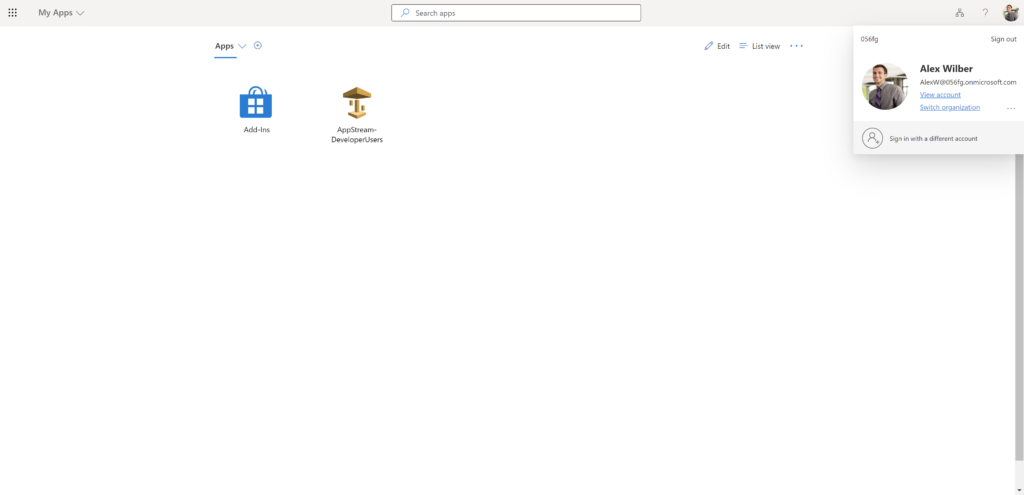
This below is a different user logging into the myapps portal (https://myapps.microsoft.com/) with their Azure AD credentials and I’ve assigned the ‘DeveloperUsers-Stack-0323’ stack to them.
User’s myapps portal view
The user gets redirected to the AppStream 2.0 portal
User redirected to AppStream 2.0 app catalog
Issues you may encounter and How to fix it
Error: RoleSessionName is required in AuthnResponse (service: AWSSecurityTokenService; status code: 400; error code: InvalidIdentityToken)
Fix: I encountered this error with the second stack I had created. When is saw this error, my obvious first step is to make sure I didn’t miss the RoleSessionName attribute in the Azure AD app I created. And it was there with the expected value.
I then decided to go back over the AWS IAM role and policy I created and realized that in the I had picked the wrong identity provider and once I picked the correct one, this issue was resolved.
RoleSessionName is required in AuthnResponse (service: AWSSecurityTokenService; status code: 400; error code: InvalidIdentityToken)
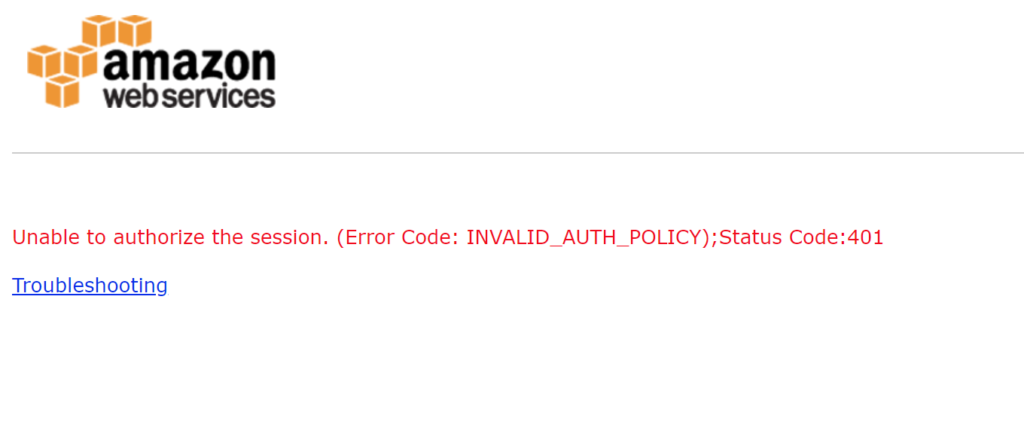
Error: Unable to authorize the session. (Error Code: INVALID_AUTH_POLICY);Status Code:401
Fix: This error message occurs when the IAM policy does not permit access to the AppStream 2.0 stack or when the stack name is not entered into the policy. Similar mess up on my part.
I had mistyped the stack’s name while creating/typing in the JSON window during the policy creation step.
Unable to authorize the session. (Error Code: INVALID_AUTH_POLICY);Status Code:401
In my experience, the SAML-tracer for Chrome and Firefox comes in handy to help identify SAML related issues. It has certainly helped me in several instances.
Hope this post helped you to setup Azure AD SSO for your AppStream 2.0 stacks.