This is a continuation of my earlier post here – AWS – AppStream 2.0 Implementation Guide – Part I – Updated
In this post, I’ll cover the steps that come in after creating an image in AppStream 2.0.
Table of Contents
Provision a fleet
A fleet defines the streaming instances which is the underlying hardware, network, Active Directory (if applicable), and scaling configuration for the application streaming infrastructure we are going to deploy.
To create a fleet:
- Login to AppStream 2.0 console (https://console.aws.amazon.com/appstream2)
- In the left navigation pane, choose Fleets, Create Fleet

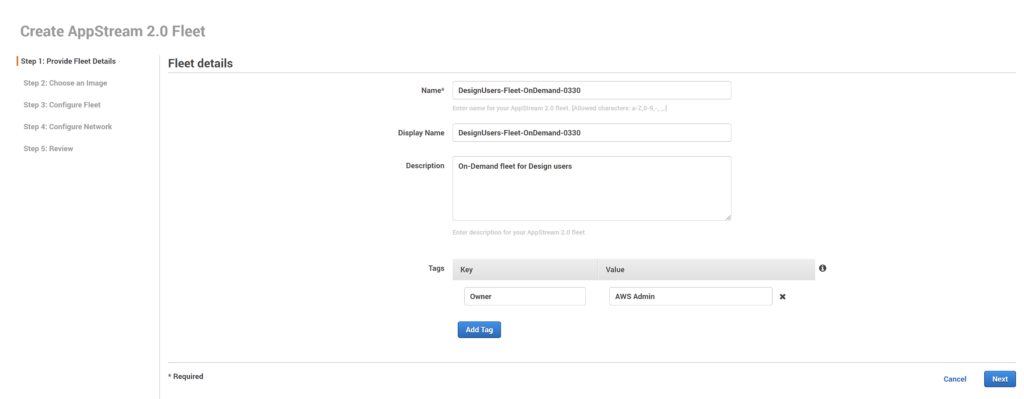
- In Step 1: Provide Fleet Details, fill the below information and choose Next
- Name = Unique name identifier for the fleet
- Display Name = A friendly name displayed in the console
- Description = An optional description for the fleet
- Tags = Provide necessary tags
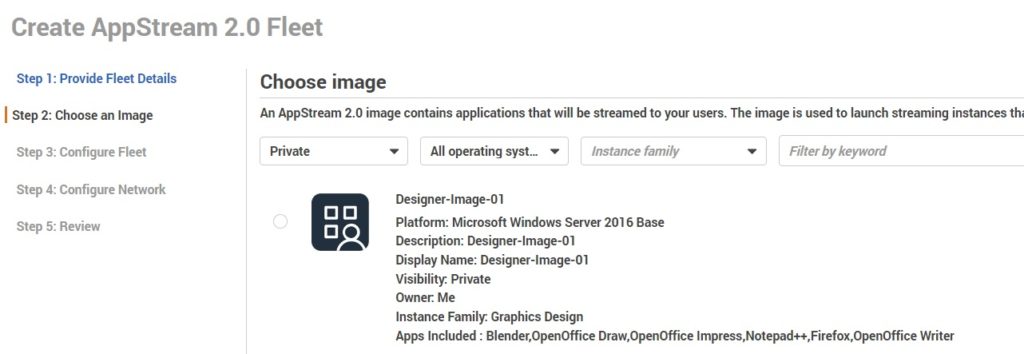
- In Step 2: Choose an image, I’m picking the image I created in my earlier post. I filter it by Private to make it easier. and then choose Next
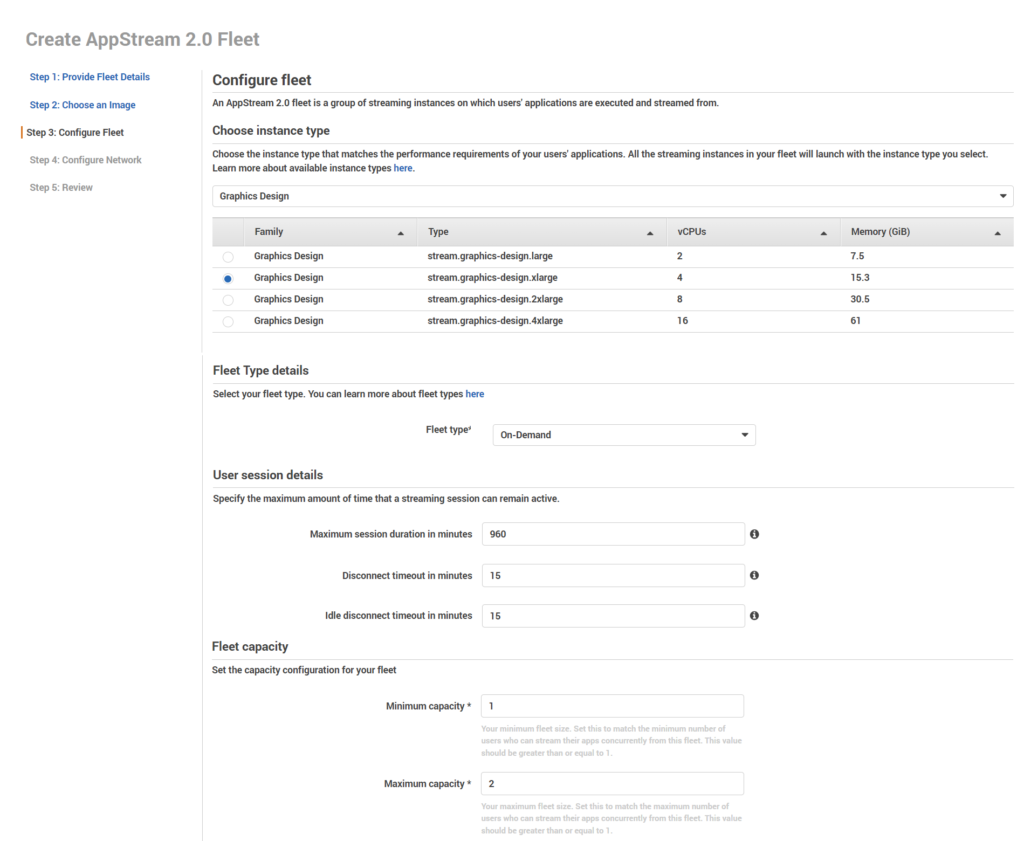
- For Step 3: Configure fleet,
- In Choose instance type, we define the hardware configuration for each of the instances that make up your fleet. Because I created the image by using the Graphics Design family, that instance type is already populated
- Assuming I had picked General Purpose family while creating the image, other instance type options will also be presented
- Instance Type = Pick the instance type. I’m picking stream.graphics-design.xlarge for this exercise
- Fleet Type details = Always-on or On-Demand. I’m picking On-Demand
- Always-on
- Instances run all the time, even when no users are streaming applications. When this option is selected, instances are immediately available for the next user to connect to immediately
- All instances that are running are charged the applicable running instance fee, based on the instance type and size, even when users aren’t connected
- On-Demand: Instances run only when users are streaming applications. Idle instances that are available for streaming are in a stopped state. When this option is selected, a user must wait for one to two minutes for an instance to start up
- Instances are charged applicable running instance fee, based on the instance type and size, only when the instances are used for streaming sessions
- Instances in On-Demand fleets that are not being used for streaming sessions are charged a small hourly stopped instance fee that is the same for all instance types and sizes
- Always-on
- User session details = I’m sticking to the default values but in a production environment, you should determine this after discussing with your IT Security and Compliance team. Or maybe you have a organizational policy defined for this
- Maximum session duration = how long user streaming sessions can remain active
- Disconnect timeout = how long user streaming sessions can remain active after users are disconnected
- Idle disconnect timeout in minutes = how long user can be idle (inactive) before they are disconnected from their streaming session
- Fleet Capacity = For this exercise, I’m defining Minimum capacity to 1 and Maximum Capacity to 2
- Minimum capacity = The minimum number of users who are expected to be streaming at the same time
- Maximum capacity = The maximum number of users who are expected to be streaming at the same time
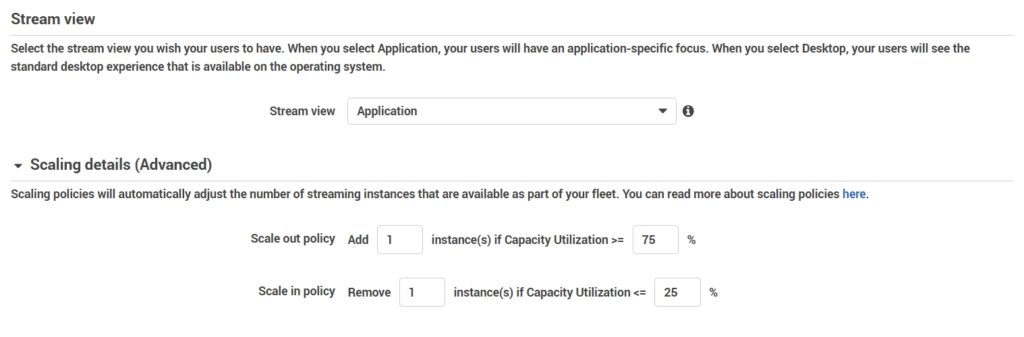
- Stream view = I’m choosing Application
- Application = Displays only the windows of applications opened by users
- Desktop = Displays the standard desktop that is provided by OS
- Scaling details (Advanced) = I’m adding 1 instance when the capacity reaches 75% and removing 1 instance when the capacity goes down to 25%
- Specify the scaling policies that AppStream 2.0 uses to increase and decrease the capacity of your fleet
- Remember that the size of the fleet is limited by the minimum and maximum capacity we’ve specified earlier
- IAM role (Advanced) = I haven’t created an IAM role and I’m leaving this option as is
- Click Next
- In Step 4: Configure Network,
- Default Internet Access = I’m leaving this option checked for this exercise
- Important Note: You wouldn’t want this in a production environment. Depending on how your network infrastructure is configured, it is preferred either to route the traffic via a NAT gateway or through a web filtering system
- VPC = I’ve picked the default VPC
- Subnet 1 = The first available subnet
- Subnet 2 = The second available subnet
- Security group(s) = I’ve picked the default
- This wouldn’t be recommended in a production environment. You’ll access which resources needs access to which ports and services if you have direct connect or if the resources in this VPC are connecting to resources that live on other VPCs
- Active Directory Domain (Optional) = I don’t have an AD domain to integrate but I’m planning to cover this in a later post
- Default Internet Access = I’m leaving this option checked for this exercise
- Click Next
- In Step 5: Review, Confirm the fleet configuration details. To change settings for any section, choose Edit, and make the needed changes. After you finish reviewing the configuration details, choose Create
- In the pricing acknowledgement dialog box, select the acknowledgement check box, and Click Create to begin provisioning your fleet with the initial set of running instances
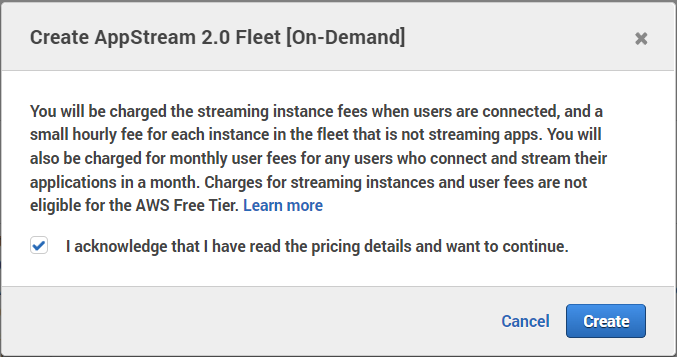
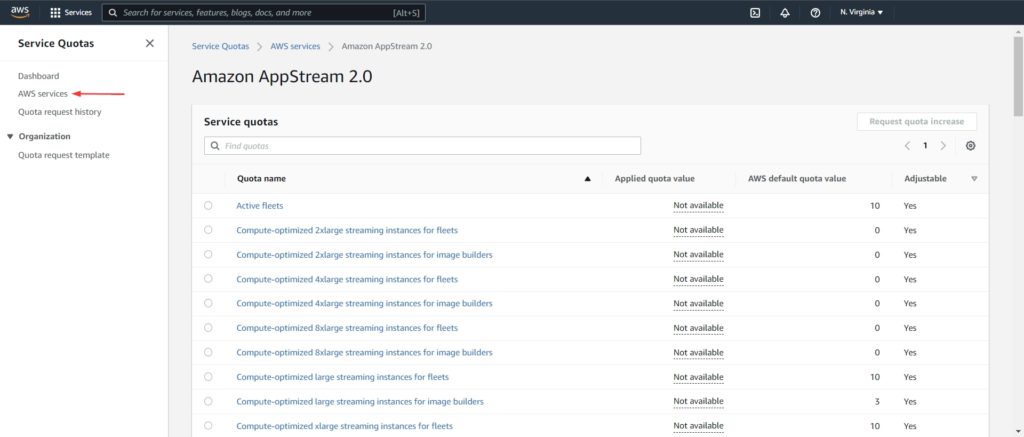
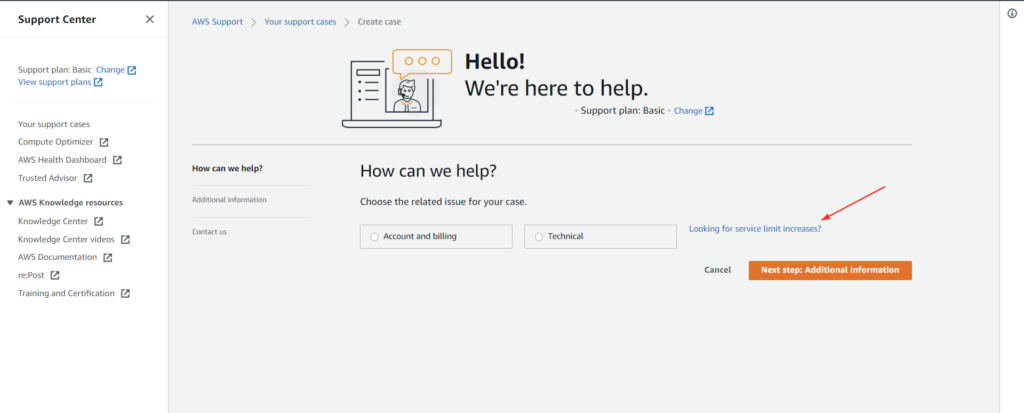
Note: If an error message that you don’t have sufficient limits to create the fleet, don’t panic it’s not you, it’s them. 😁 Submit a limit increase request to the AWS Support Center.
You can check your allocated quota for AppStream of other AWS services in Service Quotas and clicking on AWS Services and searching for the service
In the AWS support center, to request quota increase,
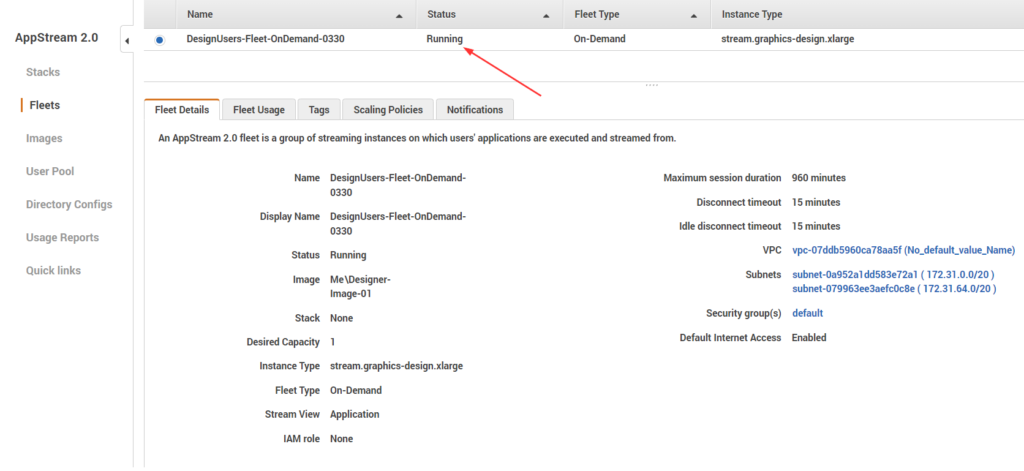
If all goes well, you’ll see a success prompt that your fleet is bein created,

Fleet provisioning usually takes 10 minutes to finish. While your fleet is being created and fleet instances are provisioned, the status of your fleet displays as Starting in the Fleets list. Choose the Refresh icon periodically to update the fleet status until the status is Running
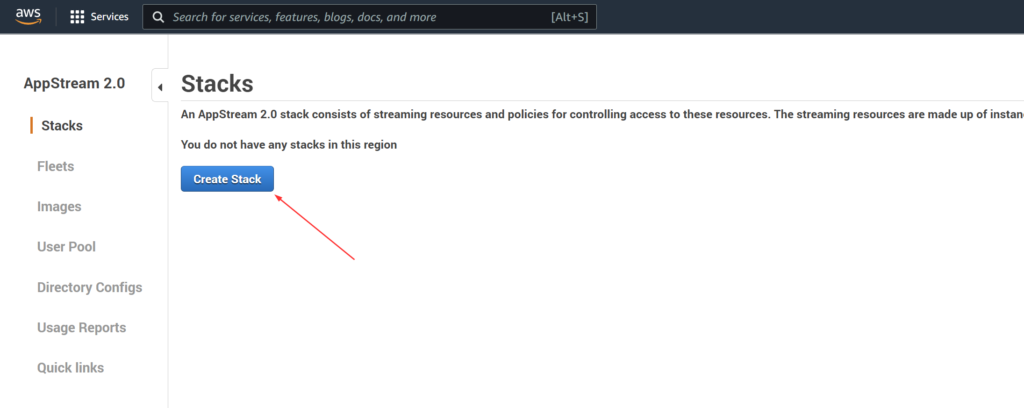
Create a stack and a streaming URL
A stack consists of a fleet, user access policies, and storage configurations. We create a stack to start streaming applications to users.
To create a stack:
- Login to AppStream 2.0 console (https://console.aws.amazon.com/appstream2)
- In the left navigation pane, choose Stacks, Create Stack
- In Step1: Stack Details, provide below information and Click Next
- Name = unique name identifier for the stack
- Display Name = name displayed in the console
- Description = Option description text
- Redirect URL = An optional URL redirect users at end of their streaming session
- Fleet = Fleet we created earlier
- Tags = Choose Add Tag and add necessary tags
- VPC Endpoints (Advanced) = Internet. We can create a private link, which is an interface VPC endpoint, in our virtual private cloud
- Embed AppStream 2.0 (Optional) = optional webpage option to embed AppStream session
- In Step 2: Enable Storage, pick an option that suits you and click Next
- For this exercise I’m not picking any of these options
- Persistent storage can be provided for our users by choosing on of these options
- Home Folders = A S3 bucket is provisioned where users can save their files to their home folder and access it during application streaming sessions
- Google Drive for G Suite = Users can link their Google Drive for G Suite account to AppStream 2.0. During application streaming sessions, they can sign in to their Google Drive account, save files to Google Drive, and access their existing files in Google Drive. Personal Gmail accounts not allowed
- OneDrive for Business = Users can link their OneDrive for Business account to AppStream 2.0. During application streaming sessions, they can sign in to their OneDrive account, save files to OneDrive, and access their existing files in OneDrive. Personal OneDrive accounts not allowed
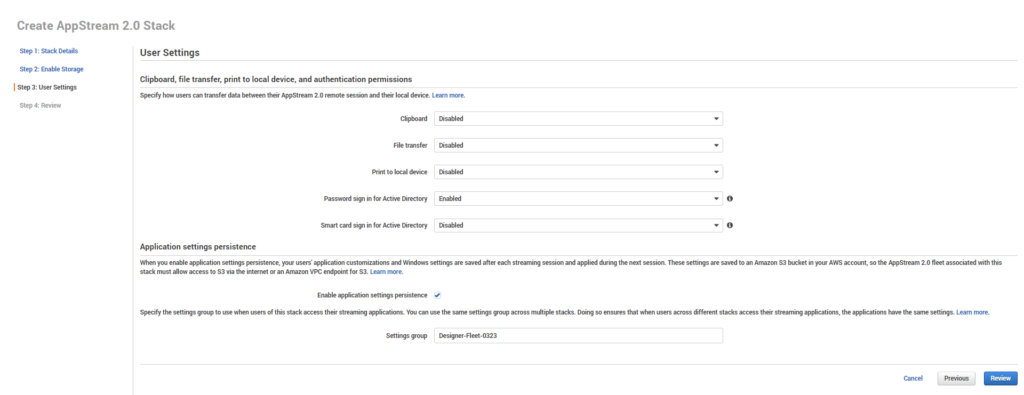
- In Step 3: User Settings, configure the following settings. When you’re done, click Review
- For this exercise, I’m picking the most restrictive options but these will usually depend on your DLP policies. Would be a good idea to consult with your IT security and compliance team on this
- Clipboard, file transfer, print to local device, and authentication permissions
- Clipboard = By default, users can copy and paste data between their local device and streaming applications
- File transfer = By default, users can upload and download files between their local device and streaming session
- Print to local device = By default, users can print to their local device from within a streaming application
- Password sign in for Active Directory = Users can enter their AD domain password to sign in to an AppStream 2.0 streaming instance that is joined to an AD domain
- Smart card sign in for Active Directory = Users can use a smart card reader and smart card connected to their local computer to sign in to an AppStream 2.0 streaming instance that is joined to an AD domain
- Application settings persistence options
- Enable Application Settings Persistence = Users’ application customizations and Windows settings are automatically saved after each streaming session and applied during the next session. These settings are saved to an Amazon S3 bucket
- Settings Group = The settings group determines which saved application settings are used for a streaming session from this stack. Let’s say we apply this same settings group to another stack, both stacks use the same application settings
- Clipboard, file transfer, print to local device, and authentication permissions
- For this exercise, I’m picking the most restrictive options but these will usually depend on your DLP policies. Would be a good idea to consult with your IT security and compliance team on this
- In Step 4: Review, Confirm the stack configuration details. To change the settings for any section, choose Edit and make the necessary changes. After reviewing the configuration details, Click Create
Create a Streaming URL
To test application streaming without setting up users, we can create a temporary URL that can be pasted into a browser window.
- In the left navigation pane, choose Stacks
- For Stacks, select the stack we just created
- Choose Actions, Create streaming URL

- In the Create streaming URL dialog box, provide User id and URL expiration, Click Get URL
- This streaming URL is purely for testing purposes
- In a production environment, we usually have other authentication and authorization methods to allow access to our users to the designated resources. I’ll cover the steps for enabling Federation with Azure AD Single SSO and AppStream 2.0 in an upcoming post

- In a browser, browse to the streaming URL. AppStream 2.0 displays an application catalog page that lists the applications that you have configured for streaming
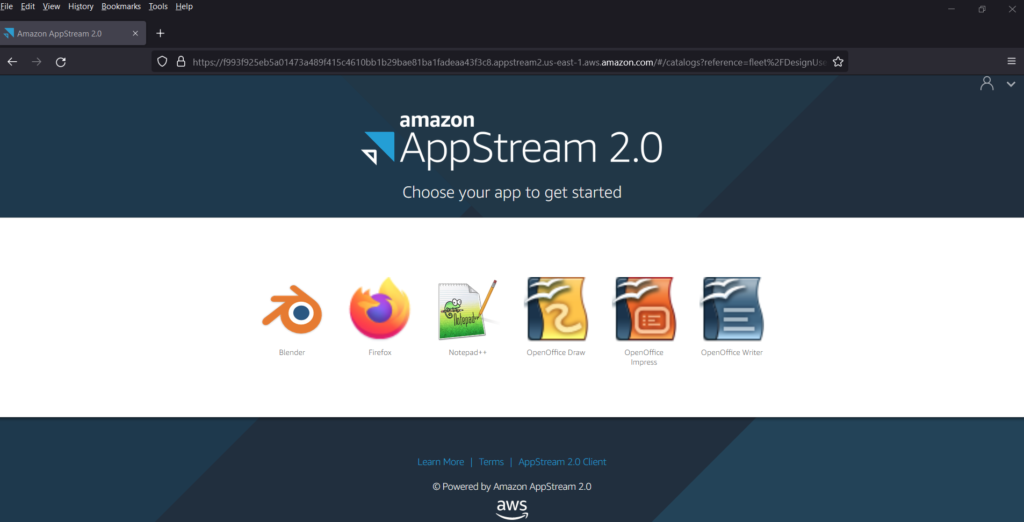
Here is Blender via AppStream in a browser,
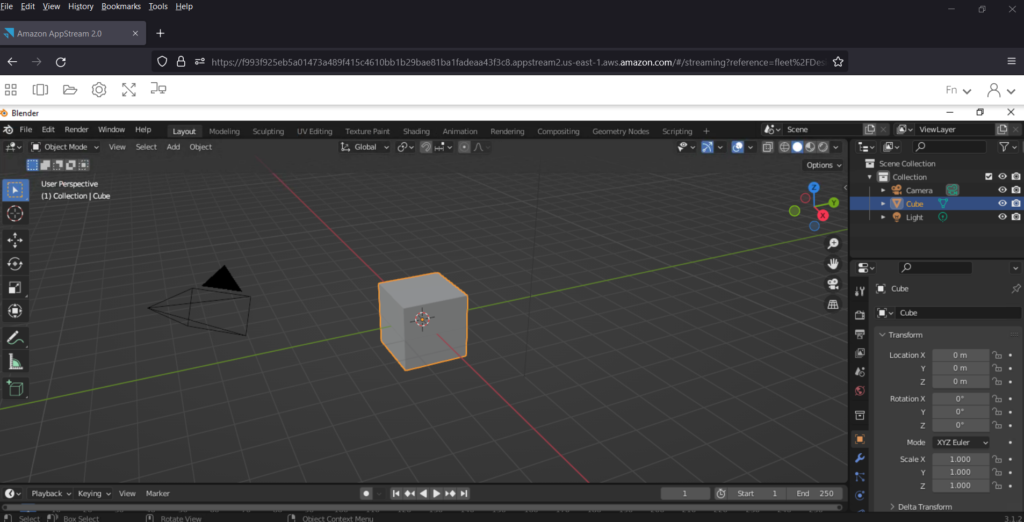
and here is Blender via the AppStream client,

Manage user access
AppStream 2.0 user pool is a built-in identity management feature that we can use to enable users to access their streamed applications.
Note: Like I mentioned earlier, in a production environment, we’d use SAML 2.0 to federate through AD or any other custom identity solution provider(Example: Azure AD) that supports SAML 2.0
To enable users in the user pool to open applications after they sign in to the AppStream 2.0 user portal, we must assign each user to at least one stack that contains applications. After we assign the user to a stack, AppStream 2.0 sends an optional notification email to the user with instructions about how to access the stack and a URL. The user can access the stack by using the URL until we delete the stack or unassign the user from the stack.
Add users
To add users:
- Login to AppStream 2.0 console (https://console.aws.amazon.com/appstream2)
- In the left navigation pane, choose User Pool, Create User
Note: Remember, along with fee on the instances, there is an Users fee charged monthly. For each end user who launches a streaming session on a fleet instance there is a fee of $4.19 for the month in which the streaming session occurred.

- In the Create User dialog box, provide Email, First Name & Last Name information and choose Create User
- The User Pool list refreshes, and the user we added is listed and enabled
Assign a stack to the user
- In the left navigation pane, choose User Pool, and select the user we created
- Choose Actions, Assign Stack
- In the Assign Stack dialog box, for Stack, I’ve selected the stack that I created earlier
- I’m leaving the Send email notification to user option selected
- Choose Assign Stack
- AppStream 2.0 sends an email to the address we specified for the user
- User can open the Login Page link in the notification email to login and access applications via AppStream 2.0
I’m aware this was a lengthy post but I hope this helped you out in your AppStream 2.0 deployment. As I mentioned earlier, I’ll add another post on how to enable federation with Azure AD SSO and Amazon AppStream 2.0.
If you were following along and if it is a test environment, remember to stop your fleet. Else, you’ll incur charges.
Thank you for stopping by. ✌