Amazon AppStream 2.0 lets us easily add existing desktop applications to AWS and enable users to instantly stream them. AppStream 2.0 offers pay-as-you-go pricing, with no upfront investment and no infrastructure to maintain. Also allows us to scale instantly and given the scenario, globally to our users.
With the expanding global workforce for many organizations, AppStream provides some very useful features which are worth exploring. Windows users can easily connect to AppStream 2.0 applications using any HTML5-capable web browser or the AppStream client.
In the ever expanding work from home/anywhere model, user’s laptops may not connect to enterprise network very often and installing new applications or updating them can be an uphill battle. Updating applications and rolling out changes are easier with AppStream comparing the traditional model.
I’ll explore AppStream 2.0 implementation in the next couple blog posts. On a high level, a typical AppStream 2.0 implementation process goes like the process diagram below:
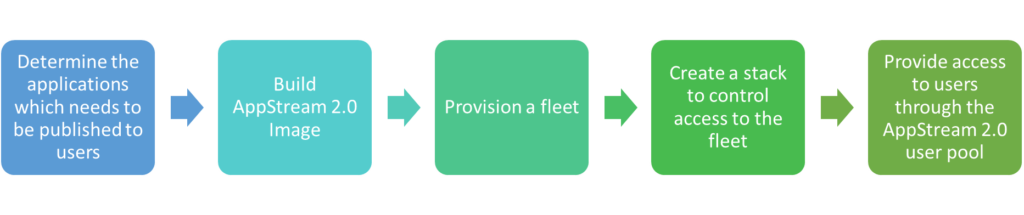
In this post, I’ll cover the what is involved in the Build AppStream 2.0 Image step,

Create an image builder
AppStream uses EC2 instances to stream applications to the users. To create a custom image, we need to connect to an image builder, install, configure and customize the applications for streaming and then create a image by creating a snapshot.
To create an image builder instance:
- Login to AppStream console (https://console.aws.amazon.com/appstream2)
- If this is the first time you are launching AppStream, ‘The AppStream 2.0 first experience page’ appears, Click Get Started and in the next screen choose skip
- We’re just telling AWS, we’ll figure it out and we don’t need their handholding. 😉
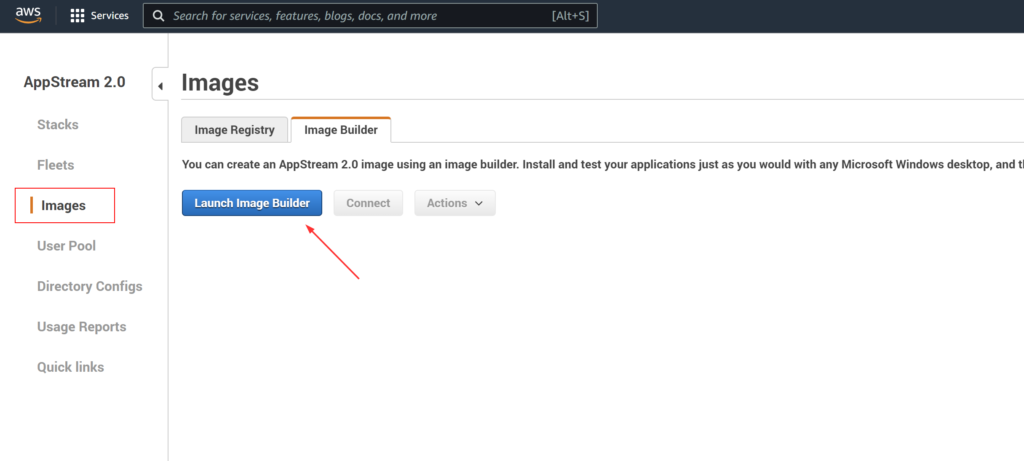
- In the navigation pane on the left, choose Images, Image Builder, Launch Image Builder
- In Step 1: Choose Image window, in the list of images, select the image builder with the name Base-Image-Builder-mm-dd-yyyy, where mm-dd-yyyy represents the most recent date
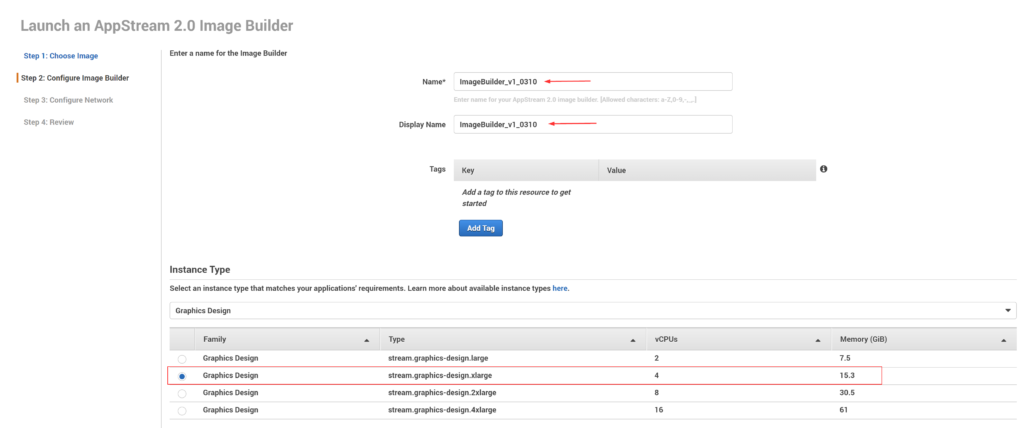
- I’m choosing Windows 2016 and an instance in Graphics design. As I’m planning to publish applications that’ll require GPU. For a full list of instances, the sizes and pricing, refer this link – Amazon AppStream 2.0 Pricing
- If you are simply trying out AppStream to get a feel of it, General purpose instances are more than enough

- In Step 2: Configure Image Builder, give the instance an unique name depending on your organizational naming conventions and standards, Pick a Instance Type, Streaming Endpoint as Internet and the IAM role need not be created.
- The VPC endpoints allows users to stream from AppStream through your VPC. This can be helpful in scenarios where you want to keep the traffic within your VPC. But By default, AppStream uses a streaming endpoint that requires the user to have access to the internet
- The IAM role part is a much more comprehensive topic and that’s why I’m leaving it with default value
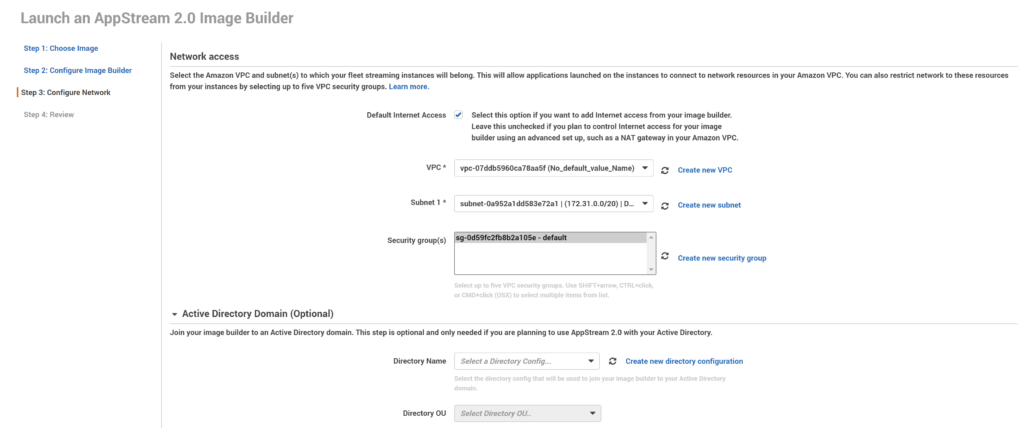
- In Step 3: Network access, I’m selecting Default Internet Access, my VPC, the subnet and the default security group
- As this is purely for testing here, I’m going through with default options but when you are rolling out this in production, you’ll probably end up creating a separate VPC and if you have services like Direct connect to connect to your on-premise, your network administrator will carve up a segment which you can use to configure
- It is not recommended to chose Default Internet Access, here is how you can decide. If your deployment must support,
- More than 100 concurrent users, configure a VPC with private subnets and a NAT gateway
- Fewer than 100 concurrent users, you can configure a new or existing VPC with a public subnet (the default option does this)
- The AD domain configuration is optional
- It comes into play when you have AWS Direct Connect and you have a line of sight with your AD domain.
- Also is needed when your applications need to be authenticated to your AD domain and/or your application’s backend(file shares, etc) live on-premise. More on Authentication in a later post
- Click Review and Launch
- It takes around 15-20 minutes for this process to complete and displays pending in the meantime
- The image builder instance will accumulate charges even when no one is connected. It ain’t cheap, so please keep an eye on it
- Pricing info in this link – Amazon AppStream 2.0 Pricing
Install Applications in image builder
- In the left navigation pane within AppStream 2.0, choose Images, Image Builder
- Select the image builder instance that you created earlier
- If the status is Stopped, select the instance, and choose Actions, Start
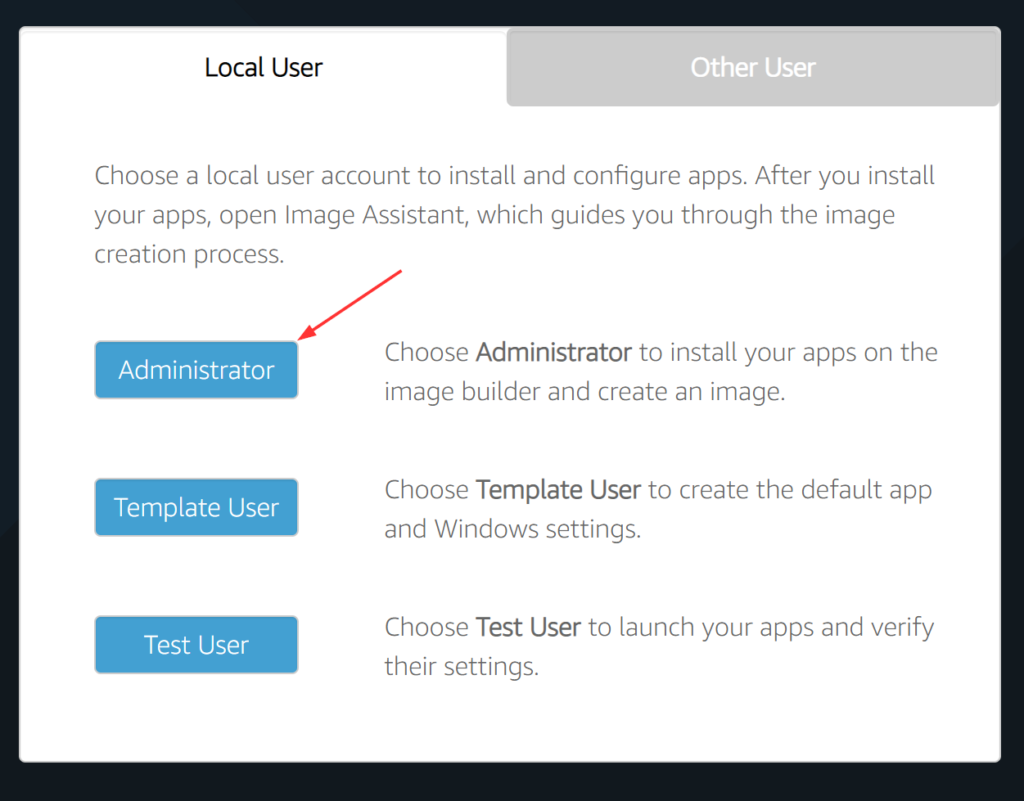
- A new browser tab opens, displaying options for logging into the image builder instance. Choose Local User, Administrator
- Once connected to Image builder, I used Firefox to download the needed software files and installed them like I would do on a server connected via RDP
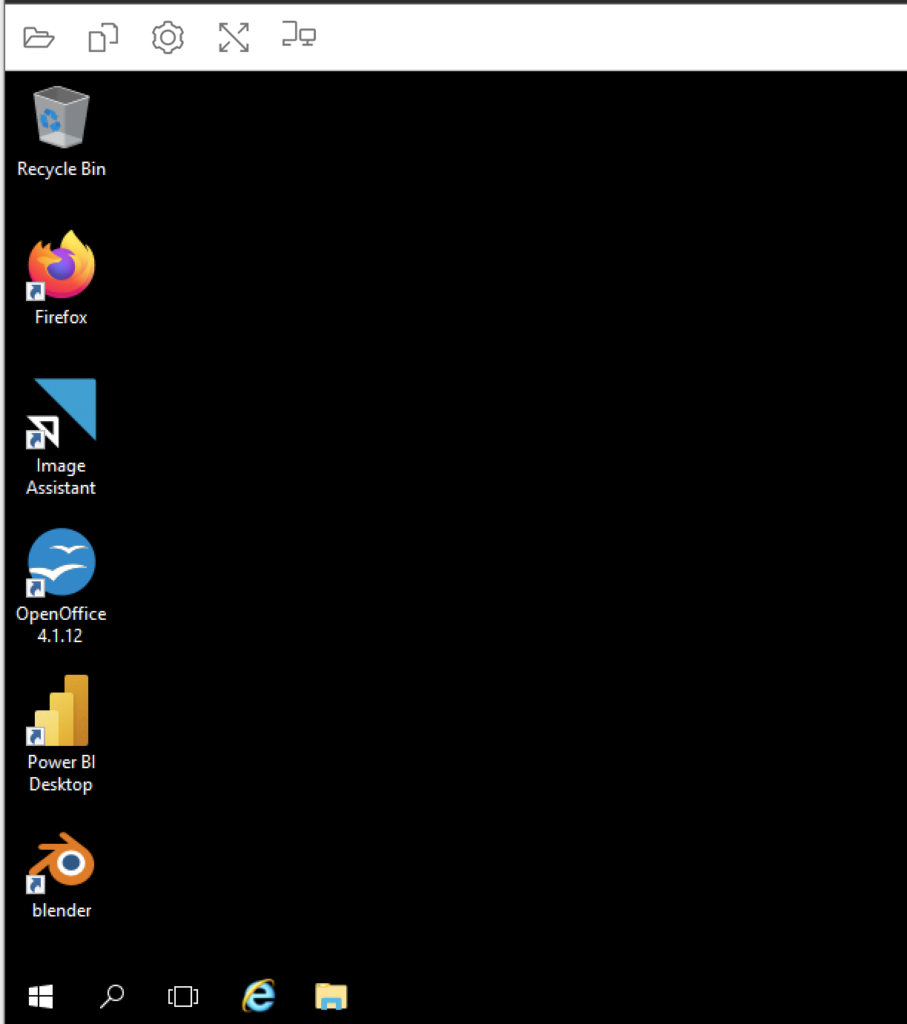
- Once the applications are installed, we are ready for the next steps
Configure applications
I’m including this section because as we all know, custom built applications which run on-premise or applications that your organization may have customized will need certain steps to be configured or worked on by your application administrators. This where you bring them in or even in the earlier step while you install the applications.
They’ll know what the customizations are, adding xml files in certain file path, IP addresses of DB servers and so on. Let them do their thing and as an AppStream administrator, we’ll take notes. 😁
Use Image Assistant to create an image
Now that we have installed and configured the applications, we are ready to create an image. The following steps will prepare the application for streaming, optimize it for performance, and create an image:
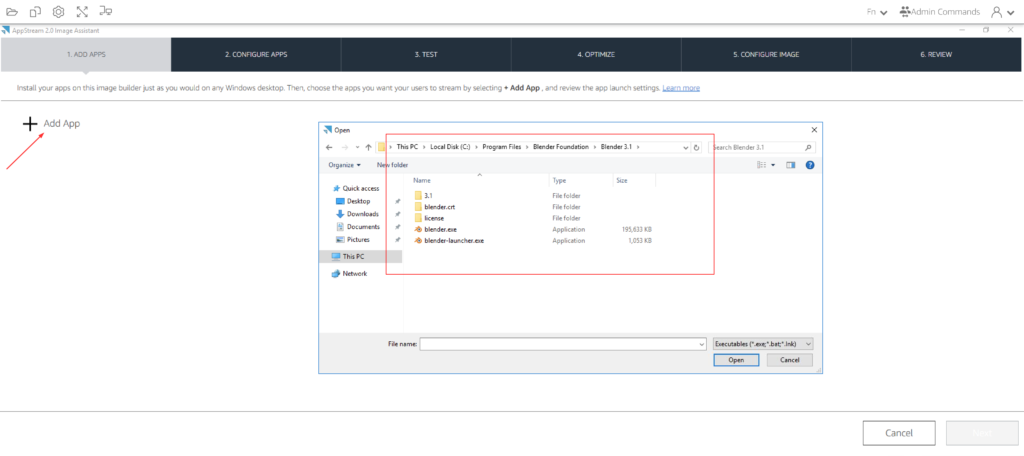
- On the image builder desktop, open Image Assistant
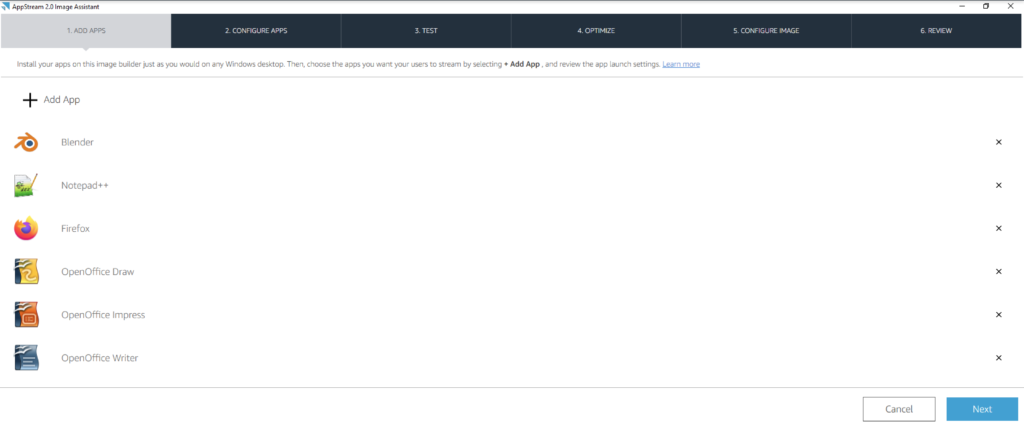
- On the Add Apps tab, choose Add App
- To add Blender, I’m navigating to the installed path and selecting the exe
- Chose the exe and click Open
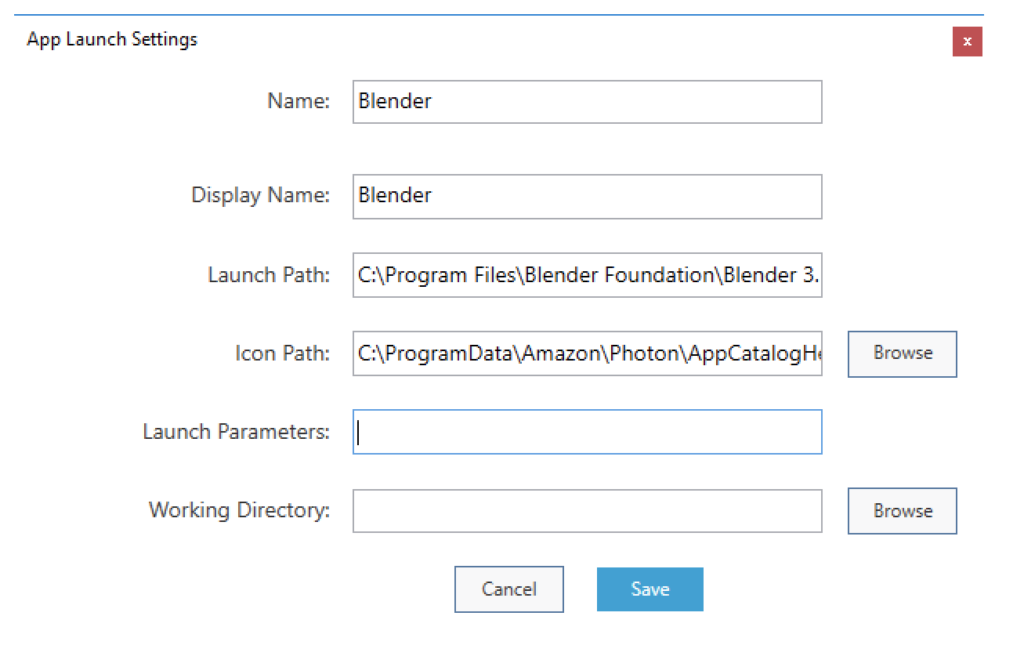
- In the next window,
- Name = A unique identifier for the app
- Display name = Name of the app that is displayed to end users
- Launch Path = Location app’s executable (Change it only if your app requires it)
- Icon Path = Location of your app’s icon (Your organization might have certain standard on app icons, this is where you pick your icon)
- Launch Parameters = Command line arguments that need to be passed to your app (Check with your application’s admin)
- Working Directory = Ok to leave blank (Check with your application’s admin)
- Click Save
- Repeat the above steps for other applications you’ll need on the image
- Once done adding, click Next
- On Configure Apps tab, click on Switch user
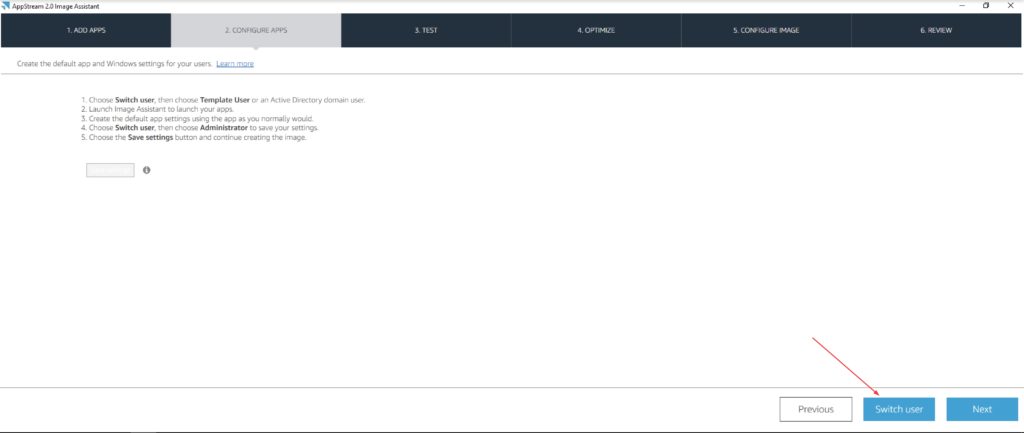
and select Template User in the login screen
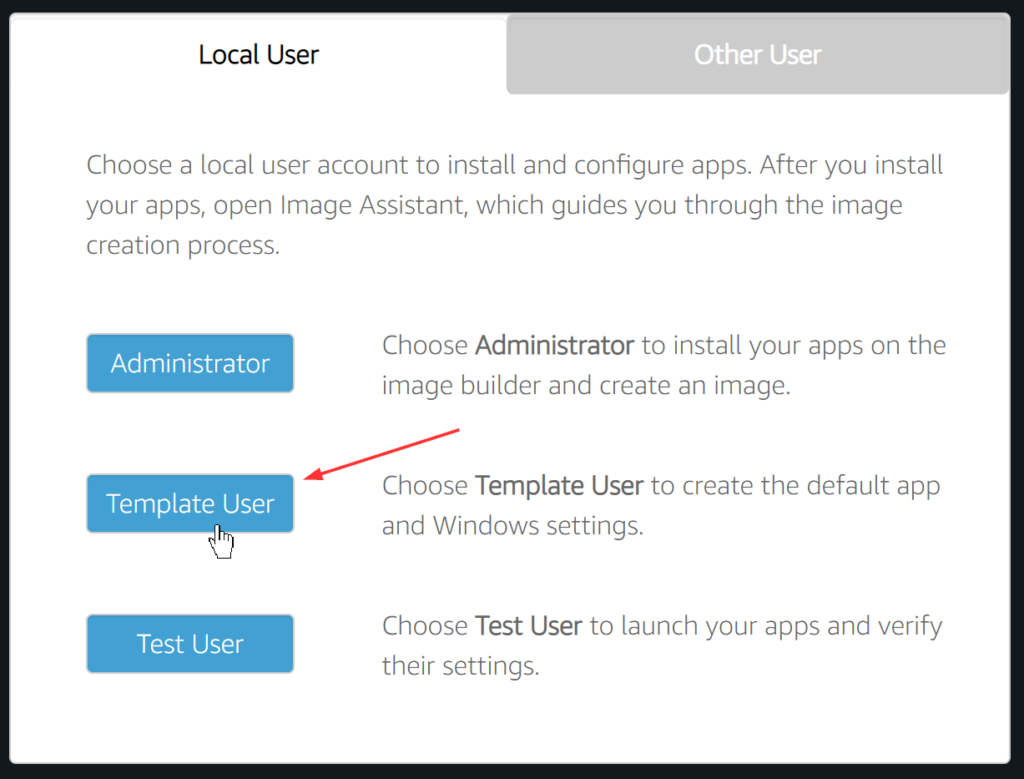
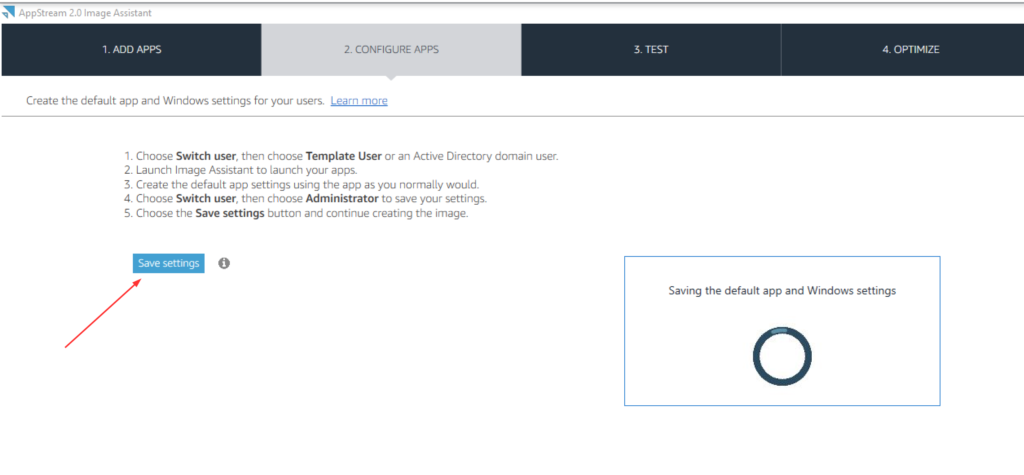
- As Template User, launch Image Assistant and click on the applications to make sure they open as desired. Once done, click on Switch User and then choose Administrator to login
- In the Administrator login, you’ll be back in the Configure Apps tab, click Save settings
- If you need to redo any of the saved settings, you can simply delete the user’s profile and do the steps again
- To remove user profile, open Windows System properties(cmd –> sysdm.cpl), Advanced tab, Settings under User profiles and click to select the DefaultProfileUser and click Delete
- On the Test tab, Click Switch User and then choose Test User to login
- Image builder includes a test user account that enables you to test your applications by using the same policies and permissions as your users
- As Test User, launch Image Assistant and click on the applications to make sure they open as desired. Once done, click on Switch User and then choose Administrator to login
- In the Administrator login, you’ll be back in the Test tab, click Next
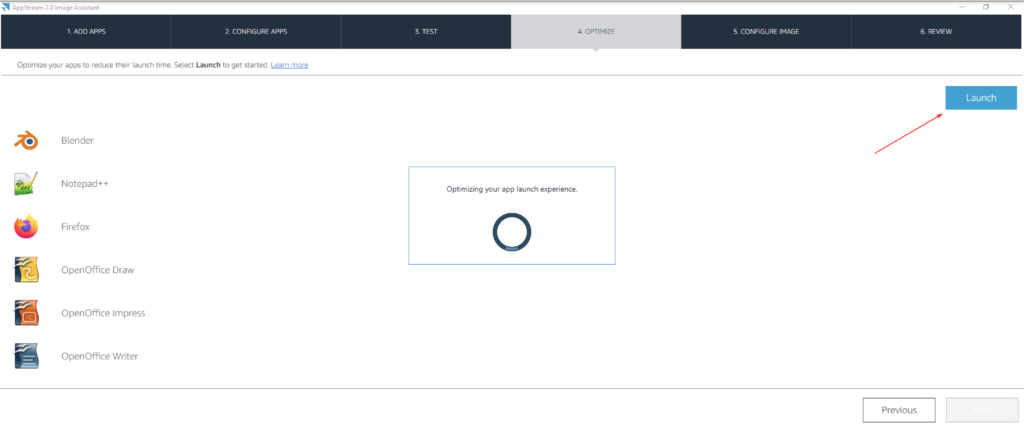
- On the Optimize tab, clicking Launch will launch each application and after the application launches, verify that it functions as expected, choose Continue
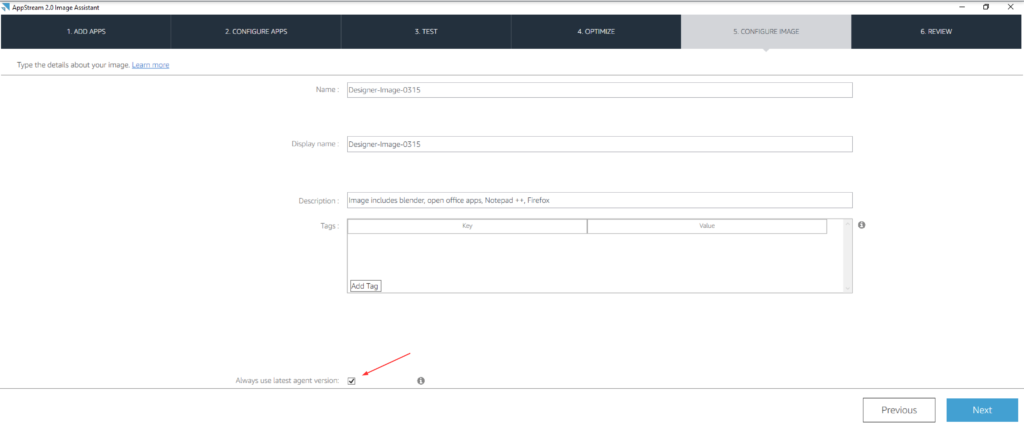
- On the Configure Image tab, enter the following information and click Next
- Name = Unique name
- Display Name = A user friendly name
- Description = What’s included in the image and notes that’ll make sense to you and the other admins
- Always use latest agent version = I leave this check box selected so that streaming instances launched our image always include the latest AppStream 2.0 features, performance improvements, and security updates
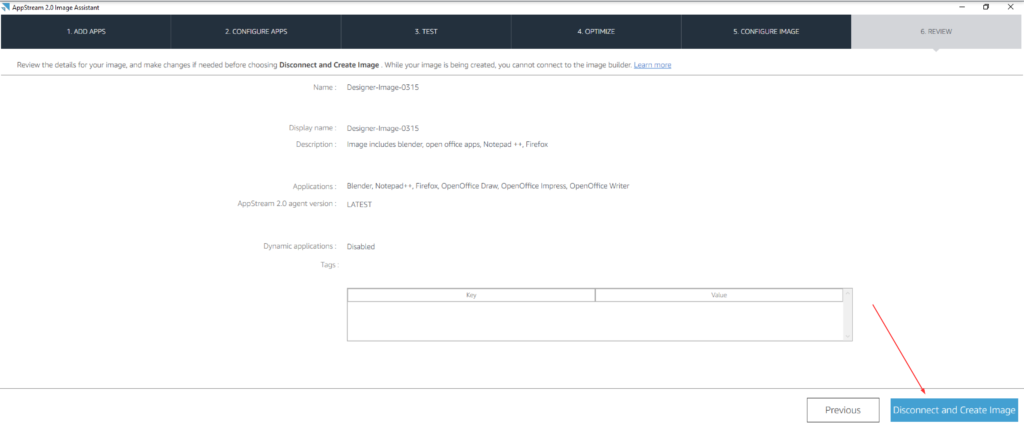
- On the Review tab, make sure you got it all correct and then choose Disconnect and Create Image
- The remote session disconnects within a few moments. When the Lost Connectivity message appears, it is safe to close the browser tab
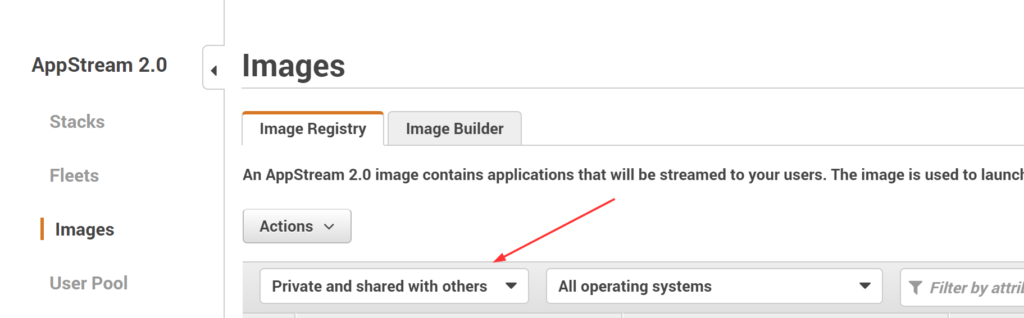
- Return to the Amazon AppStream 2.0 console and choose Images, Image Registry
- I set the filter to Private and shared with others to make it easier to view the image I created
- While the image is being created,
- the image status in the image registry of the console appears as Pending
- we cannot connect to it
The image creation process takes 20-30 minutes to complete.
I’ll update this post with the next steps on I’ve completed them – Link to Part II
Thank you for stopping by. ✌