As I have covered several times before, disabling basic authentication in one of the best things you can do in your O365 tenant for security.
MFA helps protect user’s account and prevents attacks. It is not perfect by any means but it is being improved. I’m a big fan of the Authenticator App. I try not to use the SMS or voice call options. Whenever I get a chance I always advocate the users I work with, to stick with the App. If your organization is yet to roll out MFA, it is time to take a hard look and make some drastic changes.
Microsoft in their November 18 Azure AD Identity blog revealed two new features for the Authenticator app. IMO, all O365 tenants should strongly consider enabling these two features below.
Number matching in Microsoft Authenticator
Additional context in Microsoft Authenticator
Number Matching
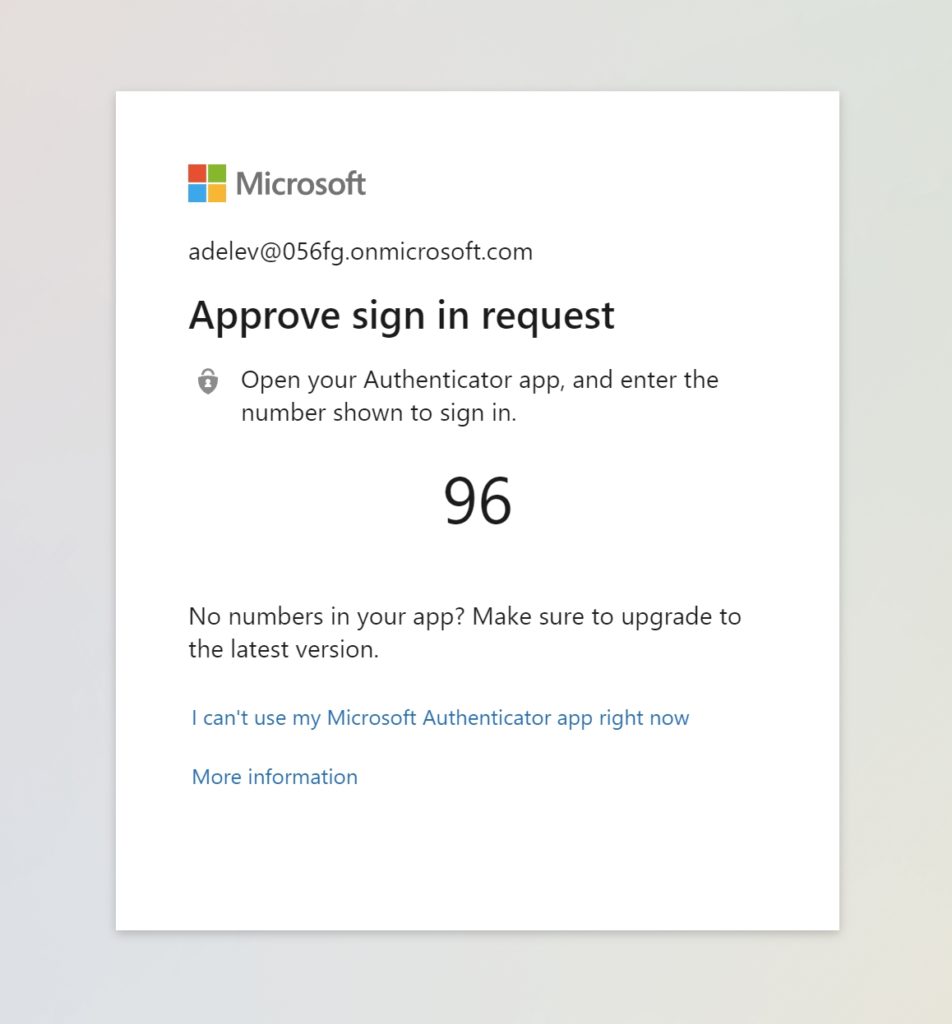
When a user responds to MFA challenge, they will see a number in the application or in the webpage which is challenging them and the user must enter this number in the Authenticator app to complete the process. This process is already part of the passwordless authentication method.
Additional Context
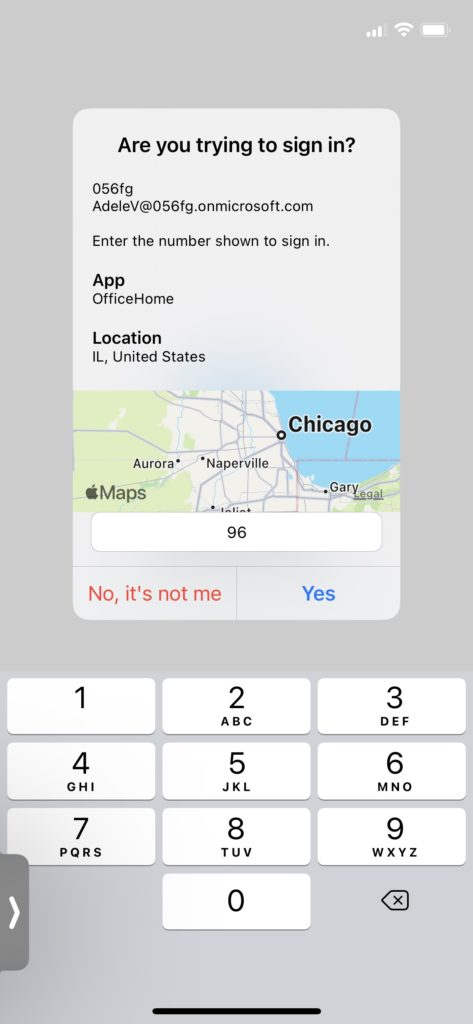
The Authenticator will also display the name of the app requesting MFA and also the user’s sign-in location. The sign-in location is based on the user’s public IP address. The location may not be accurate at times. This is because the IP location tagging and based on what I saw it is not the exact location of where the application’s traffic origin but usually close enough.
Application prompt on the webpage
Authenticator prompt
How to enable number matching with additional context in Azure AD
Click on the Security tab –> Authentication methods
Select Microsoft Authenticator
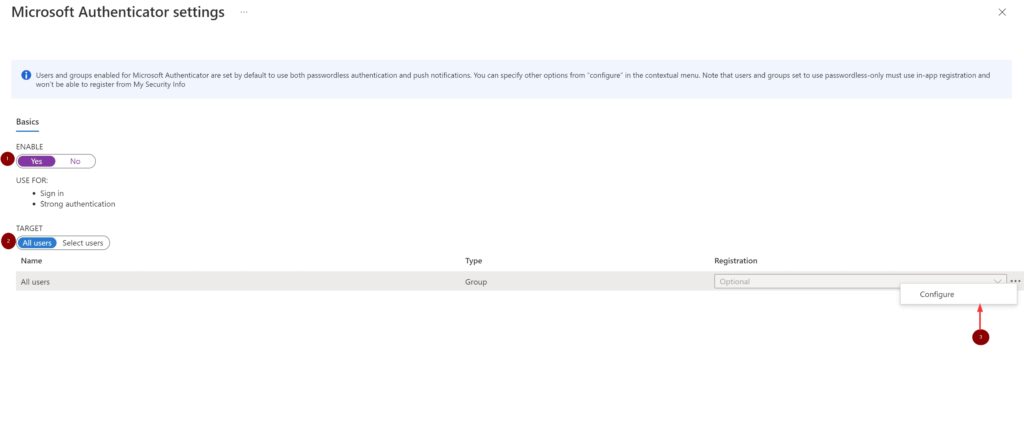
Toggle ENABLE to Yes
Toggle TARGET to All users
Depending on how you decide to roll out this feature, you can select a Azure AD group by selecting Select users, Select the group and follow along the next steps
Click on the three dots and Configure
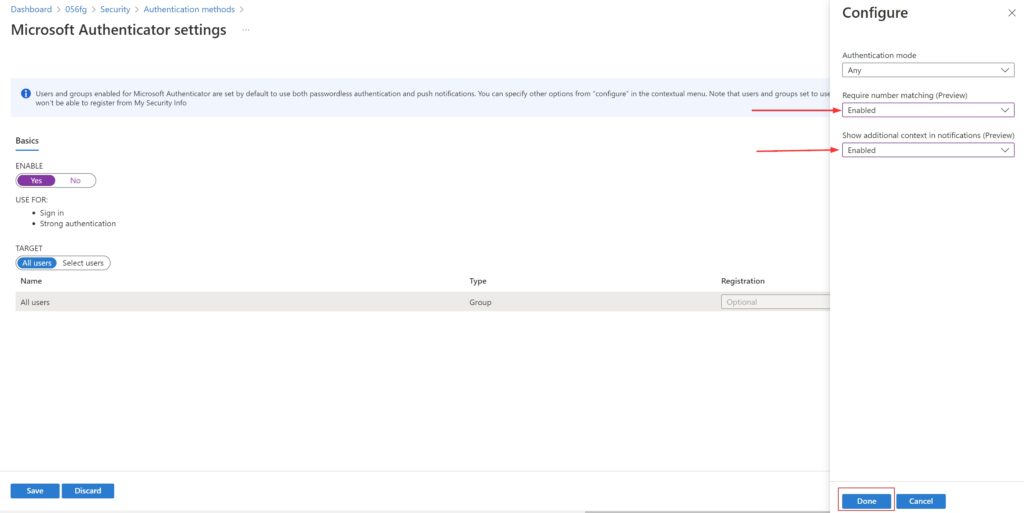
Set
Authentication mode = Any
Require number matching = Enabled
Show additional context in notifications = Enabled
Click Done
Click Save
Microsoft Authenticator settings
Configure settings for All Users
In the drop down for ‘Require number matching’ and ‘Show additional context in notifications’, there is a ‘Microsoft Managed‘ option. It means this functionality will be enabled by default for all tenants after the feature is generally available. Currently it is in public preview.
Azure AD allows granting access to resources by providing access rights to a single user or to an entire Azure AD group. Using groups let the application or the resource owner to assign a set of permissions to all the members of a group. Management rights can be granted to other roles, like example., Helpdesk administrators to add or remove members from the group.
When a group is assigned to an application, only users in the group will have access. Also, if the application exposes role, roles can also be assigned to groups or users.
When I was working on integrating Salesforce with Azure AD for SSO, I needed to assign groups to the roles that Salesforce exposed and I figured I’d document the process I went though here.
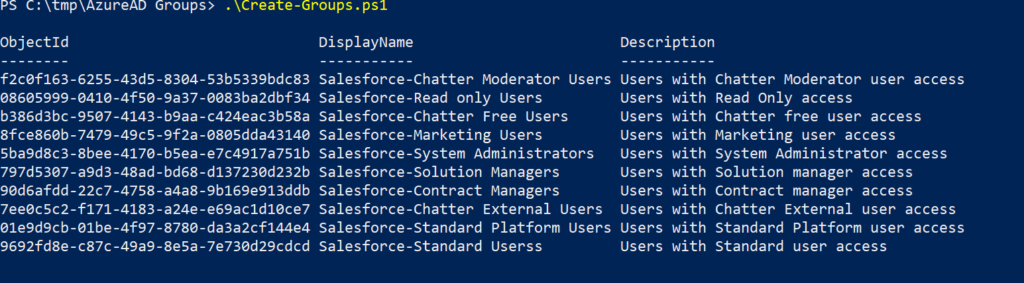
Bulk create Azure AD groups
This section describes how to create multiple groups in Azure AD. This is not needed if your organization already has groups created.
Use below script to create multiple Azure AD groups that are listed in a csv file,
Assign Groups and Users to an app using PowerShell
Assigning groups or users can be done from the Azure AD admin portal by clicking on the Users and groups tab in the application which you are granting access to.
My plan here is to create Azure AD groups that corresponds to the name of the role that Salesforce exposes and then add users to those groups which provides them with appropriate access to the application.
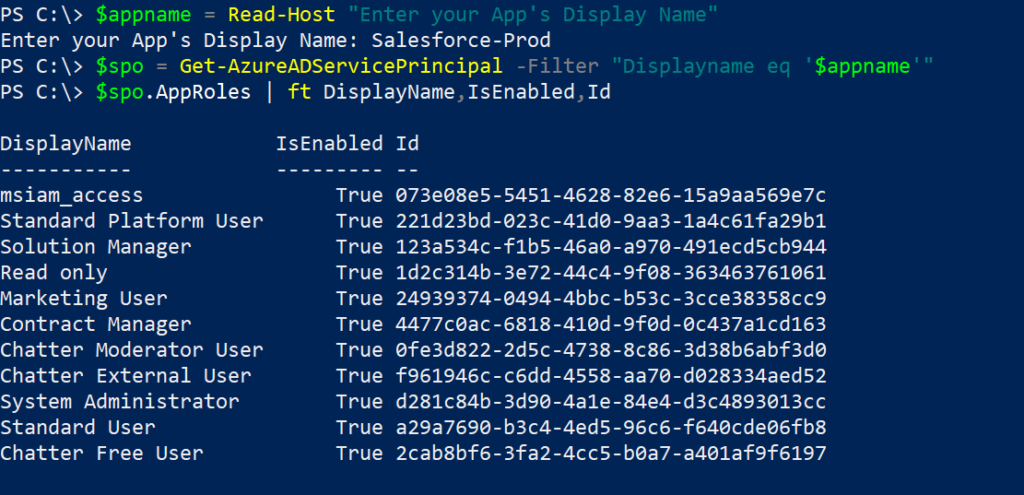
Determine the roles available for the application
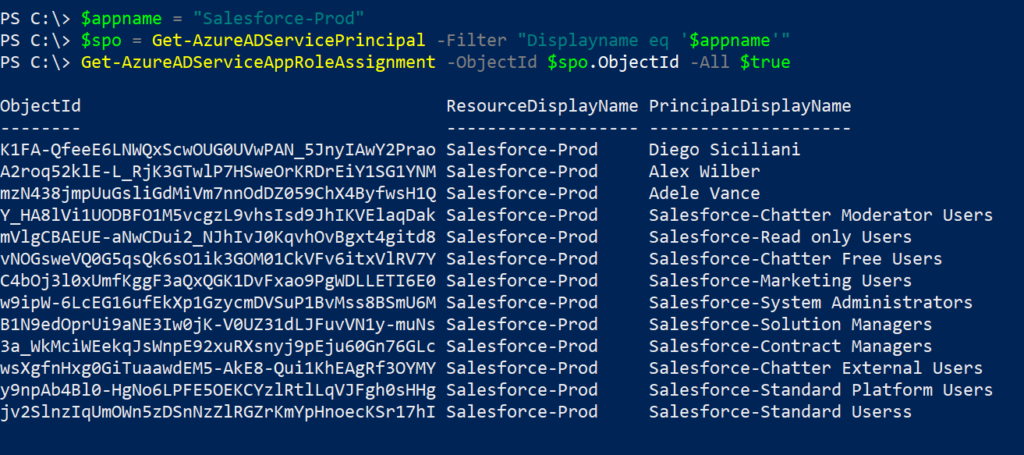
To determine the roles that the application exposes, use the cmdlet below.
$appname = Read-Host "Enter your App's Display Name"
$spo = Get-AzureADServicePrincipal -Filter "Displayname eq '$appname'"
$spo.AppRoles | ft DisplayName,IsEnabled,Id
AppRoles Output
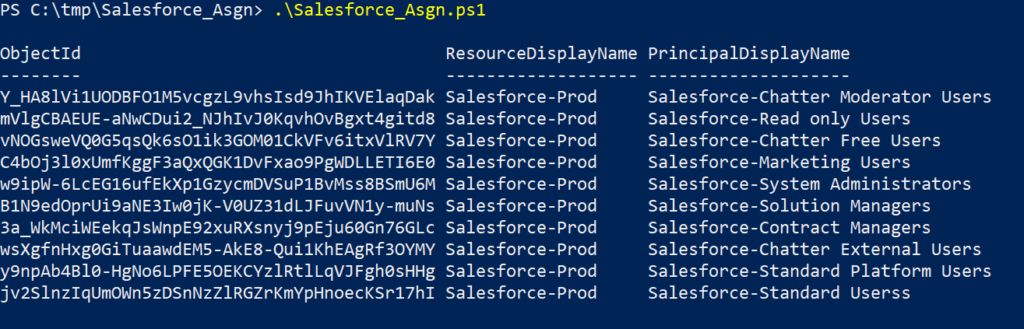
Assign Groups to Roles in Application
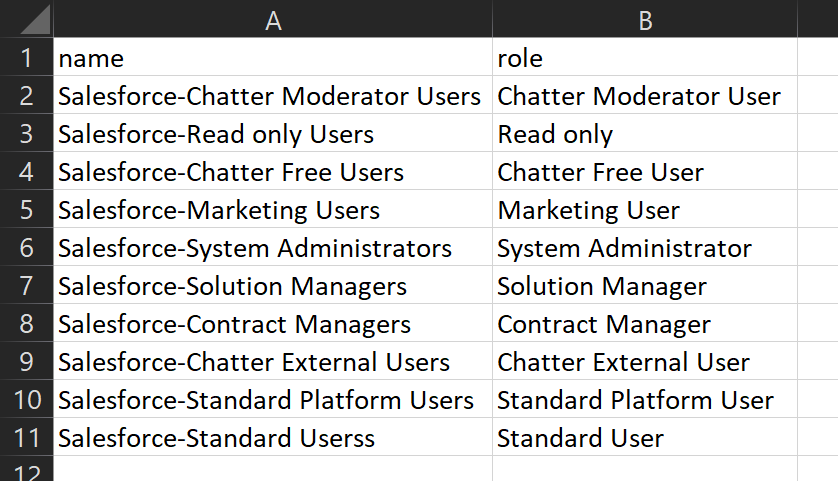
Use below script to assign the application’s roles to groups. If you notice the csv file, I’m using the groups created in the previous step to the roles. This way, it is easier to manage. The New-AzureADGroupAppRoleAssignment cmdlet can be used to achieve this.
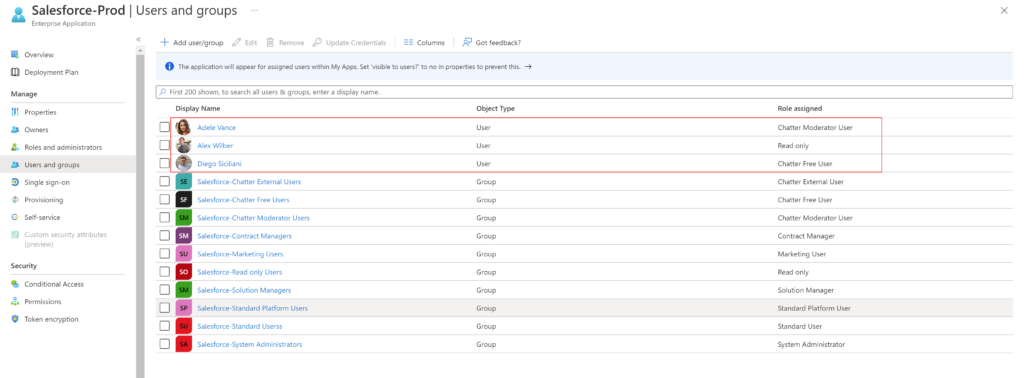
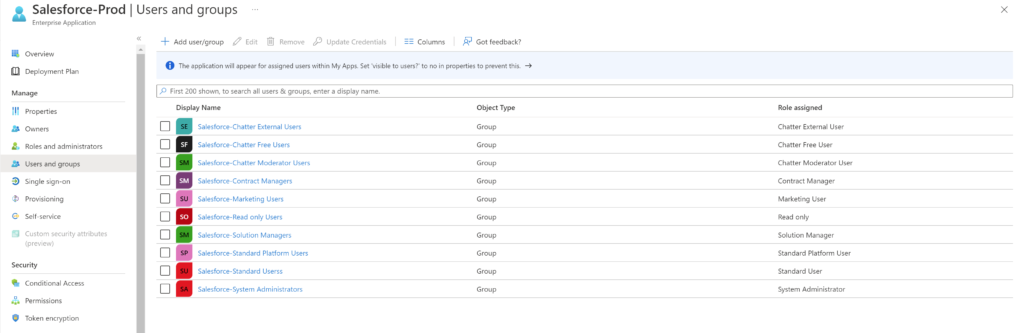
This below is how the application looks like in the Azure AD admin portal after running the above script,
Application Users and groups tab
Assign Users to Roles in Application
Use below script to assign the application’s roles to users. This can be achieved using the New-AzureADUserAppRoleAssignment cmdlet. Use the below script,
It should go without saying that removing all permissions will disable user’s access to the application. Don’t try this as a first step in a production environment, unless you are absolutely sure of it.
In this post I will go over the steps required to implement Azure AD SSO integration with Salesforce. With Salesforce and Azure AD SSO integration in place, it allows:
Users to sign-in to Salesforce with their Azure AD account
Administrators to control who can access Salesforce
Administrators can also manage users in one location – Azure AD admin center
Salesforce supports,
Service Provider-Initiated Login
Just In Time user provisioning – If a user doesn’t already exist, a new one is created in Salesforce when a login is attempted
Automated user provisioning and deprovisioning (This is covered in a later post)
Configuring the mobile application with Azure AD SSO
High level implementation steps
In Azure AD add Salesforce to Enterprise Applications
To configure this integration, first step is to add Salesforce from the gallery to your list of managed SaaS apps. Below are the steps,
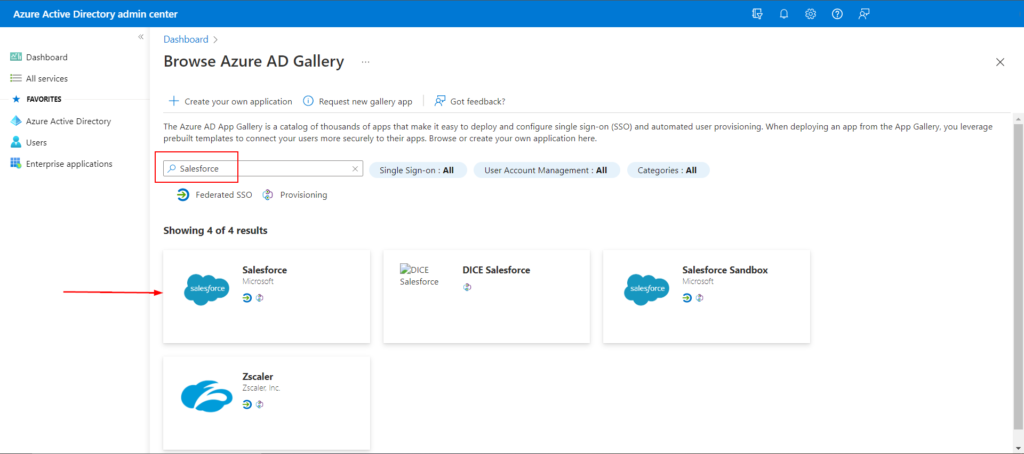
In the Browse Azure AD gallery section, enter ‘Salesforce’ in the search box
Select Salesforce and you can name it to differentiate from development to production instance with a prefix but in this scenario, I’ll leave it as default as in screenshot below. Click Create
It can take a few seconds for the app to be added
Search ‘Salesforce’
Add Salesforce by clicking ‘Create’
Configure Azure AD SSO
Below steps details how to enable SSO in Azure AD portal for the Salesforce application,
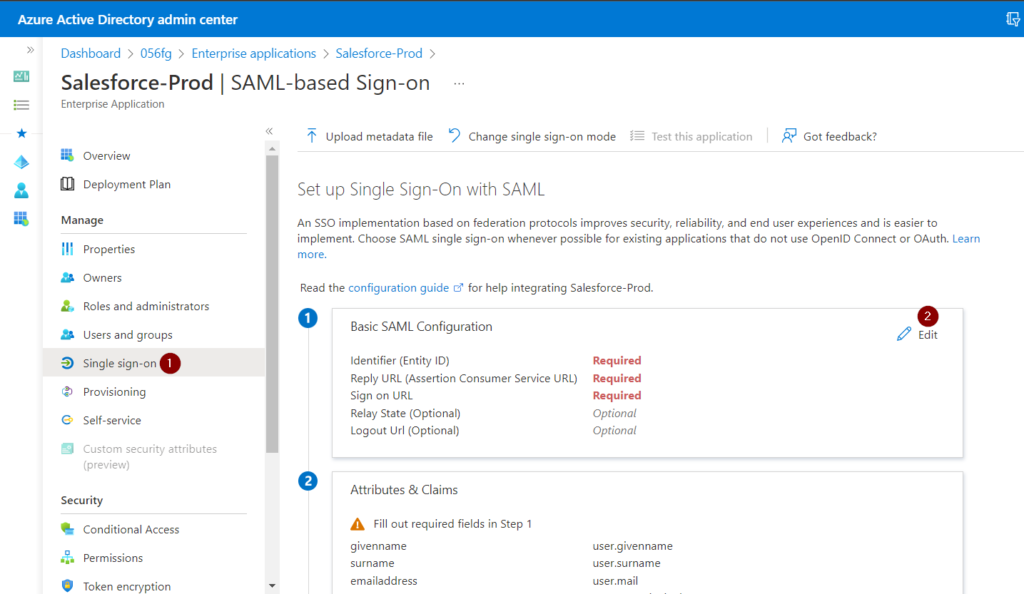
On the Salesforce application page in Azure AD,
Click on SAML-based Sign-on tab under the Manage section
Select SAML
Select the edit icon in the Basic SAML configuration section
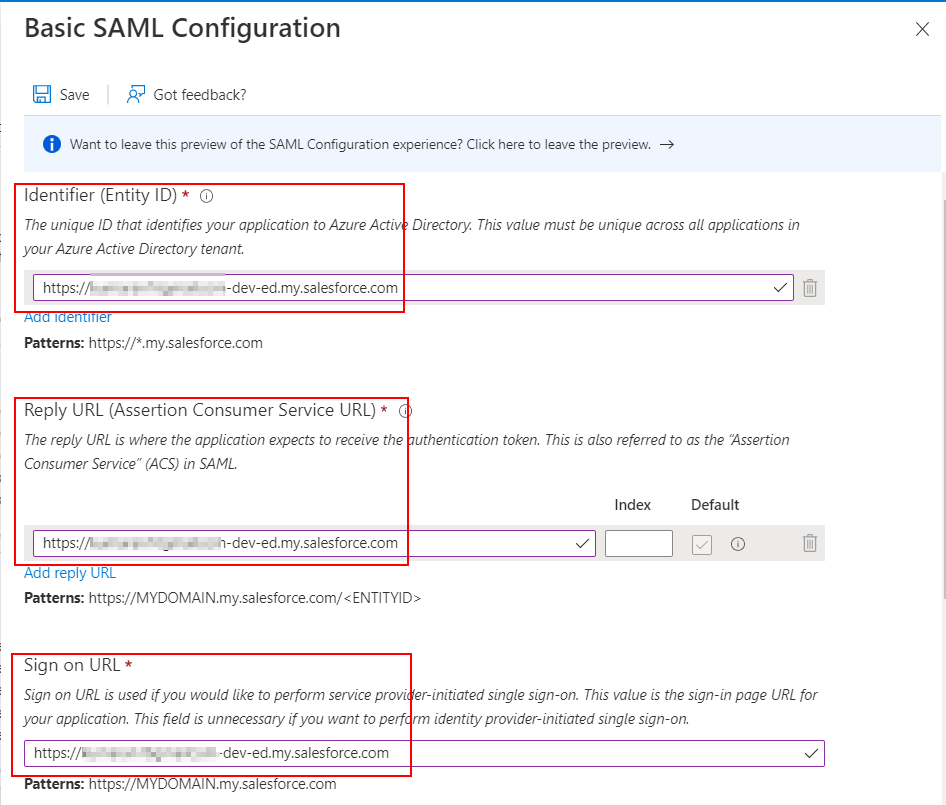
Basic SAML Configuration
Your Salesforce administrator should know this information and if not, you can contact Salesforce support. But in general, this information is easy to figure out. I’ve mentioned the format of these URLs below. and I have used my own instance’s URL in the screenshot.
Enterprise account
Developer account
Identifier (Entity ID)
https://{your-subdomain}.my.salesforce.com
https://{your-subdomain}-dev-ed.my.salesforce.com
Reply URL
https://{your-subdomain}.my.salesforce.com
https://{your-subdomain}-dev-ed.my.salesforce.com
Sign-on URL
https://{your-subdomain}.my.salesforce.com
https://{your-subdomain}-dev-ed.my.salesforce.com
Note: Recently, Salesforce has started forcing the lightning experience for the salesforce orgs. The URL is redirected to .lightning.force.com once user is logged in but based my testing, .my.salesforce.com works for the SSO configuration. This can be clarified with Salesforce tech support if necessary.
In my scenario, I’m using a Salesforce developer instance and the values in the below screenshot represent my environment.
Enter the values and click Save
Fill the URL values
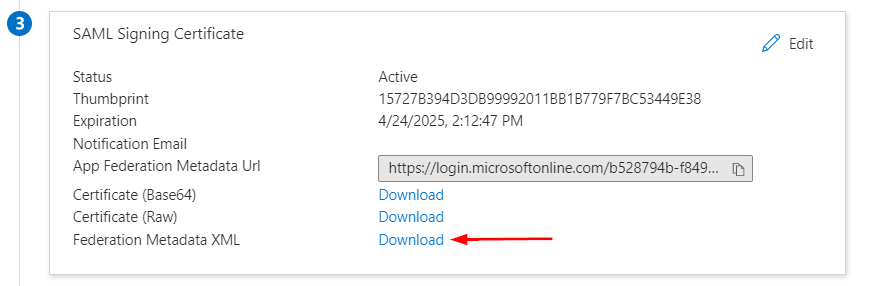
On the Set up single sign-on with SAML page, in the SAML Signing Certificate section, find Federation Metadata XML and select Download to download the xml file and save it on your computer
Download Federation Metadata XML
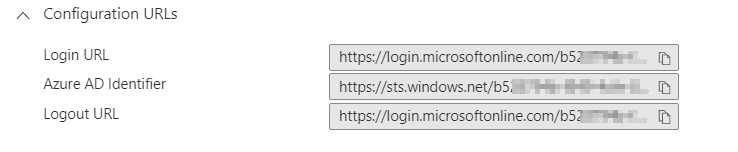
The Set up section has the configuration URLs
Azure AD configuration URLs
Create Salesforce test user
If you are planning to do Just In Time(JIT) user provisioning which is enabled by default, no action is needed but if you don’t plan on using JIT user provisioning, you will have to work with your Salesforce administrator to create a user who already exists in your Azure AD.
Configure Salesforce
Login to Salesforce portal with System Administrator privileges
Click on the Setup under settings icon on the top right corner of the page
Click Setup
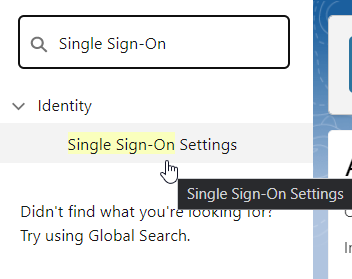
In the quick find, type ‘Single Sign-on..’
Search Single Sign-On
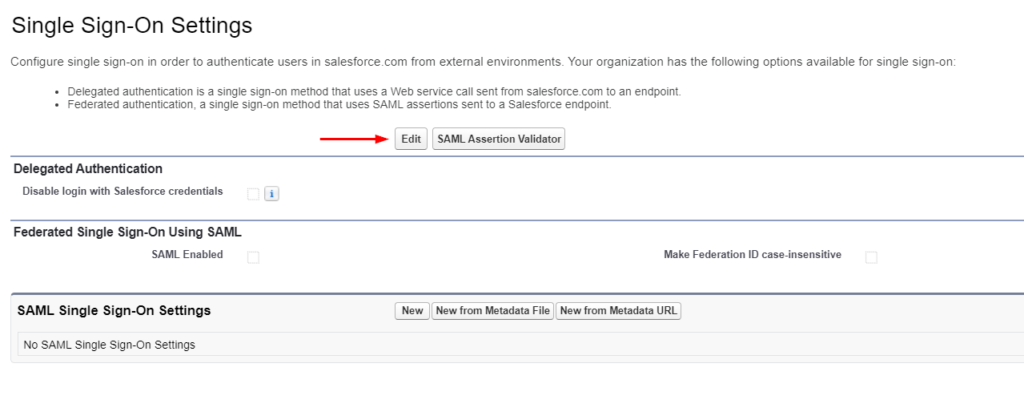
On the Single Sign-On Settings page, click the Edit button
Edit Single Sign-On Settings
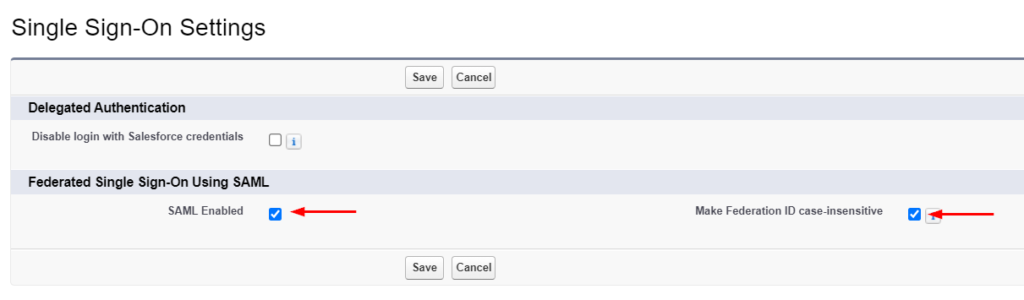
Place checkmark next to the following options below and click Save
SAML Enabled
Make Federation ID case-insensitive
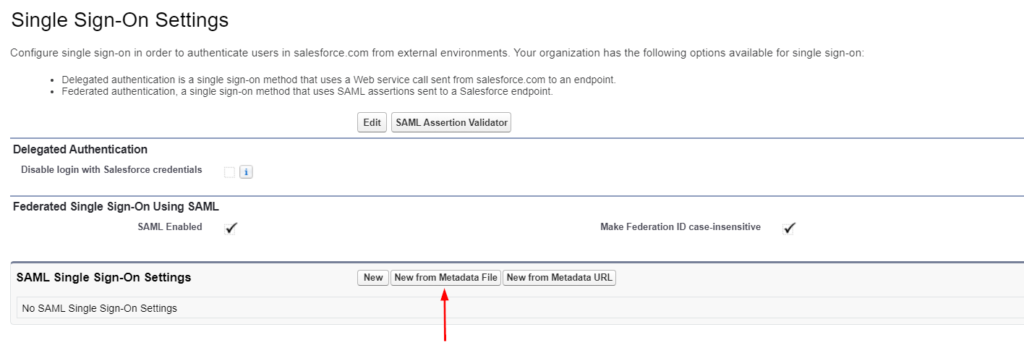
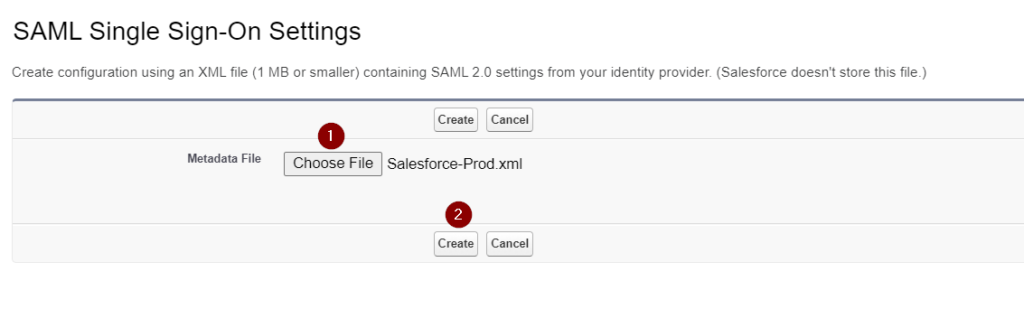
Click New from Metadata File
New SAML Single Sign-On Settings from Metadata file
Click Choose File to upload the metadata XML file downloaded from the Azure AD admin center from step 5. in ‘Configure Azure AD SSO’ section and click Create
Choose Federation Metadata file downloaded from Azure AD
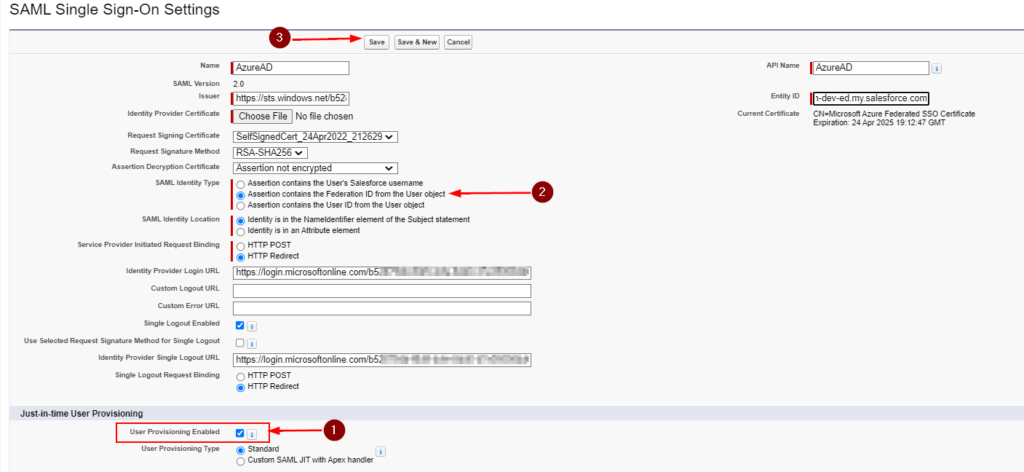
In the SAML Single Sign-On Settings page, the fields are automatically populated using the information from the federation metadata xml file. Fill in values for below and to keep things simple, I named it ‘AzureAD’ but pick what makes sense or follows naming conventions in your organization,
Name
API Name
SAML Single Sign-On Settings w/o JIT user provisioning
Optional. In the Just-in-time User Provisioning section, I’m leaving the User Provisioning Enabled unchecked but if you want to use SAML JIT, place a checkmark next to User Provisioning Enabled and select SAML Identity Type as Assertion contains the Federation ID from the User object.
SAML Single Sign-On Settings with JIT user provisioning
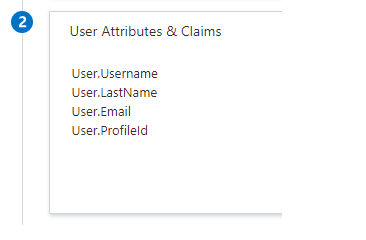
Optional..Continued.. If you configured SAML JIT, you must complete an additional step in the Configure Azure AD SSO section. The Salesforce application expects specific SAML assertions, which requires you to have specific attributes in your SAML token attributes configuration. The following screenshot shows the list of required attributes by Salesforce.
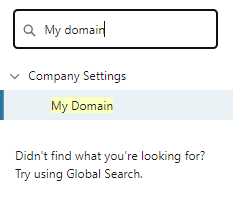
On the left navigation pane in Salesforce, search for My Domain
Search ‘My domain’
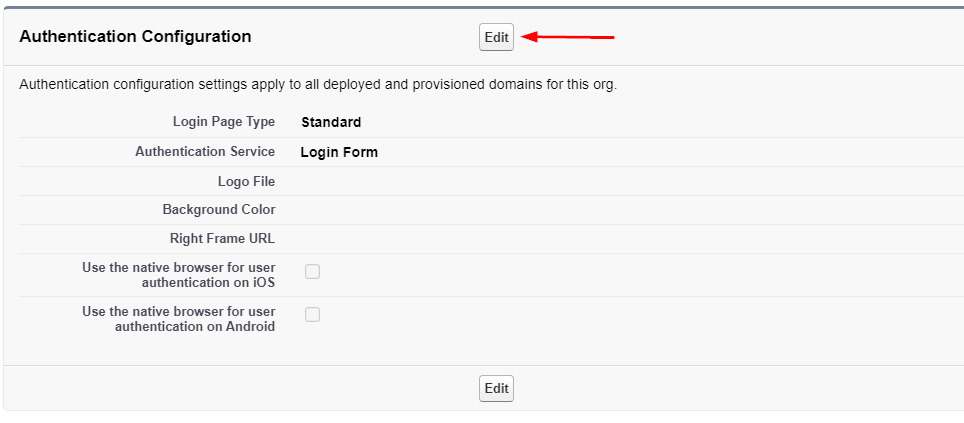
In the Authentication Configuration section, and click the Edit button
Authentication Configuration
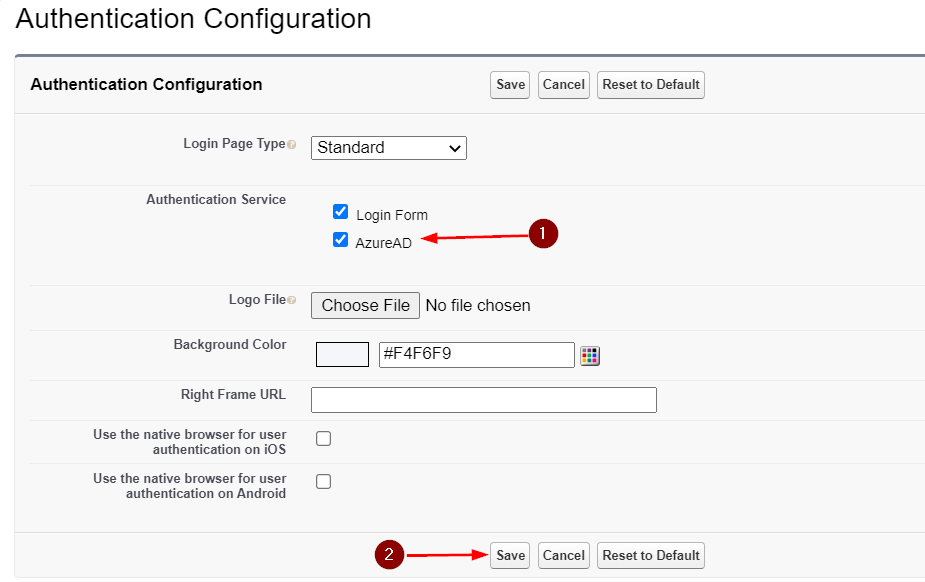
In the Authentication Configuration section, under Authentication Service, place checkmark next to ‘Login Form‘ and ‘AzureAD‘ and click Save
Authentication Configuration – Authentication Service
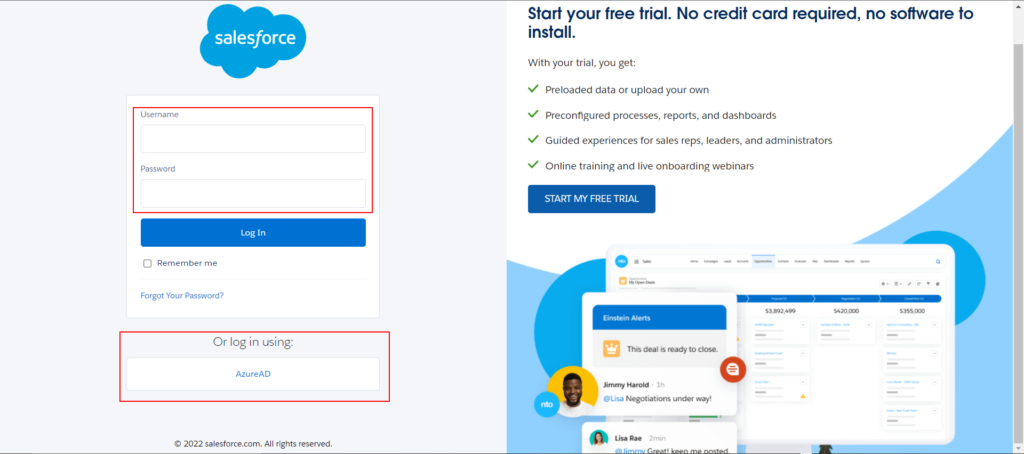
If more than one authentication service is selected, users are prompted to select which authentication service they like to sign in with while initiating SSO to your Salesforce environment
If you don’t want it to happen, then you should leave other authentication services unchecked
user login screen with authentication options
Enable Token Encryption (Optional)
Enabling encryption of SAML assertions adds another layer of security. The SAML assertions are encrypted such that the assertions can be decrypted only with the private keys held by the service provider.
Some organizations require encryption SAML assertions and this is fairly straight-forward to setup in Salesforce and Azure AD.
In the SAML Single Sign-On Settings, select the ‘SelfSignedCert…’ and click save
Your organization might require using a 3rd party certificate(Example: DigiCert, GeoTrust, etc) and in that scenario you will have to import the certificate into Salesforce using the Certificate and Key Management
SAML Single Sign-On Settings – Assertion Decryption Certificate
In the navigation pane on the left, search for Certificate and Key Management
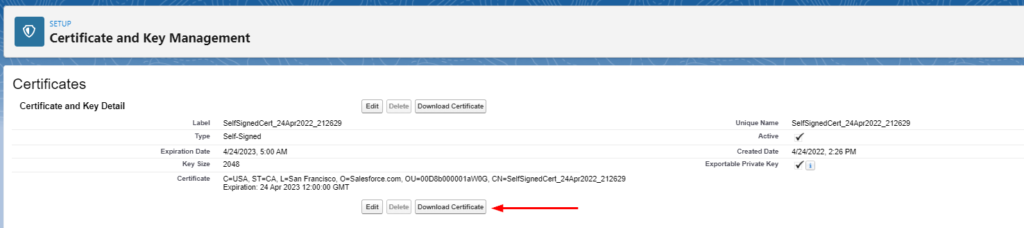
Click on the certificate
Click on the certificate
Click on Download Certificate and save the file to your machine
This steps exports the public key of the certificate which will be used by Azure AD to encrypt the assertion which Salesforce can decrypt using the private key
Click ‘Download Certificate’
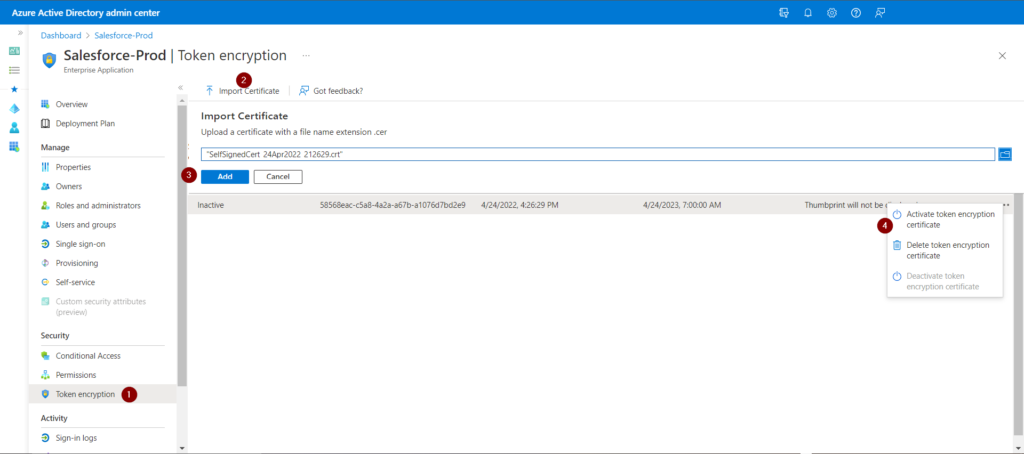
In Azure AD admin center, open the Salesforce application and click on the Token encryption tab. Click Import certificate, browse to the download certificate from Salesforce and click Add. Click on Activate token encryption certificate to make the certificate status active.
Token encryption Azure AD application
Test the Salesforce SSO to make sure everything works as expected
Test SSO
Open your organization’s Salesforce Sign-On URL directly
Use Incognito or InPrivate mode to avoid previously saved cookies
The portal should auto-redirect to login.microsoftonline.com and prompt a sign-in
Issues you may encounter and tips on how to fix it
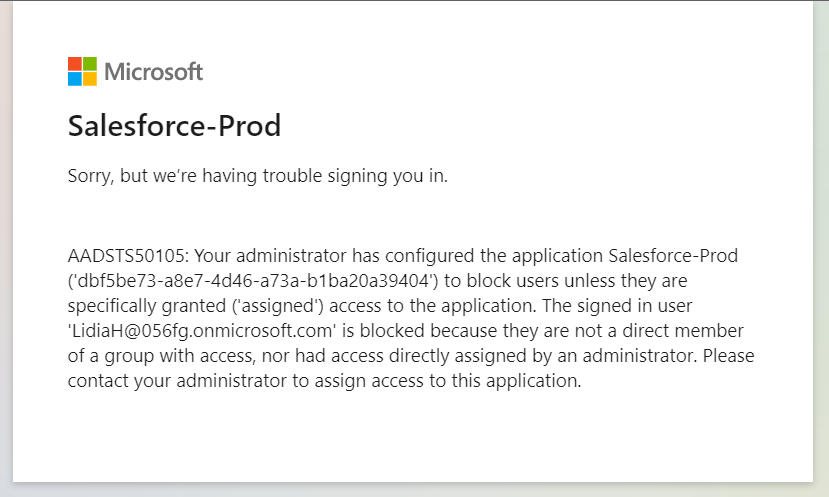
Error: Your administrator has configured the application to block access unless they are specifically granted (“assigned”) access to the application.
Fix: This can be fixed by adding users directly in Users and groups tab of the Salesforce application in Azure AD. It is also a better idea to create group for Salesforce roles and adding users to these groups. This also works better if you have an on-premise AD environment and syncing user to Azure AD.
Or you can set No to the Assignment required? option in the application properties. This way, the user access is managed in Salesforce. But managing user access in Azure AD is lot easier and along with Azure AD P2’s group reviews.
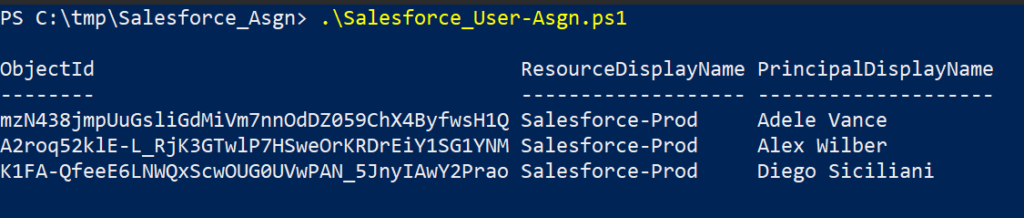
In my scenario, once I added my test user to ‘Salesforce-Standard Users’ Azure AD group I’ve created and assigned a role, the login worked.
login error
I’ve detailed the steps to accomplish this in a different post.
Azure AD Groups assigned to Salesforce Roles
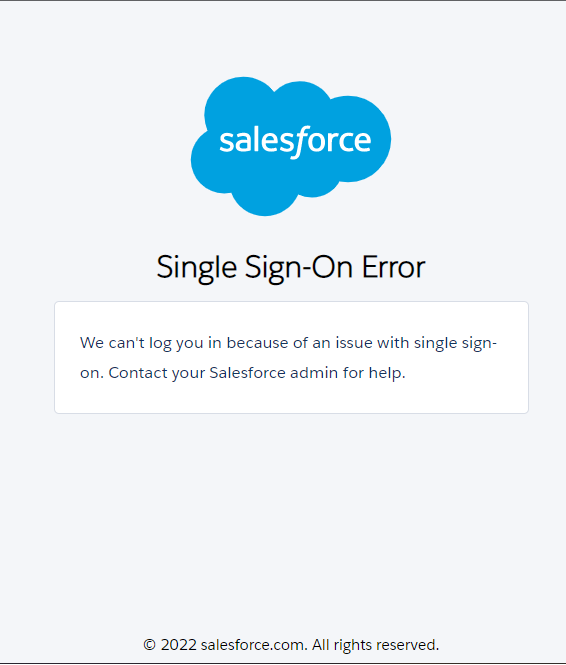
Error: Single Sign-On Error. We can’t log you in because of an issue with single sign-on. Contact your Salesforce admin for help.
Fix: This is a generic error but depending on the issue, it will need more in-depth troubleshooting.
In my scenario, In the SAML Identity Type as Assertion contains the Federation ID from the User object when I was testing JIT, I left this option enabled which caused this error. I set SAML Identity Type as Assertion contains the User’s Salesforce username and it fixed it.
Depending on your scenario, you may have to determine the issue and I use SAML-tracer which is available as extensions for Chrome and Firefox.
Typically the issue is with not having the correct SAML Assertion Fields in the Azure AD application.
Salesforce login error
Hope these steps above in this guide helped you in setting up Azure AD SSO with Salesforce.
I will go over steps on how to export the list of users with their UPN, Object ID, primary SMTP address and Alias email address.
The Get-AzureADUser cmdlet comes in handy to pull all the user details in this scenario. The Mail attribute contains the Primary SMTP address of the user and the Primary SMTP address and Alias email address are stored in the ProxyAddresses attribute in Azure AD. The ProxyAddresses attribute is a multi-value property. The Primary SMTP address can be easily identified as it is in this format, SMTP:user@emaple.com The upper-case SMTP denotes that it the primary email address.
When an object is synced from on-premise Active Directory to Azure AD, the values in the proxyAddresses attribute in AD are compared with Azure AD rules and then populated in Azure AD. So, the values of the proxyAddresses attribute in AD may not match the ProxyAddresses attribute in AzureAD.
Export all users to csv file
The below script will pull all Azure AD users,
Connect-AzureAD

$Output = @() #create an empty array

$AzureADUsers = Get-AzureADUser -All $true | Select DisplayName,UserprincipalName,ObjectId,Mail,ProxyAddresses #Get all Azure AD users

ForEach ($User in $AzureADUsers)
{
	$Output += New-Object PSObject -property $([ordered]@{ #fetch user detail and add to $output
		UserName = $User.DisplayName
		UserprincipalName = $User.UserprincipalName
		UserId = $User.objectId
		SMTPAddress = $User.Mail
		AliasSMTPAddresses = ($User.ProxyAddresses | Where-object {$_ -clike 'smtp:*'} | ForEach-Object {$_ -replace 'smtp:',''}) -join ','

	})
}
$Output | Export-csv "C:\tmp\O365Users_$((Get-Date).ToString("MMddyyyy_HHmmss")).csv" -NoTypeInformation -Encoding UTF8 #Export users to csv file
Microsoft recently announced they will disable basic authentication for all M365 tenants. This deadline has been pushed postponed due to the impact of COVID-19 across the globe.
Latest update: The latest from Microsoft is, effective October 1, 2022 Basic authentication will be disabled in all tenants.
The following components of Exchange Online will be affected,
Exchange Web Services(EWS)
POP
IMAP
Exchange ActiveSync
Remote PowerShell
Why is this a big deal?
Basic authentication uses username and password for client access requests. This used to be the industry standard during the time which organizations didn’t understand the cost of security breaches. It poses a significant security risk as Business Email Compromise (BEC) scams have exposed organizations to billions of dollars in potential losses. Check out this 2019 report from ProofPoint that goes into details.
Disabling Basic Authentication will help protect Exchange Online from brute force or password spray attacks. As the above mentioned report goes into, IMAP-based password-spraying campaigns are very effective in particular.
Beyond all this, Basic Authentication doesn’t enforce MFA and this should be the biggest driver for organizations to move away from it.
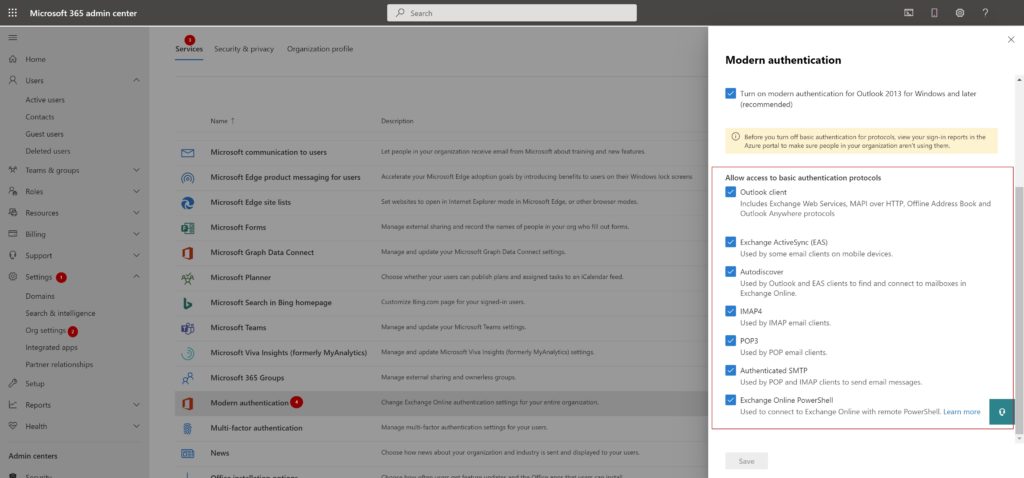
Is Basic Authentication enabled in your tenant?
Here is how to check if Basic Authentication is enabled in your tenant,
Settings –> Org Settings –> Services –> Modern Authentication
Screenshot above shows how to check if ‘Basic Auth’ is enabled in tenant
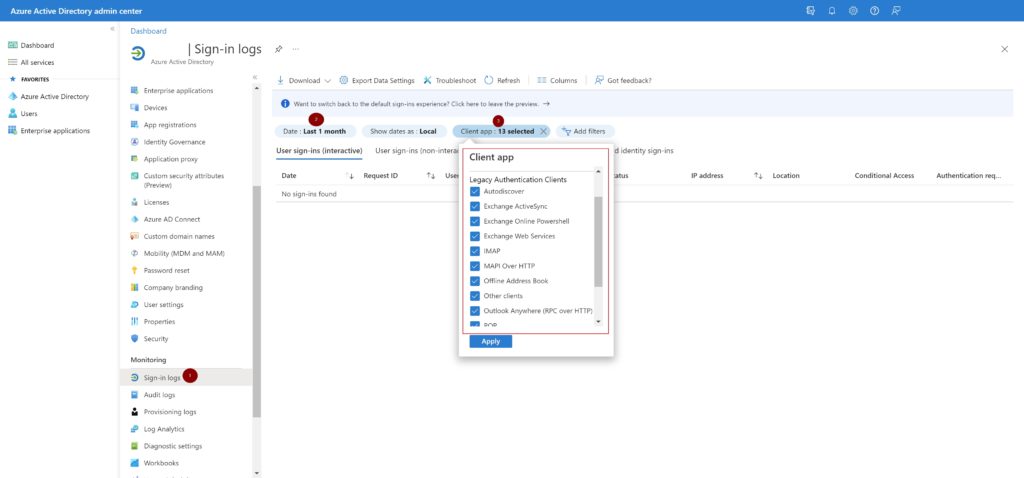
Determine who is using Basic Authentication in your tenant
Before you turn off basic authentication for protocols, view your sign-in reports in the Azure AD portal to determine who is using it in your organization.
This can be determined using sign-in logs in Azure AD.
In your Azure AD admin center, Click the ‘Sign-in logs’ blade.,
Select ‘Last 1 month‘ in the Date
Add a ‘Client app‘ as a second filter, choose all options under the ‘Legacy Authentication Clients‘ and click ‘Apply‘
Azure AD sign-ins | Basic Auth filter
With this report information, you can contact the application and account owners to determine why Basic Authentication is still in use. This information will also come in handy later if you are planning to allow exceptions to these accounts/applications. I’ve covered it later in this post.
Disable Basic Authentication
Before you begin,
Verify Modern Authentication is enabled
Verify your email clients are Modern Authentication capable
In this post, I’ve elaborated how to block Basic Authentication using Azure AD conditional access.
IMO, the easiest method to disable Basic Authentication is to use authentication policies.
With Authentication policies you can,
Apply a default organization level policy that blocks Basic Authentication
Apply a per user policy to allow certain protocols. Example: ActiveSync
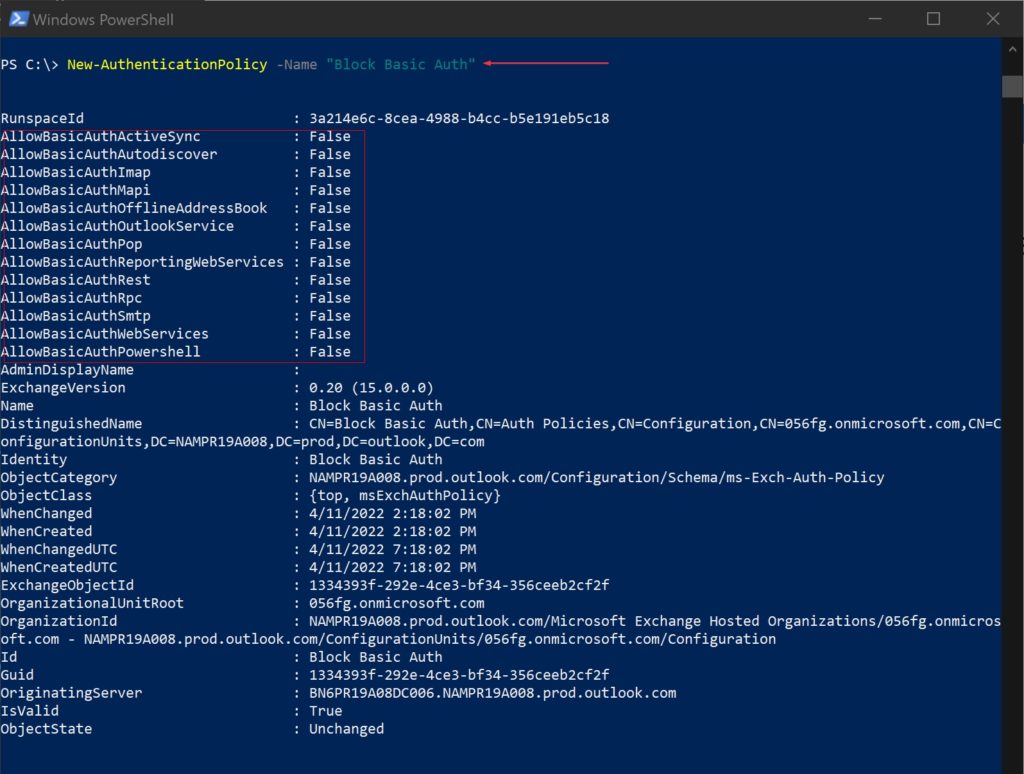
Create Authentication Policy
This creates an authentication policy named ‘Block Basic Auth’
New-AuthenticationPolicy -Name "Block Basic Auth"
When you create a new authentication policy without specifying any protocols, Basic Authentication is blocked for all client protocols in Exchange Online.
The default value of the AllowBasicAuth* parameters (switches) is False for all protocols.
Set Default Authentication Policy
The default policy is assigned to all users in the tenant who don’t have a specific policy assigned to them. To configure the default authentication policy for the organization, use this:
Authentication policies assigned to users take precedence over the default organization policy.
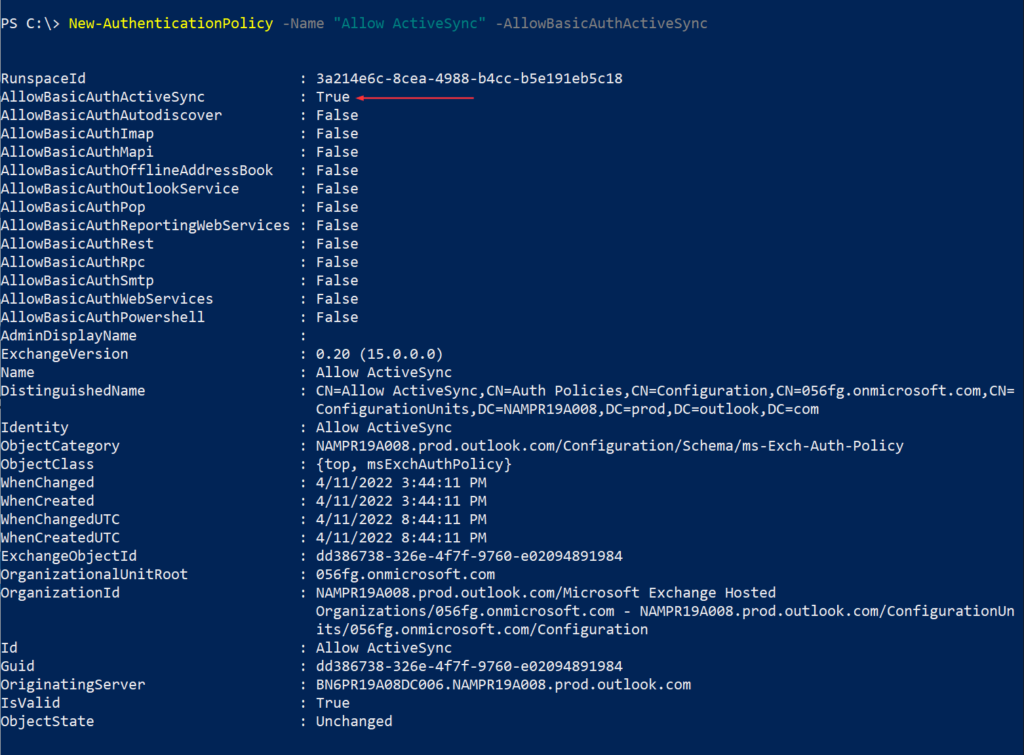
To enable Basic authentication for a specific protocol that’s disabled, specify the switch without a value
To disable Basic authentication for a specific protocol that’s enabled, use the value :$false
In this scenario, I’m creating an authentication policy to allow ActiveSync. This is sometimes typical in organizations where users will have Intune managed devices but would like to add second O365 email from a different tenant. The Outlook app prevents this but the built-in mail app can be used with ActiveSync to fetch email.
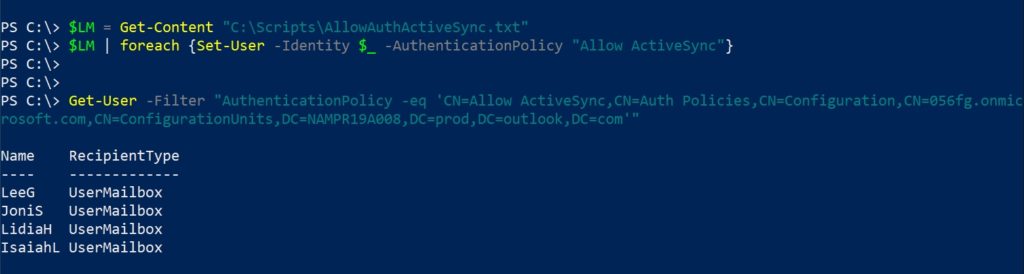
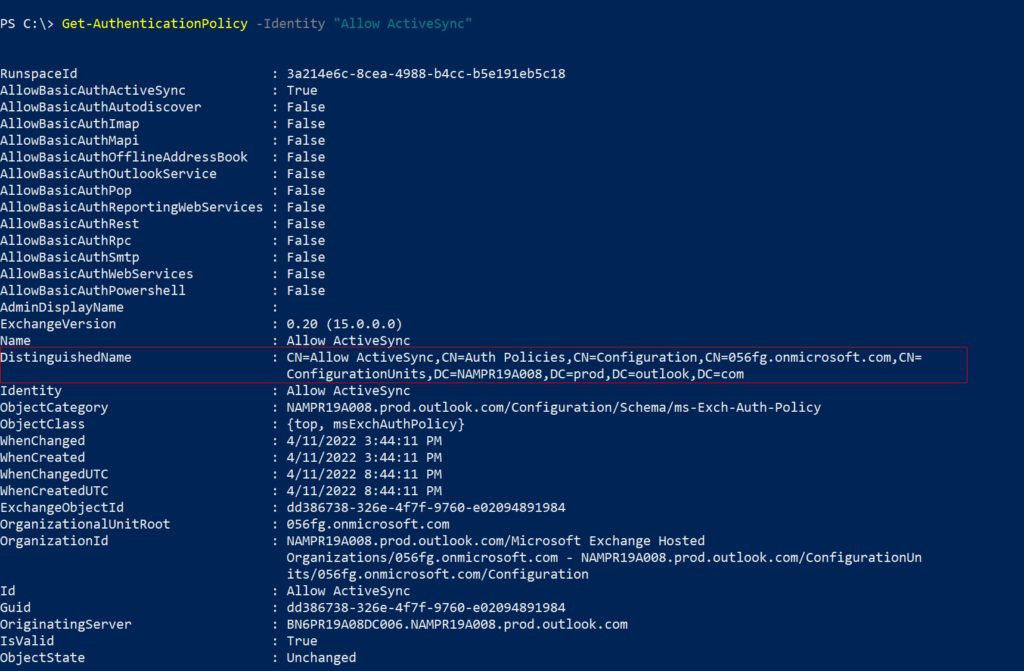
To get all users assigned to a policy you need to get the policy’s DN using the cmdlet Get-AuthenticationPolicy,
$PolicyId = Read-Host "Enter policy ID in distinguished name format"
Get-User -Filter "AuthenticationPolicy -eq '$PolicyId'"
Assign policy to user, confirm and get all users assigned to a policy
Determine policy DN using ‘Get-AuthenticationPolicy’
By default, when you create or change the authentication policy assignment on users or update the policy, the changes take effect within 24 hours. If you want the policy to take effect within 30 minutes, use the following syntax:
This example below immediately applies the authentication policy to multiple users. As I’m in the same PowerShell session and haven’t changed the variables you used to identify the users,