Public folders are meant for shared access and to enable an easy way to collect and share information with other users in an organization. Public folders makes it easier to browse content and users will see the full hierarchy in Outlook using which they can find the content they are looking for.
Public folders can also be used to archive email sent to distribution groups. When a public folder is mail-enabled, and added as a member of the distribution group, email sent to this group is automatically added to the public folder to be referenced later.
Public folders use mailbox infrastructure for high availability and mailbox database storage technologies. This architecture uses specially designed mailboxes to store both public folder hierarchy and the content.
The main component of public folders are the public folder mailboxes. Before creating public folders, we must first create public folder mailboxes. There are two types of public folder mailboxes,
- Primary hierarchy mailbox: This is the one writable copy of the public folder hierarch and is copied to all other public folder mailboxes. The first public folder mailbox created will be the primary hierarchy mailbox in the organization
- Secondary hierarchy mailbox: Additional public folder mailboxes created are secondary hierarchy mailboxes and can also contain content. Is a read-only copy of the public folder hierarchy
Before proceeding further make sure you are connected to Exchange Online,
$o365cred = Get-Credential
Connect-ExchangeOnline -credential $o365cred
To create new public folder mailbox
To create first mailbox that will be the Primary hierarchy mailbox:
$Name = Read-Host "Enter a name for the Public Folder"
New-Mailbox -PublicFolder -Name $Name
To create additional public folder mailboxes that will be Secondary hierarchy mailboxes:
$Name = Read-Host "Enter a name for the Public Folder"
New-Mailbox -PublicFolder -Name $Name
To create public folders
To create a new public folder:
$Name = Read-Host "Enter a name for the Public Folder"
New-PublicFolder -Name $Name
To create a public folder under and existing folder:
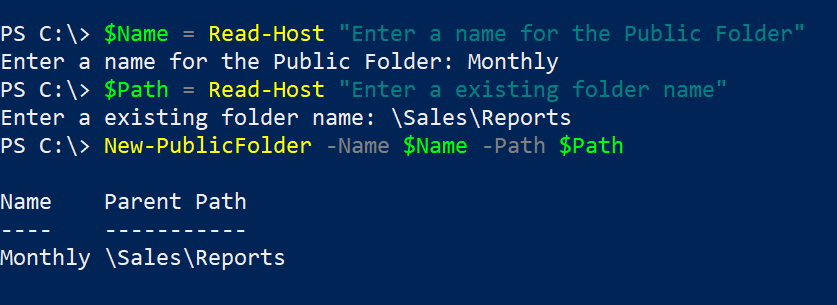
$Name = Read-Host "Enter a name for the Public Folder"
$Path = Read-Host "Enter a existing folder name"
New-PublicFolder -Name $Name -Path $Path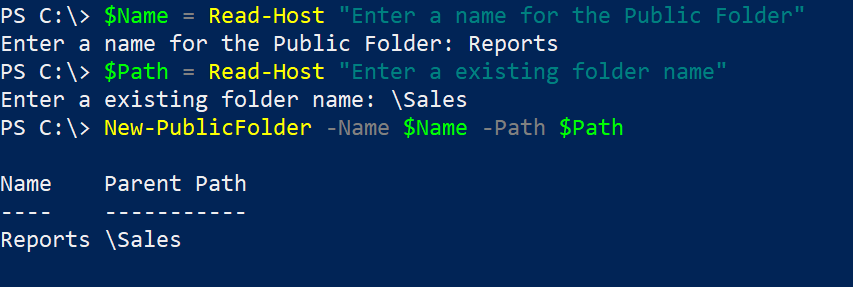
To mail enable a public folder:
$Name = Read-Host "Enter Public Folder which you wish to mail enable"
Enable-MailPublicFolder $Name
To add permissions to a specific user on a public folder:
$Name = Read-Host "Enter name of public folder that you wish to add permissions"
$user = Read-Host "Enter email address of user"
$AccessRights = Read-Host "Enter permissions separated by comma"
$AccessRights = $AccessRights -split ' *, *'
Add-PublicFolderClientPermission -Identity $Name -User $user -AccessRights $AccessRights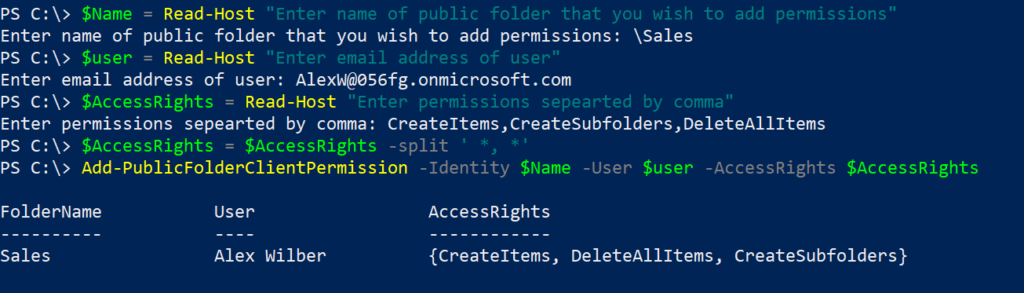
To determine permissions on a specific folder:
$Name = Read-Host "Enter a name for the Public Folder to query permissions"
Get-PublicFolder -Identity $Name | Get-PublicFolderClientPermission | Select Identity, User, AccessRights
Hope this post helped you out.
Thank you for stopping by. ✌