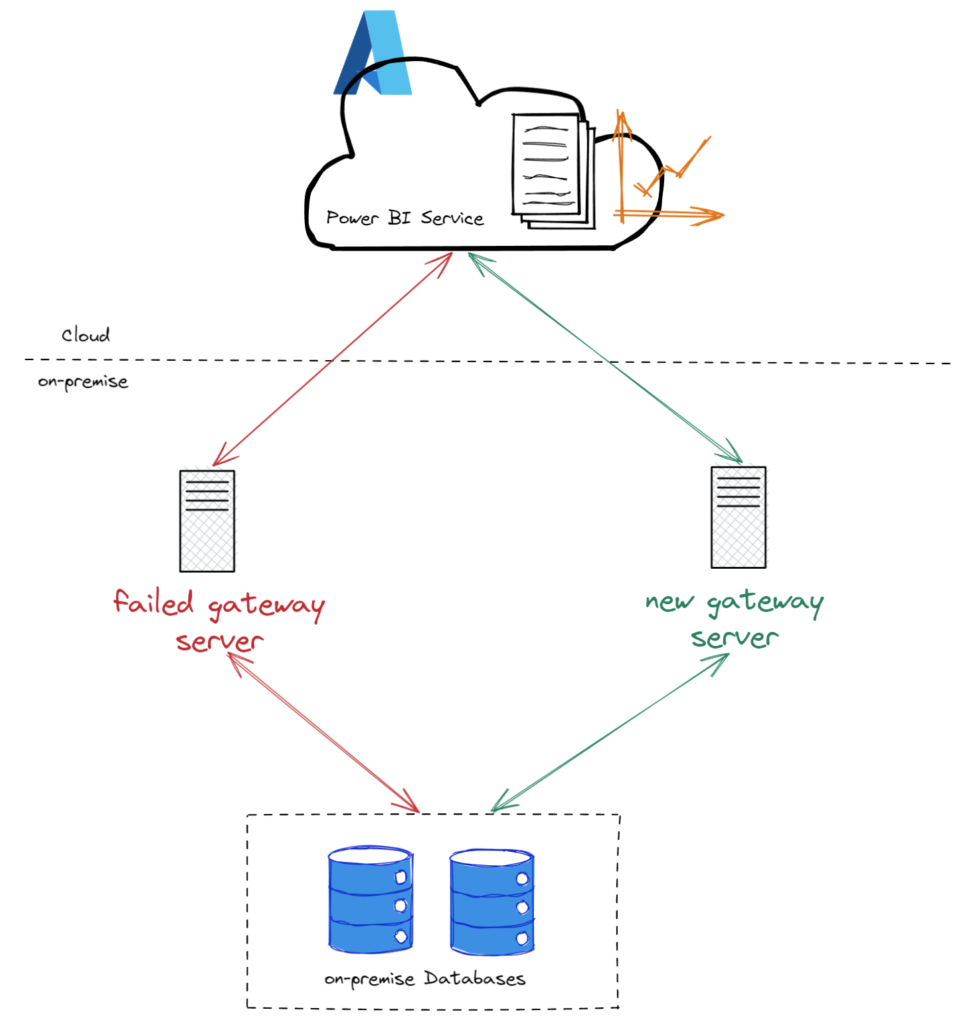
Power BI on-premises data gateway is a service running on a Windows server working as a connecting platform between the Power BI cloud service and the on-premise data sources.
Setting up a data gateway on-premise is fairly a straightforward process. There can be instances where your on-premise gateway fails because of a hardware failure, issues due to updates or you may want to move the gateway instance to a new server then you realize you need the recovery key which is no where to be found.
Without a functioning gateway, the reports and dashboard in the Power BI cloud service with datasets that are connected to on-premise data sources will fail resulting in data to become stale. I’ll elaborate more on this issue in this post on how to restore datasets from an old or failed on-premise gateway to a new gateway.
I faced a similar scenario recently and it was a great learning experience. There are few methods using which you can resolve this issue. I’ll try to cover them all in as much detail as possible.
Manual Method
Well.. If you don’t have too many data sources on-premise or if you are just planning for a quick fix maybe because someone important in your organization needs this fixed and they notified you like an hour before their big meeting.
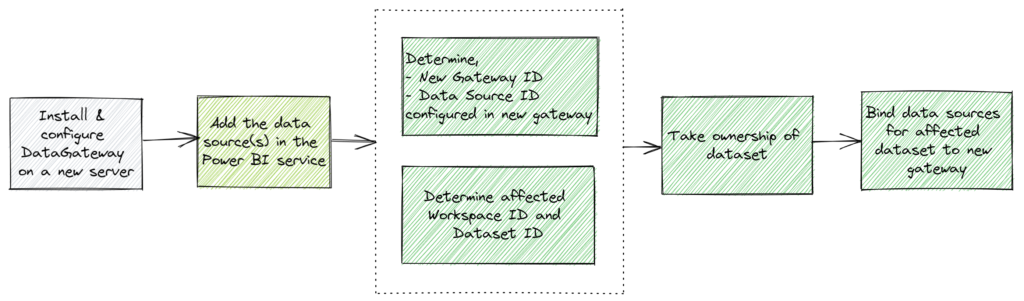
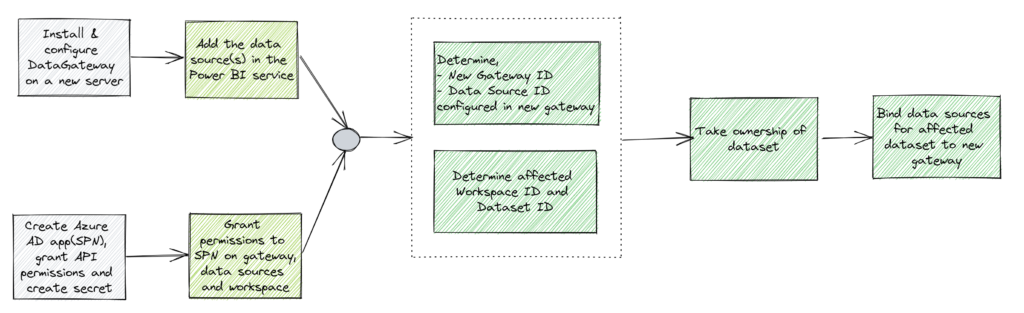
Here are the high-level steps,
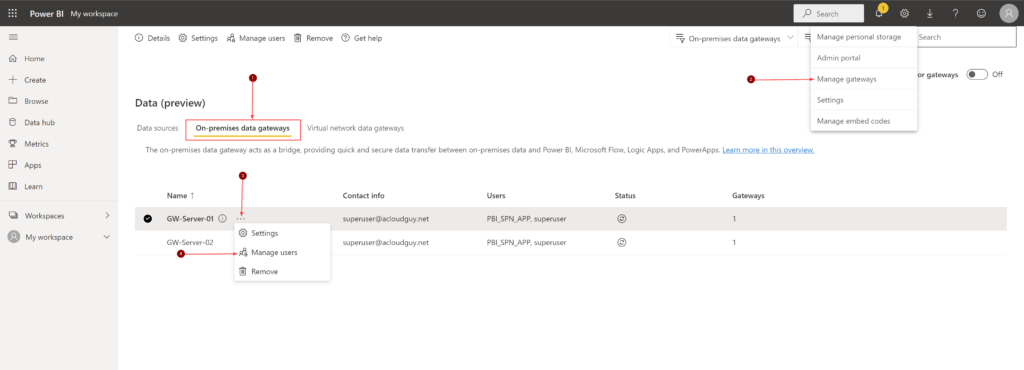
Once you install and configure the data gateway, you can see and manage both the old and new instances from the Power BI portal.
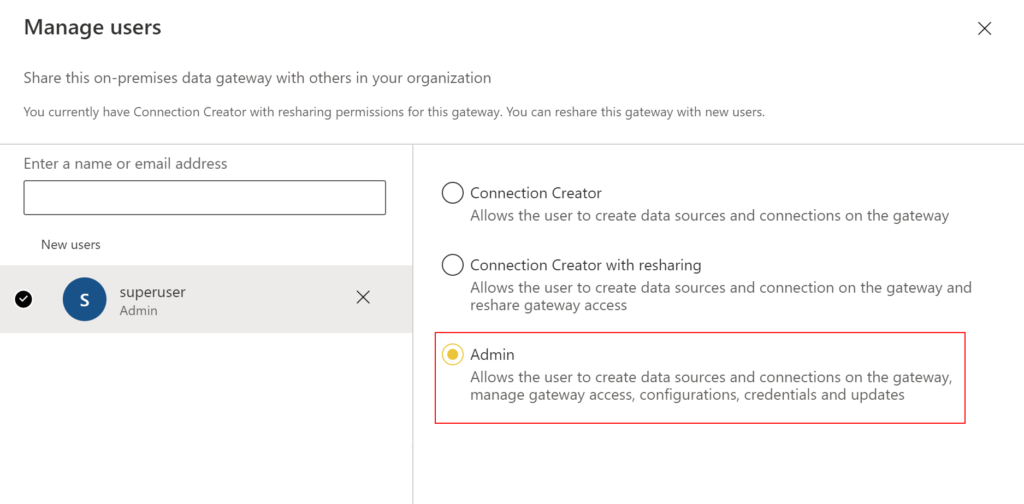
To add a user as admin to the gateway in the portal, follow below steps.
Search user using username or email address, select Admin and click Share.
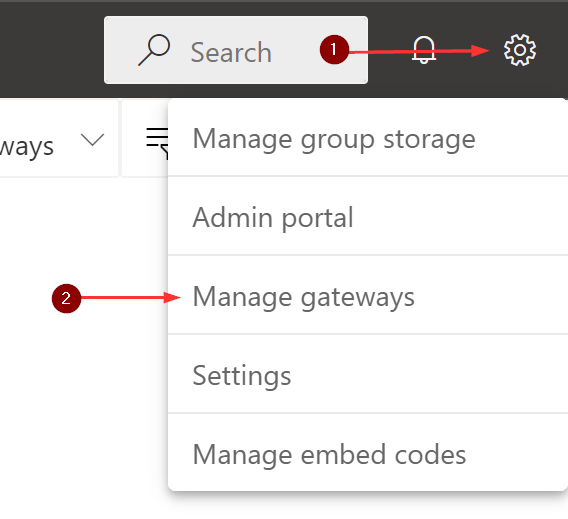
Now to add a new data source, from the page header in the Power BI service, select Settings gear icon > Manage gateways.
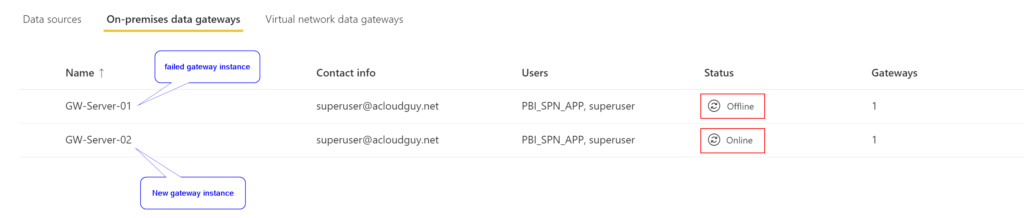
I have highlighted my failed gateway and the new gateway server in my case.
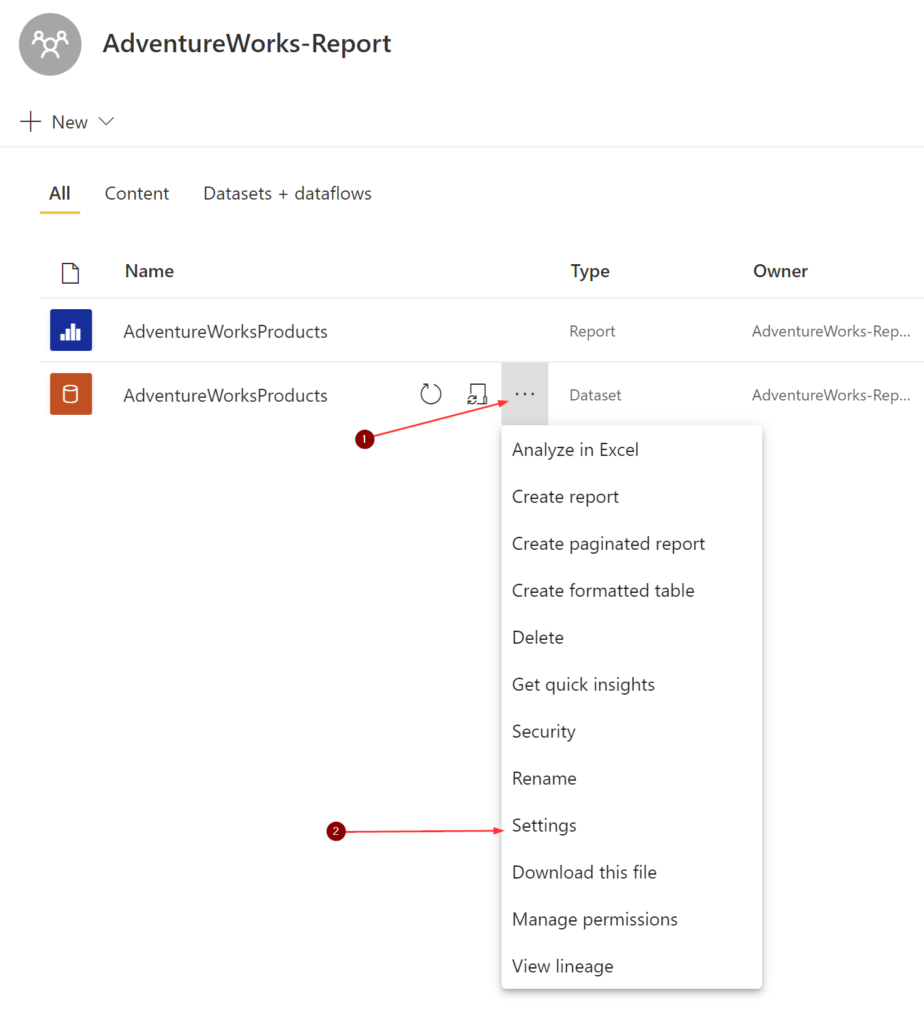
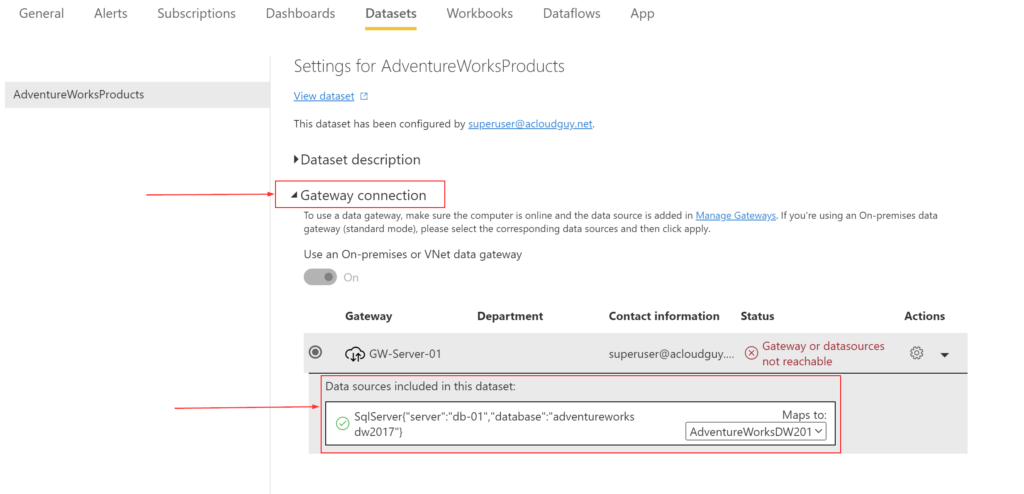
Your next step is to determine the data source of the affected dataset. To get this information, you’ll need access to the workspace. As you can see, I have a report named ‘AdventureWorksProducts‘ and the underlying dataset with the same name.
Under the Gateway connection section, you’ll find the necessary information to setup the data source in the new gateway.
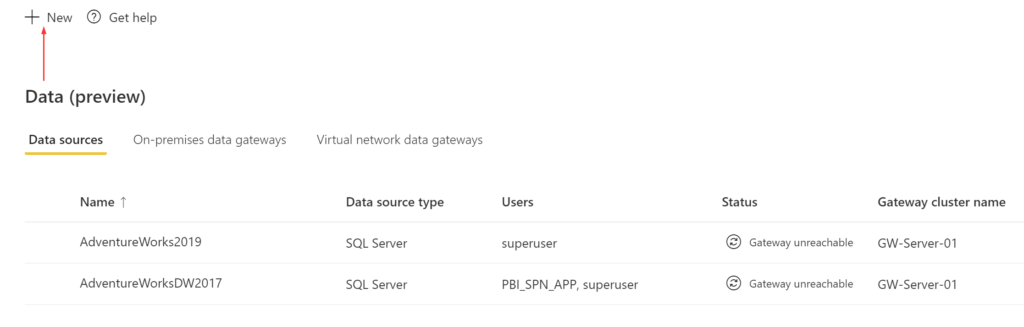
Back in the Manage Gateways page and in the Data sources tab, Click on New
Choose the new gateway to create the connection on, then select the Data source type. In my scenario, I picked SQL Server.
Once you provide all the information, Select Create. You see Created New data source if the process succeeds and a new data source entry like in screenshot below.
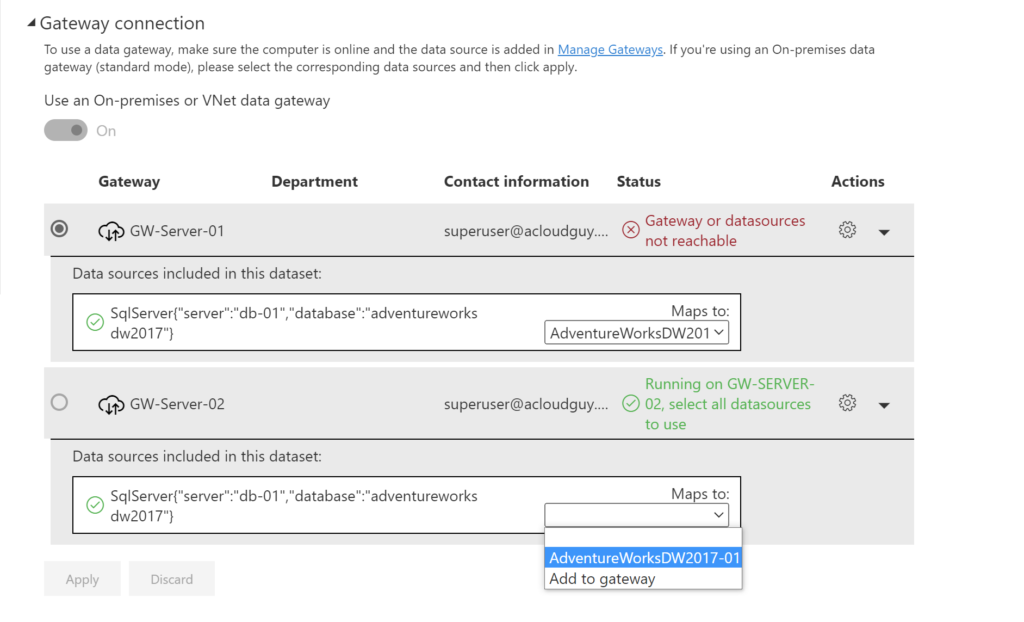
If you’ve made it this far, you are almost at the end of this method. Now back to the dataset’s settings like we did earlier and on to the Gateway connection section. As a reminder, you’ll need access(Admin, Member or Contributor) to the workspace and to the dataset, also keep in mind that you also need admin permissions on the gateway.
You should see the new data source we created listed. Select it from the drop-down and click Apply
That should take care of the connection and to confirm, you can refresh your dataset to make sure the connection works ok.
Like I said earlier, this method should be good in a small environment or if you are in a hurry to get it fixed and worry about the bulk of things later. I’ll cover the semi-automated way in the coming sections. I use the word automated loosely here but it’s more like less clicks and not moving around in the BI portal as much.
Using a Service Account
In this method, I’m using a service account or in other words a regular user account without any roles assigned to it. This can be an AD synced account or a Azure AD cloud only account. This account will need a Power BI Pro license assigned to it.
Here are the high-level steps,
I’ve already covered the adding data source part to the gateway in the earlier section and the process is same for this method too. You can do it with PowerShell or REST APIs but I don’t believe there is a method to copy the data sources from one gateway to another.
Permissions
In this method, I’m using a service account which was granted Admin permissions for the gateways and set as Owner on the data source. You should be able to get away with just having the account set as user on the data source. This service account is also set as Admin on the workspace but Member or Contributor should do the trick.
You can grant the gateway admin permission in the portal which I’ve covered in the earlier method or use the below script to add the user as admin.
Connect-AzureAD
Connect-DataGatewayServiceAccount
Get-DataGatewayAccessToken

Get-DataGatewayCluster
$gw = Read-Host "Enter Gateway ID"
$user = Read-Host "Enter username to be added as gateway admin"
$userToAdd = (Get-AzureADUser -Filter "userPrincipalName eq '$user'").ObjectId
Get-DataGatewayRegion
$Region = Read-Host "Enter region value where IsDefaultPowerBIRegion is set to true"
Add-DataGatewayClusterUser -GatewayClusterId $gw -PrincipalObjectId $userToAdd -AllowedDataSourceTypes $null -Role Admin -RegionKey $Region
With all these permissions, the service account still needs to take ownership of the dataset to finish rebinding the data source to the new gateway. You won’t have to manually take ownership of the dataset, the script below will do it for you on the dataset you specify.
Rebind dataset
Before proceeding further make sure you have the Microsoft Power BI Cmdlets for PS installed and logged in to the Power BI service using PowerShell,
Connect-PowerBIServiceAccount
Get-PowerBIAccessToken
I don’t do Power BI administration on a daily basis and there was a learning curve for me to understand the inner workings. Here is the thought process that went into building this script.
- Get all the gateways the service account has access to
- Using the output, determine and copy the new gateway ID and store it in a variable
- Using the variable from earlier step, return a list of data sources from the new gateway
- Using the output, determine and copy the data source ID where the affected dataset should be mapped to and store it in a variable
- Returns a list of workspaces the user has access to
- Using the output, determine and copy the workspace ID which has the affected dataset
- Using the variable from earlier step, return list of datasets from the specified workspace
- Using the output, determine and copy the affected dataset’s ID
- Using the variable from step 3 and step 4, transfer ownership over the specified dataset to the service account
- Using variable from steps 1, 2, 3 and 4, bind the specified dataset from the specified workspace to the new gateway
$gateways = Invoke-PowerBIRestMethod -Url "gateways" -Method Get | ConvertFrom-Json
$gateways.value
Write-Host "Please copy the new Gateway ID from above output" -ForegroundColor Red
$newGWID = Read-Host "Please paste the new Gateway ID"

$GWdatasources = Invoke-PowerBIRestMethod -Url "gateways/$($newGWID)/datasources" -Method Get | ConvertFrom-Json
$GWdatasources.value
Write-Host "Please note down the Data Source ID used by the dataset that needs to be migrated from above output" -ForegroundColor Red
$datasourceObjectIds = Read-Host "Please paste the Data source ID"

$ws = Invoke-PowerBIRestMethod -Url 'groups' -Method Get | ConvertFrom-Json
$ws.value
Write-Host "Please note down the Workspace ID which has the dataset that needs to be migrated from above output" -ForegroundColor Red
$wsID = Read-Host "Please paste the Workspace ID"

$dataset = Invoke-PowerBIRestMethod -Url "groups/$($wsID)/datasets" -Method Get | ConvertFrom-Json
$dataset.value
Write-Host "Please note down the dataset ID that needs to be migrated from above output" -ForegroundColor Red
$dsID = Read-Host "Please paste the dataset ID"

#This below line is not needed if the service account already has ownership of the dataset and is safe to comment out
Invoke-PowerBIRestMethod -Url "https://api.powerbi.com/v1.0/myorg/groups/$($wsID)/datasets/$($dsID)/Default.TakeOver" -Method POST

try { $body = "{
  'gatewayObjectId': '$newGWID',
  'datasourceObjectIds': [
    '$datasourceObjectIds'
  ]
}"

Invoke-PowerBIRestMethod -Url "https://api.powerbi.com/v1.0/myorg/groups/$($wsID)/datasets/$($dsID)/Default.BindToGateway" -Body $body -Method POST
Write-Host "Dataset updated" }

catch {
  Write-Host "An error occurred"
}
You can adjust this script according to your needs as in some instances, your gateway ID, new data source ID and workspace ID will be the same, only the affected dataset ID will vary.
Using a Service Principal
In this method, I’m using a service principal to accomplish the same as above. One added advantage of using this method is, the Power BI Dataset can be setup to refresh without an actual user account. This would be great from an automation point of view and to avoid being tied to a specific user.
Here are the high-level steps,
Create SPN
The az ad app is part of Azure CLI and not a PS cmdlet. You’ll need to have Azure CLI installed and do az login as well before running this.
Connect-AzureAD
Connect-AzAccount
az login
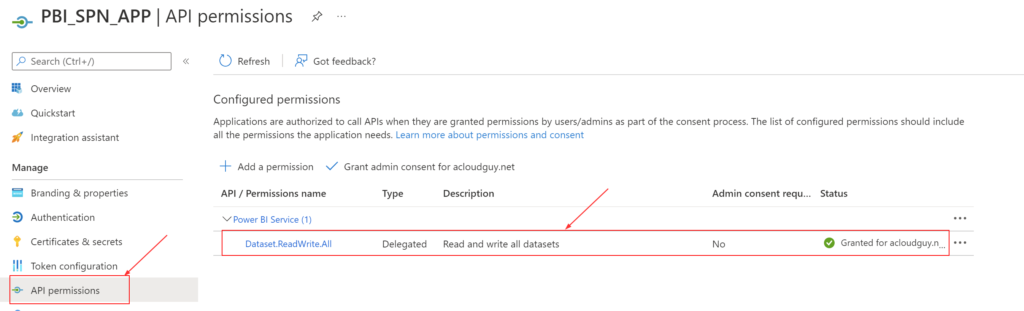
You can create an Azure AD application which will be the service principal from the portal and grant the and grant the ‘Dataset.ReadWrite.All’ API permission or use the below lines to create it. I’ve detailed how to determine the API ID and Permission ID in this blog post here.
A new Azure AD group is also needed and the Azure AD application has be made a member of this group. The below lines will accomplish that and if you have an existing group you have in mind, you can use that too. I’ll go over the reason for creating this group later in this section.
$appname = Read-Host "Enter a name Azure AD Application's Display Name"
$ObjID = New-AzureADApplication -DisplayName $appname | Select ObjectId
Add-AzADAppPermission -ObjectId $ObjID.ObjectId -ApiId 00000009-0000-0000-c000-000000000000 -PermissionId 322b68b2-0804-416e-86a5-d772c567b6e6 -Type Scope
Start-Sleep -Seconds 60
az ad app permission admin-consent --id $ObjID.ObjectId
Get-AzureADApplication -Filter "DisplayName eq '$appname'" | fl

$grpName = Read-Host "Enter a name for new Azure AD group"
$grpID = (New-AzureADGroup -DisplayName $grpName -MailEnabled $false -SecurityEnabled $true -MailNickName "NotSet").ObjectId
Get-AzureADGroup -ObjectId $grpID
Add-AzureADGroupMember -ObjectId $grpID -RefObjectId $spnToAdd
Get-AzureADGroupMember -ObjectId $grpID
The Get-AzureADApplication cmdlet will list the API permissions we applied. This can be verified in the ‘App registrations‘ blade from the Azure AD portal too.
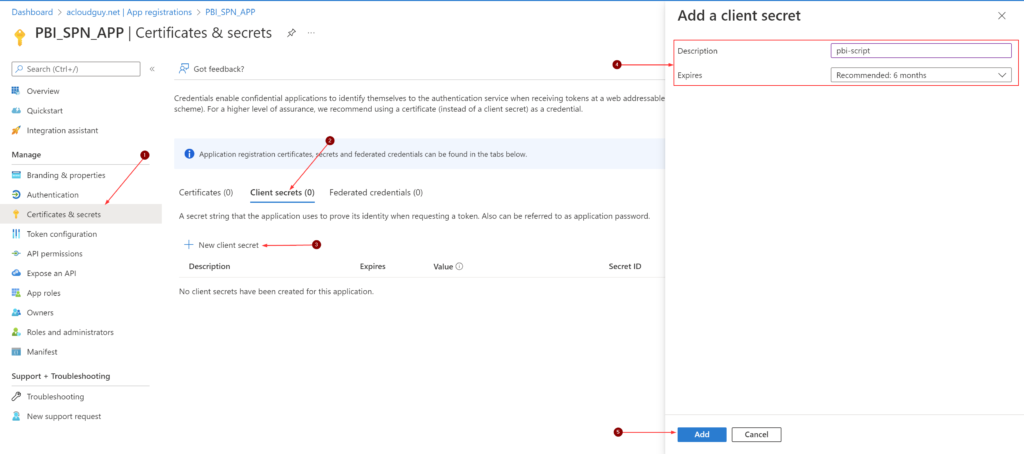
Create a new Secret in this Azure AD application. You can also achieve this by using PowerShell. This secret value is needed for authentication while running the script later this section.
Remember to copy the secret value as it’ll be masked forever.
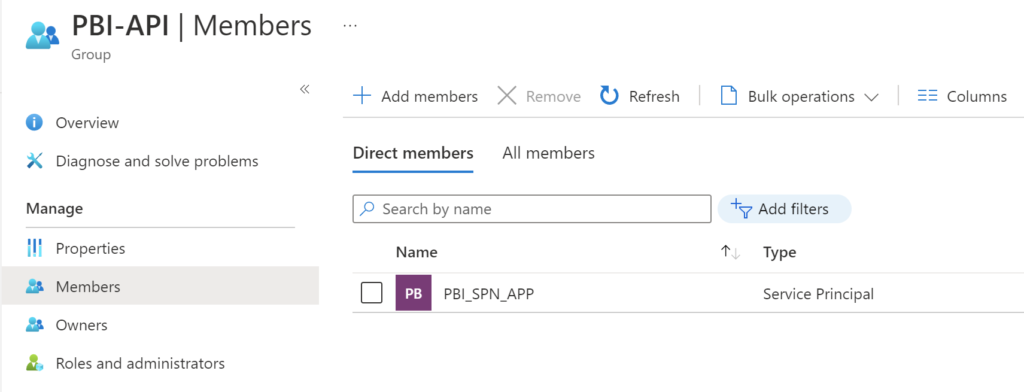
And we can also make sure of the group we created and it’s membership. I named the group, ‘PBI-API‘ in Azure AD.
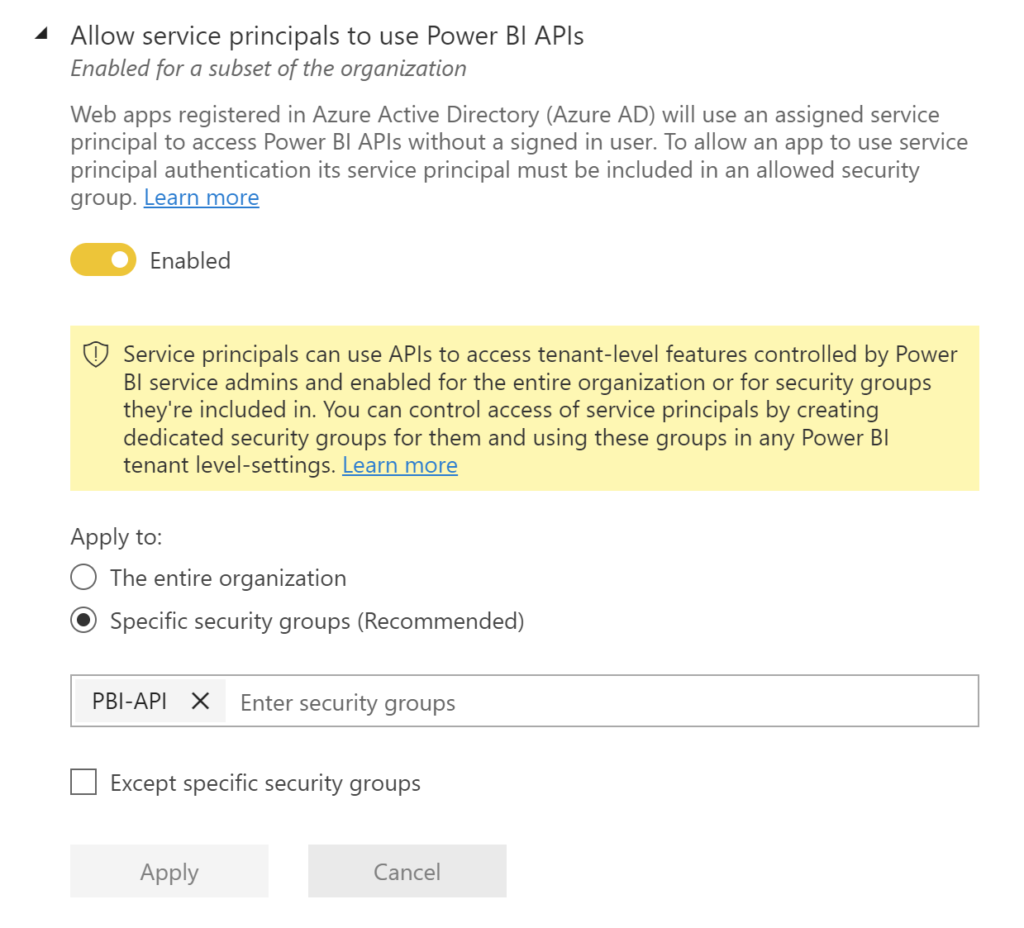
For an Azure AD app to be able to access the Power BI content and APIs, the following settings need to be enabled in Azure AD portal. This is where the Azure AD group comes into play.
Go to Tenant settings in the Power BI Admin portal, and scroll down to Developer settings
- Enable the Allow service principals to use Power BI APIs
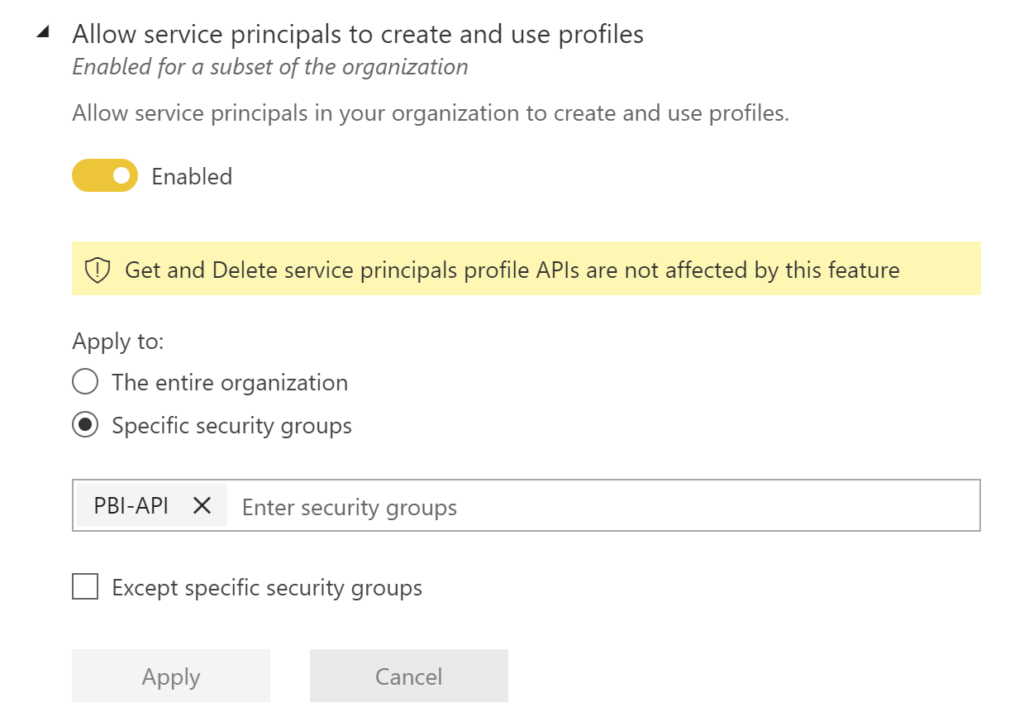
- Enable the Allow service principals to create and use profiles
Create SPN profile
I noticed that the SPN way of doing things worked in one instance without having a service principal profile created by the service principal. Profiles can be created using Profiles REST API. I’ve included the below lines which will create a profile for the SPN.
$prof = Read-Host "Enter a name for SPN's profile"

$body = "{
    'displayName' : '$prof'
}"

Invoke-PowerBIRestMethod -Url 'https://api.powerbi.com/v1.0/myorg/profiles' -Body $body -Method POST
A service principal can also call GET Profiles REST API to get a list of its profiles.
Invoke-PowerBIRestMethod -Url 'profiles' -Method Get
Permissions
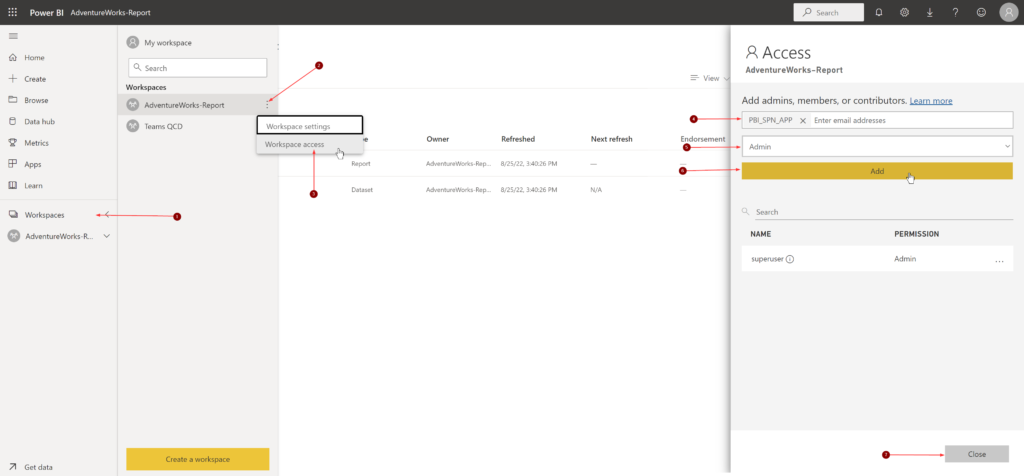
Next, the service principal needs permissions on the dataset. We can achieve this by granting permissions to the service principal on the workspace.
Note: Adding the Azure AD group that has SPN as members doesn’t work
This next step is kind of where things get tricky.
What are we trying to achieve here?
- Grant the service principal, admin permissions on the new gateway
- Grant the service principal, user permissions on the gateway data source
Reason why it is tricky is, I first tried adding the Azure AD group the above permissions and it allowed me to add it but the script which comes later in this section didn’t work as expected. Based on further research, I realized that the SPN needs to be granted the above access directly instead of using the Azure AD group. Also, at the time of writing this post, adding SPN the above permissions using the portal is not supported. Hence, we’ll have to use PowerShell cmdlets,
Before proceeding further, please connect to the AzAccount and PowerBIService using the below cmdlets,
Connect-AzAccount
Connect-PowerBIServiceAccount
Get-PowerBIAccessToken
The below script will add the permissions I mentioned above and display the same at the end of executing the cmdlets. One good thing about the part where you add permissions to the gateway, data sources and workspaces is, it is a one-time deal.
Get-DataGatewayCluster
$gw = Read-Host "Enter Gateway ID"
$spn = Read-Host "Enter App name to be added as gateway admin"
$spnToAdd = (Get-AzADServicePrincipal -DisplayName $spn).Id
Get-DataGatewayRegion
$Region = Read-Host "Enter region value where IsDefaultPowerBIRegion is set to true"
Add-DataGatewayClusterUser -GatewayClusterId $gw -PrincipalObjectId $spnToAdd -AllowedDataSourceTypes $null -Role Admin -RegionKey $Region
Get-DataGatewayCluster -GatewayClusterId $gw | Select -ExpandProperty Permissions | ft
Get-DataGatewayClusterDatasource -GatewayClusterId $gw
$gwDSID = Read-Host "Enter Gateway Cluster DatasourceId"
Add-DataGatewayClusterDatasourceUser -GatewayClusterId $gw -GatewayClusterDatasourceId $gwDSID -DatasourceUserAccessRight Read -Identifier $spnToAdd
Get-DataGatewayClusterDatasourceUser -GatewayClusterId $gw -GatewayClusterDatasourceId $gwDSID
With all the permissions for the SPN now in place, we are ready to take ownership of the affected datasets in the workspaces and bind it with the new data source on the new gateway
Rebind dataset
In this SPN method, Instead of logging in with a username and password, you’ll have to login with the Application ID and secret
$Tenant = Read-Host "Enter Azure AD Tenant ID"
Connect-PowerBIServiceAccount -Tenant $Tenant -ServicePrincipal -Credential (Get-Credential) #user = Application (client) ID | Password is the secret value we created earlier in this section
Get-PowerBIAccessToken
The script is pretty much the same as in earlier section but only runs in the SPN context.
$gateways = Invoke-PowerBIRestMethod -Url "gateways" -Method Get | ConvertFrom-Json
$gateways.value
Write-Host "Please copy the new Gateway ID from above output" -ForegroundColor Red
$newGWID = Read-Host "Please paste the new Gateway ID"

$GWdatasources = Invoke-PowerBIRestMethod -Url "gateways/$($newGWID)/datasources" -Method Get | ConvertFrom-Json
$GWdatasources.value
Write-Host "Please note down the Data Source ID used by the dataset that needs to be migrated from above output" -ForegroundColor Red
$datasourceObjectIds = Read-Host "Please paste the Data source ID"

$ws = Invoke-PowerBIRestMethod -Url 'groups' -Method Get | ConvertFrom-Json
$ws.value
Write-Host "Please note down the Workspace ID which has the dataset that needs to be migrated from above output" -ForegroundColor Red
$wsID = Read-Host "Please paste the Workspace ID"

$dataset = Invoke-PowerBIRestMethod -Url "groups/$($wsID)/datasets" -Method Get | ConvertFrom-Json
$dataset.value
Write-Host "Please note down the dataset ID that needs to be migrated from above output" -ForegroundColor Red
$dsID = Read-Host "Please paste the dataset ID"

Invoke-PowerBIRestMethod -Url "https://api.powerbi.com/v1.0/myorg/groups/$($wsID)/datasets/$($dsID)/Default.TakeOver" -Method POST

try { $body = "{
  'gatewayObjectId': '$newGWID',
  'datasourceObjectIds': [
    '$datasourceObjectIds'
  ]
}"

Invoke-PowerBIRestMethod -Url "https://api.powerbi.com/v1.0/myorg/groups/$($wsID)/datasets/$($dsID)/Default.BindToGateway" -Body $body -Method POST
Write-Host "Dataset updated" }

catch {
  Write-Host "An error occurred"
}
Similar to the earlier section, you can adjust this script according to your needs as in some instances, your gateway ID, new data source ID and workspace ID will be the same, only the affected dataset ID will vary.
Needless to say, you can test if this was successful by doing a ‘Refresh now‘ on the dataset.
Issues you may encounter and How to fix it
Issue: You may encounter below status codes while running the Invoke-PowerBIRestMethod
Response status code : 404 (Not Found)
Response status code : 400 (Bad Request)
Fix or workaround: Well.. If you’ve already browsed though community.powerbi.com, then might have already realized that you are not alone dealing with these error codes. Usually this means you are requesting the Power BI REST API endpoints for data that doesn’t exist or you or the SPN that’s requesting the resource doesn’t have the necessary permissions to it. These best way to troubleshoot is to run these requests one at a time to determine where you it is failing or understand which resource you don’t have permissions to.
Issue: Applied permissions don’t reflect in the portal
Fix or workaround: I noticed that some of the changes takes time. Give it a few minutes before you go changing more things and you lose track of all the things you’ve changed in the process. If the permissions still didn’t show up for a while, use PowerShell cmdlets to verify if the permissions you’ve set was applied or not.
I’ll keep experimenting other scenarios and I’ll update the issues I come across later on.
This was one of those really lengthy posts but hey..as long as there is a solution at the end..Hopefully..am I right?..😁🤷♂️
Thank you for stopping by.✌