In Azure AD you can create dynamic groups based on user or device properties. Users or devices can be automatically added or removed based on the group’s definition, so you don’t have to maintain the list of users in this group manually.
Whenever any property of a user or device changes, all dynamic group rules in your Azure AD tenant are reevaluated to determine if the user or device should still remain in the group. If a user or device satisfies a rule on a group, they are added as a member and If they no longer satisfy the rule, they are removed.
Manually adding or removing users from dynamic groups is not allowed.
Table of Contents
Why use Dynamic Groups?
Simply put, dynamic groups have query-based memberships. This helps in maintaining group membership and application access depending on the query defined. For example, A dynamic group can be defined for all Marketing department users based on the value filled in the ‘department’ attribute. The conditions can also be combined. Following the same example above, a dynamic group of all Marketing department users from New York or a dynamic group with a list of users who report to a specific manager and need access to an application.
In a scenario where you are maintaining user access to applications based on the department, location, this comes in handy.
Note: You need Azure AD P1 and above to be able to create dynamic groups.
Dynamic Groups in Azure AD
Azure AD admin center provides a rule builder to create and/or update the dynamic group rules.
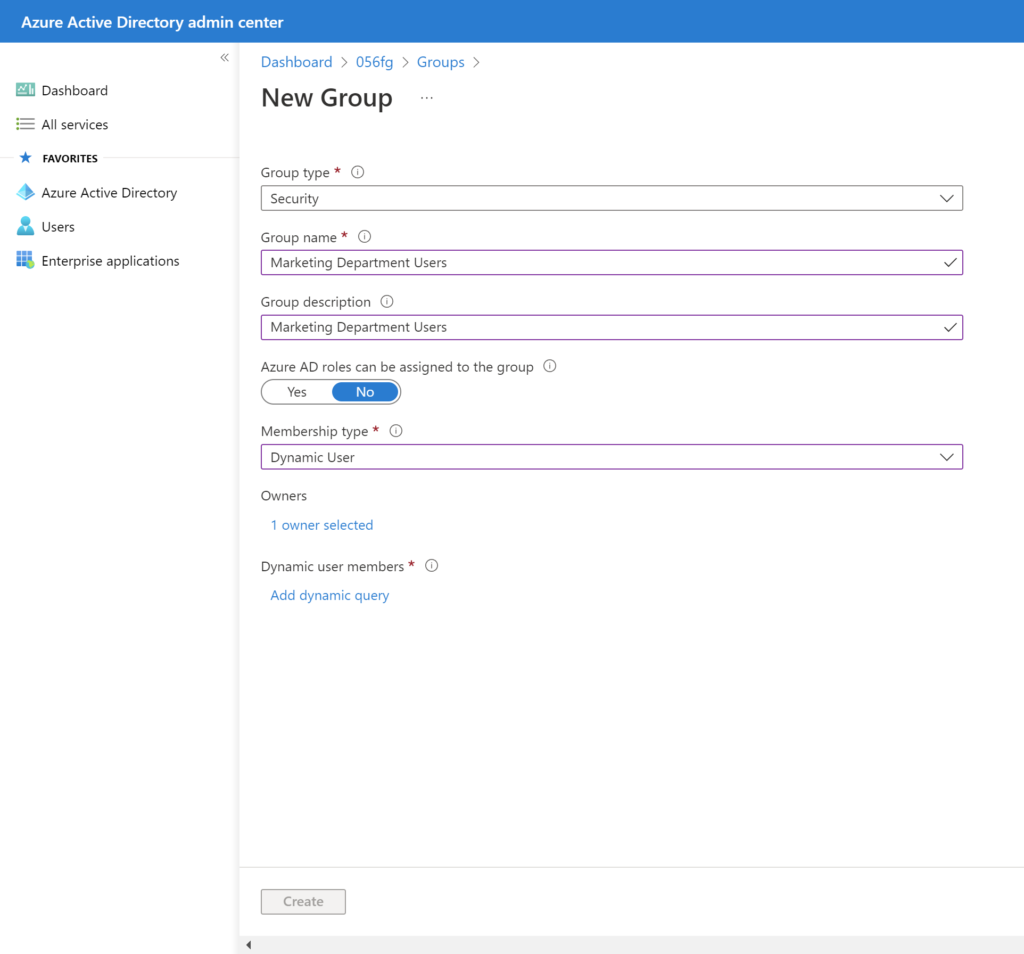
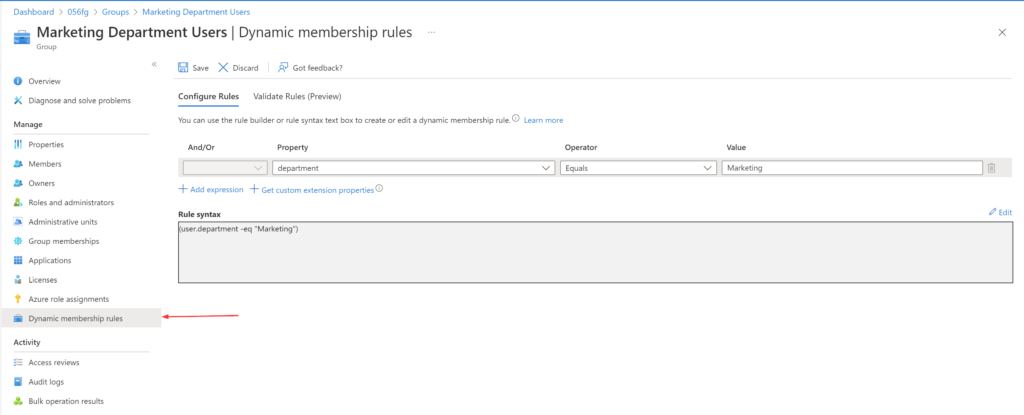
In the below steps I’ll create a dynamic group in my tenant with users who are in the Marketing department,
- Sign in to the Azure AD admin center portal (https://aad.portal.azure.com/) as global administrator
- Select Azure Active Directory –> Click on the Groups tab –> New group
- In New Group:
- Select Security as the group type
- Enter ‘Marketing Department Users’ as the name and description for the group
- Change Membership type to Dynamic User
- Select Owners and in the Add Owners blade search for any desired owners. Click on the desired owners to add to the selection
- Click Select to close the Add Owners blade
- Click Add dynamic query in the Dynamic user members
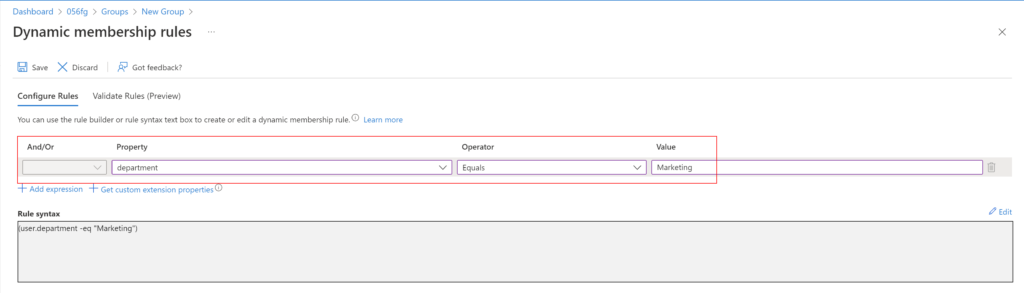
- On the Dynamic membership rules blade:
- In the Property field, click on the existing value and select department
- The Operator field as Equals
- Select the Value field and type ‘Marketing Department Users’
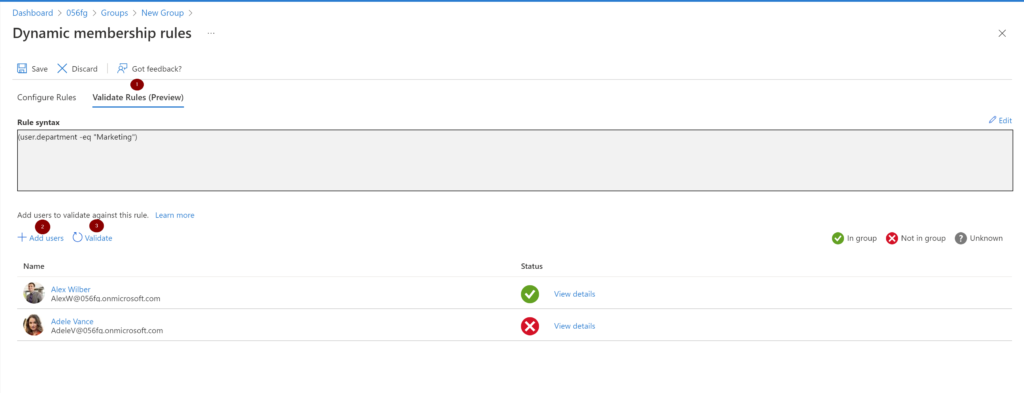
Azure AD now provides an option to validate dynamic group rules. On the Validate rules tab, you can validate your dynamic rule against sample group members to confirm the rule is working as expected. This feature is now in public preview.
The rule builder supports the construction of up to 5 expressions. You also need to use the text editor for setting operator precedence, and for writing more complex rules. The rule builder can’t be used to reproduce every rule.
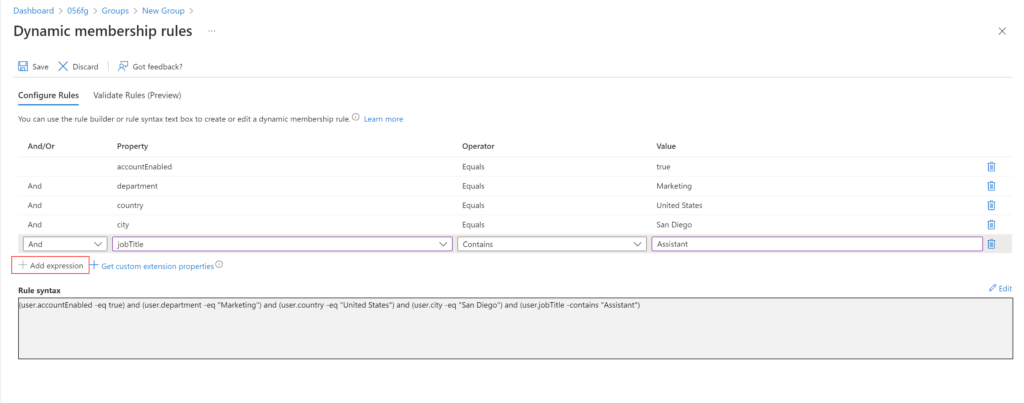
If the rule builder doesn’t support the rule you want to create, the text box can be used. And below are some of the scenarios to use the text box,
- Rule with more than 5 expressions
- Direct reports rule
- For the rule to work, make sure the Manager property is set correctly for users. If you are syncing from your on-premise AD, make sure the Manager attribute is filled
- When the manager’s direct reports change in the future, the group’s membership is adjusted automatically
- This rule can’t be combined with any other membership rules
- Setting operator precedence
- All operators are listed below in order of precedence from highest to lowest. Operators on same line are of equal precedence:
- -eq -ne -startsWith -notStartsWith -contains -notContains -match –notMatch -in -notIn
- -not
- -and
- -or
- -any -all
- All operators are listed below in order of precedence from highest to lowest. Operators on same line are of equal precedence:
- Rules with complex expressions
- Property consists of a collection of values; specifically, multi-valued properties
- assignedPlans
- proxyAddresses
- Expressions use the -any and -all operators
- -any (At least one item in the collection matches the condition)
- -all (All items in the collection match the condition)
- Value of the expression can itself be one or more expressions
- Property consists of a collection of values; specifically, multi-valued properties
Constructing a membership rule
Three parts of a simple rule are Property, Operator and Value
Supported properties
Three types of properties that can be used to construct a rule are Boolean, String and String collection.
The following are the user properties that can be used to create a single expression.
Boolean
| Properties | Allowed values | Usage |
| accountEnabled | true false | user.accountEnabled -eq true |
| dirSyncEnabled | true false | user.dirSyncEnabled -eq true |
String
| Properties | Allowed values | Usage |
| city | Any string value or null | (user.city -eq “value”) |
| country | Any string value or null | (user.country -eq “value”) |
| companyName | Any string value or null | (user.companyName -eq “value”) |
| department | Any string value or null | (user.department -eq “value”) |
| displayName | Any string value | (user.displayName -eq “value”) |
| employeeId | Any string value | (user.employeeId -eq “value”) (user.employeeId -ne null) |
| facsimileTelephoneNumber | Any string value or null | (user.facsimileTelephoneNumber -eq “value”) |
| givenName | Any string value or null | (user.givenName -eq “value”) |
| jobTitle | Any string value or null | (user.jobTitle -eq “value”) |
| Any string value or null (SMTP address of the user) | (user.mail -eq “value”) | |
| mailNickName | Any string value (mail alias of the user) | (user.mailNickName -eq “value”) |
| mobile | Any string value or null | (user.mobile -eq “value”) |
| objectId | GUID of the user object | (user.objectId -eq “11111111-eeee-1111-aaaa-111111111111”) |
| onPremisesSecurityIdentifier | On-premises security identifier (SID) for users who were synchronized from on-premises to the cloud. | (user.onPremisesSecurityIdentifier -eq “S-1-1-11-1111111111-1111111111-1111111111-1111111”) |
| passwordPolicies | None DisableStrongPassword DisablePasswordExpiration DisablePasswordExpiration, DisableStrongPassword | (user.passwordPolicies -eq “DisableStrongPassword”) |
| physicalDeliveryOfficeName | Any string value or null | (user.physicalDeliveryOfficeName -eq “value”) |
| postalCode | Any string value or null | (user.postalCode -eq “value”) |
| preferredLanguage | ISO 639-1 code | (user.preferredLanguage -eq “en-US”) |
| sipProxyAddress | Any string value or null | (user.sipProxyAddress -eq “value”) |
| state | Any string value or null | (user.state -eq “value”) |
| streetAddress | Any string value or null | (user.streetAddress -eq “value”) |
| surname | Any string value or null | (user.surname -eq “value”) |
| telephoneNumber | Any string value or null | (user.telephoneNumber -eq “value”) |
| usageLocation | Two lettered country/region code | (user.usageLocation -eq “US”) |
| userPrincipalName | Any string value | (user.userPrincipalName -eq “alias@domain”) |
| userType | member guest null | (user.userType -eq “Member”) |
String Collection
| Properties | Allowed values | Usage |
| otherMails | Any string value | (user.otherMails -contains “alias@domain”) |
| proxyAddresses | SMTP: alias@domain smtp: alias@domain | (user.proxyAddresses -contains “SMTP: alias@domain”) |
Supported expression operators
Operators can be used with or without the hyphen (-) prefix. Contains operator does partial string matches but not item in a collection matches. Following are the supported operators and their syntax for a single expression,
| Syntax | Operator |
| -ne | Not Equals |
| -eq | Equals |
| -notStartsWith | Not Starts With |
| -startsWith | Starts With |
| -notContains | Not Contains |
| -contains | Contains |
| -notMatch | Not Match |
| -match | Match |
| -in | In |
| -notIn | Not In |
Supported values
Values used in an expression can consist of several types, including:
- Strings
- Boolean = true or false
- Numbers
- Arrays = number array, string array
To specify a null value in a rule, you can use the null value. The -not operator can’t be used as a comparative operator for null.
Common rules in a typical environment
Below, I will go over some of the rules that are typically used in production environments
“Direct reports” rule
This rule supports only the manager’s direct reports. A group consisting of manager’s direct reports and their reports can’t be created.
Use below syntax. Object ID can be found in the user’s(in this case, the user who is the manager) profile in Azure AD.
Direct Reports for "{objectID_of_manager}"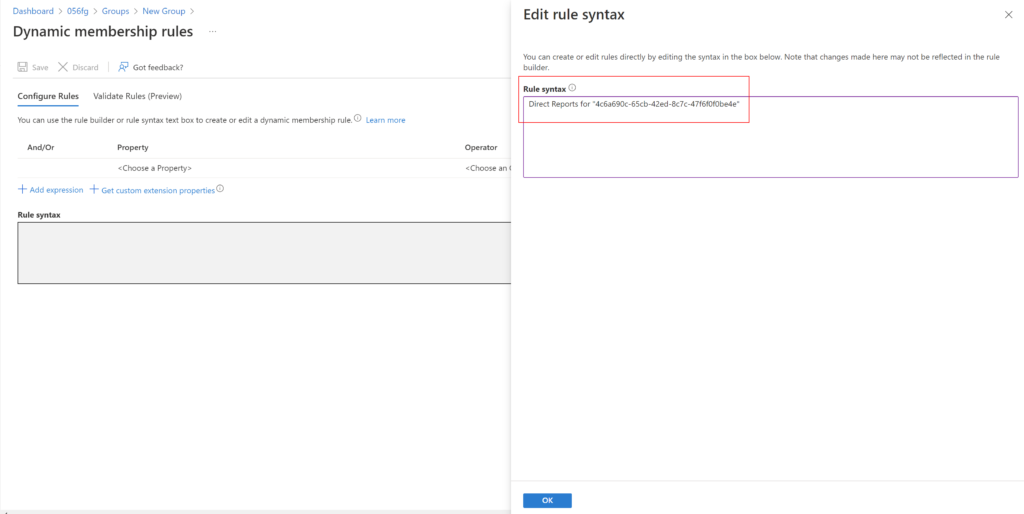
“All users” rule
Include only members of your organization and exclude guest users.
(user.objectId -ne null) -and (user.userType -eq "Member")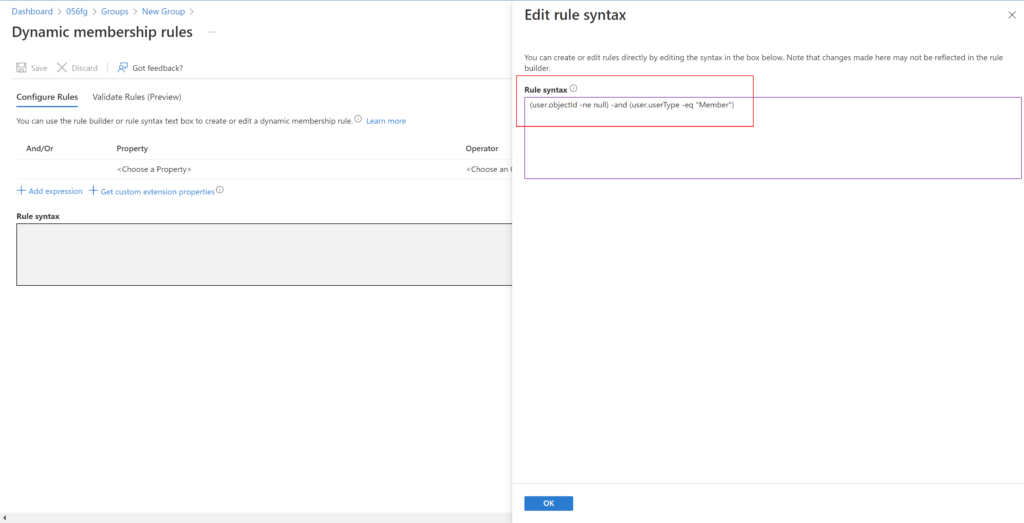
Device Rules
A rule to select devices objects can also be created for membership in a group. Both users and devices as group members is not allowed.
Below are the device attributes,
| Device attribute | Values | Example(s) |
| accountEnabled | true false | (device.accountEnabled -eq true) |
| displayName | any string value | (device.displayName -eq “Bob iPhone”) (device.deviceOSType -eq “iPad”) -or (device.deviceOSType -eq “iPhone”) (device.deviceOSType -contains “AndroidEnterprise”) (device.deviceOSType -eq “AndroidForWork”) (device.deviceOSType -eq “Windows”) |
| deviceOSVersion | any string value | (device.deviceOSVersion -eq “9.1”) (device.deviceOSVersion -startsWith “10.0.1”) |
| deviceCategory | a valid device category name | (device.deviceCategory -eq “BYOD”) |
| deviceManufacturer | any string value | (device.deviceManufacturer -eq “Samsung”) |
| deviceModel | any string value | (device.deviceModel -eq “iPad Air”) |
| deviceOwnership | Personal, Company, Unknown | (device.deviceOwnership -eq “Company”) |
| enrollmentProfileName | Apple Device Enrollment Profile name, Android Enterprise Corporate-owned dedicated device Enrollment Profile name, or Windows Autopilot profile name | (device.enrollmentProfileName -eq “DEP iPhones”) |
| isRooted | true false | (device.isRooted -eq true) |
| managementType | MDM (for mobile devices) | (device.managementType -eq “MDM”) |
| deviceId | a valid Azure AD device ID | (device.deviceId -eq “d4fe7726-5966-431c-b3b8-cddc8fdb717d”) |
| objectId | a valid Azure AD object ID | (device.objectId -eq “76ad43c9-32c5-45e8-a272-7b58b58f596d”) |
| devicePhysicalIds | any string value used by Autopilot, such as all Autopilot devices, OrderID, or PurchaseOrderID | (device.devicePhysicalIDs -any _ -contains “[ZTDId]”) (device.devicePhysicalIds -any _ -eq “[OrderID]:179887111881”) (device.devicePhysicalIds -any _ -eq “[PurchaseOrderId]:76222342342”) |
| systemLabels | any string matching the Intune device property for tagging Modern Workplace devices | (device.systemLabels -contains “M365Managed”) |
Update an existing rule
- Sign in to the Azure AD admin center portal (https://aad.portal.azure.com/) as global administrator
- Select Azure Active Directory –> Click on the Groups tab –> All groups
- Select a group to open it
- On the profile page for the group, select Dynamic membership rules
- After updating the rule, select Save
Dynamic Groups with PowerShell
To create dynamic groups
Use the New-AzureADMSGroup cmdlet,
New-AzureADMSGroup -DisplayName "Sales Department Users" -Description "Sales Department Users" -MailEnabled $false -MailNickname "SalesDepartmentUsers" -SecurityEnabled $true -GroupTypes "DynamicMembership" -MembershipRule "(User.department -eq ""Sales"")" -MembershipRuleProcessingState "On"
To update dynamic groups
Use the Set-AzureADMSGroup cmdlet,
Set-AzureADMSGroup -Id '23c2768b-6cef-4006-a052-d9b288b4d17c' -MembershipRule "(User.department -eq ""Sales"") and (user.city -eq ""Tulsa"")"
Another interesting part I came across when I was exploring dynamic groups is, I was trying to create a dynamic group of administrators to whom I can assign an Azure AD role. And it turns out, the membership type for role-assignable groups must be Assigned and can’t be an dynamic group. This makes sense as automated population of groups could lead to unwanted access being granted.
Thank you for stopping by. ✌