If you aren’t familiar with Azure AD B2C, it is a customer identity access management (CIAM) solution and is a separate service from Azure Active Directory (Azure AD). It is built on the same technology as Azure AD but for a different purpose. It allows businesses to build customer facing applications, and then allow anyone to sign up into those applications with no restrictions on user account. Azure AD B2C uses standards-based authentication protocols including OpenID Connect, OAuth 2.0, and SAML.
In an earlier post, I detailed steps on how to configure ServiceNow with Azure AD SSO. In this post, I will go through steps on how to integrate Azure AD B2C with ServiceNow.
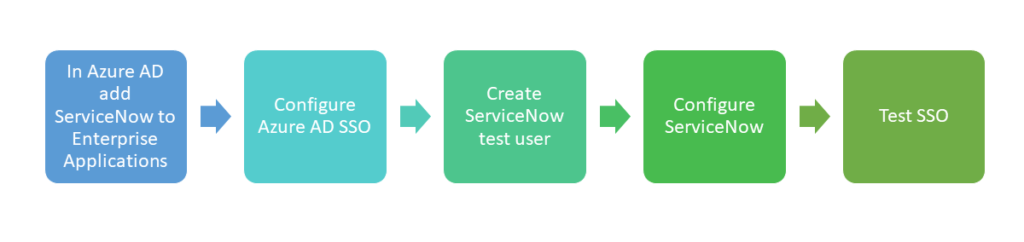
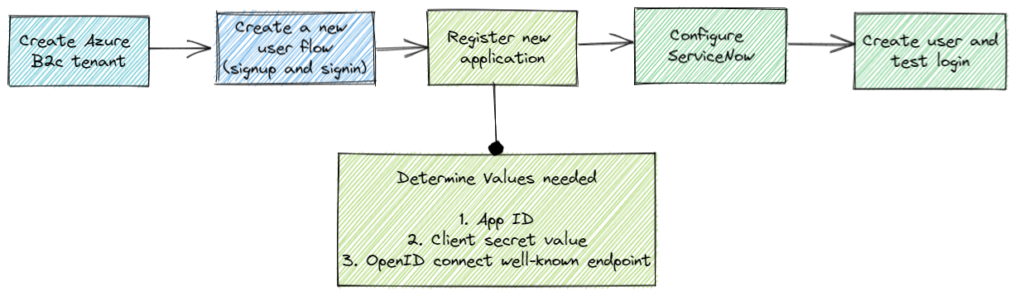
Below is a diagram show the high level implementation steps on how to do this integration,
OpenID Connect (OIDC) is an identity layer built on top of the OAuth protocol, which provides a modern and intuitive Single Sign-on (SSO) experience. ServiceNow supports OIDC to authenticate users in Azure B2C.
I will not cover the Azure AD B2C tenant creation steps in this post.
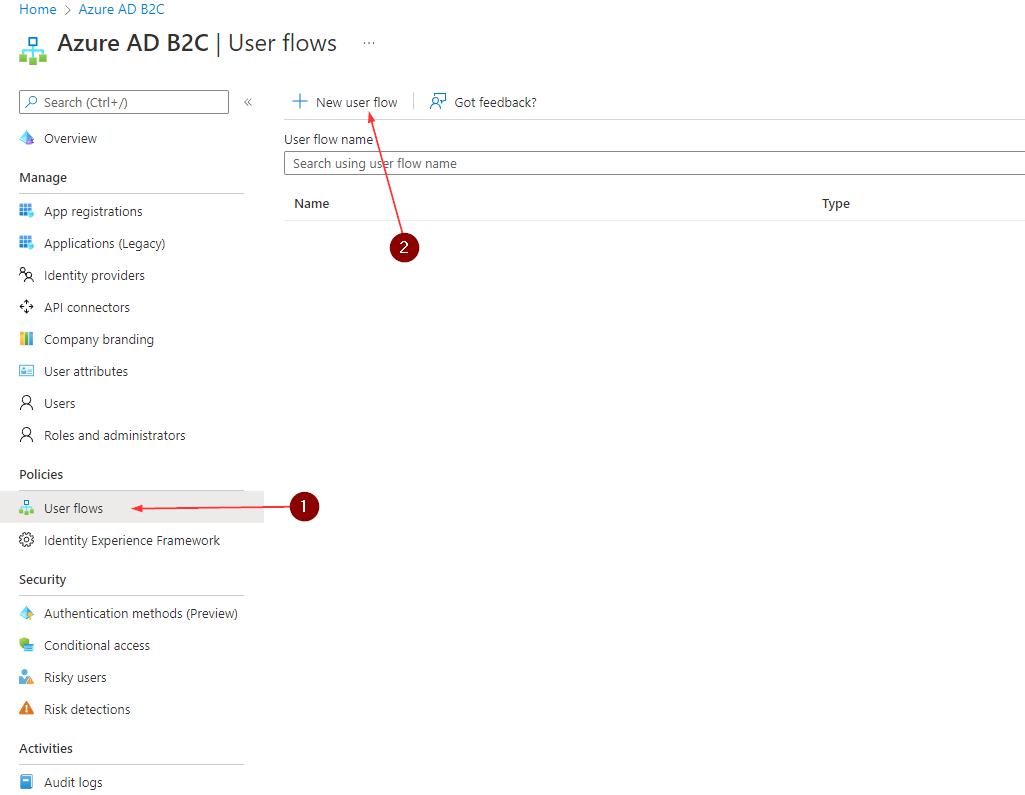
Create new user flow
A user flow lets us determine how users interact with our application when they do things like sign-in, sign-up, edit a profile, or reset a password.
- Sign in to the Azure portal
- Make sure you’re using the directory that contains your Azure AD B2C tenant. Select the Directories + subscriptions icon in the portal toolbar
- On the Portal settings | Directories + subscriptions page, find your Azure AD B2C directory in the Directory name list, and then select Switch
- In the Azure portal, search for and select Azure AD B2C
- Under Policies, select User flows, and then select New user flow
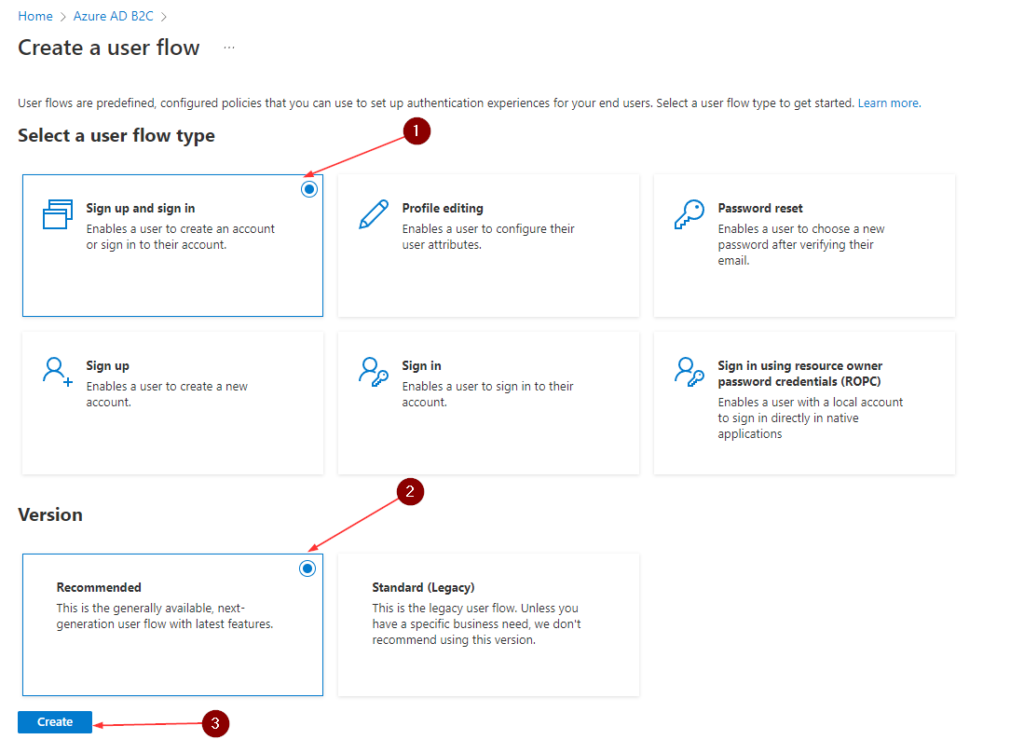
- On the Create a user flow page, select the Sign up and sign in user flow
- Under version, select Recommended, and then select Create
- Enter a Name for the user flow. For example, su_si-1
- For Identity providers, select Email signup
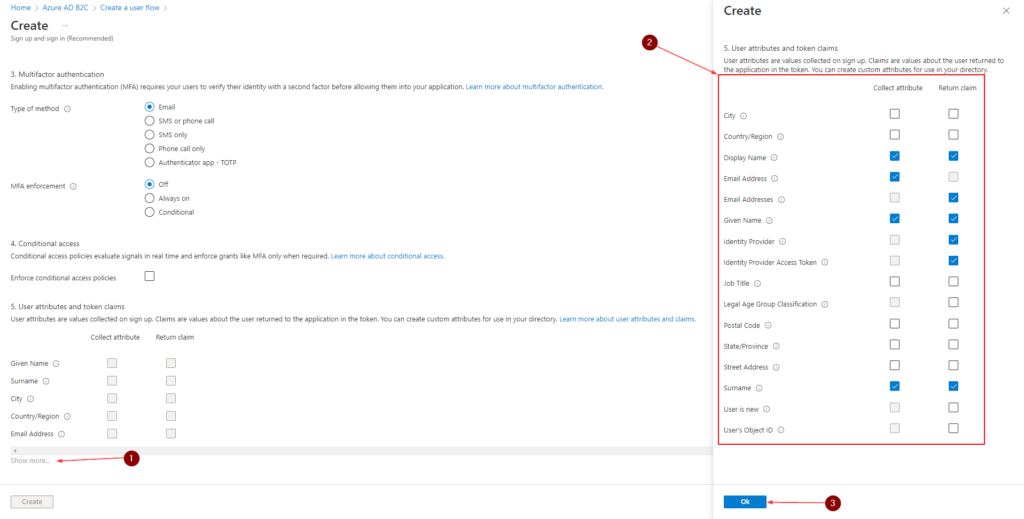
- Under User attributes and token claims, choose the claims and attributes to collect and send from the user during sign-up. Select Show more, and then choose attributes and claims. Click OK. Below screenshot shows the attributes I’m collecting but it is up to you. These attributes can be modified in the user flow at any time
- Click Create to add the user flow. A prefix of B2C_1_ is automatically prefixed to the name
Create App Registration
- Stay logged into the Azure portal
- Make sure you are in the B2C directory
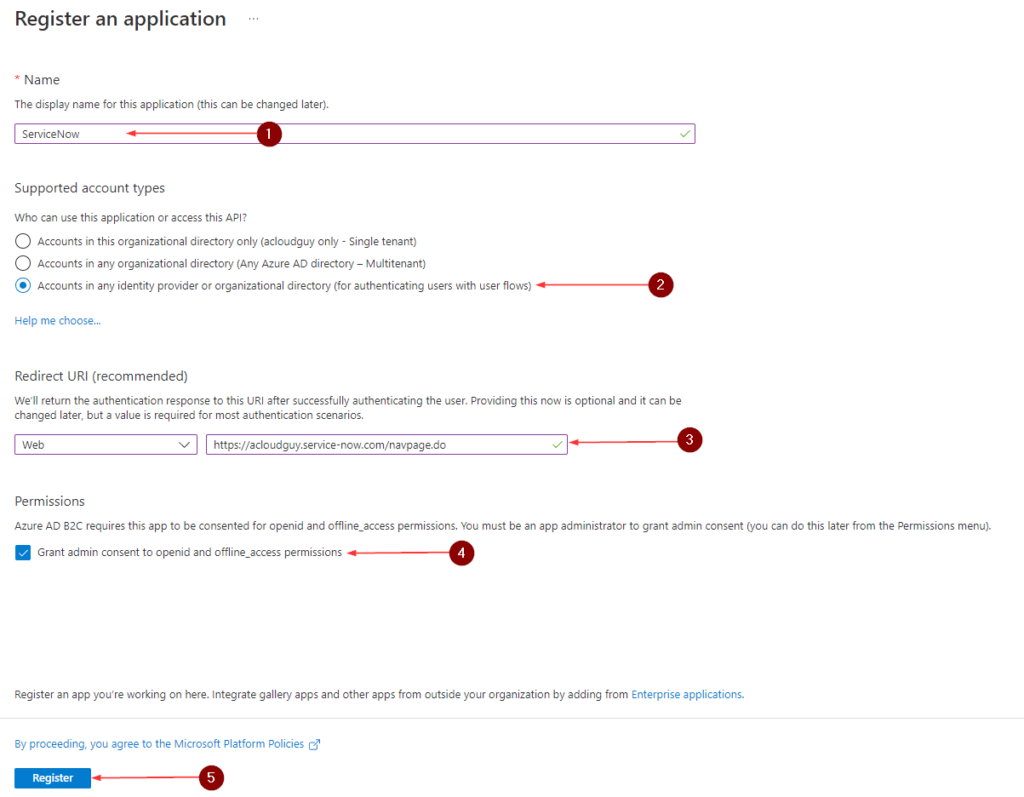
- In the left navigation menu, under Manage, Click App registrations, and then select New registration
- Enter a Name for the application. For example, ServiceNow
- Under Supported account types, select Accounts in any identity provider or organizational directory (for authenticating users with user flows)
- Under Redirect URI, select Web then enter your ServiceNow instance with /navpage.do in the URL text box
- Under Permissions, select the Grant admin consent to openid and offline_access permissions check box
- Click Register
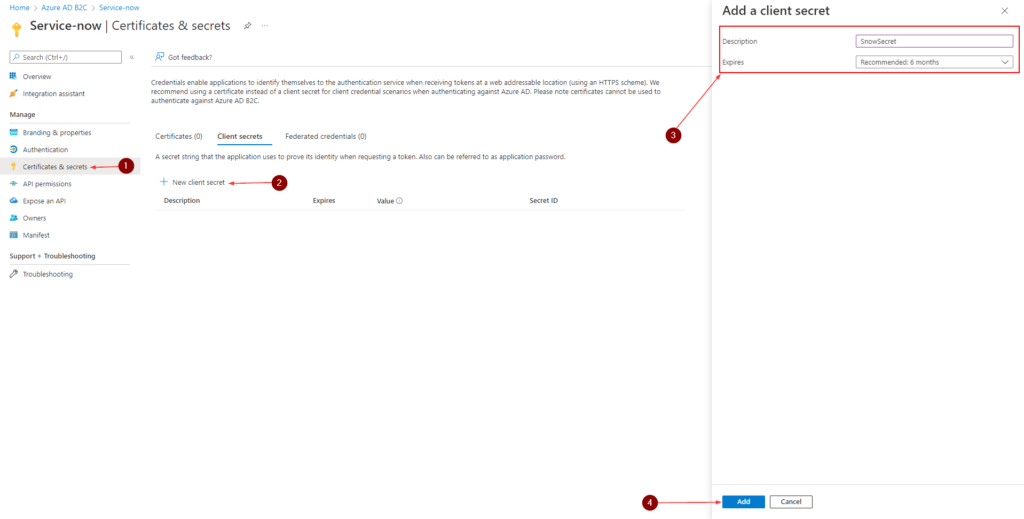
Create a client secret
The client secret is also known as an application password. The secret will be used by ServiceNow to exchange an authorization code for an access token
- In the left menu, under Manage, select Certificates & secrets
- Click New client secret
- Enter a description for the client secret in the Description box. For example, SnowSecret
- Under Expires, select a duration for which the secret is valid, and then select Add
- Note down the secret’s Value for use in ServiceNow. This value is never displayed again after you leave this page
Information needed to configure ServiceNow instance
- Click on the Overview, copy the Application (client) ID
- Next Click Endpoints
- Copy the value in Azure AD B2C OpenID Connect metadata document
- Replace with the User flow name we created earlier e.g. B2C_1_su_si-1. Browse to the URL in a Web browser to confirm you have the right URL
- You should have these 3 values,
- Application (client) ID
- Client Secret Value
- OIDC well-known endpoint
Configure ServiceNow Instance
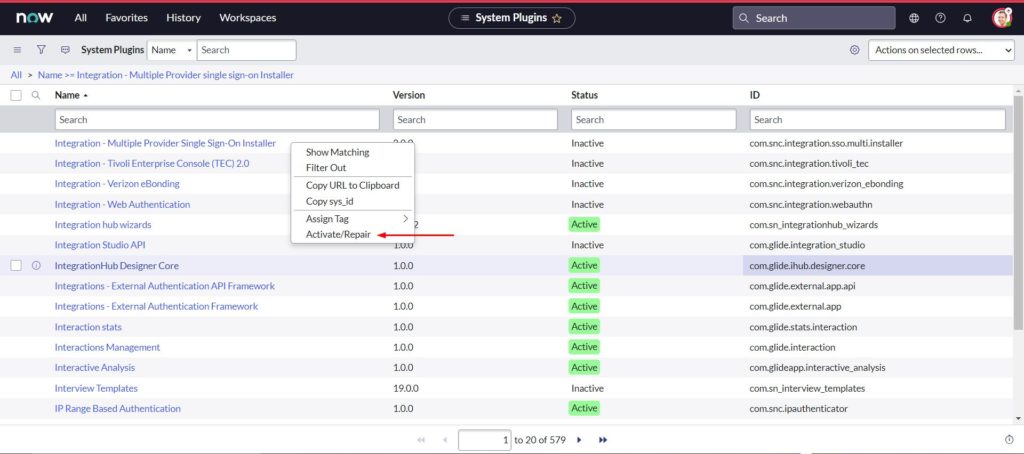
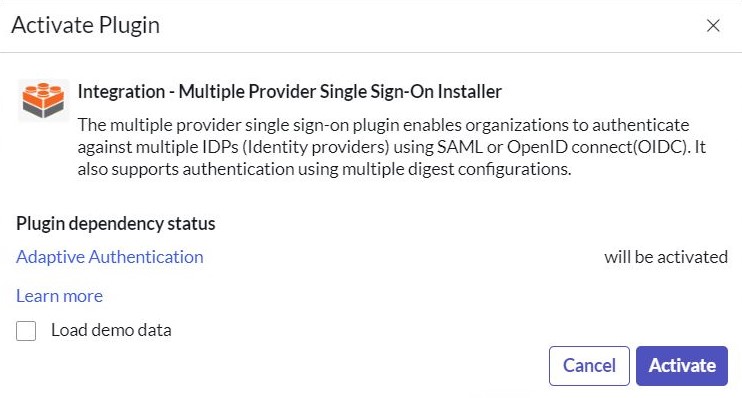
Hopefully, you already have SSO enabled in your ServiceNow instance. If not, please refer to this earlier post of mine
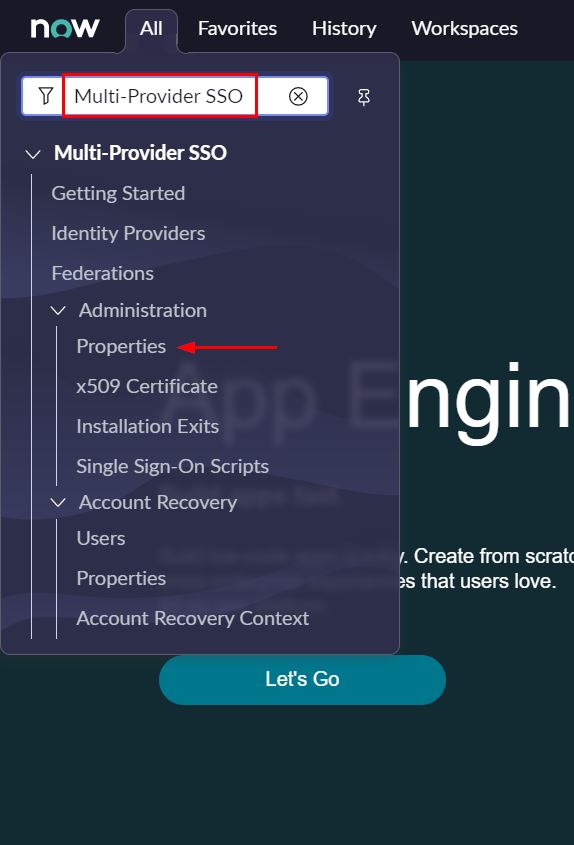
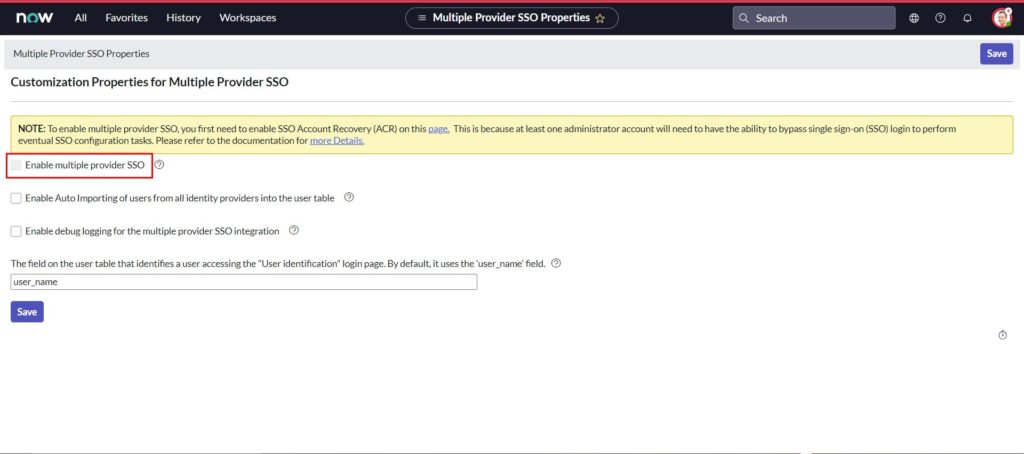
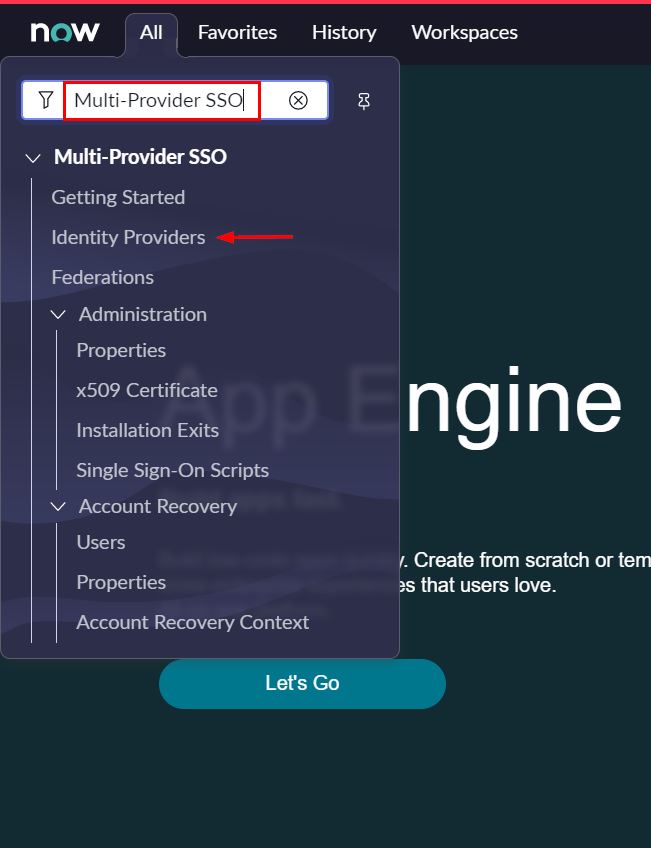
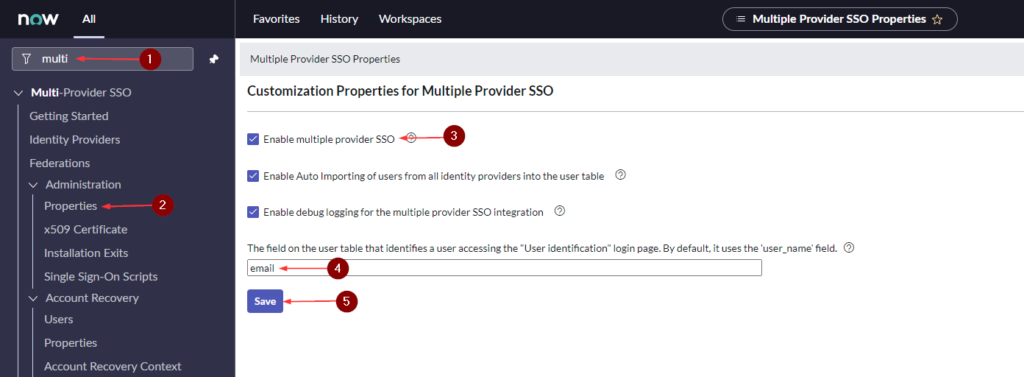
- Search for multi-provider sso and click Properties
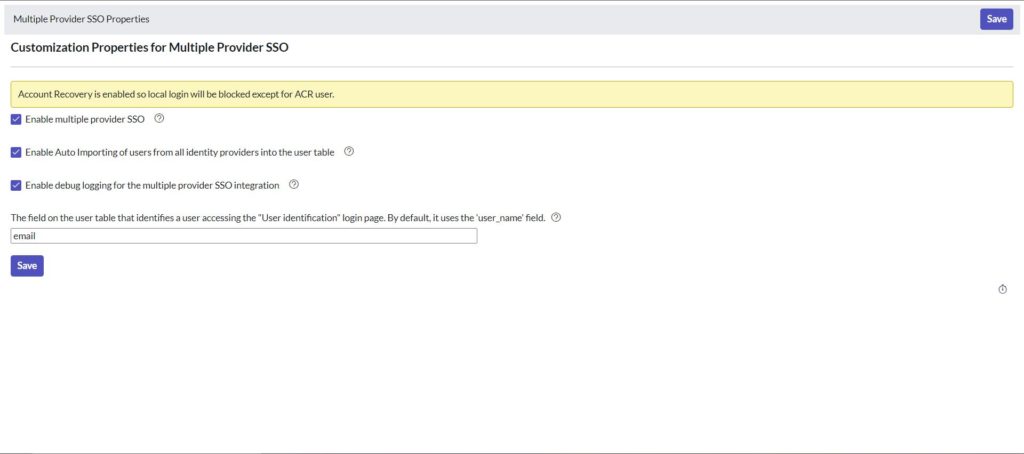
- Enable multiple provider SSO
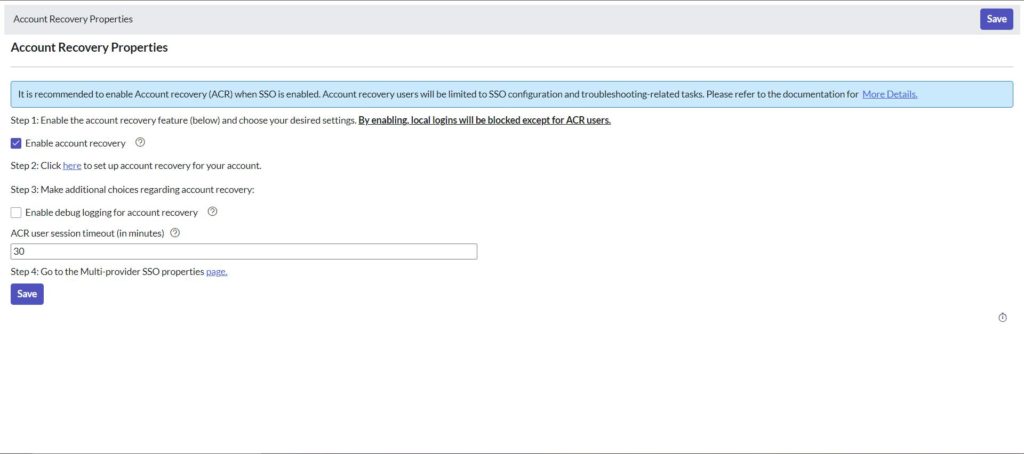
- You’ll be asked to setup a recovery account
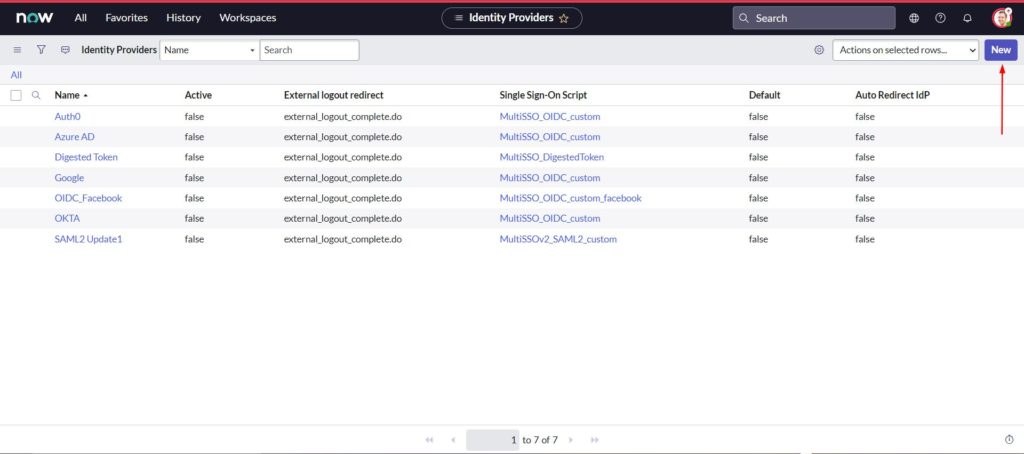
- Under Multi-Provider SSO and click Identity Providers
- Click New
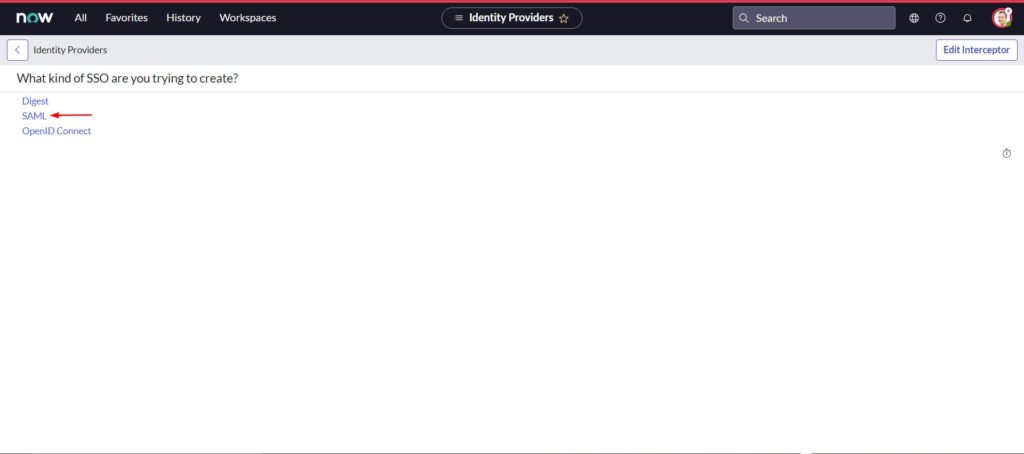
- Click OpenID Connect
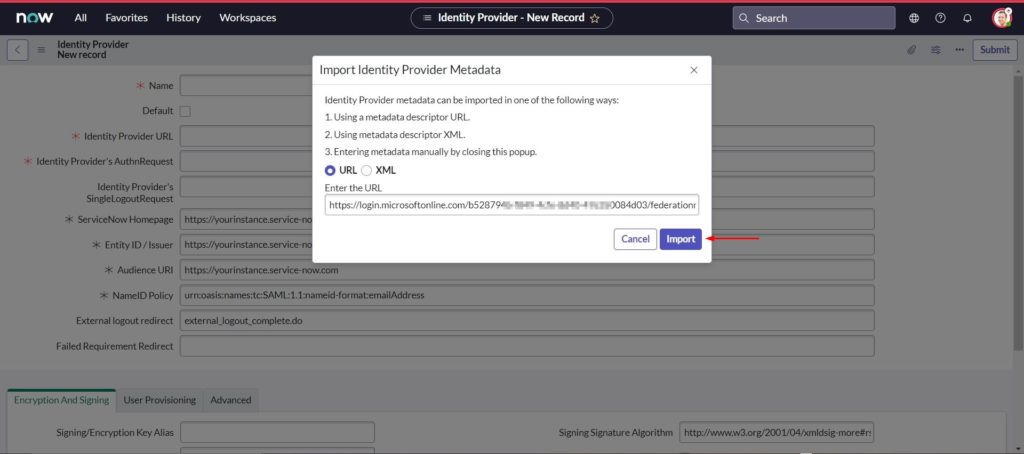
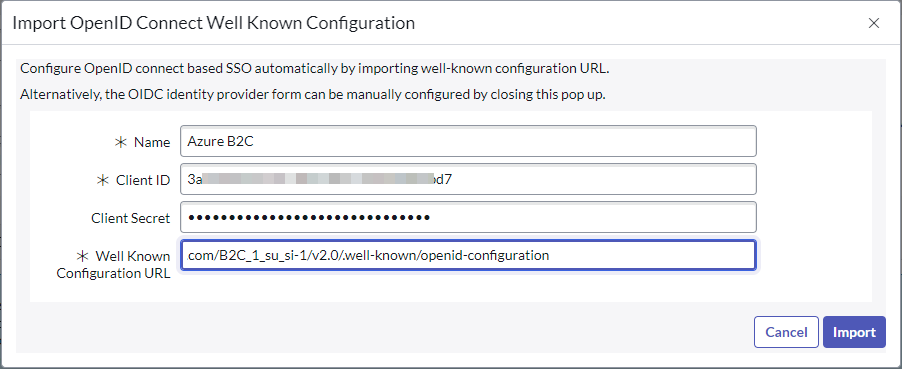
- In the Import OpenID Connect Well Known Configuration window, provide following information
- Name = Name of the IdP you wish. Example, B2C
- Client ID = Application (client) ID from Azure B2C application
- Client Secret = Client Secret Value we created earlier in the application
- Well Known Configuration URL = URL we constructed earlier with the policy name
- Click Import
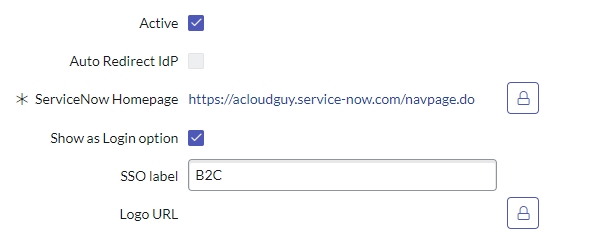
- Make sure the new IdP is marked Active and Show as Login option is checked
- Click on the OIDC Entity tab and click to open the OIDC Entity
- Click on OAuth Entity Scopes, double-click on OAuth scope and replace openid with the below value
- Use your Application (client) ID from B2C app registration
<Application (client) ID> openid offline_access profile email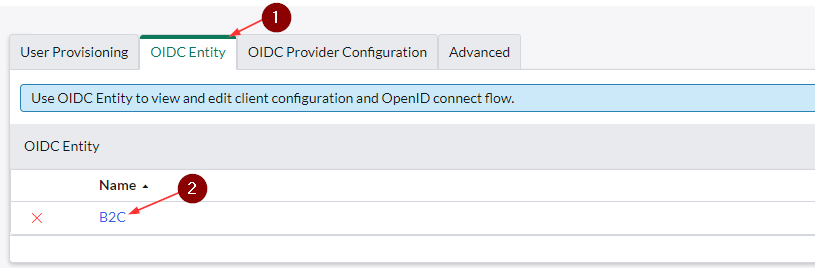
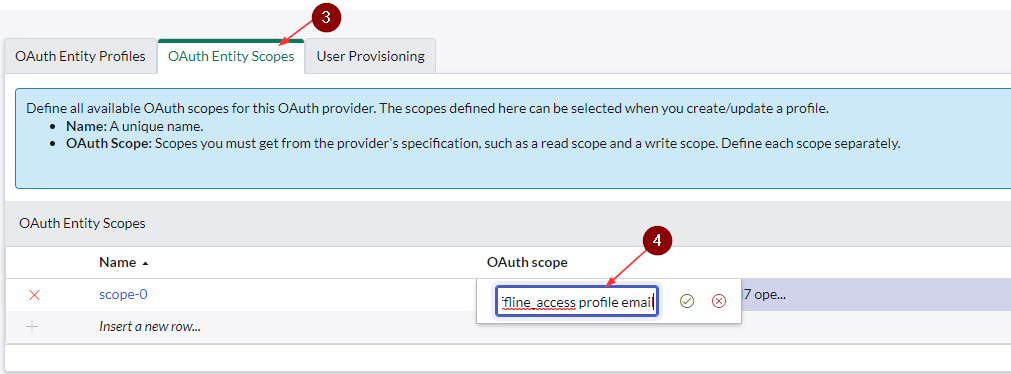
This OAuth Scope value is required to generate an access token and without that ServiceNow will error out with a missing parameter. I realized this later on based on my research. I initially left it at openid and searching with the error, lead me to this.
- Click Update to save changes
- Click on OIDC Provider Configuration
- Click on OIDC provider value
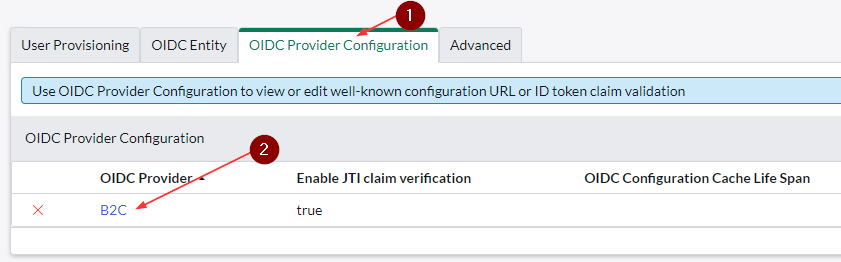
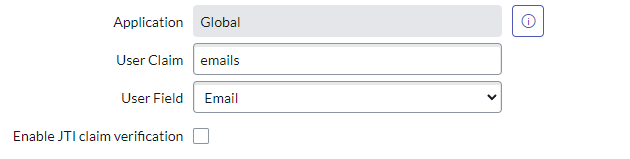
- Update the User Claim to emails
- Click Update
- To keep things simple, I’m not enabling the Automatic user provisioning option
- You can choose to enable automatic user provisioning during user login. When automatic user provisioning is enabled, a user record is automatically created in the ServiceNow instance if that user record does not exist.
- Back in the Identity provider window, Click Update to save the OIDC Identity Provider values
- Navigate to the login page of the instance to verify that IdP appears as a login option
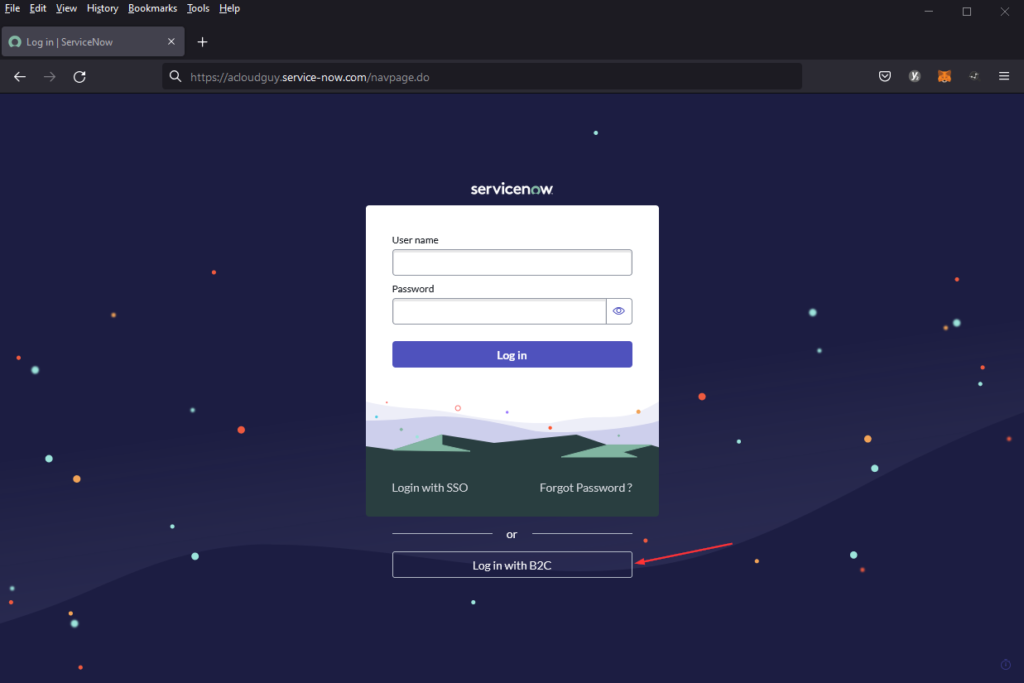
- Create a test user in ServiceNow and login with the credentials to test if the IdP configuration works
- Optionally you can browse to the login page with the URL in following format,
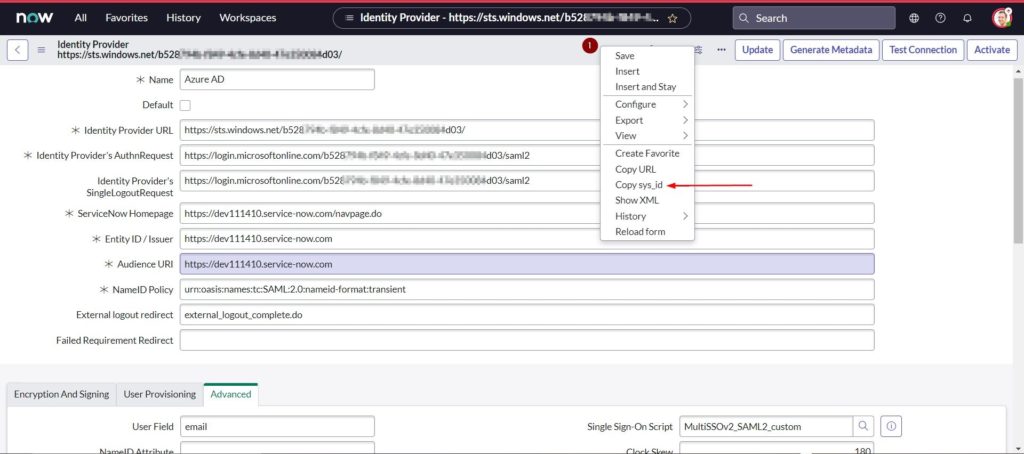
- To determine the sys_id, open the OIDC Identity provider we created, right-click on the grey bar and click Copy sys_id
- Replace this sys_id in the URL below
- This URL will take you directly to the sign-in page
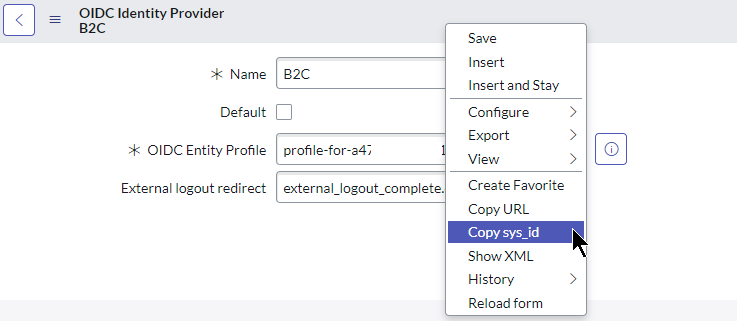
https://<yourinstance>/login_with_sso.do?glide_sso_id=<sys_id>Hope this post helped you in setting up your ServiceNow instance with Azure AD B2C.
Thank you for stopping by. ✌