Azure AD – Self-Service Sign-up for Guest Users

A Self-Service user flow defines the steps an user will follow while signing-up for an application in your tenant. These applications can be the custom built or SaaS applications. This allows users to sign-up for an app and creates a guest account in the Azure AD tenant.

These user flows cannot be used for MS apps like Teams or SharePoint.

Enable self-service sign-up

Before creating and adding self-service sign-up user flow to your applications, the feature has to be enabled. Once enabled, the necessary options become available.

  1. Login to Azure AD admin portal (https://aad.portal.azure.com/)
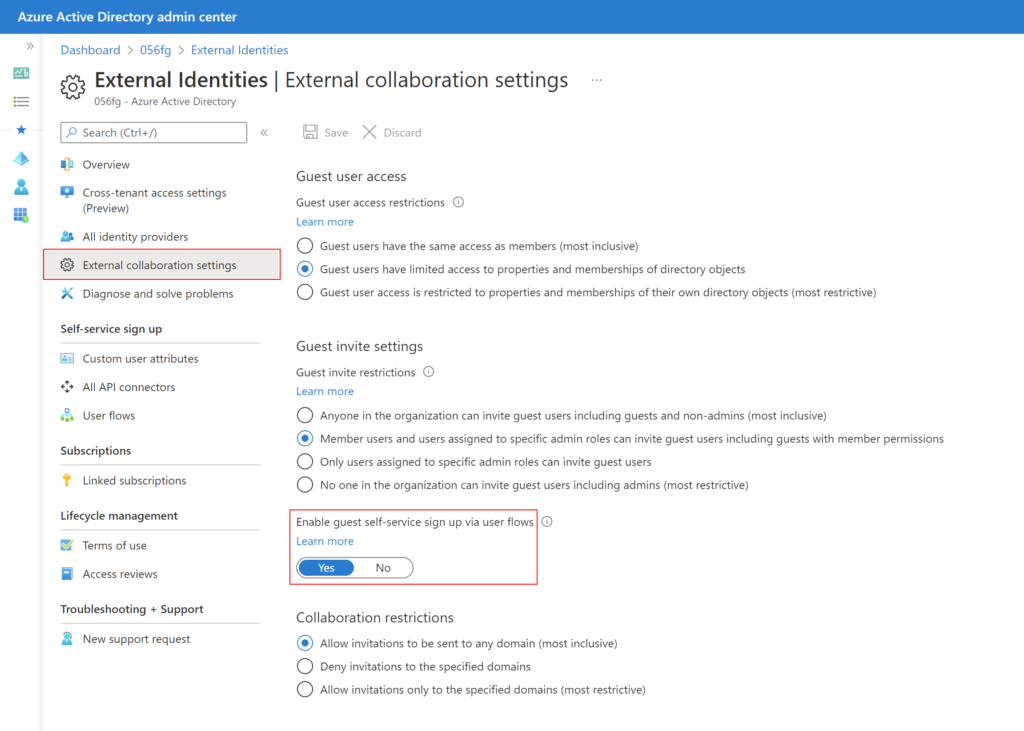
  2. In the left menu, click External Identities and then External collaboration settings
External collaboration settings
  1. Toggle Yes to Enable guest self-service sign up via user flows
  2. Click Save

Create user flow for self-service sign-up

Now we’re ready to create user flow for self-service sign-up and add it to an application.

  1. Under the same External identities section in the above steps, click User flows in the left menu
  2. Select New user flow
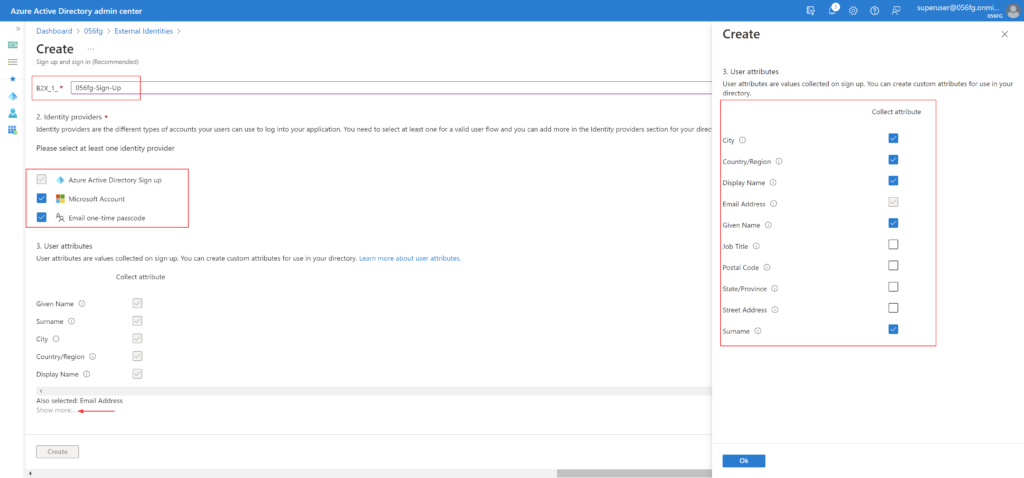
  3. Enter a Name for the user flow. The name is automatically prefixed with B2X_1_
  4. Select the Identity providers
    • Azure AD is the default identity provider, which means that users are able to sign up by default with an Azure AD account
    • Google and Facebook, Microsoft Account, and Email OTP are also options
  5. Under User attributes, choose the attributes you want to collect from the user
    • For additional attributes, click on Show more
  6. Click Create
New user flow

Select the Page Layout

We can customize the order in which the attributes are displayed on the sign-up page

  1. Click on the user flow created
  2. Click on Page Layouts under Customize in the left menu
  3. For my scenario, I’ve reordered the fields and selected optional as No for the fields I consider mandatory
  4. Click Save
Page Layout

Add Application(s) to the user flow

Now, we are ready to associate an application to the user flow,

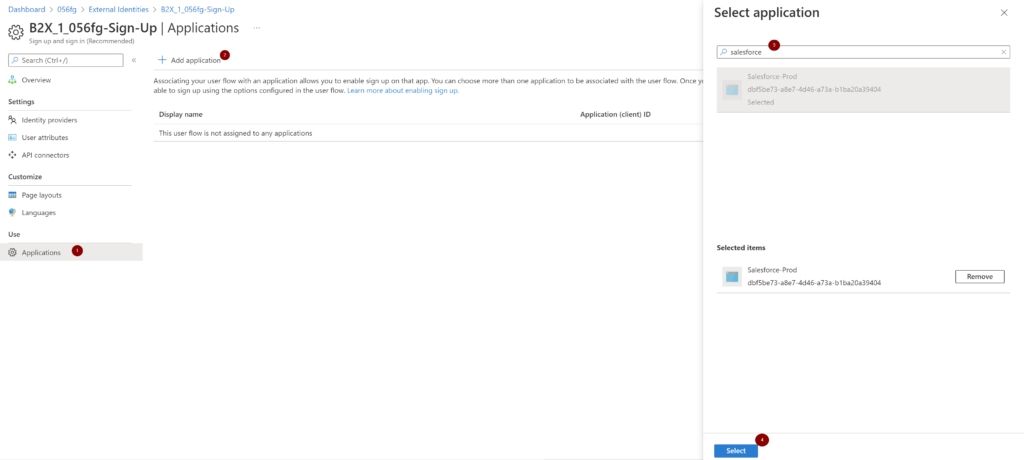
  1. In the left menu, under Use, select Applications
  2. Select Add application
    • For my scenario, I’m adding the Salesforce application to enable users to do a self-signup
  3. Search for the application and click Select
Add application

This concludes the steps in the Azure AD admin portal

Guest User experience

We can simply provide the application URL to the guest user for them to sign-up.

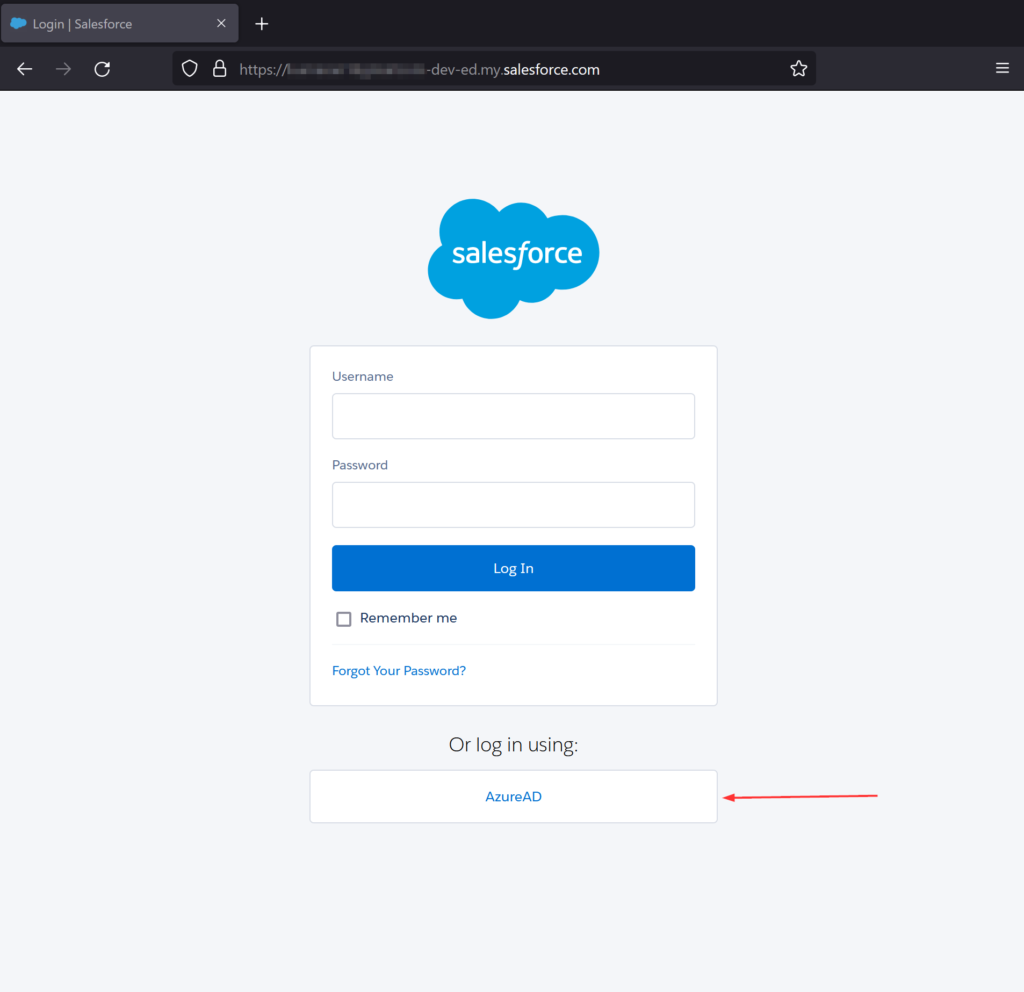
In my scenario, I’m using the Salesforce application in my environment,

Salesforce login page

When user tries to login with their own credentials, they will get an error ‘This account does not exist in this organization..‘ This means that the user who is part of a different Azure AD tenant doesn’t exist in the home tenant which the Salesforce application is part of.

Login error

User clicks on Create a new one or Create one!

Select Sign up with email. Enter Email address and password

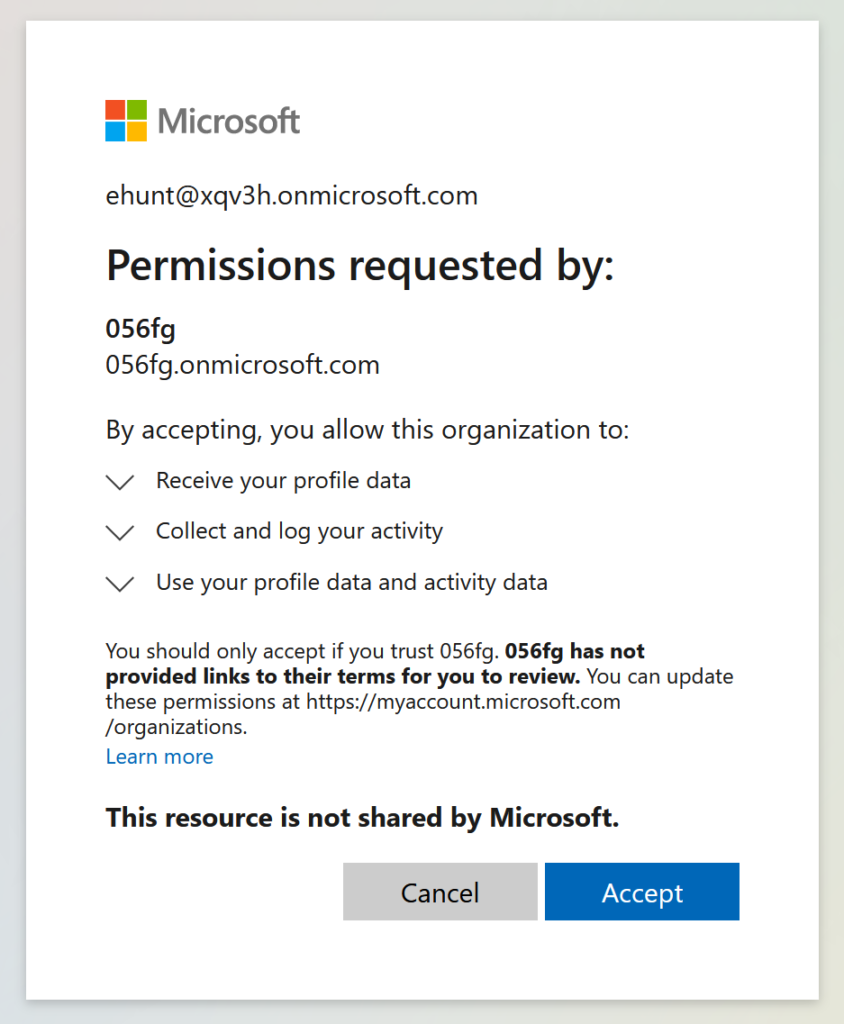
Review and click Accept in the Permissions requested by: screen

Note: See in screenshot below, Permissions requested by: is the tenant where the application lives

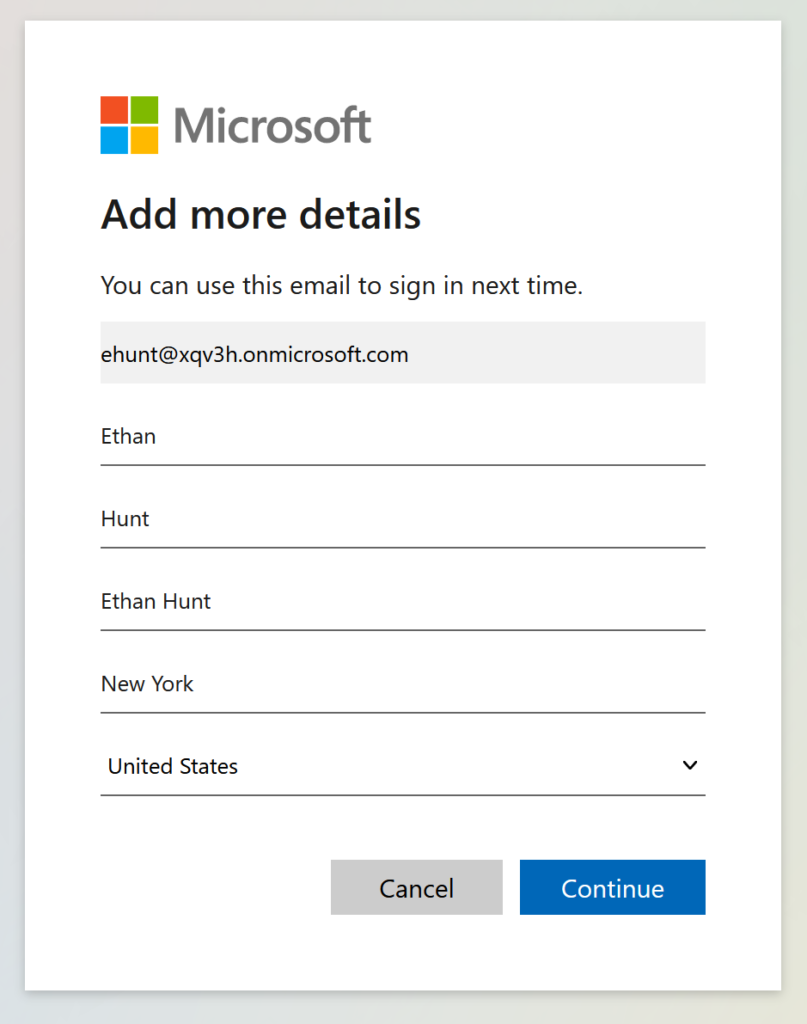
Fill the necessary information and click Continue

Note: This next screen is a result of how we configured the page layout earlier.

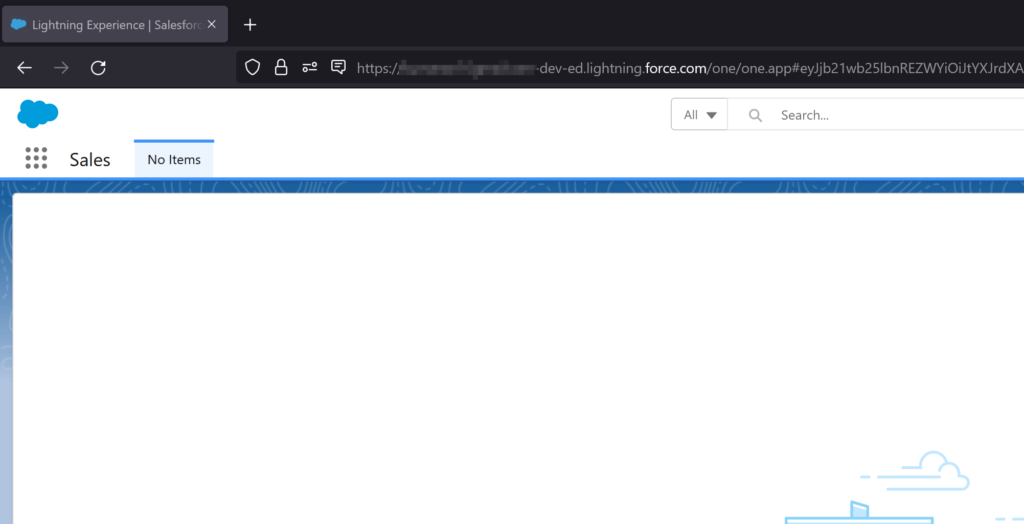
And it redirects the user to the Salesforce landing page. I don’t have anything configured within Salesforce for this specific user

Salesforce landing page

So, there are few things to note here:

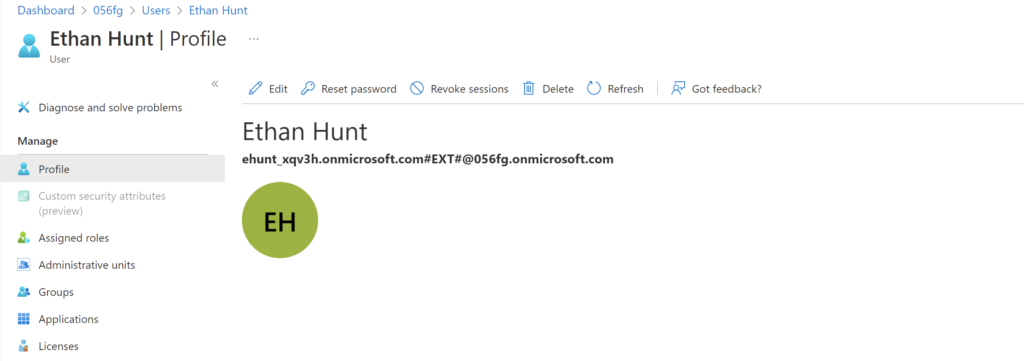
  • When the user goes through a self-signup process, guest account is automatically created for the user in the home tenant
  • Like in my example, as I don’t have user provisioning enabled with Salesforce, the user has to be created within Salesforce
    • I’m only know the basics on Salesforce’s inner workings but I do have the authentication part configured with Azure AD
    • If you are following this guide and also allowing guest users to login to Salesforce, have your Salesforce administrator setup this guest user with the user’s home tenant’s email account
Guest user’s profile

Hope this post helped you in setting up the Azure AD self-service sign-up user flow to an app.

Thank you for stopping by.✌
M365 – Manage Group Creation Permission

All users can create M365 groups, this is the option enabled by default. Microsoft probably took this approach so as to make sure users can collaborate without any IT assistance.

This is good but when it comes to start managing Teams and the related resources that get created, it can easily become an IT data governance nightmare. If your organization is in its initial phases of Teams rollout, IMO it is better to disable group creation ability for the masses and preferable do a phased approach.

When we disable M365 group creation, it affects all services that rely on groups for access, including:

  • Outlook
  • SharePoint
  • Microsoft Teams
  • Microsoft Stream
  • Yammer
  • Planner
  • Power BI (classic)
  • Project for the web

To have a solution that is sort of a best of both worlds scenario, we can designate an Azure AD group with specific users who have the permissions to create M365 groups.

Create an Azure AD Group

To create a new Azure AD group, the New-AzureADGroup cmdlet can be used or can also be created from the Azure AD admin portal. I’m naming the group ‘M365 – Group Creators’

New-AzureADGroup -DisplayName "M365 - Group Creators" -Description "Group that allows users to create M365 groups" -MailEnabled $false -SecurityEnabled $true -MailNickName "NotSet"
New Azure AD group

Keep in mind this doesn’t prevent users with Azure AD admin roles which has group creation capabilities from creating new groups.

Set Group Creators

The following needs to be run from PowerShell. Make sure AzureADPreview is installed and connected.

Install-module AzureADPreview
Import-Module AzureADPreview
Connect-AzureAD

Run the following commands,

$Template = Get-AzureADDirectorySettingTemplate | where {$_.DisplayName -eq 'Group.Unified'}
$Setting = $Template.CreateDirectorySetting()
New-AzureADDirectorySetting -DirectorySetting $Setting
‘..already exists’ error

If you get an ‘..already exists’ error, that means your tenant already this setting defined. Proceed with the next steps below,

$Setting = Get-AzureADDirectorySetting -Id (Get-AzureADDirectorySetting | where -Property DisplayName -Value "Group.Unified" -EQ).id
$Setting["EnableGroupCreation"] = $False
$Setting["GroupCreationAllowedGroupId"] = (Get-AzureADGroup -SearchString "<Name of your security group>").objectid
EnableGroupCreation and GroupCreationAllowedGroupId

Use the Set-AzureADDirectorySetting below to set the value in the $Setting variable which has the object ID of the Azure AD group.

Set-AzureADDirectorySetting -Id (Get-AzureADDirectorySetting | where -Property DisplayName -Value "Group.Unified" -EQ).id -DirectorySetting $Setting

To determine if the group is allowed to create to groups,

(Get-AzureADDirectorySetting).Values
verify settings

Only one group can be used to control the ability to create Microsoft 365 Groups. But, other groups can be nested as members of this group.

In case your organization wants to revert back this setting in the future, you can do so by changing $AllowGroupCreation to “True” and the group value to “”

$Setting = Get-AzureADDirectorySetting -Id (Get-AzureADDirectorySetting | where -Property DisplayName -Value "Group.Unified" -EQ).id
$Setting["EnableGroupCreation"] = $true
$Setting["GroupCreationAllowedGroupId"] = ""
Set-AzureADDirectorySetting -Id (Get-AzureADDirectorySetting | where -Property DisplayName -Value "Group.Unified" -EQ).id -DirectorySetting $Setting
(Get-AzureADDirectorySetting).Values
Enable group creation

Usually the settings takes 30ish minutes to take effect. You can verify this by trying to create a group with a user who is a non-member of the allowed Azure AD group.

If a user who is part of the group creators can’t create a M365 group, it’s worth checking the OWA policy. The Get-OwaMailboxPolicy can be used to check this,

Get-OwaMailboxPolicy | Select GroupCreationEnabled

If the above output shows ‘False’, you can enable this by using the Set-OwaMailboxPolicy cmdlet,

Set-OwaMailboxPolicy -Identity "Name of your OWA Policy" -GroupCreationEnabled $true

Hope this helped you in setting up the policies to disable M365 group creation.

Thank you for stopping by.✌
Azure AD – Create Security Groups and Add Members using PowerShell

Azure AD security groups can be used to manage member and computer access to shared resources for a group of users. A security group can have users, devices, groups and SPNs as its members. In this post, I’ll go over steps on how to create a Azure AD security group, add users to one group and also bulk import users to one group and multiple groups.

Make sure you are connected to Azure AD,

$credential = Get-Credential
Connect-AzureAD -credential $credential

To create an Azure AD security group:

$GroupName = Read-Host "Enter name for Azure AD group"
New-AzureADGroup -DisplayName $GroupName -MailEnabled $false -SecurityEnabled $true -MailNickName "NotSet"

To create multiple Azure AD security groups:

Note: csv file has name,description as column headers

$groups = import-csv "C:\tmp\AzureAD Groups\groups.csv"

Foreach($group in $groups) {
New-AzureADGroup -DisplayName $group.name -Description $group.description -MailEnabled $false -SecurityEnabled $true -MailNickName "NotSet"
}

To add an user and an owner to an existing group:

$Group = Read-Host "Enter name of Azure AD group"
$User = Read-Host "Enter username of user to be added"
$Owner = Read-Host "Enter username of group owner"

$GroupObj = Get-AzureADGroup -SearchString $Group
$UserObj = Get-AzureADUser -SearchString $User
$OwnerObj = Get-AzureADUser -SearchString $Owner

Add-AzureADGroupMember -ObjectId $GroupObj.ObjectId -RefObjectId $UserObj.ObjectId
Add-AzureADGroupOwner -ObjectId $GroupObj.ObjectId -RefObjectId $OwnerObj.ObjectId

To display members of a security group:

$Group = Read-Host "Enter name of Azure AD group to display members"
$GroupObj = Get-AzureADGroup -SearchString $Group
Get-AzureADGroupMember -ObjectId $GroupObj.ObjectId

To display owners of a security group:

$Group = Read-Host "Enter name of Azure AD group to display owner(s)"
$GroupObj = Get-AzureADGroup -SearchString $Group
Get-AzureADGroupOwner -ObjectId $GroupObj.ObjectId

To bulk add multiple users to a specific group:

Note: csv file has UserPrincipalName as column header

$Group = Read-Host "Enter name of Azure AD group to add users"
$GroupObj = Get-AzureADGroup -SearchString $Group
$Members = Import-csv "C:\tmp\GroupMembers.csv"
Foreach($Member in $Members) {

$User = $Member.UserPrincipalName
Write-Progress -Activity "Adding user.." -Status $User

Try {
$UserObj = Get-AzureADUser -SearchString $User
Add-AzureADGroupMember -ObjectId $GroupObj.ObjectId -RefObjectId $UserObj.ObjectId
}
catch {
Write-Host "Error occured while adding $User" -ForegroundColor Red
}
}

To bulk add multiple users to multiple groups. This below script checks to see if the user is already part of the Azure AD group and returns an error.

Note: csv file has UserPrincipalName,Group as column headers

$list = Import-csv "C:\tmp\UsersGroups.csv"
Foreach($entry in $list) {

$User = $entry.UserPrincipalName
$Group = $entry.Group
$UserObj = Get-AzureADUser -SearchString $User
$GroupObj = Get-AzureADGroup -SearchString $Group
$GroupMembers = (Get-AzureADGroupMember -ObjectId $GroupObj.ObjectId).UserPrincipalName

If ($User -notin $GroupMembers) {
    Add-AzureADGroupMember -ObjectId $GroupObj.ObjectId -RefObjectId $UserObj.ObjectId
    Write-Host "$User added to $Group" -ForegroundColor Green
    }
    else {
    Write-Host "$User already in $Group" -ForegroundColor Red
    }
}

Hope this was helpful for you in exploring Azure AD security groups.

Thank you for stopping by. ✌

Azure AD – Bulk Add Guest users using PowerShell

With Azure AD B2B collaboration, we can invite guest users into our tenant to allow them to access M365 apps and other Azure AD SSO integrated apps. There are multiple ways to invite external users into our Azure AD tenant. In this post, I’ll go through what I worked on recently to invite a bunch of external users in to one of the tenants I manage.

Make sure you are connected to Azure AD,

$credential = Get-Credential
Connect-AzureAD -credential $credential

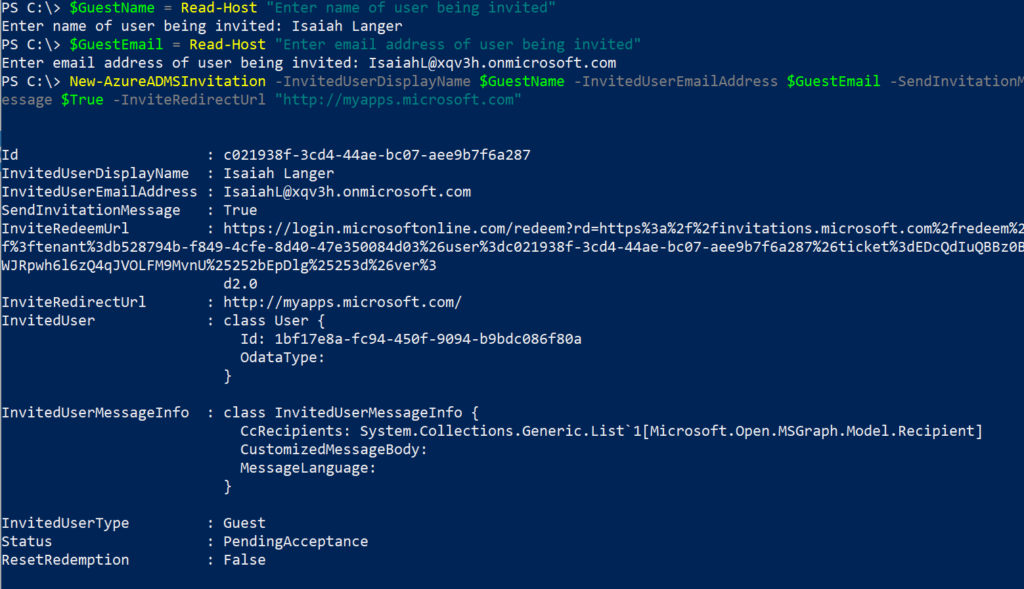
To send an invite to an external user:

$GuestName = Read-Host "Enter name of user being invited"
$GuestEmail = Read-Host "Enter email address of user being invited"
New-AzureADMSInvitation -InvitedUserDisplayName $GuestName -InvitedUserEmailAddress $GuestEmail -SendInvitationMessage $True -InviteRedirectUrl "http://myapps.microsoft.com"

To bulk invite users from a csv file, this below script will work. This script checks to make sure if the user is already invited and also includes a custom message you can include in the invite.

How the csv file looks like,

$GuestUsers = Import-csv "C:\tmp\InviteGuestUsers\GuestUsers.csv"

$invitationBody = @"
Hi,

Please accept this invitation to join our organization.
If you have any questions, please contact our helpdesk at
support@internaldomain.com

"@

$invitemessage = @{customizedmessagebody = $invitationBody}

ForEach($GuestUser in $GuestUsers) {

$GuestUserEmail = $GuestUser.GuestEmail
$GuestUserName = $GuestUser.GuestName

    if ((Get-AzureADUser -SearchString $GuestUserEmail).Length -le 0) {

        $Invite = New-AzureADMSInvitation -InvitedUserDisplayName $GuestUserName -InvitedUserEmailAddress $GuestUserEmail -SendInvitationMessage $True -InvitedUserMessageInfo $invitemessage -InviteRedirectUrl "http://myapps.microsoft.com"
        Write-Host "Guest user $GuestUserName invited" -ForegroundColor Green
        } else {
        $status = Get-AzureADUser -filter "Mail eq '$GuestUserEmail'" | Select -Expandproperty UserState
        Write-Host "Guest user $GuestUserName already invited - Guest account exists in tenant and invite status is $status" -ForegroundColor Red
        }
}

To list all guest users in the tenant and their invitation acceptance status:

Get-AzureADUser -filter "UserType eq 'Guest'" | Select DisplayName,UserPrincipalName,UserState

or a filter can be applied to determine a specific user,

$guestuser = Read-Host "Enter the guest user email address to check invite status"
Get-AzureADUser -filter "Mail eq '$guestuser'" | Select DisplayName,UserPrincipalName,UserState

Hope this post helped you in external user invites.

Thank you for stopping by. ✌