Azure AD – Implement SSO integration with Salesforce

In this post I will go over the steps required to implement Azure AD SSO integration with Salesforce. With Salesforce and Azure AD SSO integration in place, it allows:

  • Users to sign-in to Salesforce with their Azure AD account
  • Administrators to control who can access Salesforce
  • Administrators can also manage users in one location – Azure AD admin center

Salesforce supports,

  • Service Provider-Initiated Login
  • Just In Time user provisioning – If a user doesn’t already exist, a new one is created in Salesforce when a login is attempted
  • Automated user provisioning and deprovisioning (This is covered in a later post)
  • Configuring the mobile application with Azure AD SSO
High level implementation steps

In Azure AD add Salesforce to Enterprise Applications

To configure this integration, first step is to add Salesforce from the gallery to your list of managed SaaS apps. Below are the steps,

  1. Login to Azure AD Admin Center(https://aad.portal.azure.com) and click on the Enterprise applications tab
  2. To add new application, Click New application
  3. In the Browse Azure AD gallery section, enter ‘Salesforce’ in the search box
  4. Select Salesforce and you can name it to differentiate from development to production instance with a prefix but in this scenario, I’ll leave it as default as in screenshot below. Click Create
  5. It can take a few seconds for the app to be added
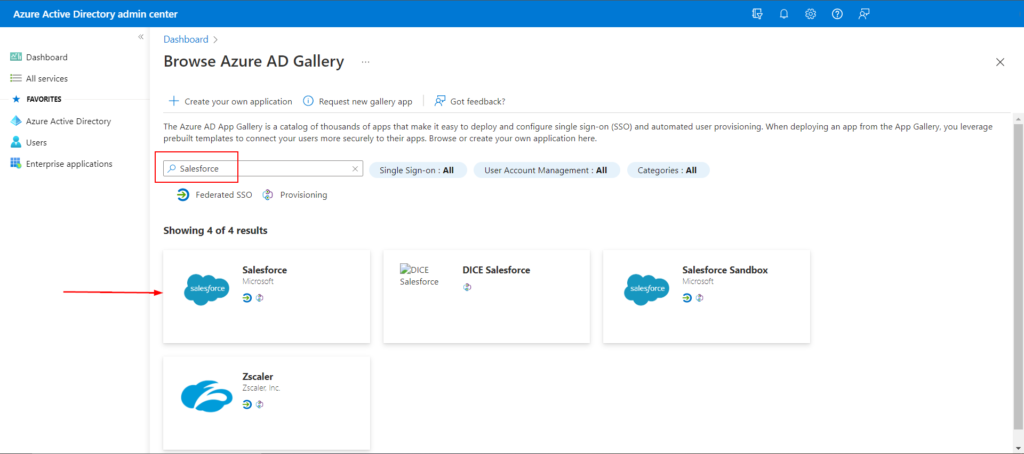
Search ‘Salesforce’
Add Salesforce by clicking ‘Create’

Configure Azure AD SSO

Below steps details how to enable SSO in Azure AD portal for the Salesforce application,

  1. On the Salesforce application page in Azure AD,
    • Click on SAML-based Sign-on tab under the Manage section
    • Select SAML
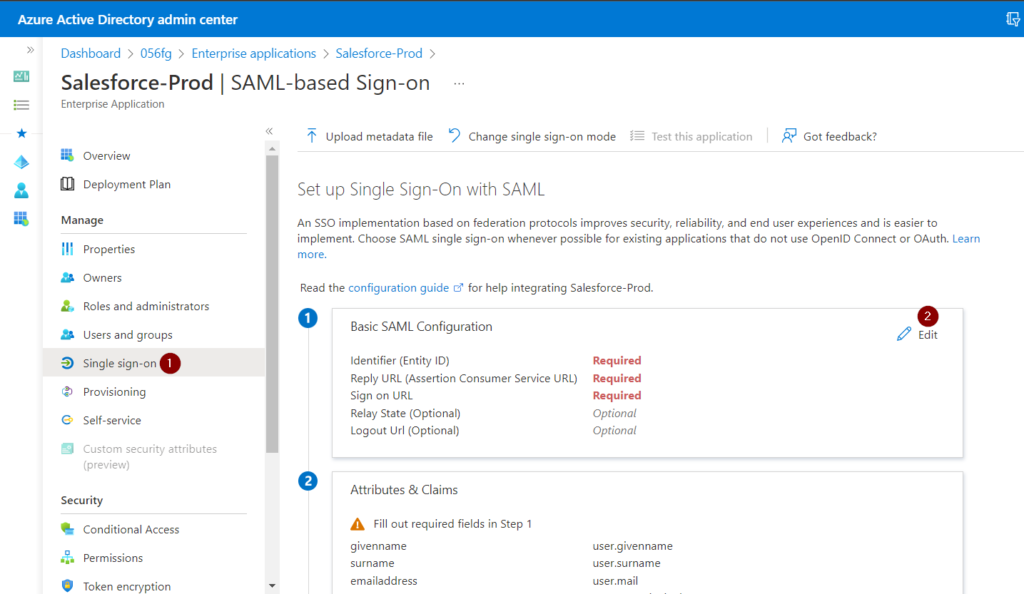
  2. Select the edit icon in the Basic SAML configuration section
Basic SAML Configuration
  1. Your Salesforce administrator should know this information and if not, you can contact Salesforce support. But in general, this information is easy to figure out. I’ve mentioned the format of these URLs below. and I have used my own instance’s URL in the screenshot.
Enterprise accountDeveloper account
Identifier (Entity ID)https://{your-subdomain}.my.salesforce.comhttps://{your-subdomain}-dev-ed.my.salesforce.com
Reply URLhttps://{your-subdomain}.my.salesforce.comhttps://{your-subdomain}-dev-ed.my.salesforce.com
Sign-on URLhttps://{your-subdomain}.my.salesforce.comhttps://{your-subdomain}-dev-ed.my.salesforce.com

Note: Recently, Salesforce has started forcing the lightning experience for the salesforce orgs. The URL is redirected to .lightning.force.com once user is logged in but based my testing, .my.salesforce.com works for the SSO configuration. This can be clarified with Salesforce tech support if necessary.

In my scenario, I’m using a Salesforce developer instance and the values in the below screenshot represent my environment.

  1. Enter the values and click Save
Fill the URL values
  1. On the Set up single sign-on with SAML page, in the SAML Signing Certificate section, find Federation Metadata XML and select Download to download the xml file and save it on your computer
Download Federation Metadata XML
  1. The Set up section has the configuration URLs
Azure AD configuration URLs

Create Salesforce test user

If you are planning to do Just In Time(JIT) user provisioning which is enabled by default, no action is needed but if you don’t plan on using JIT user provisioning, you will have to work with your Salesforce administrator to create a user who already exists in your Azure AD.

Configure Salesforce

  1. Login to Salesforce portal with System Administrator privileges
  2. Click on the Setup under settings icon on the top right corner of the page
Click Setup
  1. In the quick find, type ‘Single Sign-on..’
Search Single Sign-On
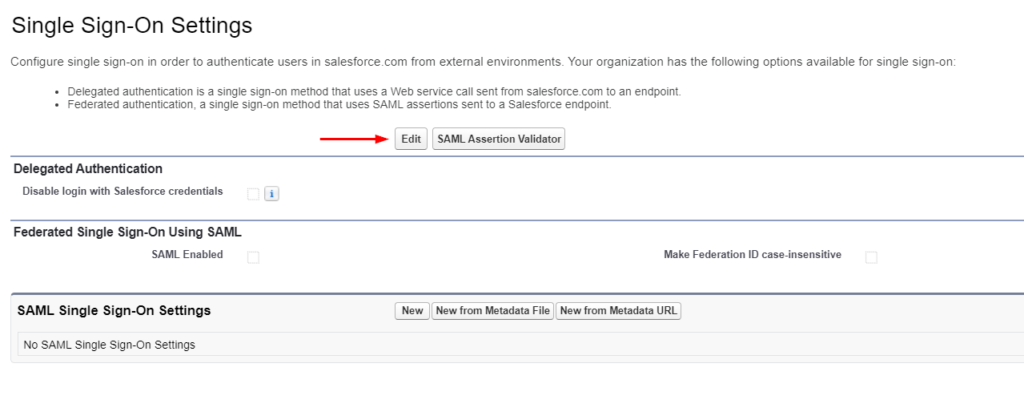
  1. On the Single Sign-On Settings page, click the Edit button
Edit Single Sign-On Settings
  1. Place checkmark next to the following options below and click Save
    • SAML Enabled
    • Make Federation ID case-insensitive
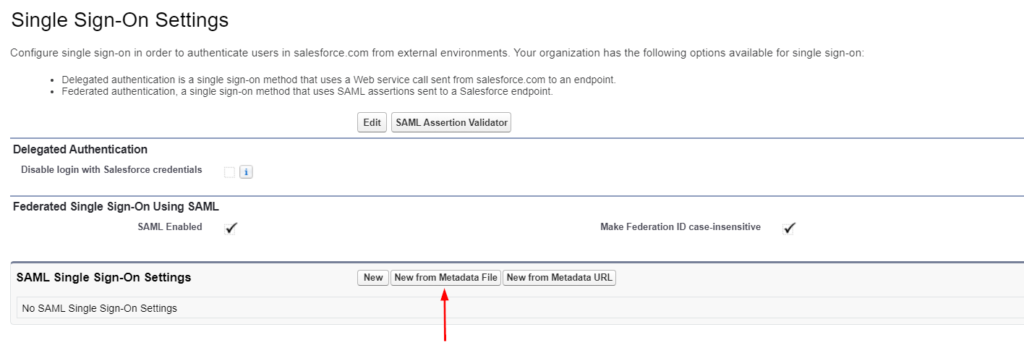
  1. Click New from Metadata File
New SAML Single Sign-On Settings from Metadata file
  1. Click Choose File to upload the metadata XML file downloaded from the Azure AD admin center from step 5. in ‘Configure Azure AD SSO’ section and click Create
Choose Federation Metadata file downloaded from Azure AD
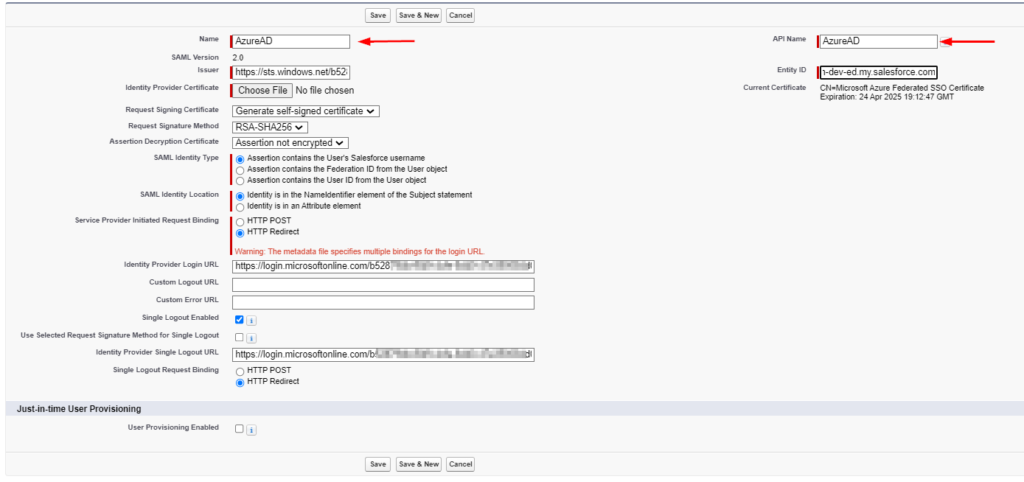
  1. In the SAML Single Sign-On Settings page, the fields are automatically populated using the information from the federation metadata xml file. Fill in values for below and to keep things simple, I named it ‘AzureAD’ but pick what makes sense or follows naming conventions in your organization,
    • Name
    • API Name
SAML Single Sign-On Settings w/o JIT user provisioning
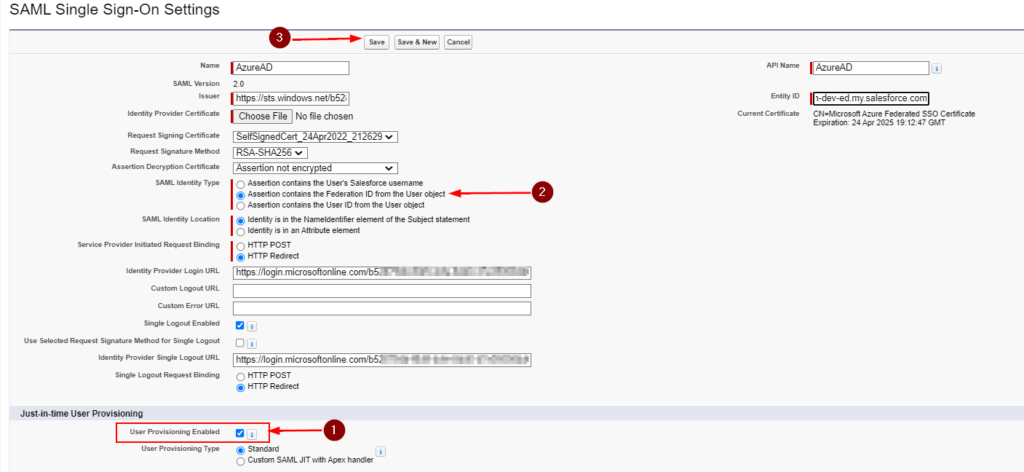
  1. Optional. In the Just-in-time User Provisioning section, I’m leaving the User Provisioning Enabled unchecked but if you want to use SAML JIT, place a checkmark next to User Provisioning Enabled and select SAML Identity Type as Assertion contains the Federation ID from the User object.
SAML Single Sign-On Settings with JIT user provisioning
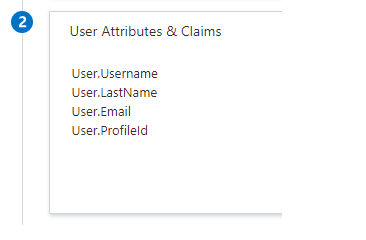
  1. Optional..Continued.. If you configured SAML JIT, you must complete an additional step in the Configure Azure AD SSO section. The Salesforce application expects specific SAML assertions, which requires you to have specific attributes in your SAML token attributes configuration. The following screenshot shows the list of required attributes by Salesforce.
Screenshot that shows the JIT required attributes pane.
  1. On the left navigation pane in Salesforce, search for My Domain
Search ‘My domain’
  1. In the Authentication Configuration section, and click the Edit button
Authentication Configuration
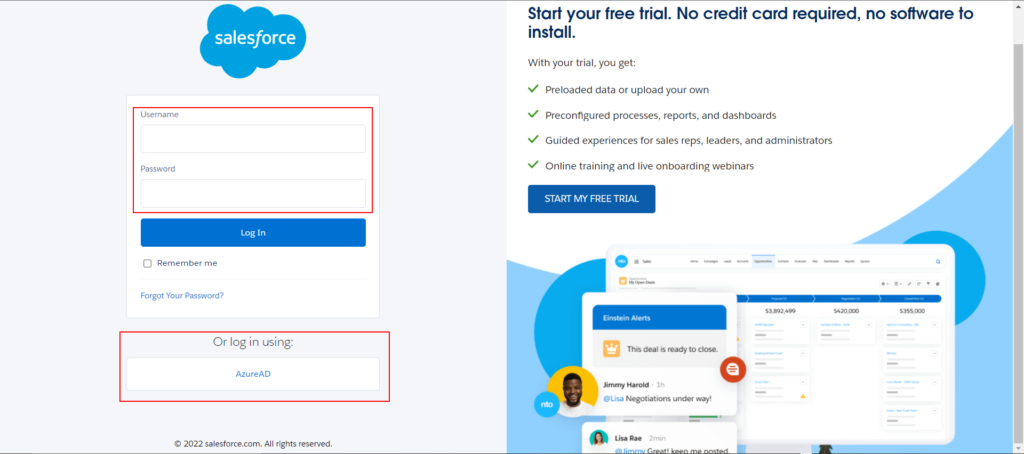
  1. In the Authentication Configuration section, under Authentication Service, place checkmark next to ‘Login Form‘ and ‘AzureAD‘ and click Save
Authentication Configuration – Authentication Service
  1. If more than one authentication service is selected, users are prompted to select which authentication service they like to sign in with while initiating SSO to your Salesforce environment
    • If you don’t want it to happen, then you should leave other authentication services unchecked
user login screen with authentication options

Enable Token Encryption (Optional)

Enabling encryption of SAML assertions adds another layer of security. The SAML assertions are encrypted such that the assertions can be decrypted only with the private keys held by the service provider.

Some organizations require encryption SAML assertions and this is fairly straight-forward to setup in Salesforce and Azure AD.

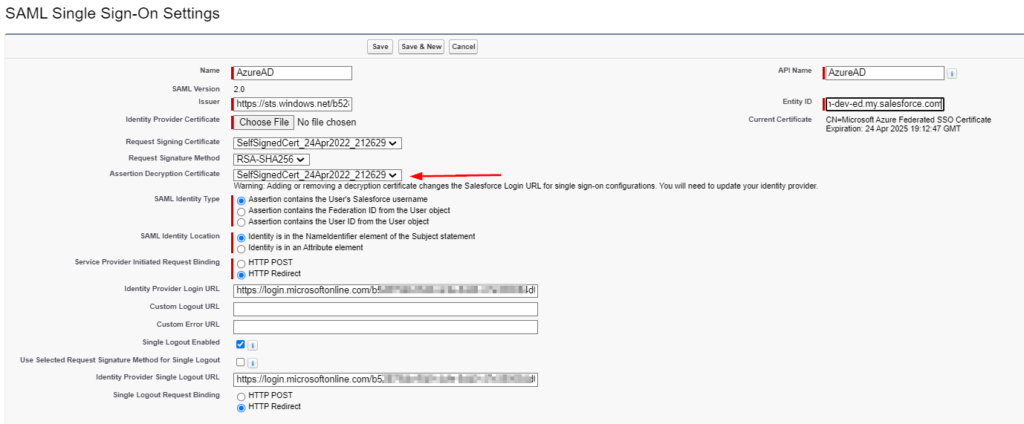
  1. In the SAML Single Sign-On Settings, select the ‘SelfSignedCert…’ and click save
    • Your organization might require using a 3rd party certificate(Example: DigiCert, GeoTrust, etc) and in that scenario you will have to import the certificate into Salesforce using the Certificate and Key Management
SAML Single Sign-On Settings – Assertion Decryption Certificate
  1. In the navigation pane on the left, search for Certificate and Key Management
  2. Click on the certificate
Click on the certificate
  1. Click on Download Certificate and save the file to your machine
    • This steps exports the public key of the certificate which will be used by Azure AD to encrypt the assertion which Salesforce can decrypt using the private key
Click ‘Download Certificate’
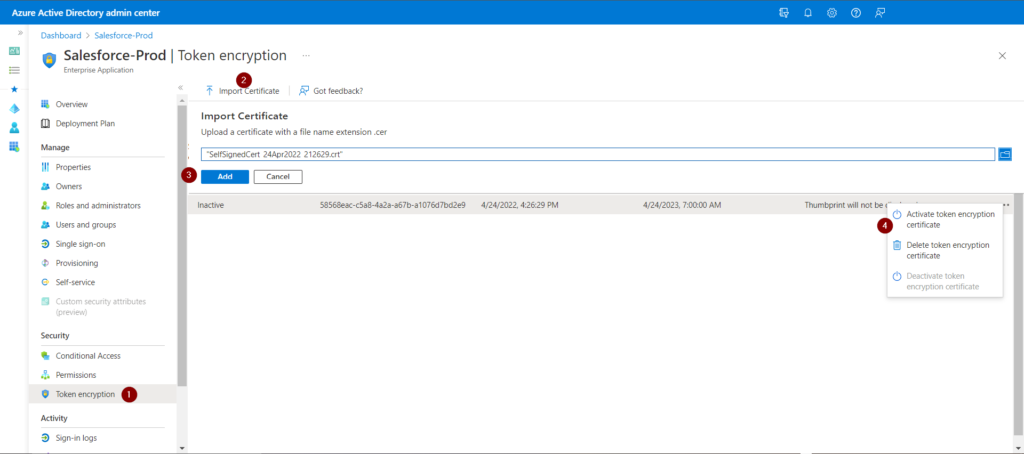
  1. In Azure AD admin center, open the Salesforce application and click on the Token encryption tab. Click Import certificate, browse to the download certificate from Salesforce and click Add. Click on Activate token encryption certificate to make the certificate status active.
Token encryption Azure AD application
  1. Test the Salesforce SSO to make sure everything works as expected

Test SSO

  1. Open your organization’s Salesforce Sign-On URL directly
    • Use Incognito or InPrivate mode to avoid previously saved cookies
  2. The portal should auto-redirect to login.microsoftonline.com and prompt a sign-in

Issues you may encounter and tips on how to fix it

Error: Your administrator has configured the application to block access unless they are specifically granted (“assigned”) access to the application.

Fix: This can be fixed by adding users directly in Users and groups tab of the Salesforce application in Azure AD. It is also a better idea to create group for Salesforce roles and adding users to these groups. This also works better if you have an on-premise AD environment and syncing user to Azure AD.

Or you can set No to the Assignment required? option in the application properties. This way, the user access is managed in Salesforce. But managing user access in Azure AD is lot easier and along with Azure AD P2’s group reviews.

In my scenario, once I added my test user to ‘Salesforce-Standard Users’ Azure AD group I’ve created and assigned a role, the login worked.

login error

I’ve detailed the steps to accomplish this in a different post.

Azure AD Groups assigned to Salesforce Roles

Error: Single Sign-On Error. We can’t log you in because of an issue with single sign-on. Contact your Salesforce admin for help.

Fix: This is a generic error but depending on the issue, it will need more in-depth troubleshooting.

In my scenario, In the SAML Identity Type as Assertion contains the Federation ID from the User object when I was testing JIT, I left this option enabled which caused this error. I set SAML Identity Type as Assertion contains the User’s Salesforce username and it fixed it.

Depending on your scenario, you may have to determine the issue and I use SAML-tracer which is available as extensions for Chrome and Firefox.

Typically the issue is with not having the correct SAML Assertion Fields in the Azure AD application.

Salesforce login error

Hope these steps above in this guide helped you in setting up Azure AD SSO with Salesforce.

Thank you for stopping by. ✌

Azure AD – Implement Single Sign-On with ServiceNow

In this post I will go over the steps required to implement Azure AD SSO integration with ServiceNow. With this in place, it is easier to control access to your ServiceNow implementation and also allow your users to login with their domain credentials.

ServiceNow also supports user account provisioning which I will cover in a later post.

I’ve updated this post for ServiceNow San Diego version. The earlier versions may have different UI options but the steps behind the integration mostly remains the same.

High level implementation steps

In Azure AD add ServiceNow to Enterprise Applications

To configure this integration, first step is to add ServiceNow from the gallery to your list of managed SaaS apps. Below are the steps,

  1. Login to Azure AD Admin Center and click on the Enterprise applications tab
  2. To add new application, Click New application
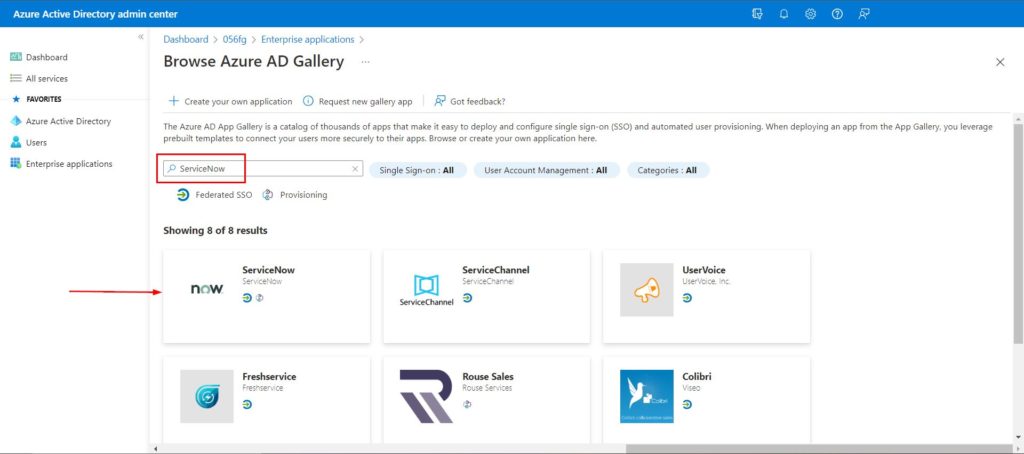
  3. In the Browse Azure AD gallery section, enter ServiceNow in the search box
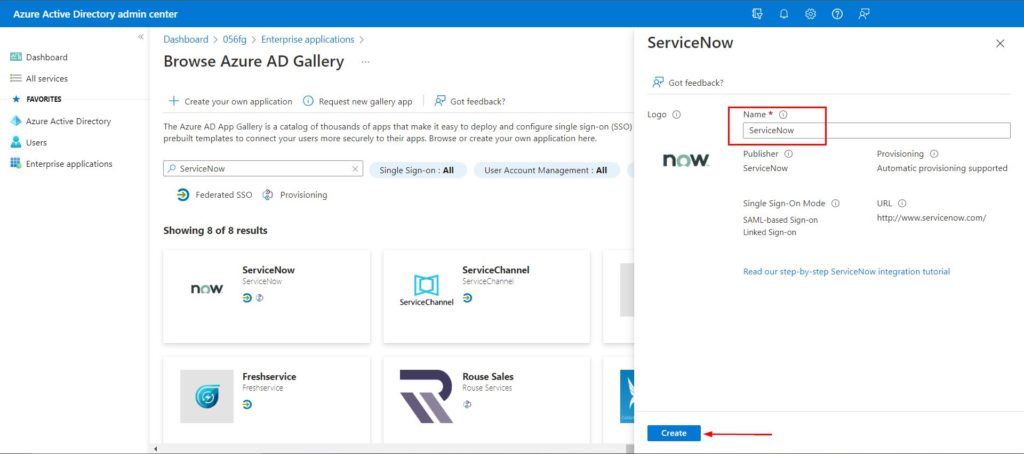
  4. Select ServiceNow and you can name it to differentiate from development to production instance with a prefix but in this scenario, I’ll leave it as default as in screenshot below. Click Create
  5. It takes a few seconds for the app to be added
Search ‘ServiceNow’
add ServiceNow by clicking ‘Create’

Configure Azure AD SSO

Below steps details how to enable SSO in Azure AD portal for the ServiceNow application,

  1. On the ServiceNow application page, select SAML-based Sign-on under the Manage section. Select SAML
  2. Select the edit icon in the Basic SAML configuration section
Basic SAML config

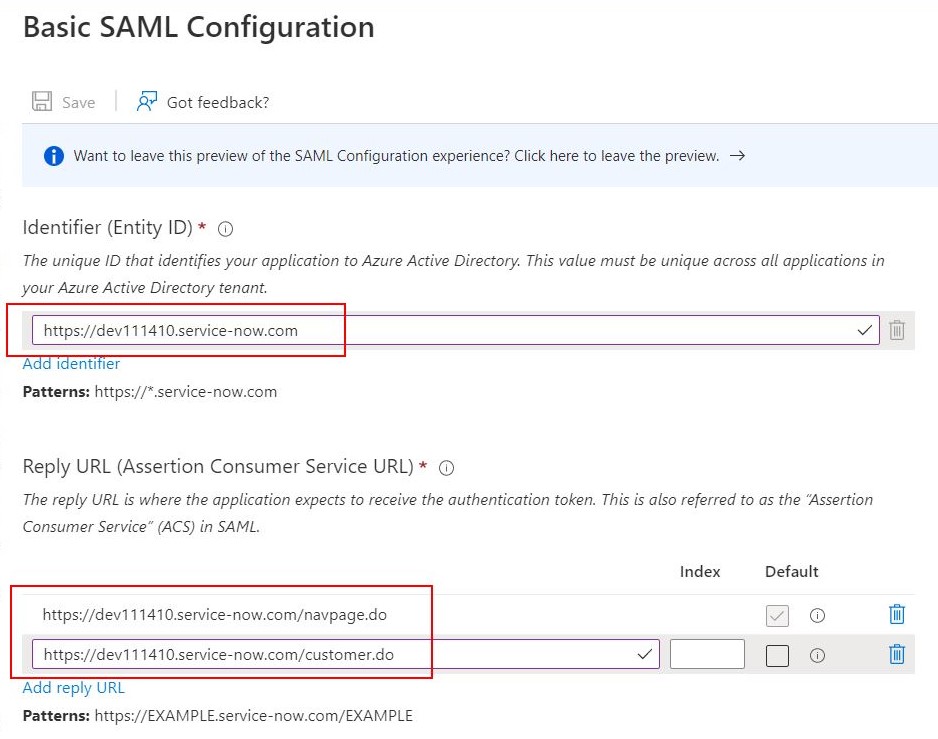
Your ServiceNow administrator should know this information and if not, you can contact ServiceNow support. But in general, this information is easy to figure out. I’ve mentioned the format of these URLs below. and I have used my own instance’s URL in the screenshot.

Identifier (Entity ID)https://{your-instance-name}.service-now.com
Reply URLhttps://{your-instance-name}.service-now.com/navpage.do
https://{your-instance-name}.service-now.com/customer.do
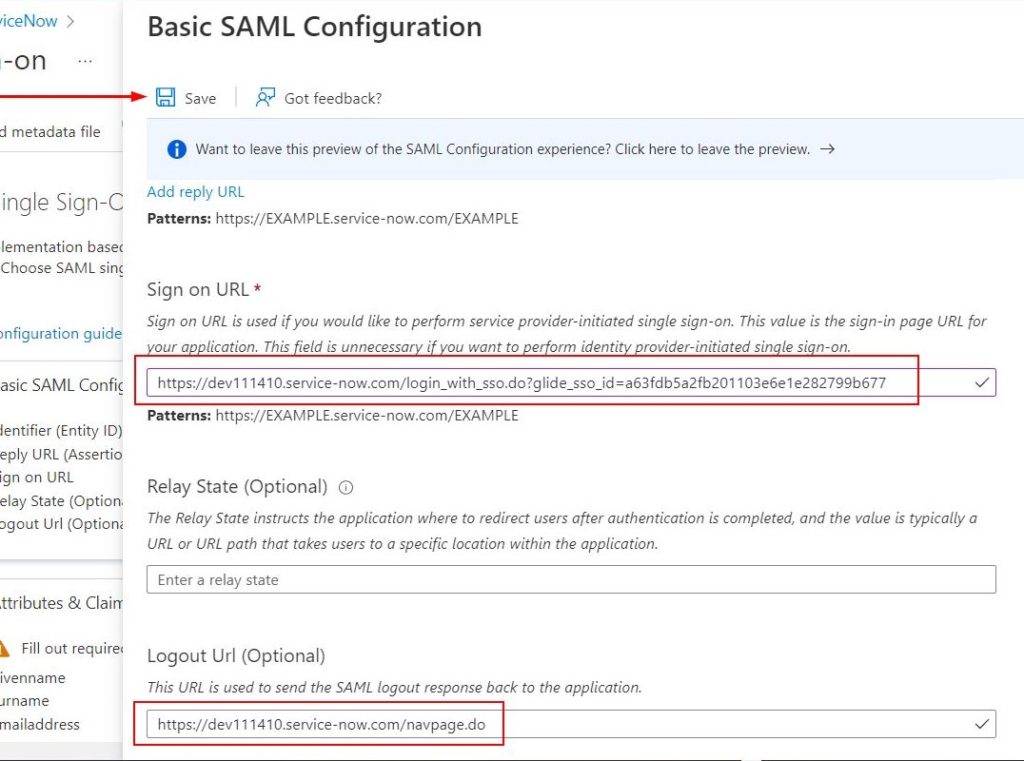
Sign on URLhttps://{your-instance-name}.service-now.com/login_with_sso.do?glide_sso_id=[sys_id of sso configuration]
Logout URLhttps://{your-instance-name}.service-now.com/navpage.do

Please follow along and I have a step below on how to determine the sys_id value from ServiceNow for the Sign on URL. Refer to Step 16. under the ‘Configure ServiceNow’ section below.

Below screenshots show values from my environment. I constructed the Sign on URL based on the sys_id information I got from ServiceNow as mentioned above

  1. In the SAML Signing Certificate section, find Certificate (Base64). Click Download to download Certificate(Base64), and then save the certificate file to your computer.
Download Certificate(Base64)

Create ServiceNow test user

  1. In ServiceNow portal, go to User Administration > Users
  2. Click New, complete the properties for your new user, and click Submit

Most organizations do ‘Automated user provisioning’ and this way you won’t have to create all the users in your Azure AD domain onto ServiceNow. But to make the SSO part easier, co-ordinate with your ServiceNow administrator and create an user account in ServiceNow with the email ID of a user in your Azure AD.

Configure ServiceNow

  1. Login on to your ServiceNow application portal as an administrator
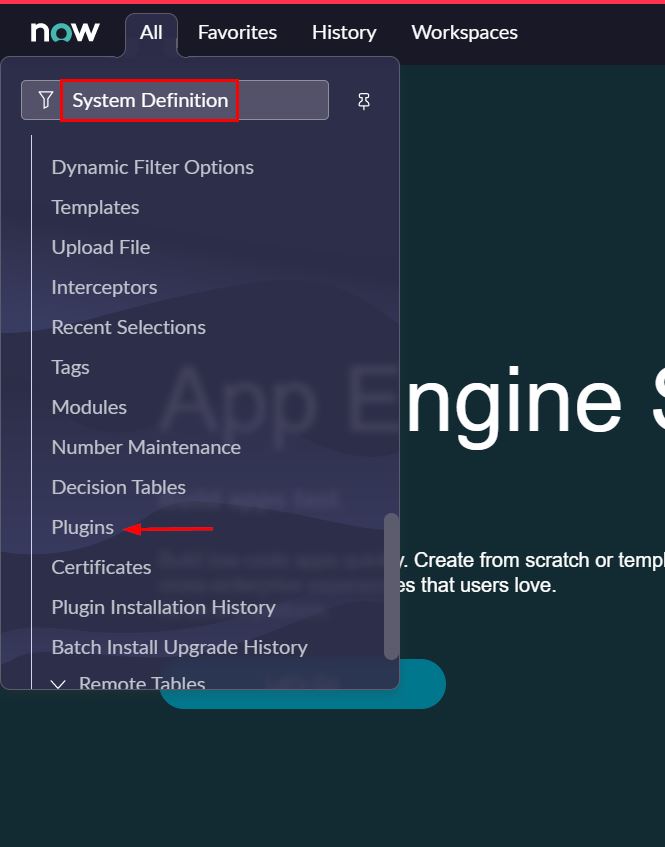
  2. In the left pane, search for the System Definition section from the search box, and then select Plugins
ServiceNow plugins
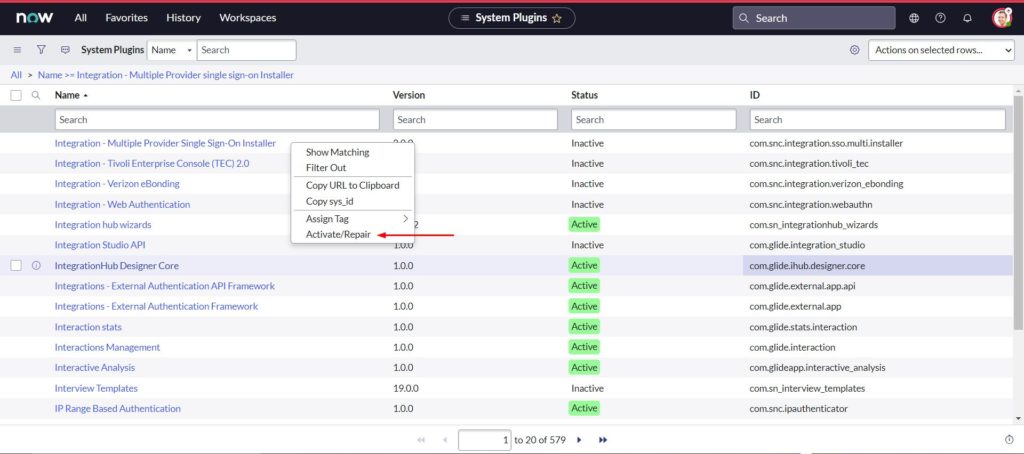
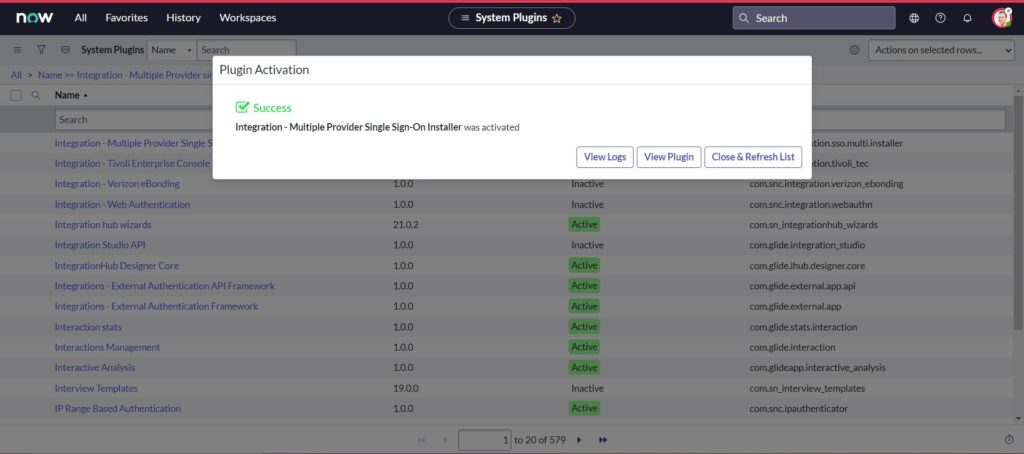
  1. Search for Integration – Multiple Provider single sign-on Installer
  2. Right-click, and select Activate/Repair
search plug-in and activate
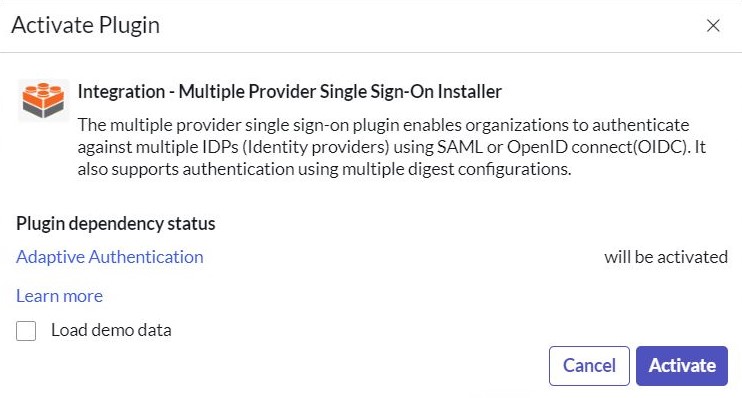
  1. Select Activate
Click Activate
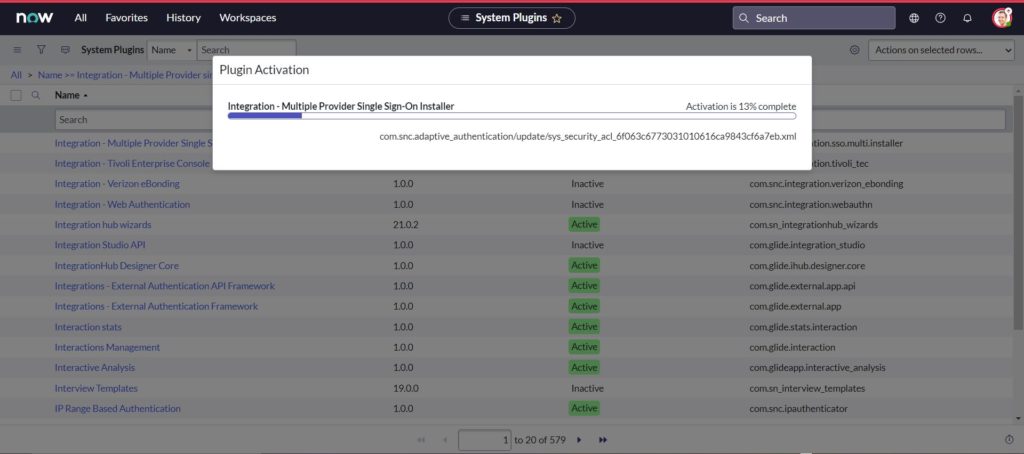
wait till activation complete
Click Close & Refresh List
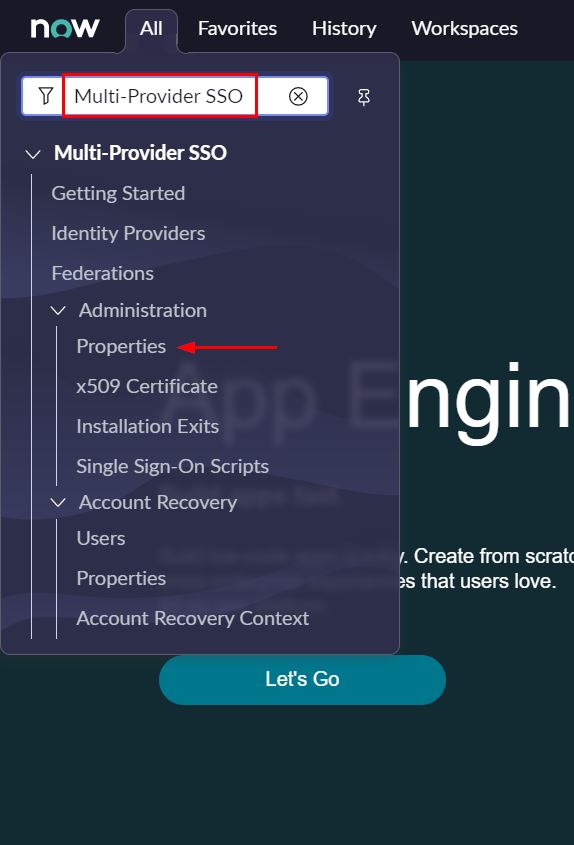
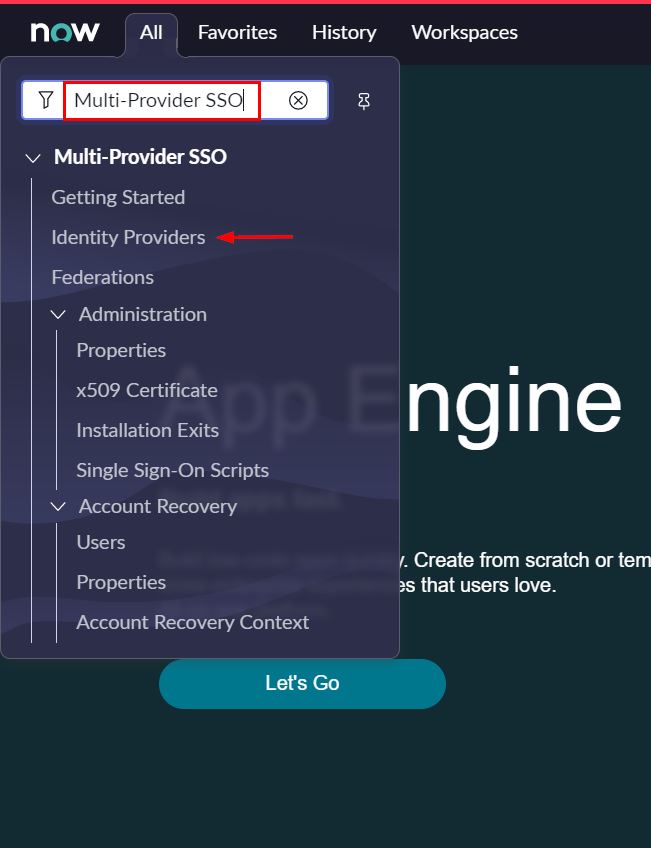
  1. In the left pane, search for the Multi-Provider SSO, and then select Properties
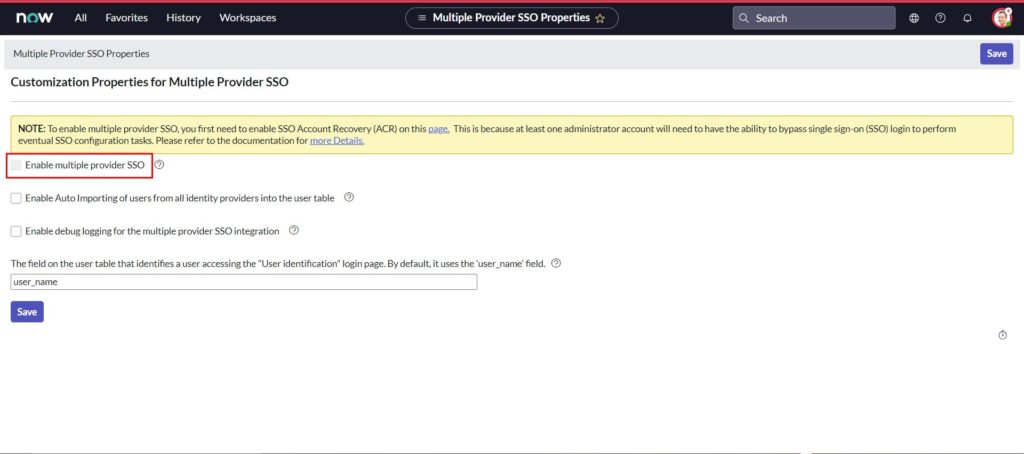
  1. Enable multiple provider SSO option is not active as in screenshot below and this is because Account Recovery is not setup. This comes in handy if something goes wrong with the SSO configuration and prevents admins from being locked out.
Enable multiple provider SSO not active
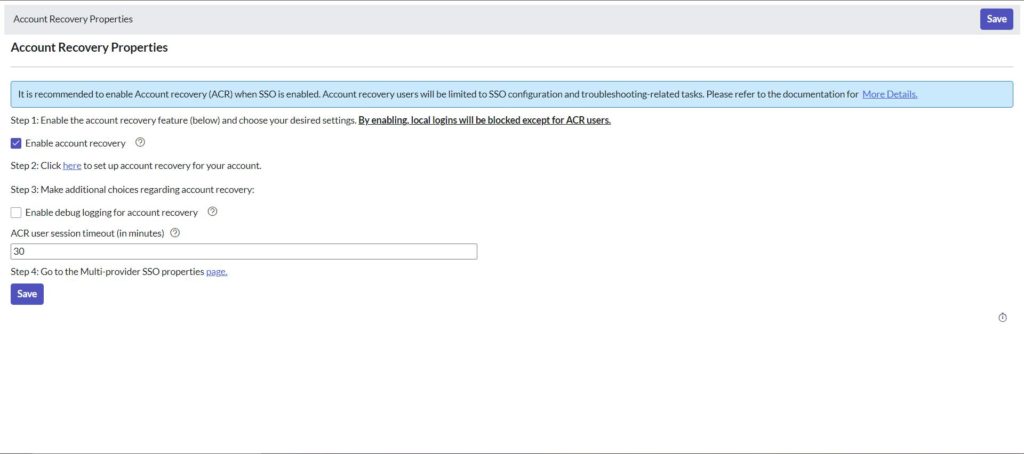
  1. Place a checkmark next to Enable account recovery to enable it
Account recovery properties
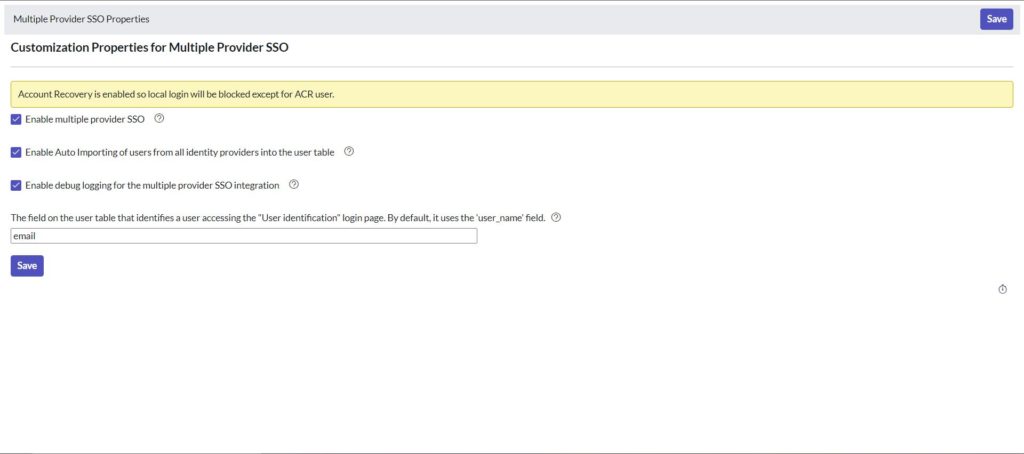
  1. Now back on the Customization Properties for Multiple Provider SSO page, place check mark next to below options,
    • Enable multiple provider SSO
    • Enable Auto Importing of users from all identity providers into the user table
    • Enable debug logging for the multiple provider SSO integration
    • The field on the user table that…,
      • email
Customization Properties for Multiple Provider SSO options
  1. Click Save to save configuration
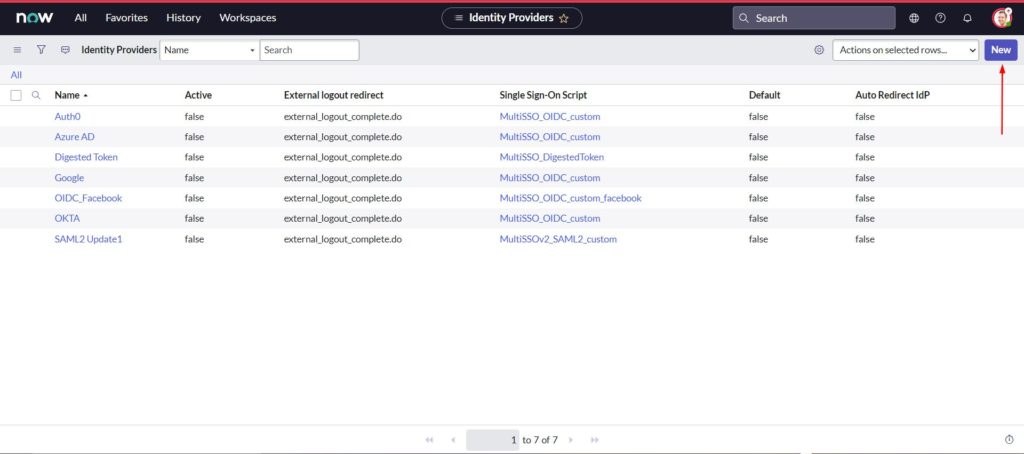
  2. In the left pane, search for the Multi-Provider SSO, and then select Identity Providers
  1. Click New
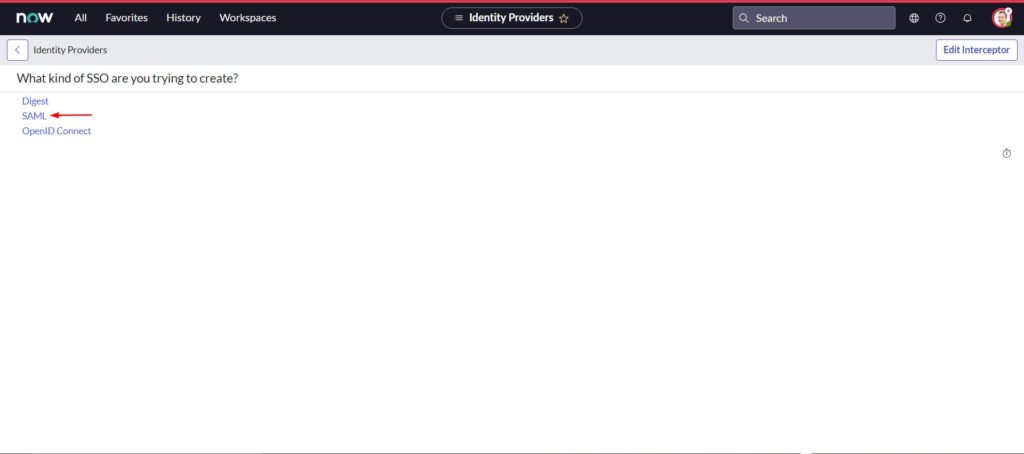
  1. select SAML
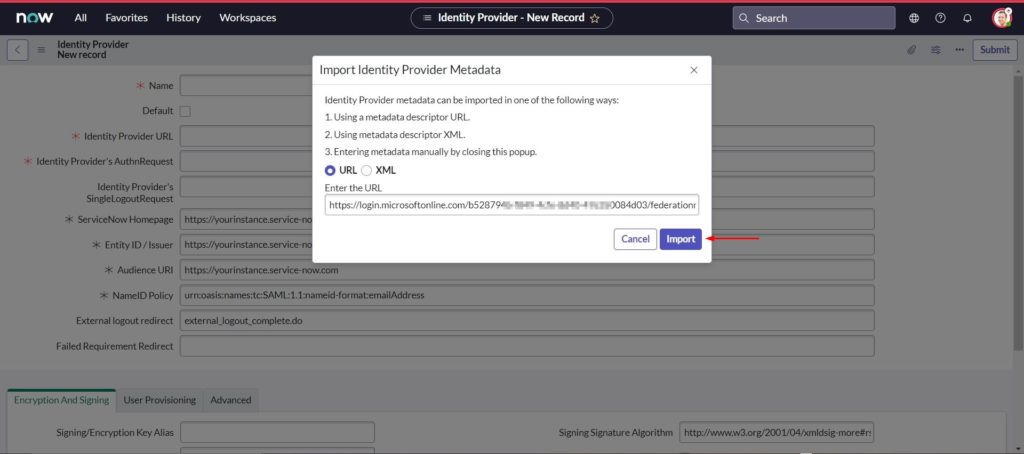
  1. In the Import Identity Provider Metadata, select URL
    • The Metadata Url can be found in the Azure AD ServiceNow application SAML Signing Certificate section
    • Copy the App Federation Metadata Url value
Azure AD App Federation Metadata Url
  1. Paste the App Federation Metadata Url from Azure AD under Enter the URL and click Import
Paste the App Federation Metadata Url value
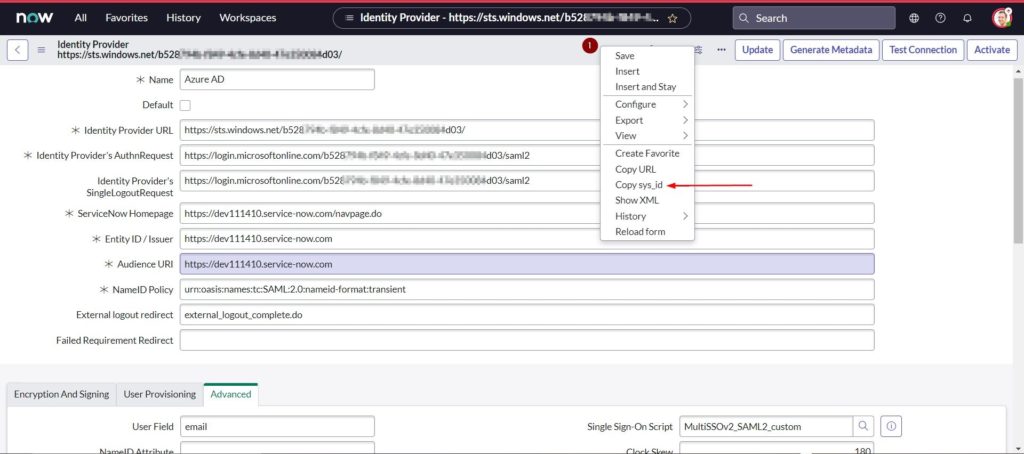
  1. Right click on the grey bar at the top of the screen and click Copy sys_id and save this value in a notepad to construct your Sign on URL in Azure AD
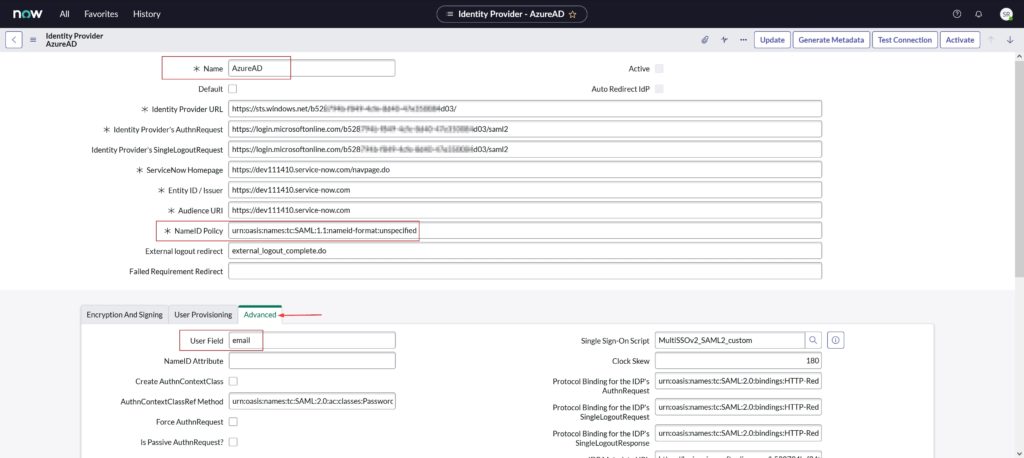
  1. The import metadata url reads the metadata and populates all the necessary information
    • Enter a name for your configuration. I’ve named it ‘Azure AD’
    • Confirm the NameID Policy is set to urn:oasis:names:tc:SAML:1.1:nameid-format:unspecified
    • Select Advanced. In User Field, enter email
SSO config
  1. Scroll down to the Encryption And Signing tab and X.509 Certificate section, and select New
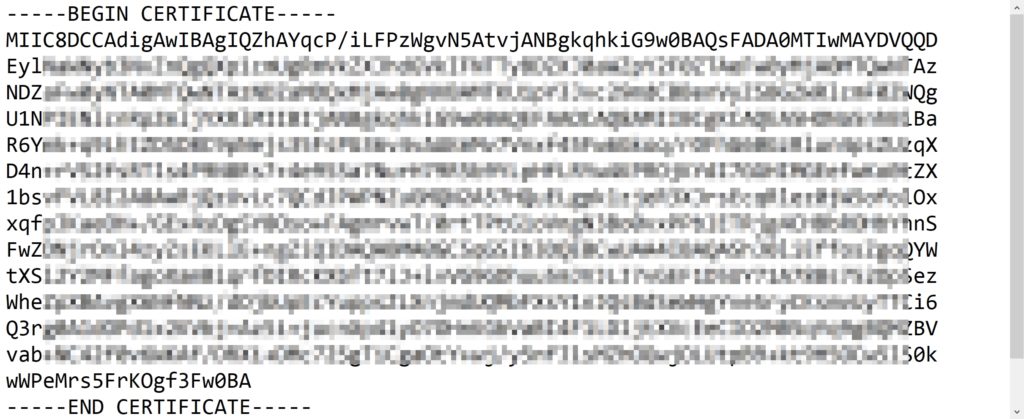
  2. Open the .cer file with notepad which was downloaded from Azure AD and saved to your PC
    • copy the entire content and leave it in the clipboard
Azure AD certificate open using notepad
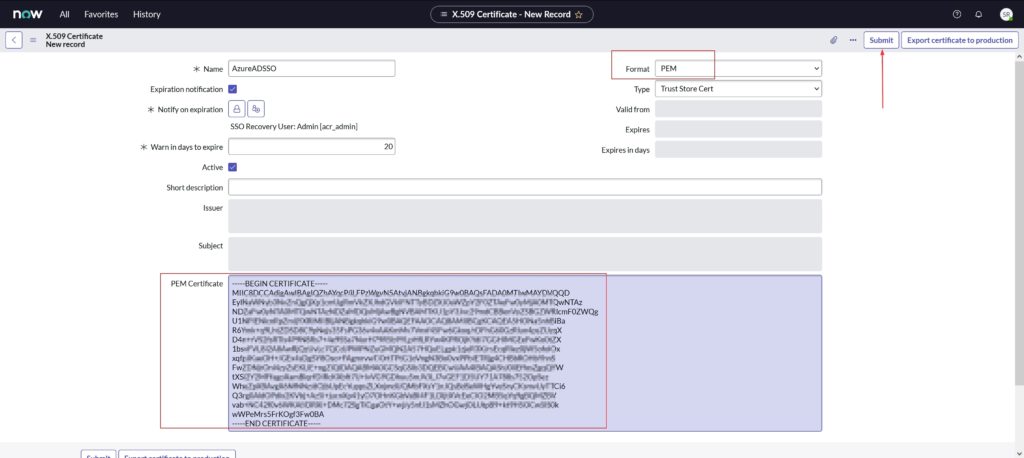
  1. Paste the contents in PEM certificate section
    • Provide a Name
    • Select Format as PEM
  2. Click Submit
x.509 certificate
  1. Click Update
Click Update
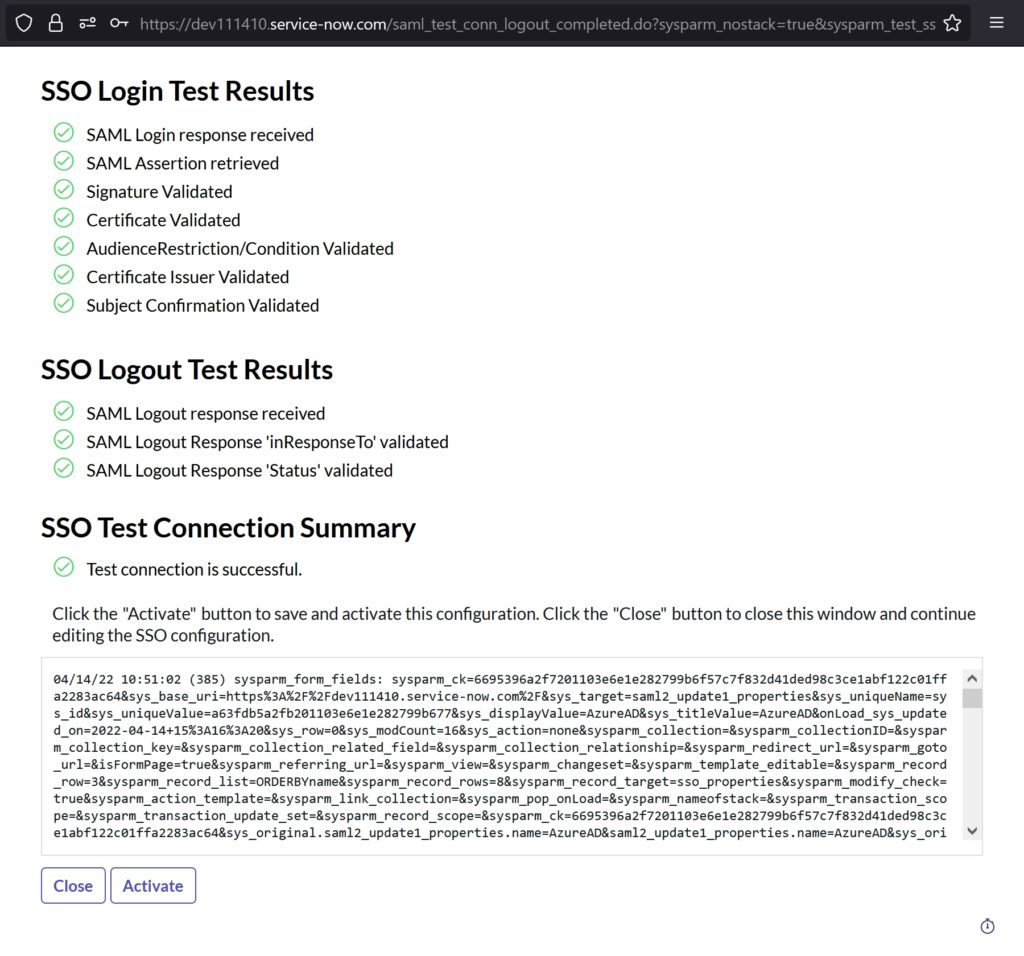
  1. Click Test Connection at the upper-right corner of the page
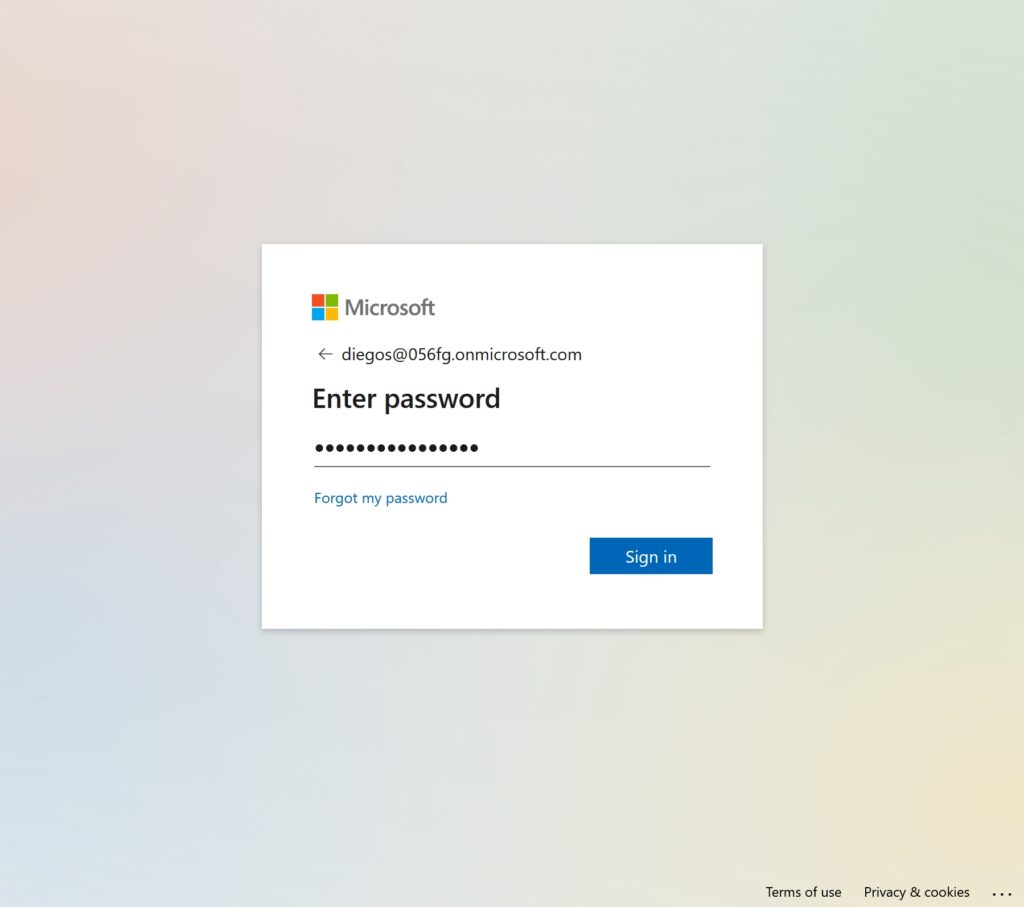
    • Sign-in using the test user account created earlier in the ‘Create ServiceNow test user’ section
    • Click Close
  1. Click Activate
Click Activate
  1. Ensure Default and Active are checked like in screenshot below
Active enabled
  1. To ensure ServiceNow auto-redirects the users to Azure AD SSO, click on the Set as Auto Redirect IdP in the Related Links section
Set as Auto Redirect IdP
Auto Redirect IdP is enabled
  1. Click Update to save the configuration

Test SSO

  1. Open ServiceNow portal
    • Use Incognito or InPrivate mode to avoid previously saved cookies
  2. The portal should auto-redirect to login.microsoftonline.com and prompt a sign-in

Issues you may encounter and How to fix it

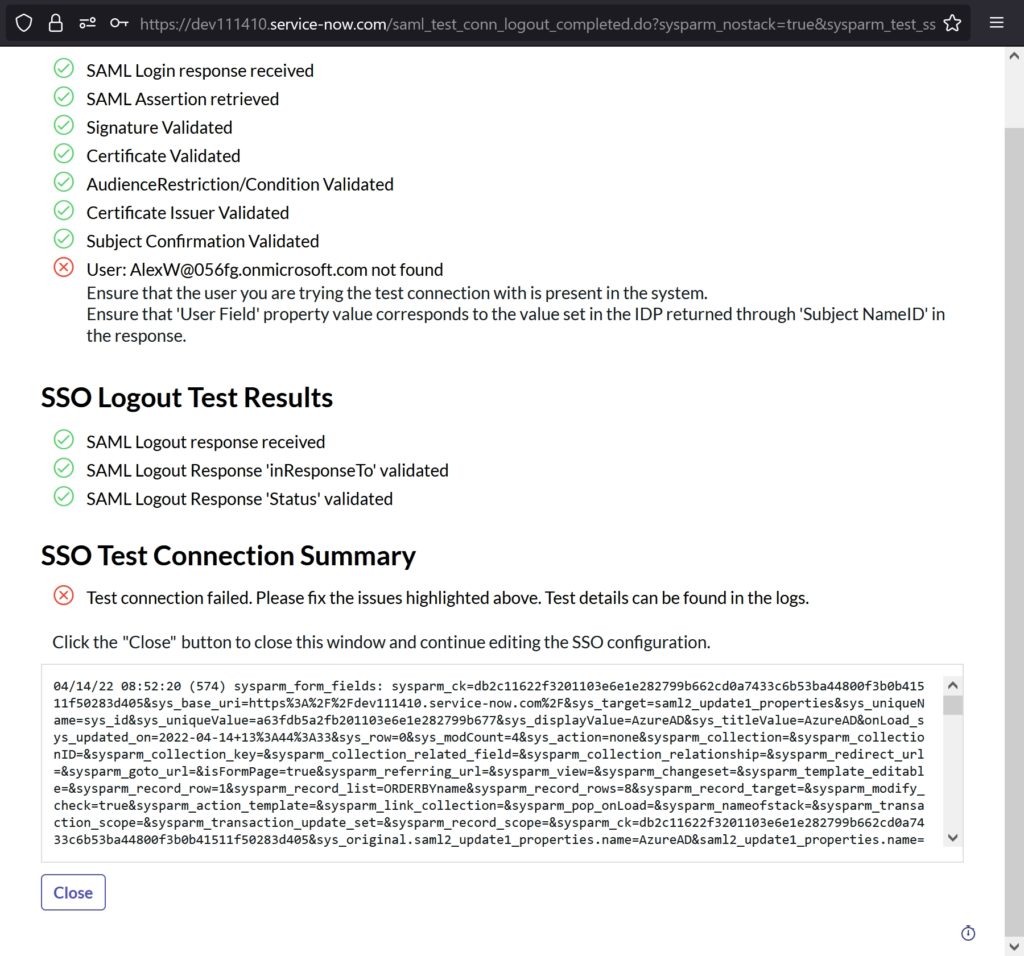
Error: Ensure that the user you are trying the test connection with is present in the system.
Ensure that ‘User Field’ property value corresponds to the value set in the IDP returned through ‘Subject NameID’ in the response.

Fix: I tried the SSO with a user ID that only existed in Azure AD and not in ServiceNow. The System didn’t know what to do and hence the error..duh!

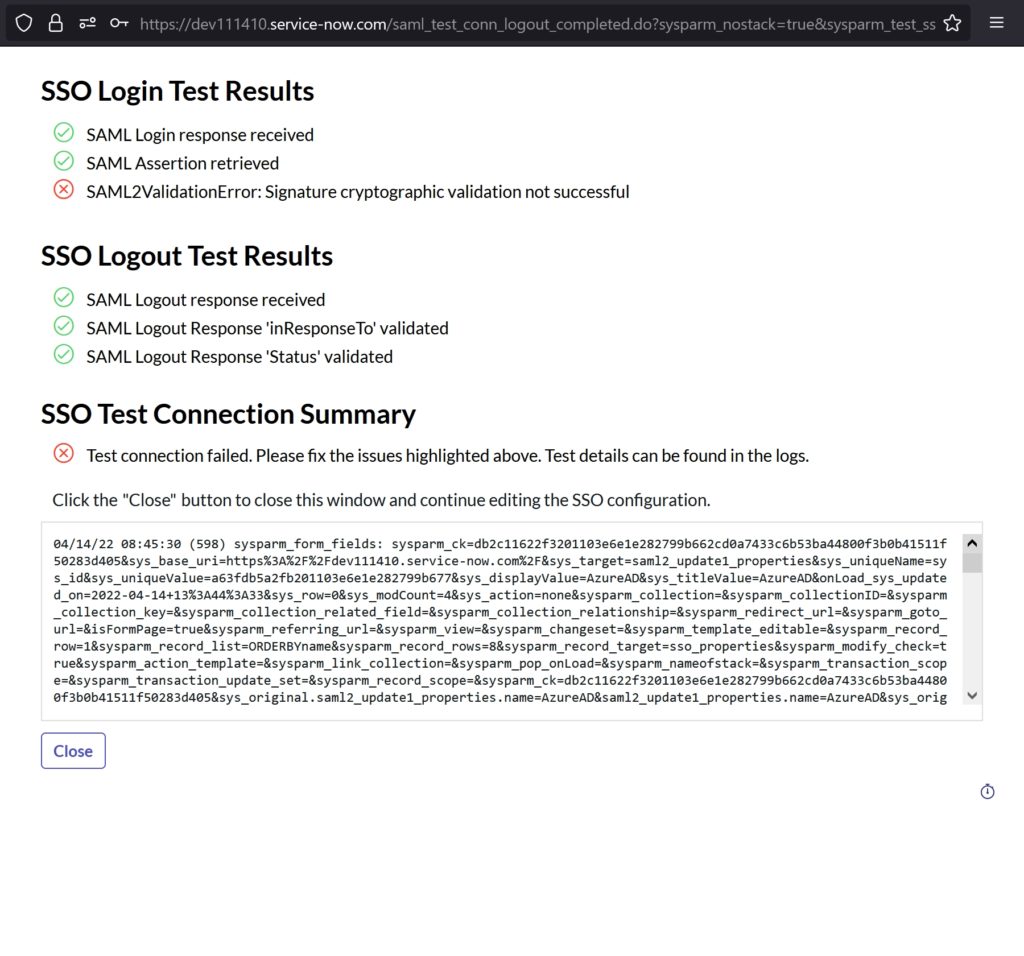
Error: SAML2ValidationError: Signature cryptographic validation not successful

Fix: I imported the PEM certificate from Azure AD into ServiceNow but I forgot to save it by not clicking update

This should help you with the Azure Active Directory single (SSO) integration with ServiceNow. I believe I’ve covered everything in this process.

Thank you for stopping by.✌

Enable Federation with Azure AD SSO and Amazon AppStream 2.0

We can enable users to sign in to AppStream 2.0 by using their existing Azure AD credentials, and start streaming applications. To accomplish this, we use an IAM role and a relay state URL to configure Azure AD and enable AWS to permit users to access an AppStream 2.0 stack. The IAM role grants users the permissions to access the stack. The relay state is the stack portal to which users are forwarded after successful authentication by AWS.

In this post, I’ll go over steps on how to configure federated user access for Amazon AppStream 2.0 using Azure AD SSO for Enterprise Apps.

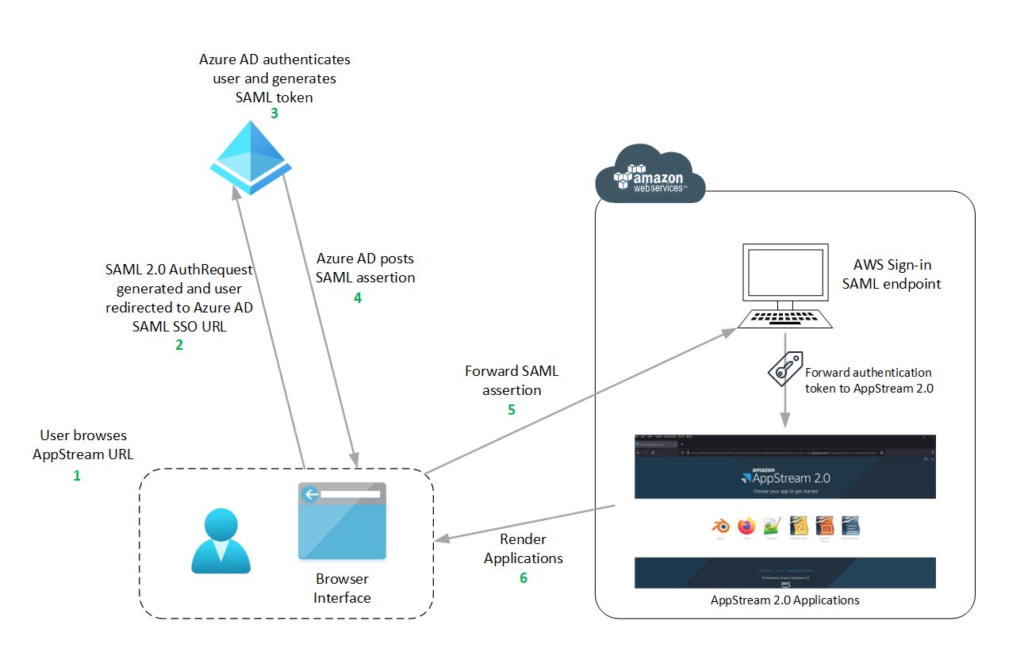
The below diagram illustrates the authentication flow between AppStream 2.0 and Azure AD as identity provider (IdP).

Authentication Workflow

From a user’s perspective, this above process happens seamlessly. The user starts at myapps.microsoft.com and is automatically redirected to an AppStream 2.0 application portal without being required to enter AWS credentials.

The setup process goes like in this diagram below,

Create an Azure AD SSO application

  1. Login to Azure AD Admin Center (https://aad.portal.azure.com/)
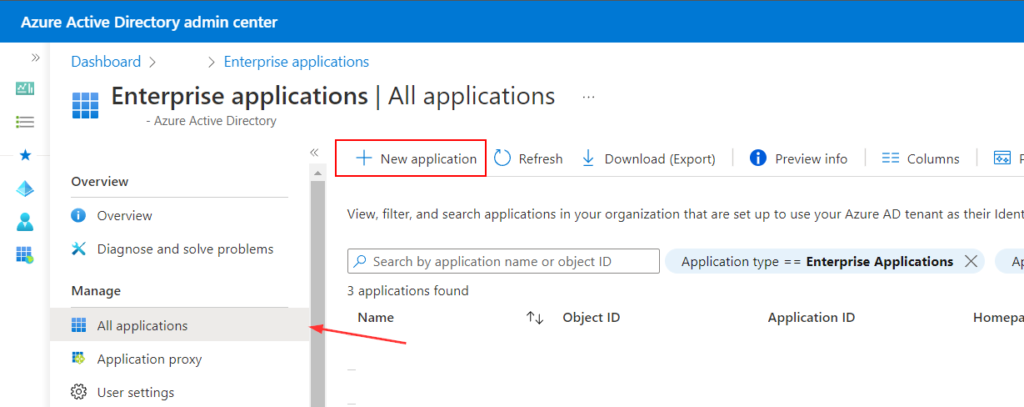
  2. Click on the Enterprise applications tab
  3. To add new application, Click New application
Enterprise applications
  1. Click Create your own application
Azure AD – New Application
  1. Provide a name for your application
    • I’ve named my application AppStream-DesignUsers
  2. Select Integrate any other application you don’t find in the gallery (Non-gallery) and click Create
Create your own application
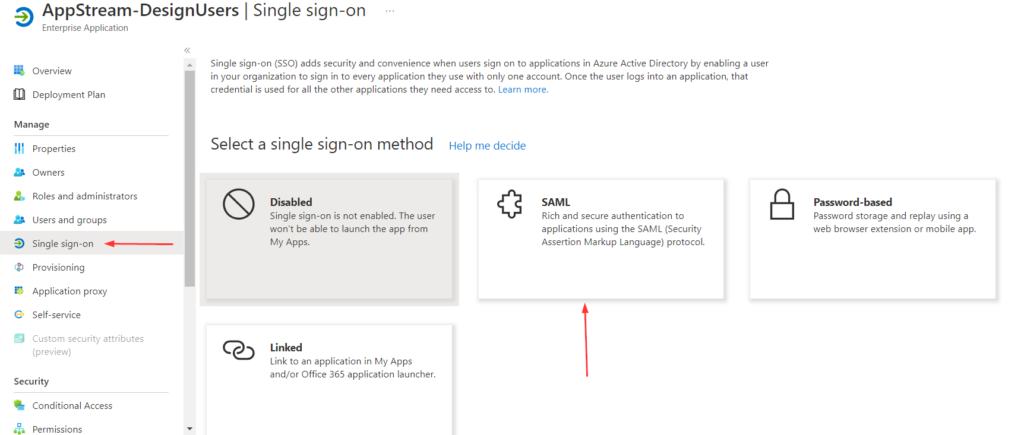
  1. Once the application is added, from the left navigation menu, Click on Single sign-on, and choose SAML
SSO method – SAML
  1. Click Edit in the Basic SAML Configuration
Basic SAML Configuration
  1. Provide the Identifier (Entity ID) and Reply URL (Assertion Consumer Service URL), then click Save
    • Identifier (Entity ID) = URN:AMAZON:WEBSERVICES
    • Reply URL (Assertion Consumer Service URL) = https://signin.aws.amazon.com/saml
    • Sign on URL (Optional) = <leave it blank>
    • Relay State (Optional) = <leave it blank>, We will revisit this later in this post
      • The entity ID is passed during the SAML exchange
      • Azure AD requires this value to be unique for each application
      • When we add more AppStream 2.0 stacks, we can append a number to the string; for example, URN:AMAZON:WEBSERVICES1,URN:AMAZON:WEBSERVICES2
Basic SAML Configuration – Continued
  1. In the SAML Signing Certificate section, click Download next to the Federation Metadata XML and save the .xml file to your computer
Download Federation Metadata XML

Create the SAML identity provider

Now, we need to create the SAML provider in AWS IAM console.

  1. In AWS console, search and open IAM
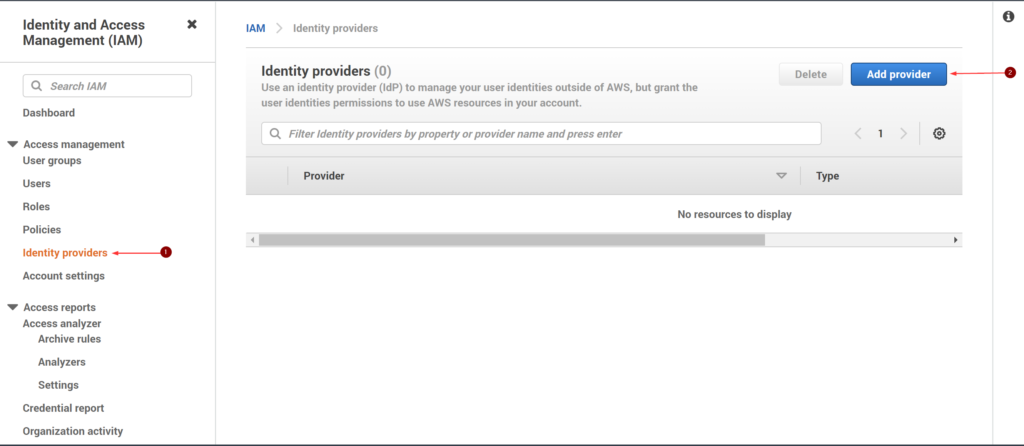
  2. In the left navigation window, click Identity providers, and the Add provider
AWS IAM – Add provider
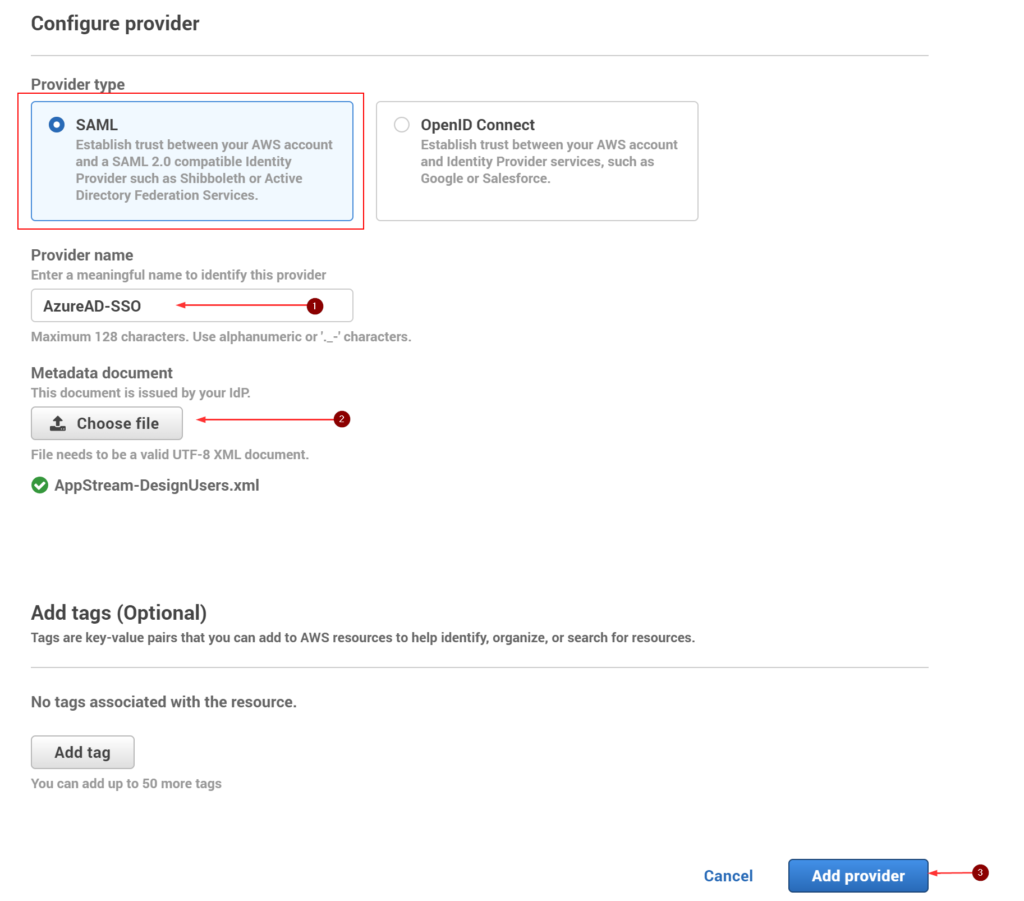
  1. On the Configure Provider page, for the Provider Type, select SAML
  2. For Provider name, I’ve named it AzureAD-SSO
  3. Click Choose File to upload the metadata document that previously downloaded from Azure AD, and click Add provider
Configure identity provider
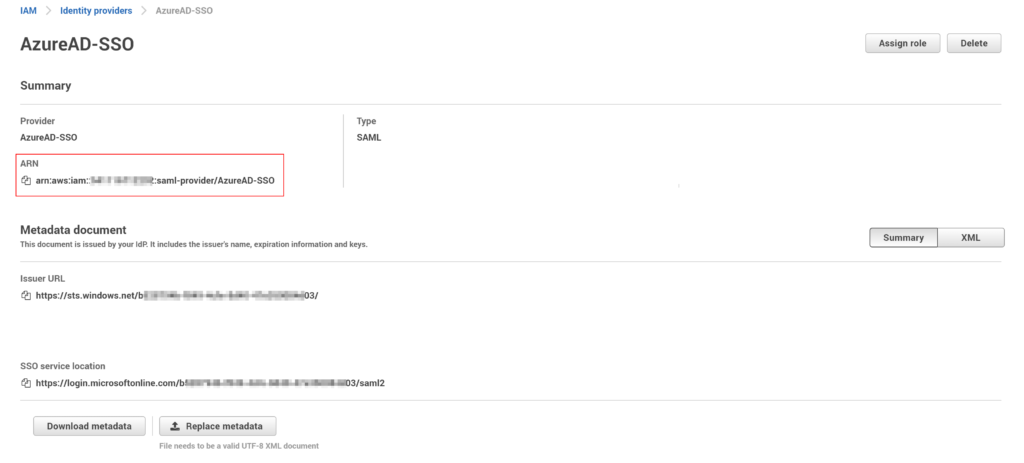
  1. Click on the identity provider we just created
Identity provider added
  1. Copy the value for the Provider ARN
    • The ARN is in the following format: arn:aws:iam::AccountID:saml-provider/Provider Name
Copy Identity provider ARN

Configure an IAM policy

We need to create a policy with permissions to the AppStream 2.0 stack. This way we can ensure that users have only the permission to stream applications from a specific stack.

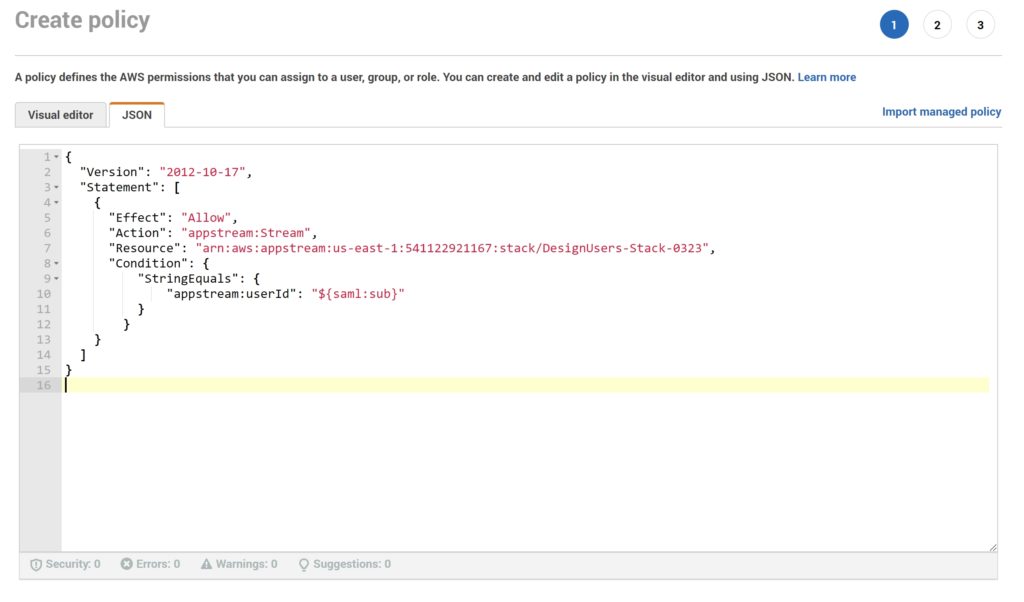
  1. In the IAM console, choose Policies, click Create Policy
  2. In Create policy page, choose the JSON tab
  3. Copy and paste the following JSON policy into the JSON window
    • Modify the resource by entering your AWS Region Code, account ID, and stack name
      • AWS Region Code = Determine AWS region code here
      • account ID = In AWS console, click on your user name in the top right of the window and your account ID is there
      • Stack name = AppStream stack name which we want to grant access to users to
{
  "Version": "2012-10-17",
  "Statement": [
    {
      "Effect": "Allow",
      "Action": "appstream:Stream",
      "Resource": "arn:aws:appstream:REGION-CODE:ACCOUNT-ID-WITHOUT-HYPHENS:stack/STACK-NAME",
      "Condition": {
          "StringEquals": {
              "appstream:userId": "${saml:sub}"           
          }
        }
    }
  ]
}
AWS IAM – Policy
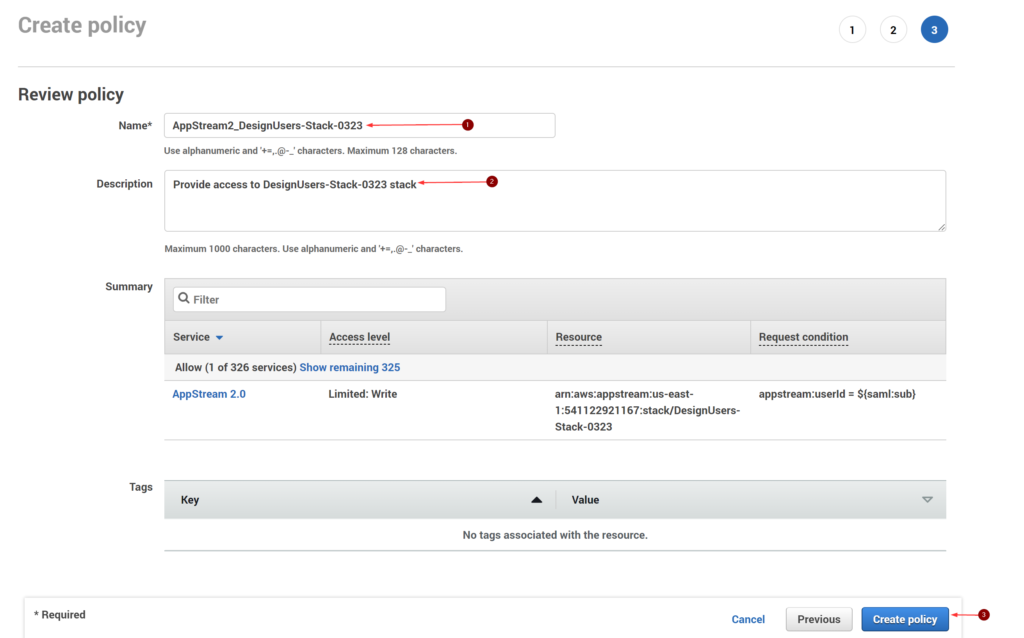
  1. In the Review policy page, provide Name, Description and click Create policy
Review and create policy
  1. You should see the following notification once the policy is created,

Create an IAM Role

In this step, we will create a role that our Azure AD users will assume when federating to AppStream 2.0

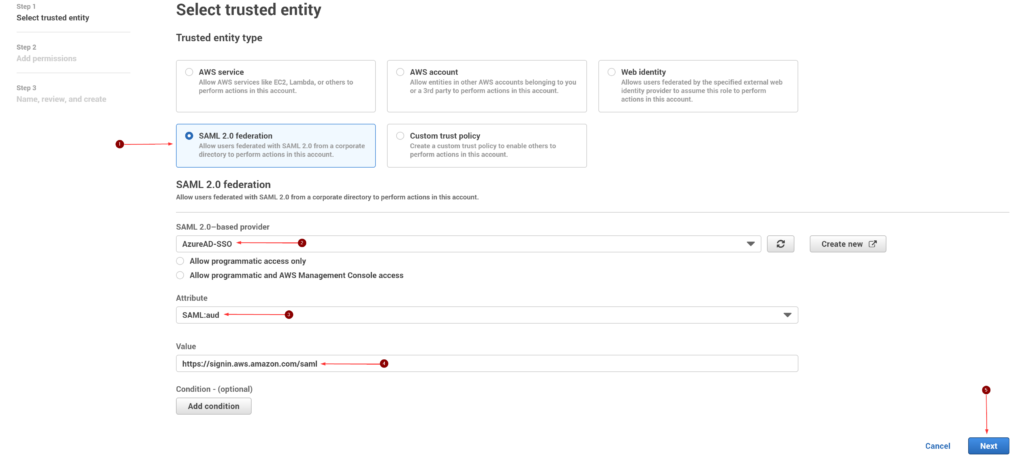
  1. In the IAM console, choose Roles, click Create role
  2. For the Trusted entity type, select SAML 2.0 federation
  3. Under SAML 2.0-based provider, choose the SAML IdP that we created earlier
  4. For the Attribute, pick SAML:aud and type https://signin.aws.amazon.com/saml
  5. Do not add any conditions and click Next
AWS IAM – Role
  1. In Add permissions, select the IAM policy we created earlier and click Next
Add permissions
  1. Provide a Role Name and Description that identifies the role, and click Create Role
  2. Once created, locate and click on the role we just created
  3. Copy the Role ARN
    • The ARN is required to configure claims rules later
    • The ARN is in the following format: arn:aws:iam::AccountID:role/Role Name
Copy role ARN

Configure the Azure AD SSO Application

Now we are ready to finish configuring the Azure AD application we started working on earlier

  1. Login to Azure AD Admin Center (https://aad.portal.azure.com/)
  2. Click on the Enterprise applications tab
  3. Choose the application we created earlier, from the left navigation menu, Click on Single sign-on
  4. Click Edit in the Basic SAML Configuration, Provide Relay State URL and click Save
    • Relay State = The Relay State is unique to the account, AWS Region, and AppStream 2.0 stack
    • Format is,
      • https://relay-state-region-endpoint?stack=stackname&accountId=aws-account-id-without-hyphens
    • Below table has a list of AppStream 2.0 Relay State Region Endpoints
Region Relay state endpoint
US East (N. Virginia)https://appstream2.us-east-1.aws.amazon.com/saml
(FIPS) https://appstream2-fips.us-east-1.aws.amazon.com/saml
US West (Oregon)https://appstream2.us-west-2.aws.amazon.com/saml
(FIPS) https://appstream2-fips.us-west-2.aws.amazon.com/saml
Asia Pacific (Mumbai)https://appstream2.ap-south-1.aws.amazon.com/saml
Asia Pacific (Seoul)https://appstream2.ap-northeast-2.aws.amazon.com/saml
Asia Pacific (Singapore)https://appstream2.ap-southeast-1.aws.amazon.com/saml
Asia Pacific (Sydney)https://appstream2.ap-southeast-2.aws.amazon.com/saml
Asia Pacific (Tokyo)https://appstream2.ap-northeast-1.aws.amazon.com/saml
Canada (Central)https://appstream2.ca-central-1.aws.amazon.com/saml
Europe (Frankfurt)https://appstream2.eu-central-1.aws.amazon.com/saml
Europe (Ireland)https://appstream2.eu-west-1.aws.amazon.com/saml
Europe (London)https://appstream2.eu-west-2.aws.amazon.com/saml
AWS GovCloud (US-West)https://appstream2.us-gov-west-1.amazonaws-us-gov.com/saml
(FIPS) https://appstream2-fips.us-gov-west-1.amazonaws-us-gov.com/saml
AppStream 2.0 Relay State Region Endpoints
Azure AD – Add Relay State
  1. Click Edit in the Attributes & Claims section
Azure AD – Attributes & Claims
  1. In Required claim,
    • Unique User Identifier (Name ID) = Key used to identify users in the SAML assertion
    • I generally stick with user.userprincipalname
    • Usually user.mail or user.userprincipalname works
  2. Click + Add new claim and add the below claims
    • By default, Azure AD populates several SAML attributes for all new applications
    • These attributes are not needed for the federation to AppStream 2.0
    • We can remove them by choosing the three dots next to each, and choosing Delete
      • If you decide to leave them as is, it doesn’t do any harm

Name = Role
Namespace = https://aws.amazon.com/SAML/Attributes
Source = Attribute
Source Attribute = This is the Role ARN from earlier in this post, followed by a comma and then the Provider ARN

Role attribute

Name = RoleSessionName
Namespace = https://aws.amazon.com/SAML/Attributes
Source = Attribute
Source Attribute = We can provide any string value. I’m going with user.mail

RoleSessionName attribute

Name = SAML_SUBJECT
Namespace = https://aws.amazon.com/SAML/Attributes
Source = Attribute
Source Attribute = We can provide any string value. I’m going with user.displayname

SAML_SUBJECT attribute

If the user intend to use the AppStream 2.0 client, sessions will default to a 60 minute timeout. This setting will determine the duration.

Name = SessionDuration
Namespace = https://aws.amazon.com/SAML/Attributes
Source = Attribute
Source Attribute = Value in seconds between 900 (15 minutes) and 43200 (12 Hours). I’m going with 28800 (8 Hours)

SessionDuration attribute

Assign Azure AD groups in Application

  1. In the left navigation menu, click Users and groups, click + Add user/group
  2. In Add Assignment, click Users and groups
  3. In the Users and groups dialog box, select the Azure AD group to provide access the AppStream 2.0 stack
  4. Click Assign
Assign Group

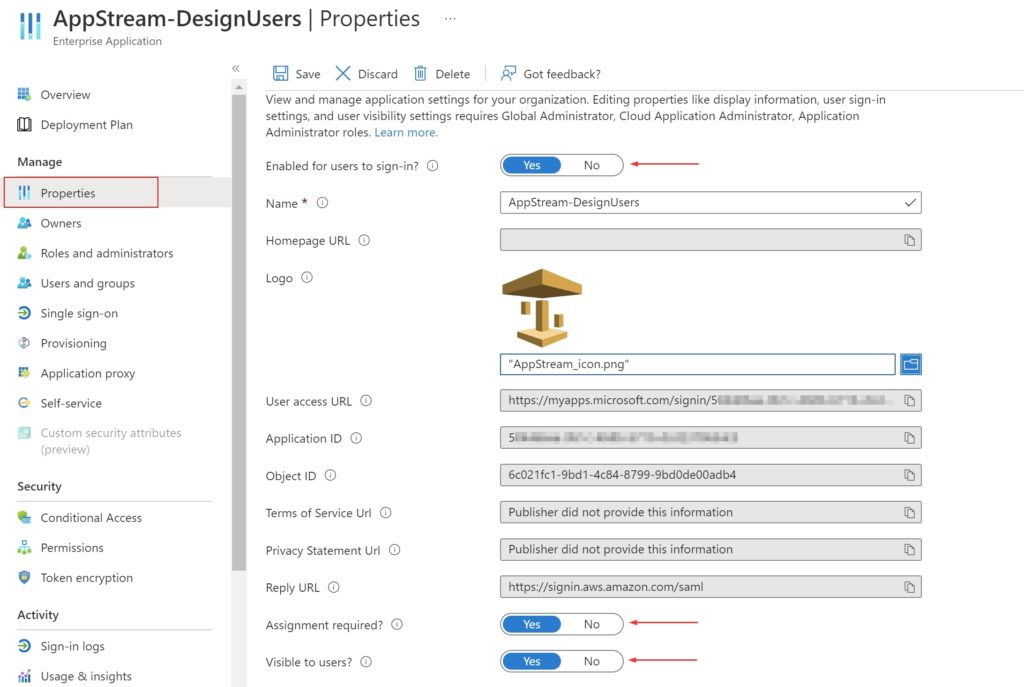
Also click on the Properties tab in the left navigation menu to check the following,

  • Enabled for users to sign-in? = Yes
  • Assignment required? = Yes
  • Visible to users? = Yes

I also uploaded an icon file for the app to look nicer.😉

Test Application

With a Azure AD security group assigned to the application and the other setting configured, we’re ready to test this with a user account. I’ve already added the user account to the assigned Azure AD group. To test this,

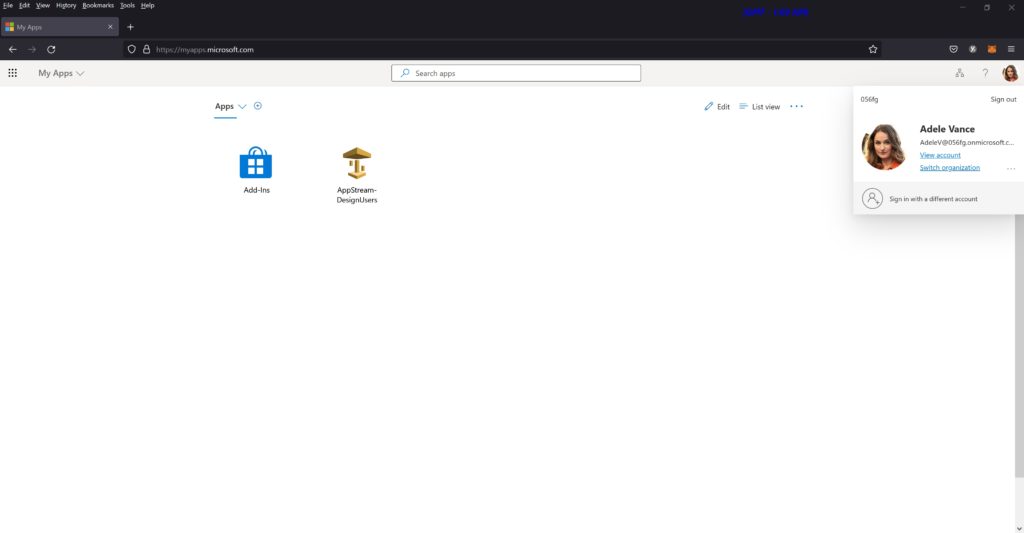
  1. User logs into myapps portal (https://myapps.microsoft.com/) with their Azure AD credentials
  2. User is presented with the AppStream stack,
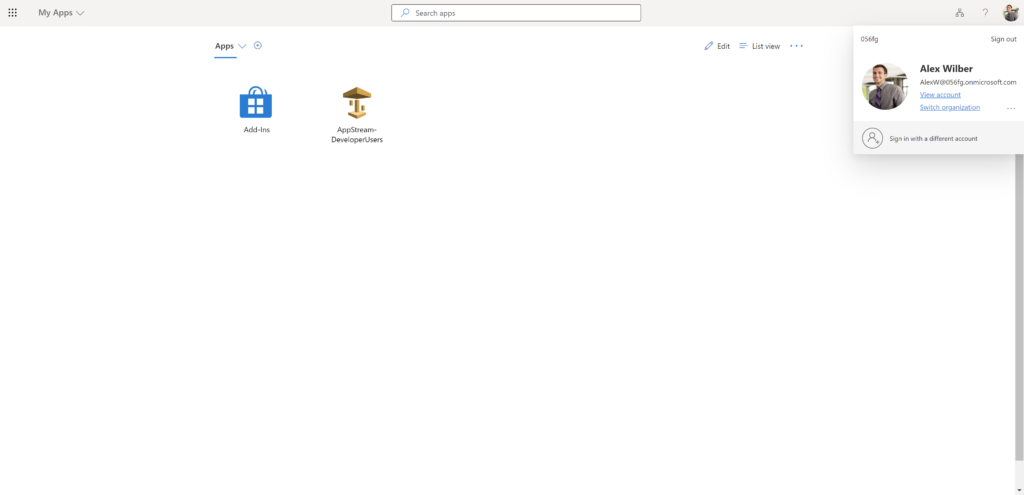
User’s myapps portal view
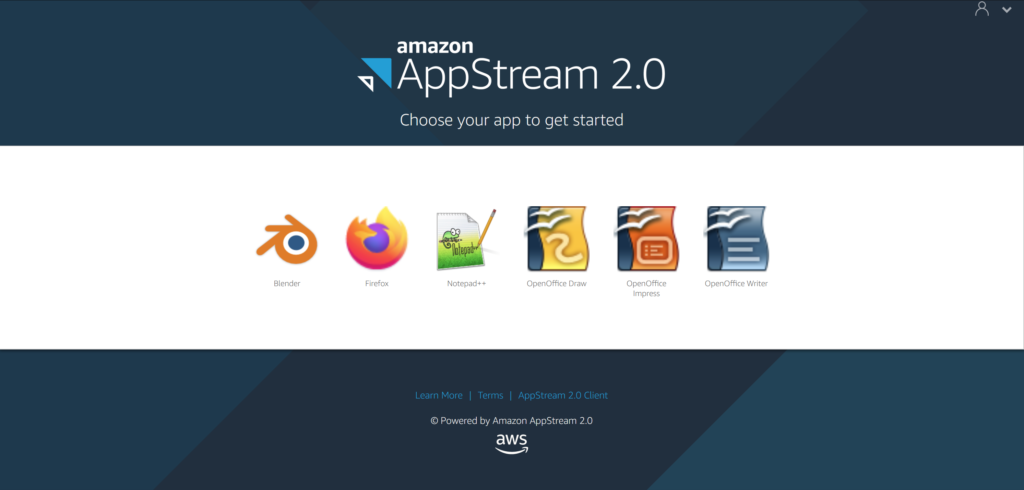
User redirected to AppStream 2.0 app catalog

I also created a second fleet and stack, associated the fleet to the stack to demonstrate how we can assign different users to stacks. IMO, the myapps portal is a really cool feature and we can it to present AppStream to our users.

As I mentioned earlier in this post, adding more stack will require adding additional Azure AD applications and assigning AD group(s) to it.

All Stacks
All Fleets

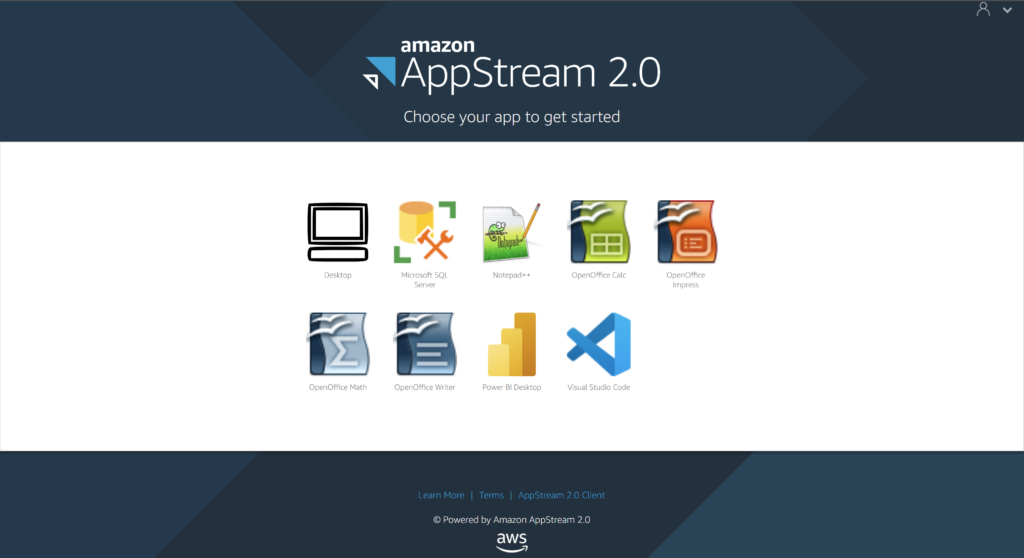
This below is a different user logging into the myapps portal (https://myapps.microsoft.com/) with their Azure AD credentials and I’ve assigned the ‘DeveloperUsers-Stack-0323’ stack to them.

User’s myapps portal view

The user gets redirected to the AppStream 2.0 portal

User redirected to AppStream 2.0 app catalog

Issues you may encounter and How to fix it

Error: RoleSessionName is required in AuthnResponse (service: AWSSecurityTokenService; status code: 400; error code: InvalidIdentityToken)

Fix: I encountered this error with the second stack I had created. When is saw this error, my obvious first step is to make sure I didn’t miss the RoleSessionName attribute in the Azure AD app I created. And it was there with the expected value.

I then decided to go back over the AWS IAM role and policy I created and realized that in the I had picked the wrong identity provider and once I picked the correct one, this issue was resolved.

RoleSessionName is required in AuthnResponse (service: AWSSecurityTokenService; status code: 400; error code: InvalidIdentityToken)

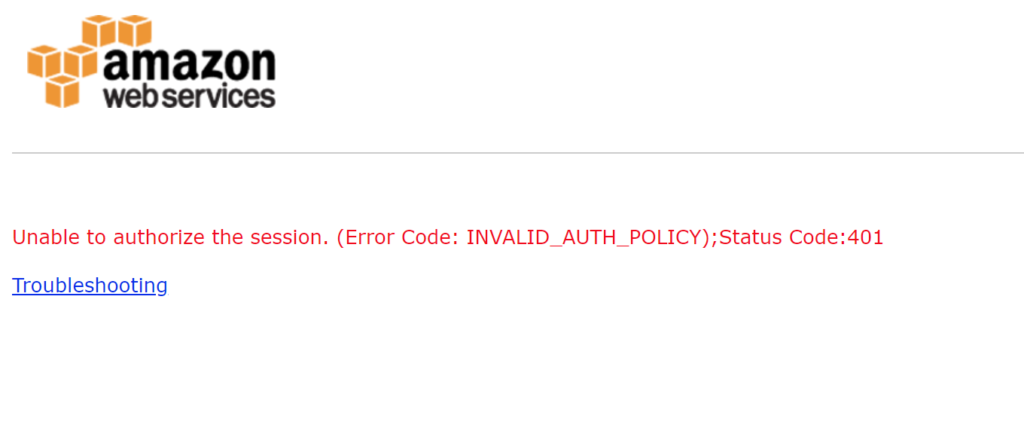
Error: Unable to authorize the session. (Error Code: INVALID_AUTH_POLICY);Status Code:401

Fix: This error message occurs when the IAM policy does not permit access to the AppStream 2.0 stack or when the stack name is not entered into the policy. Similar mess up on my part.

I had mistyped the stack’s name while creating/typing in the JSON window during the policy creation step.

Unable to authorize the session. (Error Code: INVALID_AUTH_POLICY);Status Code:401

In my experience, the SAML-tracer for Chrome and Firefox comes in handy to help identify SAML related issues. It has certainly helped me in several instances.

Hope this post helped you to setup Azure AD SSO for your AppStream 2.0 stacks.

Thank you for stopping by.✌