In Azure AD, Seamless Single Sign-on can be configured when Password Hash Sync or Pass through authentication is configured. Azure AD Seamless SSO automatically signs in users when they are in their corporate owned devices and one the corporate network. This helps save a lot of time without repeatedly typing credentials in to Azure AD and other Azure AD integrated applications.
When we enable Azure AD Seamless SSO, a computer account named AZUREADSSOACC is created in on-premises AD in each AD forest. This computer account represent Azure AD in the on-premises AD. Considering how important this computer object is, it is better to take the following steps to protect it,
Move it into a OU,
Where they are safe from accidental deletions
Where only domain admins have access
Ensure that Kerberos delegation on the computer account is disabled
No other accounts in AD have delegation permissions
This can be easy to miss if you have permissions sprawl
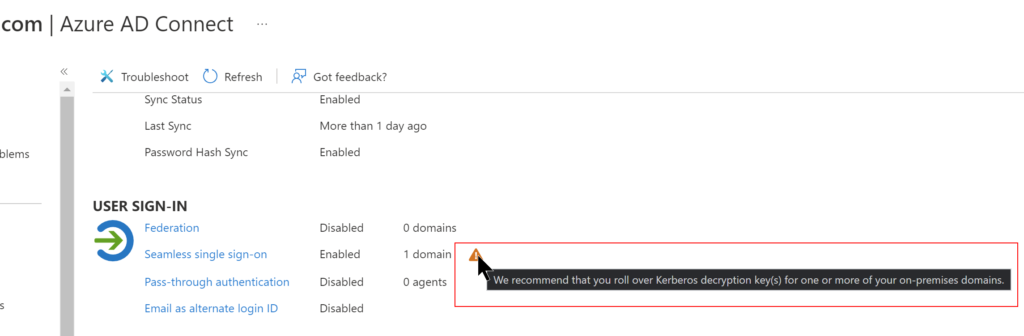
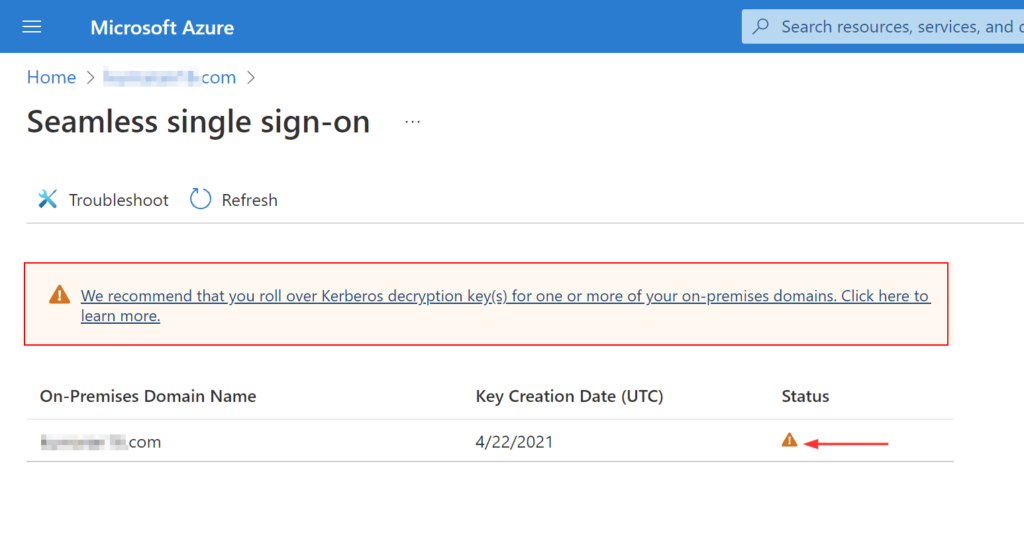
The Kerberos decryption key for this computer account is securely shared with Azure AD. Microsoft recommends to roll over the Kerberos decryption Key at least every30 days. You will notice a warning when the key has not been updated in the past 30 days.
Azure AD warning
Kerberos decryption key
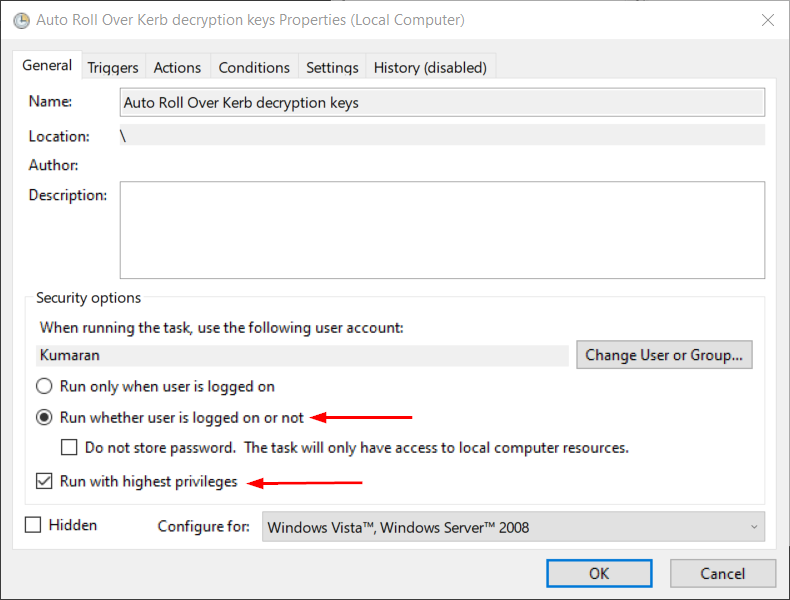
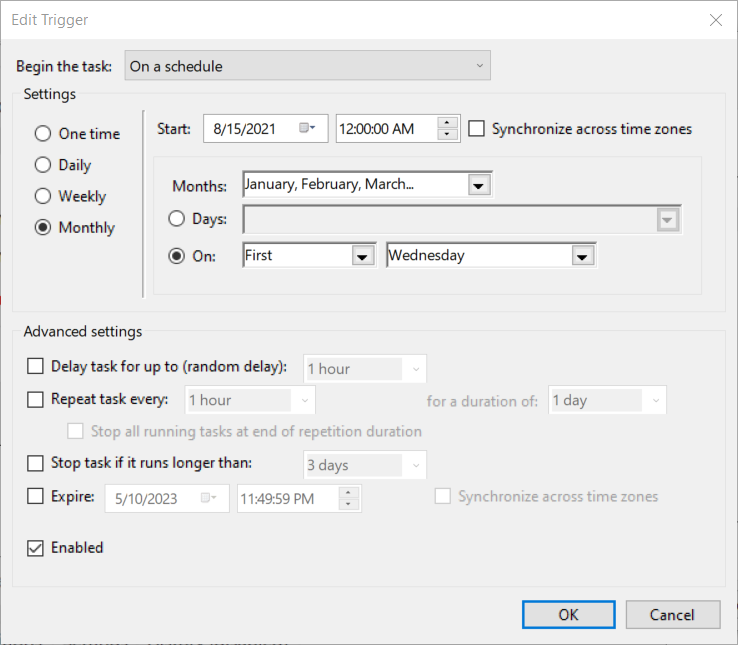
As I mentioned earlier, Microsoft recommends to roll over the keys at least every 30 days. Obviously, I can remember it promptly or even put a meeting invite in Outlook to recur 30 days, keep snoozing it to eventually dismiss the alert because I’m stuck doing something else on that day. I’m sure this feels very familiar to most of you reading this. 😂
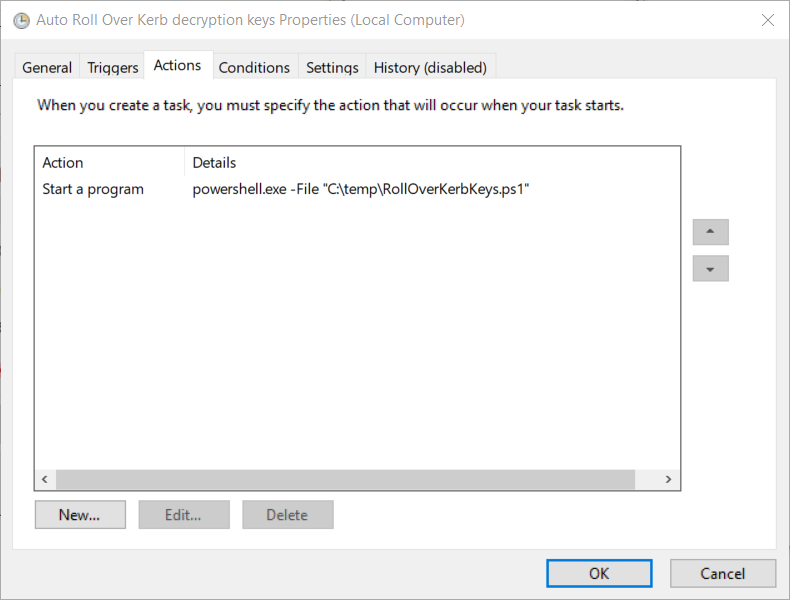
This is a great scenario where automation can come in handy and I’ll go through the steps on how I implemented this.
Prerequisites
Below are the requirements for implementing this solution.
Global admin account
With MFA exception (preferably by origin IP)
Administrator account on AD Connect server with logon as a batch job
On-Premises AD domain admin account
Domain account that has permissions to ‘login as batch service’ on the Azure AD connect server
I covered in later half of another post about securely storing credentials using PowerShell into a file. Run these below lines to store encrypted credentials into a text file. This is far better than storing the password in plain text.
Remember, this method is secure but not 100% safe.
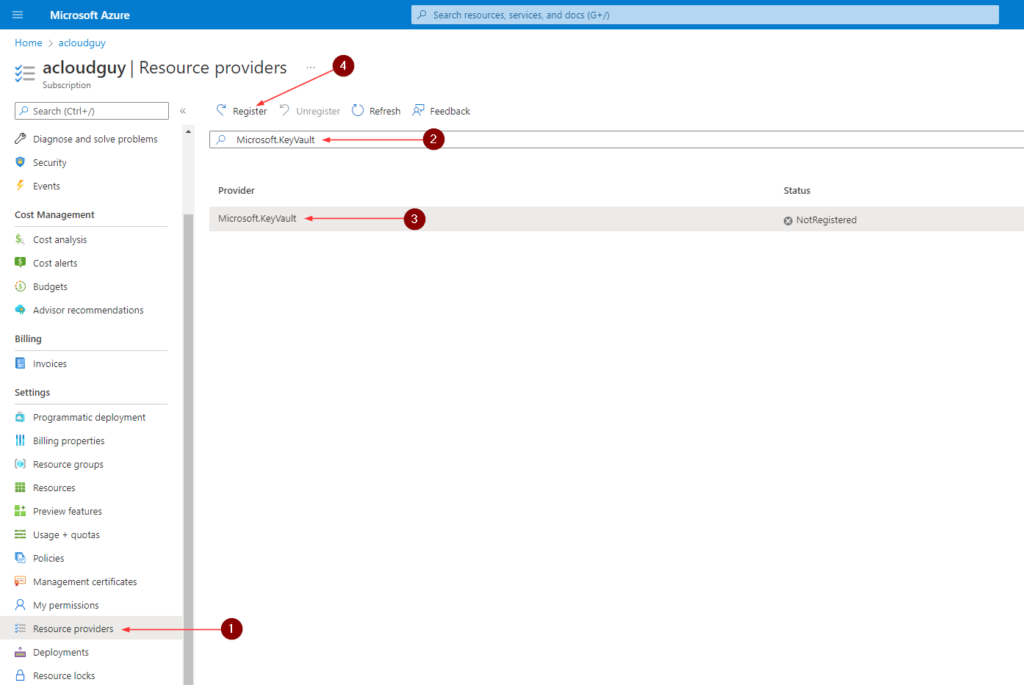
Azure Key Vault is used to safely manage Secrets, Certificates and Crytographic Keys used by cloud and on-premise applications. After the secrets are stored in Azure Key Vault, we can assign access policies to user accounts or SPNs to retrieve and use them.
In this post, I will cover,
How to create Azure Key Vault
Create and update secrets in Azure Key Vault
Create a new Azure AD application and SPN
Create a client Secret
Assign a policy in Azure Key Vault to allow access to the SPN we create
Store the Azure AD application ID and client secret in the SecretStore vault
Retrieve Secret from Azure Key vault using credentials stored in SecretStore vault
I’ll go through the steps in both the portal and via PowerShell.
Before proceeding further, make sure you are connected to Azure AD and Azure via PowerShell. You may or may not use the same global admin account to connect to both Azure AD and Azure, either way you can use the below cmdlets and adjust it accordingly where necessary.
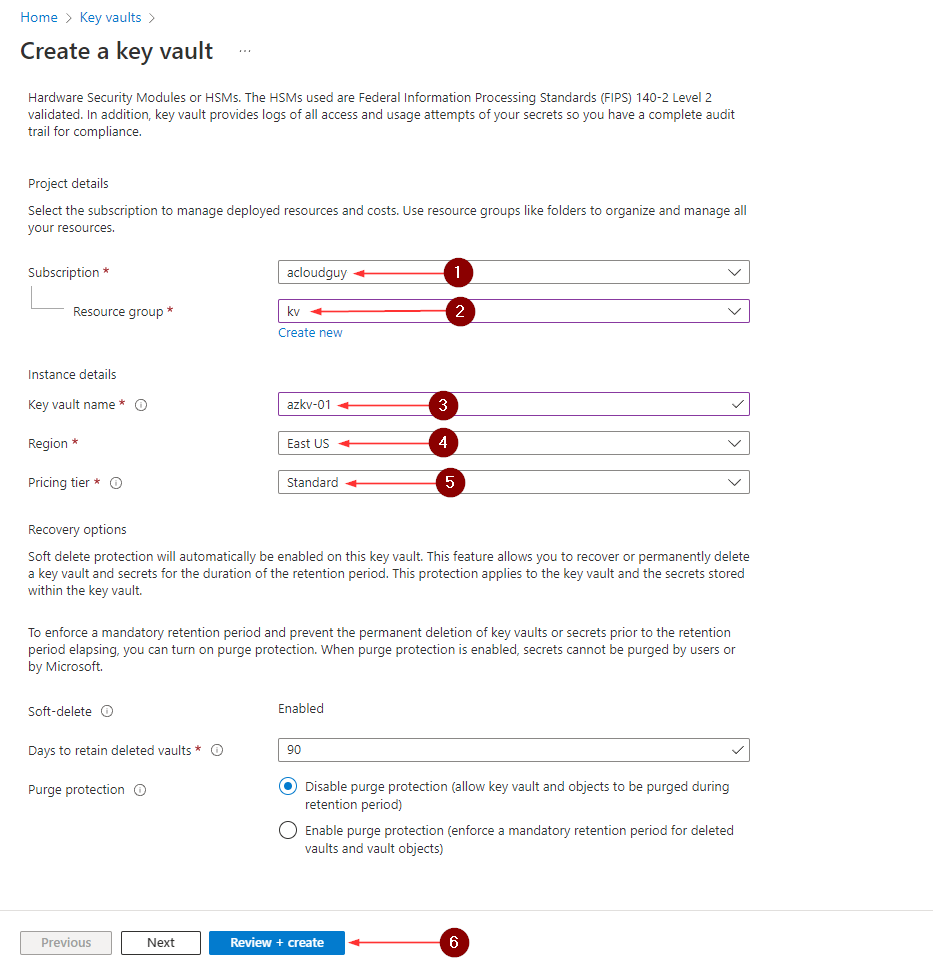
Leave the other options default and click Review + create
The other options in the creation steps,
Access policy = I’ll go through it later in this post
Networking = All networks to make it publicly accessible
Tags = As necessary
Below are my settings,
Create a key vault
Create SPN in Azure AD
In this step, we’re creating a service principal in Azure AD. We will assign permissions for this SP to retrieve secrets from the Azure Key vault in later step.
In Azure AD, the application registration is the template used to create the SP. Also, the SP is what can be authenticated and authorized. Application and SP are associated by Application ID and they differ in it Object ID.
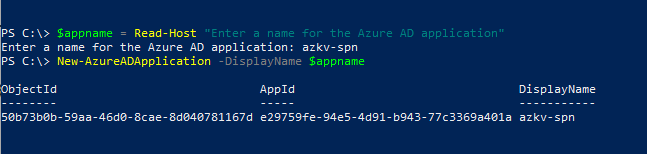
To create a new Azure AD application,
$appname = Read-Host "Enter a name for the Azure AD application"
New-AzureADApplication -DisplayName $appname
To create a service principal,
$appname = Read-Host "Enter name of Azure AD application"
$AppId = (Get-AzureADApplication -Filter "DisplayName eq '$appname'").AppId
New-AzureADServicePrincipal -AccountEnabled $true -AppId $AppId -DisplayName $appname
Create Client Secret
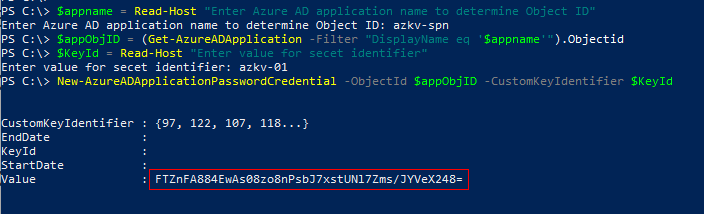
Next, we create a new client secret using the Get-AzureADApplicationPasswordCredential cmdlet,
$appname = Read-Host "Enter Azure AD application name to determine Object ID"
$appObjID = (Get-AzureADApplication -Filter "DisplayName eq '$appname'").Objectid
$KeyId = Read-Host "Enter value for secret identifier"
New-AzureADApplicationPasswordCredential -ObjectId $appObjID -CustomKeyIdentifier $KeyId
Copy the value in the output to a notepad as I have highlighted above. This value will not be available to copy later.
Assign Permissions
Using PowerShell
We can assign necessary permissions to the Azure AD application we created in above step, using the Set-AzKeyVaultAccessPolicy cmdlet,
$appname = Read-Host "Enter Azure AD application name to determine Object ID"
$Appid = (Get-AzureADApplication -Filter "DisplayName eq '$appname'").AppId
$kvName = Read-Host "Enter a name for Key Vault"
Set-AzKeyVaultAccessPolicy -VaultName $kvName -ServicePrincipalName $Appid -PermissionsToSecrets list,get
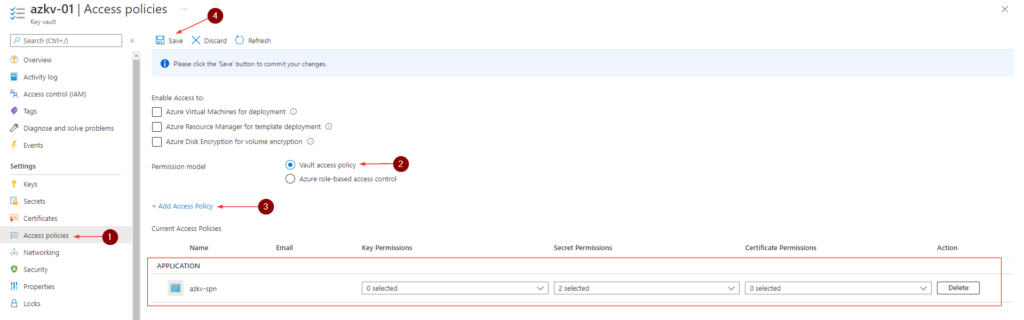
In the left navigation menu, click on Access policies
Select Permission model as Vault access policy
Click +Add Access Policy
In the Add access policy window
For Secret permissions, select Get and List
For Select principal, select the SPN we created earlier
Click Add
Click Save to save policy
Manage Secrets in Key Vault
Applications, scripts or users can create, update, delete and retrieve secrets if they have the necessary policy assigned to them
Creating/Updating Secrets
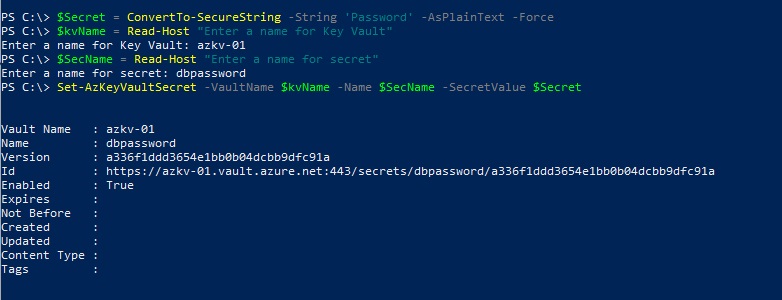
To create a new secret, we can use the Set-AzureKeyVaultSecret cmdlet,
$Secret = ConvertTo-SecureString -String 'Password' -AsPlainText -Force
$kvName = Read-Host "Enter a name for Key Vault"
$SecName = Read-Host "Enter a name for secret"
Set-AzKeyVaultSecret -VaultName $kvName -Name $SecName -SecretValue $Secret
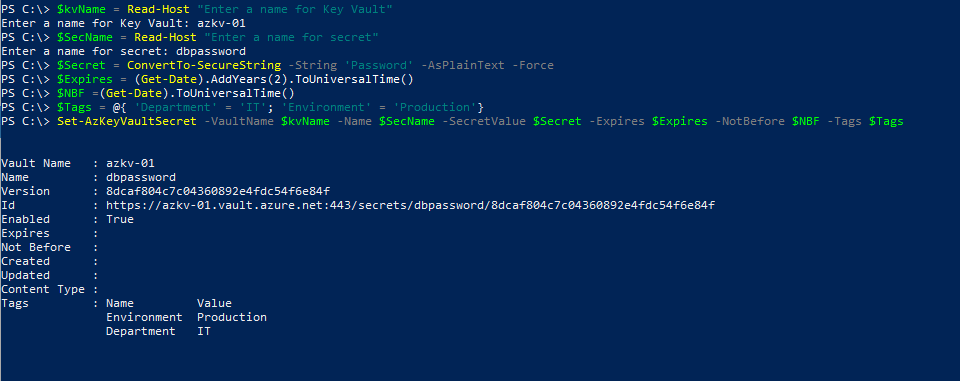
The secret can be updated to a new value using the same Set-AzureKeyVaultSecret cmdlet,
$Secret = ConvertTo-SecureString -String 'Password' -AsPlainText -Force
$kvName = Read-Host "Enter a name for Key Vault"
$SecName = Read-Host "Enter a name for secret"
$Expires = (Get-Date).AddYears(2).ToUniversalTime()
$NBF =(Get-Date).ToUniversalTime()
$Tags = @{ 'Department' = 'IT'; 'Environment' = 'Production'}
Set-AzKeyVaultSecret -VaultName $kvName -Name $SecName -SecretValue $Secret -Expires $Expires -NotBefore $NBF -Tags $Tags
Retrieving Secrets
To retrieve the current version of a secret, we use the Get-AzureKeyVaultSecret cmdlet,
$kvName = Read-Host "Enter a name for Key Vault"
$SecName = Read-Host "Enter a name for secret"
$secruretext = (Get-AzKeyVaultSecret -VaultName $kvName -Name $SecName).SecretValue
This will assign the stored secret to the $secruretext variable as a SecureString. We can now pass this to any other cmdlets that require a SecureString.
As I’ve already covered the Microsoft.PowerShell.SecretManagement and Microsoft.PowerShell.SecretStore PS modules in an earlier post, I’ll follow on the premise and store the client secret we created in the local vault. This way, I don’t have to save the client secret in the code as plaintext. To do this, we can store the Application ID and Client secret in a PSCredential object to the store,
In the Windows PowerShell Credential request window, for User Name input the Application (client) ID of the Azure AD application and for password input the Client Secret value we copied into a notepad earlier.
I’ve also created another secret as string in the local vault with my tenant ID value.
Putting this all together, we can use these below lines in PowerShell automation scripts,
To retrieve the secure string stored in the Azure Key vault, I’m using these lines below. Also for demo purposes, I’m including the -AsPlainText to the Get-AzKeyVaultSecret cmdlet but as I mentioned earlier, we can store this secure string to a variable and pass it on to other cmdlets.
$kvName = Read-Host "Enter a name for Key Vault"
$SecName = Read-Host "Enter a name for secret"
Get-AzKeyVaultSecret -VaultName $kvName -Name $SecName -AsPlainText
#or
$secruretext = (Get-AzKeyVaultSecret -VaultName $kvName -Name $SecName).SecretValue
I know this was a lengthy post and it may have gotten a little confusing right at the end with too many things named vault🤷♂️
Hope this helped you out in figuring out in including Azure Key Vault in your PowerShell automations.
When it comes to automation with PowerShell we come across scenarios where credentials are needed for the script to run and I’ve seen scripts being used by admins where the passwords are there in plain-text. It starts with..’this is only for testing‘,’oh!..that’s just a service account‘ and next thing you know, it is in production and the said service account has more previleged roles attached to it than when it was in testing.
I’ve done it too but I’ve realized that I can spend some time to understand and make it a practice on storing the passwords securely. I went over this issue briefly in a different post when earlier. In this post, I will go over the steps on how to use the Microsoft’s SecretManagement and Secret Store modules to manage passwords securely in a script and interactively.
And yes, there is a long list of 3rd party secret vaults that can be used to accomplish this like HashiCorp Vault, LastPass, KeePass, etc. I’ve started using Azure Key Vault which is great and doesn’t cost a lot. The Azure Key Vault is great for storing and sharing secrets in an organization and also to set a process around it. I will cover this in a future post.
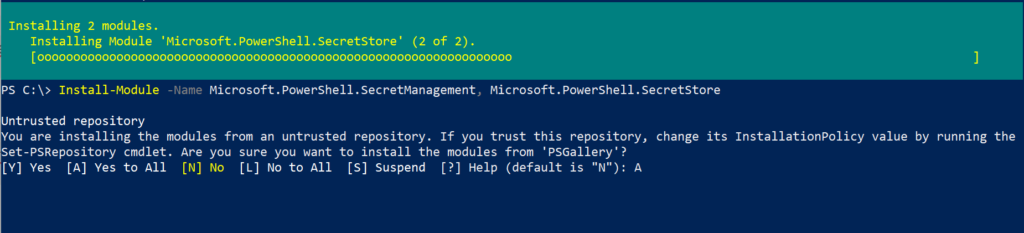
Installing the modules
To start storing and managing passwords from a encrypted vault, we need to install the PowerShell SecretManagement and SecretStore modules. These modules require Windows PowerShell version 5.1 or PowerShell Core 6.x, 7.x
Microsoft.PowerShell.SecretManagement – Provides a convenient way to store and retrieve secrets Microsoft.PowerShell.SecretStore – Provides local secure store extension vault for Microsoft.PowerShell.SecretManagement module
First, we need to create a local secret vault. I will name mine CredsDB
$vaultName = Read-Host "Enter a name for the vault"
$vaultDesc =  Read-Host "Enter vault description"
Register-SecretVault -Name $vaultName -ModuleName Microsoft.PowerShell.SecretStore -Description $vaultDesc
To display the registered vault,
Get-SecretVault
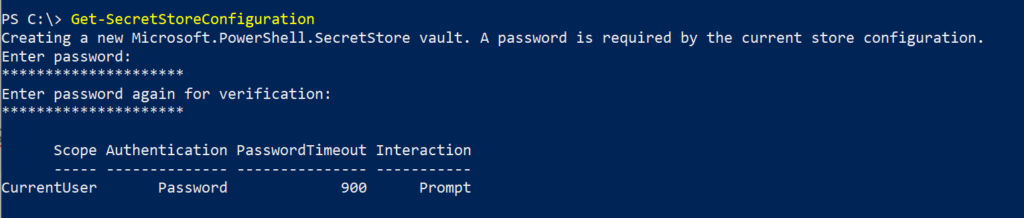
To set a master password to the SecretStore vault
To create a master password to access the SecretStore,
Get-SecretStoreConfiguration
The following settings determine access to the password stores,
Scope – The Scope is always CurrentUser. AllUsers Scope is not supported
Authentication – Access vault using a master password
PasswordTimeout – 900 seconds, duration of the session before we need to enter the master password
Interaction – Prompt – to make changes
Note: If you forget the vault master password, you won’t be able to access stored data.
To change master password,
$oldPassword = Read-Host "Enter old password" -AsSecureString
$newPassword = Read-Host "Enter new password" -AsSecureString
Set-SecretStorePassword -NewPassword $newPassword -Password $oldPassword
Storing and updating secrets
Now that we have created a new secret vault, we are ready to start storing sensitive information into it. The secret store accepts the following data types as secrets,
Byte[]
Hashtable
PSCredential
SecureString
String
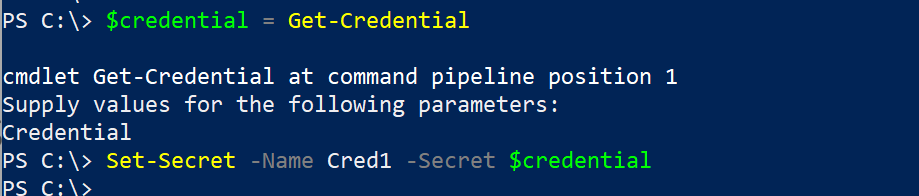
To add a new username and password, PSCredential object to the store,
If you missed to set the master password in the earlier step I described, you’ll be prompted to set the master password while running the Set-Secret cmdlet for the first time.
If you need to update the secret at a later point in time, use the same Set-Secret cmdlet to overwrite the existing secret
Retrieving secrets
To retrieve the entries in the vault, we can use the below cmdlet to unlock the vault first. Type the vault’s password and press enter,
Unlock-SecretStore
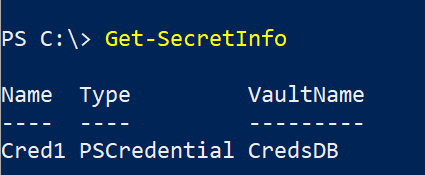
To display entries in the secret vault,
Get-SecretInfo
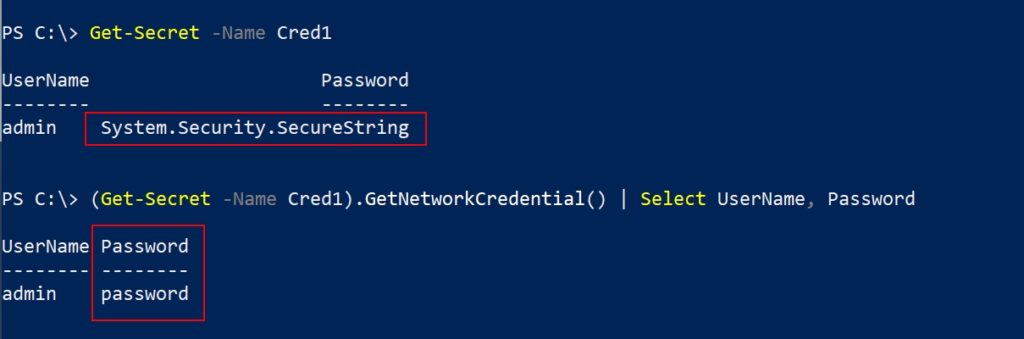
To retrieve a secret’s value shown as System.Security.SecureString,
$Secret = Read-Host "Enter name of the secret"
Get-Secret -Name $Secret
To view the password in plaintext,
$Secret = Read-Host "Enter name of the secret"
(Get-Secret -Name $Secret).GetNetworkCredential() | Select UserName, Password
Using secrets in PowerShell automation
We’ve registered, created a new vault and also created a new secret and also retrieved the stored secret in the above steps. The above retrieval process needs manual interaction and in automation we need to avoid that. I know what you are thinking, if there is a master password, we’ll need to type that in anyway to unlock the stored secret.
You might be tempted to disable the request of the master password request to access the secret by using the below cmdlet, but please don’t. This method might be good to do some quick testing but is not recommended in production environments.
Set-SecretStoreConfiguration -Authentication None
There are many options to unlocking the secret store without manually entering the master password while making sure it is not stored anywhere in plain text. One method is to save the master password in an encrypted xml file.
Use the below command to save master password in a CliXml file.
The command will prompt for credentials
Type any username
Type the master password
You can name the xml file to your preference
It is recommended to store the xml file in a location where you can lock down the permissions
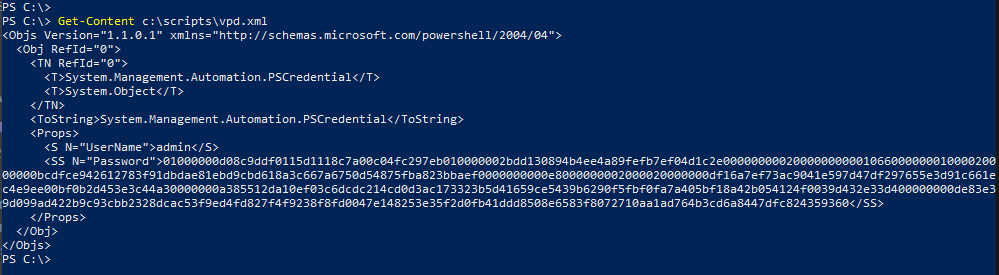
Get-Credential | Export-CliXml c:\scripts\vpd.xml
We can confirm the credential file exists and contains the encrypted master password. The XML file will not display the password in plain text as you can see in the screenshot.
Get-Content c:\scripts\vpd.xml
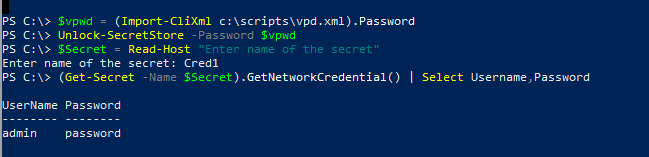
Now we can import the encrypted password from the xml file to a variable
We can use this above variable to unlock the Secret Store,
Unlock-SecretStore -Password $vpwd
To retrieve the secret,
$Secret = Read-Host "Enter name of the secret"
(Get-Secret -Name $Secret).GetNetworkCredential() | Select Username,Password
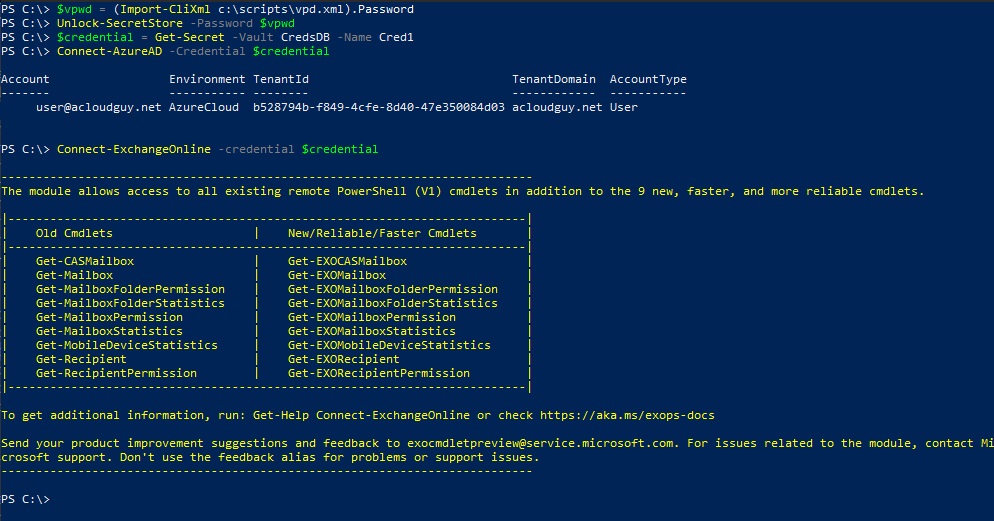
With this in place, to keep things simple you can use the variable and Unlock-SecretStore in PowerShell automation scripts. We can use this to connect to Azure AD tenant or to O365.
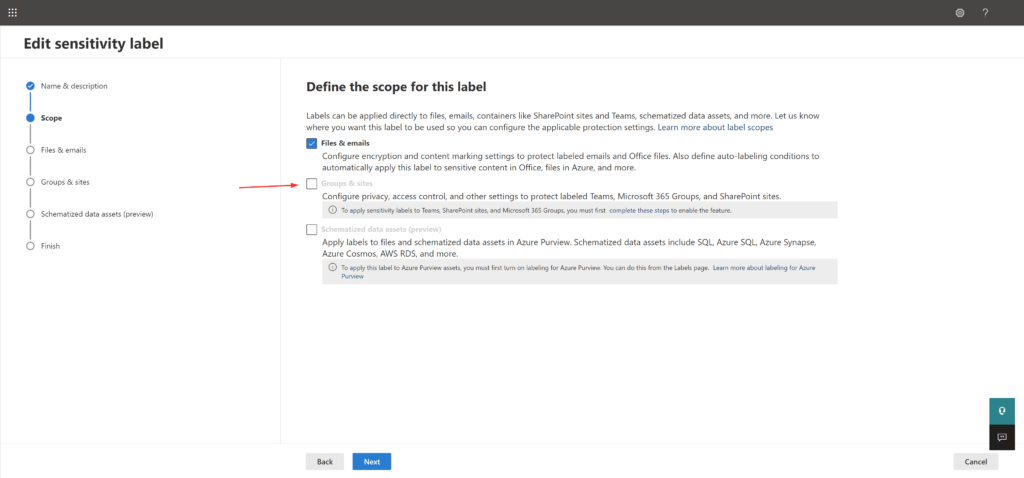
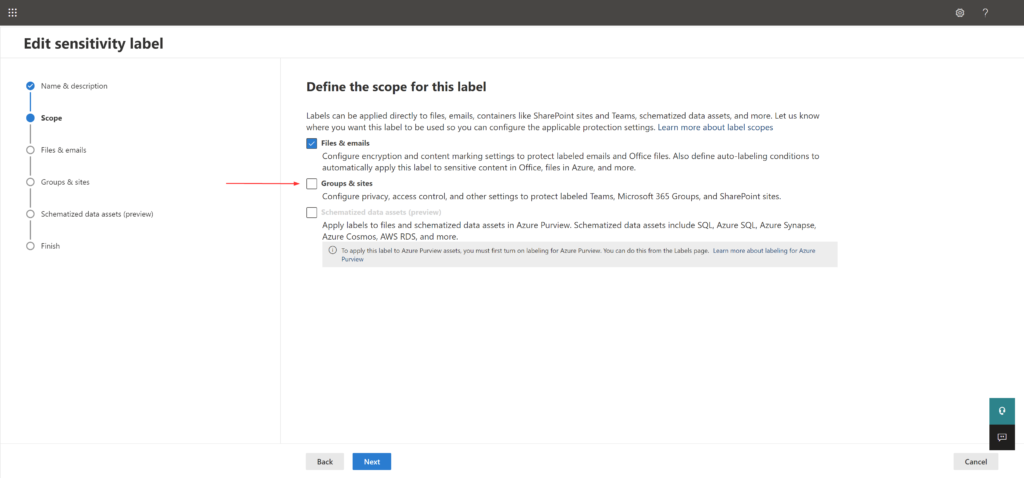
In a O365 tenant I manage, I had rolled out the Azure Information Protection labels from earlier. The recent requirement was to make sure the sensitivity labels will apply to group across services like Outlook, Microsoft Teams and SharePoint online.
When I checked the sensitivity label, I noticed the ‘Groups and sites’ option greyed out and which lead me to research a bit into this and write my findings below,
Groups & sites greyed out
Enable sensitivity labels for containers in Azure AD
Sensitivity labeling for containers i.e., groups and sites, should enabled before we can configure the settings in the sensitivity labeling wizard. Else, it will be greyed out as in screenshot above.
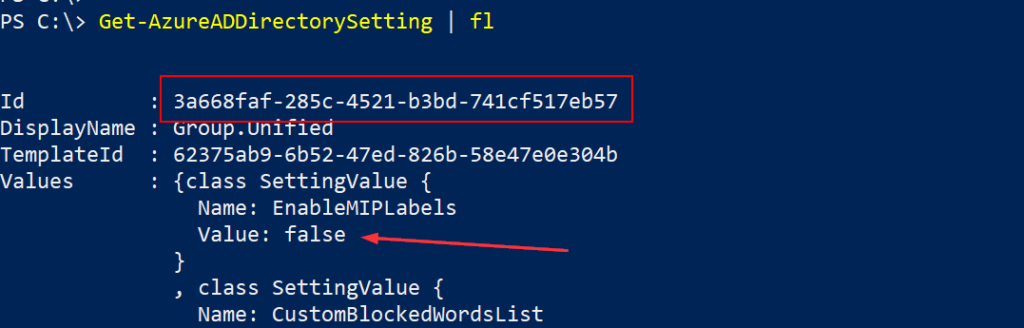
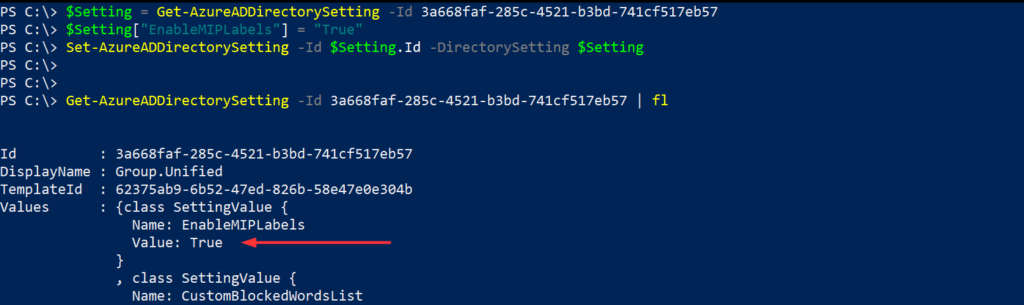
To determine current group settings for your Azure AD organization, use the below cmdlet. If no group settings are defined, this cmdlet won’t return any output value.
Get-AzureADDirectorySetting | fl
In my scenario, I have only one setting and it was easier to see it. But your organization might have more than one setting and in that case, you can use this below cmdlet to search and determine the setting.
Get-AzureADDirectorySetting -Id (Get-AzureADDirectorySetting | where -Property DisplayName -Value "Group.Unified" -EQ).id
EnableMIPLabels = false
Below, I’m storing the value of the cmdlet’s output into the $Setting variable. And once stored, I’m setting ‘True’ as the value for ‘EnableMIPLabels’. I’m listing out both methods, what I used and what you can potentially use. The second method is much easier.
$Setting = Get-AzureADDirectorySetting -Id <Group.Unified policy's Id from your tenant>
$Setting["EnableMIPLabels"] = "True"
Set-AzureADDirectorySetting -Id $Setting.Id -DirectorySetting $Setting
Plus addressing or subaddressing is available in Exchange Online. Plus addressing is using a unique, dynamically created receive-only email addresses for mailboxes.
Basic syntax of an SMTP email address: @. Example, JohnD@domain.com
Plus addressing syntax: +@. Example, JohnD+statements@domain.com
The original email address must be valid one. The +tag value is arbitrary, although regular character restrictions for SMTP email addresses apply.
Here is a scenario, Let’s say the users’ email address is JohnD@domain.com. User can use plus addresses as unique addresses for services that you sign up for, right after the local part (JohnD) and add (string) of choice. So for instance, to receive all bank statement, the user can end up with something like this: JohnD+statements@domain.com
Plus addressing Limitations
When using plus addressing, there are a few things to keep in mind:
Plus addresses aren’t aliases in Exchange Online
Hence, it can be used only to receive messages and not send them
It does not resolve to a user’s name in Outlook clients, so it is easily identifiable in the To and CC fields
In a Hybrid environment, plus addressing won’t work for on-premises mailboxes that do not resolve in Exchange Online
Web Developers are aware of plus addresses and some online forms/services won’t accept a plus sign in the email field
Some subscription services require the user use the original email address that they subscribed with
Select Turn on plus addressing for your organization, and then select Save
Note: After the plus addressing is turned on by default in April 2022, you will see the option Turn off plus addressing for your organization if you are following the above steps. Which will be unchecked meaning it is turned on. So placing a checkmark will turn off plus addressing. See screenshot below.
Enable using Exchange Online PowerShell
Before proceeding further make sure you are connected to Exchange Online,
This setting will be effective only after plus addressing is turned on by default in all organizations starting in late April 2022. Before that happens, plus addressing can be disabled in the O365 tenant by using the AllowPlusAddressInRecipients parameter I described earlier with the value $false value. This can also be proactively set, you don’t have to wait for it to be turned on by default.