I’m sure all Exchange Online environments have users who are data hoarders in their email environment. Most tenants have policies to limit how big the mailbox can be for various reasons. Users may come back with increasing mailbox sizes so they can hoard more of those outdated data. It is good practice to maintain the folder items. Get-MailboxFolderStatistics helps retrieve information about folders in mailboxes, including number and size of items in the folder and other information.
Before proceeding, make sure you are connected to Exchange Online module,
Get-MailboxFolderStatistics returns IPM subtree folders. This folder structure consists of messages between recipients(Inbox, Sent Items). In the Exchange Online, the Non-IMP subtree is quite larger, as different O365 applications have been using mailboxes to store and process data. Teams, Delve, MyAnalytics, all have their own folders or folder trees inside the Non-IPM root.
To determine Non-IPM subtree folders and their sizes:
I was recently tasked with providing access to a SaaS Business Spend Management applications access to specific mailboxes in an O365 tenant. This lead me in reading and understanding how this can be achieved and I’ve detailed it in this post.
Before we go further, it is important to understand the differences between Application permissions and Delegated permissions supported by the Microsoft identity platform:
Delegated permissions allow an Azure AD application perform actions on behalf of the signed-in user. The user or an administrator consents to the permissions that the app requests. The app has permission to act as the signed-in user when it makes API calls to the target resource.
Application permissions allow an Azure AD application run as background services or daemon apps without the presence of a signed-in user.
This SaaS application needed to access emails from a shared mailbox in the tenant. This permission was needed by the SaaS application to read invoices and bills sent to a shared mailbox.
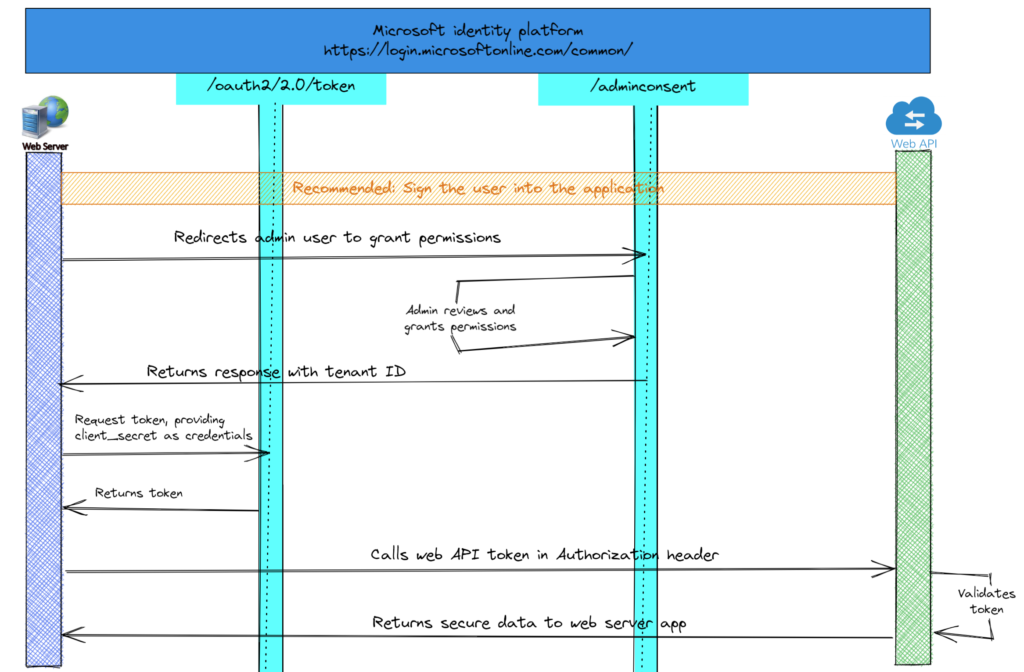
This would be application permissions. Applications like these use OAuth 2.0 Client credentials grant flow to authenticate. So, creating an Azure AD application and granting application permissions as mail.read should solve what we are trying to achieve..right? but wait, there this more. Adding mail.read application permissions allows this app, ability to read mail in all mailboxes in an organization in Exchange Online.
In my above statement, ‘ability to read mail in all mailboxes’ should make any mail administrator scream. Well, that is the problem statement and what we have to solve here.
OAuth 2.0 Client credentials grant flow
In this scenario, I have to limit an Azure AD app to only access specific mailboxes and not all mailboxes in the tenant. Below diagram has a high-level overview of the thought process on how I’m planning to implement this.
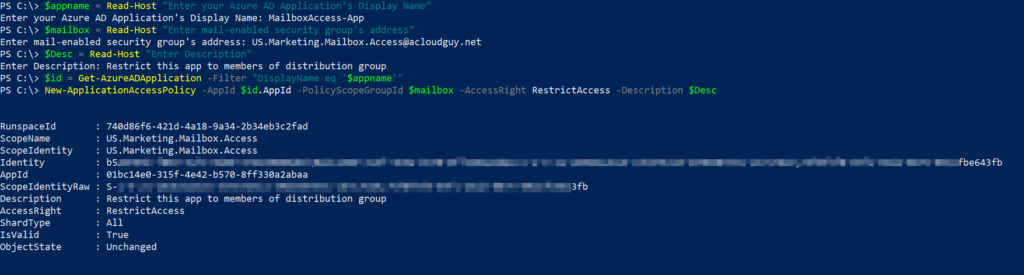
For sake of explanation, I have a mailbox named ‘U.S – Marketing’ and I have to grant mail.read permission to the SaaS BSM application. I’ll create a new Azure AD application, add mail.read permission. Next, create a mail-enabled security group named ‘US.Marketing.Mailbox.Access’, add ‘U.S – Marketing’ to the group and then apply the application access policy to restrict access to the mail-enabled security group.
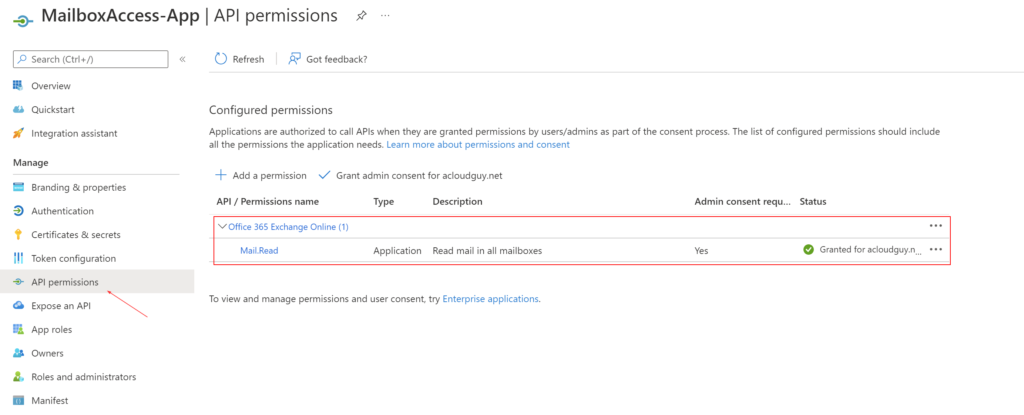
First step is to create a new Azure AD application, add mail.read API permissions and grant admin consent. Yes. we can do this in the Azure AD portal in the App registrations blade but where is the fun in that. If you are in a hurry and need to get this done, the Azure AD portal is the best way as there is lot more information you need to determine for the Add-AzADAppPermission cmdlet’s parameters.
Before proceeding further, make sure you are connected to Azure AD PowerShell with a global admin account.
You can use the below lines in PS to achieve this. The az ad app is part of Azure CLI and not a PS cmdlet. You’ll need to have Azure CLI installed and do az login as well before running this.
$appname = Read-Host "Enter your Azure AD Application's Display Name"
$ObjID = New-AzureADApplication -DisplayName $appname | Select ObjectId
Add-AzADAppPermission -ObjectId $ObjID.ObjectId -ApiId 00000002-0000-0ff1-ce00-000000000000 -PermissionId 810c84a8-4a9e-49e6-bf7d-12d183f40d01 -Type Role
Start-Sleep -Seconds 60
az ad app permission admin-consent --id $ObjID.ObjectId
For the Add-AzADAppPermission cmdlet above, How I determined and arrived with the ApiId and PermissionId is covered in a different blogpost here.
Checking the result in Azure AD portal –> App Registration blade,
Second step is to create an ApplicationAccessPolicy with the policy scope set to the mail-enabled security group,
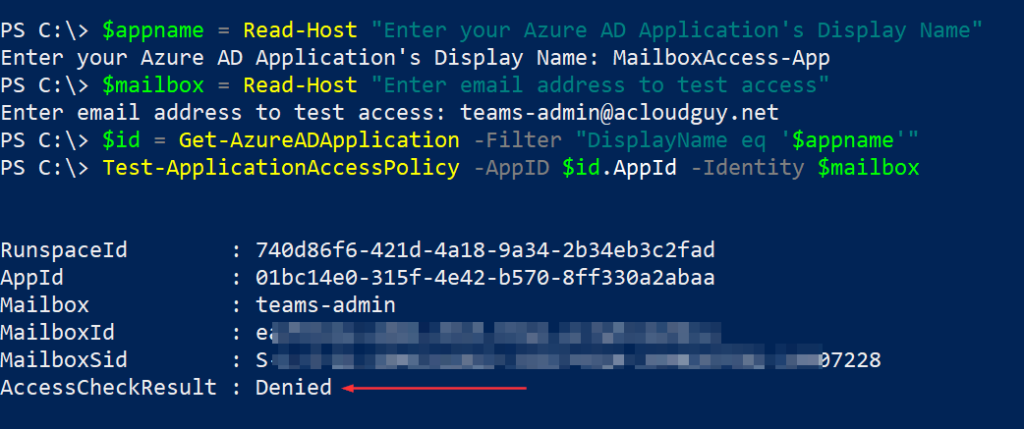
What we’ve done so far is, provided an application permissions to read all emails in a specific mailbox. As we applied the scope to a mail-enabled security group, we add this ‘specific mailbox’ I mentioned in my earlier statement to this mail-enabled security group. To test access right of an application to a specific mailbox or a user, Test-ApplicationAccessPolicy cmdlet can be used:
$appname = Read-Host "Enter your Azure AD Application's Display Name"
$mailbox = Read-Host "Enter email address to test access"
$id = Get-AzureADApplication -Filter "DisplayName eq '$appname'"
Test-ApplicationAccessPolicy -AppID $id.AppId -Identity $mailbox
In the below examples with screenshots, the ‘U.S – Marketing’ mailbox is part of the mail-enabled security group named ‘US.Marketing.Mailbox.Access’. Whereas ‘teams-admin’ mailbox is not, you can see the AccessCheckResult output.
While I was experimenting with the application access policies, I noticed that the changes made to it can take some time to show results. So, if you are following the steps and it still didn’t work..give it some time.
Hope this helped you in limiting application permissions to specific mailboxes in your tenant.
Reporting on O365 licenses is crucial and is necessary to keep track. I’m sure just like me most administrators get asked to generate reports on how the current license state on the tenant. In this post, I have this script I’ve put together just for this purpose.
The O365 portal does provide few options to export the data but this script generates the below reports,
O365 license usage
All enabled and licensed users report
All unlicensed users report
All disabled and licensed users report
This report can also be scheduled to run if you already use a mechanism to store your credentials securely and pass it on to your PS scripts.
I use the ImportExcel PowerShell module for this script,
Install-Module -Name ImportExcel
Before proceeding further, you must first connect to your MS online service. To do so, run the cmdlet Connect-MsolService at the Windows PowerShell command prompt. You will then be prompted for your credentials.
I used this link to create a file to do a lookup of the ID which is the output from the AccountSkuId and convert it into a friendly name. This list is subject to change but you can download the ‘FriendlyLicenseName.txt‘ from this below link.
Place this file in the same location as you have the PS script or modify script accordingly.
I found it useful that this script’s output can be readily used to generate Pivot tables or charts. If you wish, you can also generate it straight from the script using -IncludePivotTable
Hope this script was helpful in determining the current license state in your O365 environment.
Azure AD security groups can be used to manage member and computer access to shared resources for a group of users. A security group can have users, devices, groups and SPNs as its members. In this post, I’ll go over steps on how to create a Azure AD security group, add users to one group and also bulk import users to one group and multiple groups.
$Group = Read-Host "Enter name of Azure AD group"
$User = Read-Host "Enter username of user to be added"
$Owner = Read-Host "Enter username of group owner"

$GroupObj = Get-AzureADGroup -SearchString $Group
$UserObj = Get-AzureADUser -SearchString $User
$OwnerObj = Get-AzureADUser -SearchString $Owner

Add-AzureADGroupMember -ObjectId $GroupObj.ObjectId -RefObjectId $UserObj.ObjectId
Add-AzureADGroupOwner -ObjectId $GroupObj.ObjectId -RefObjectId $OwnerObj.ObjectId
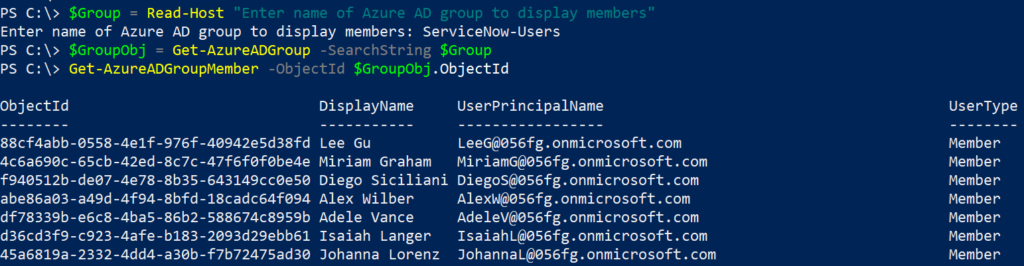
To display members of a security group:
$Group = Read-Host "Enter name of Azure AD group to display members"
$GroupObj = Get-AzureADGroup -SearchString $Group
Get-AzureADGroupMember -ObjectId $GroupObj.ObjectId
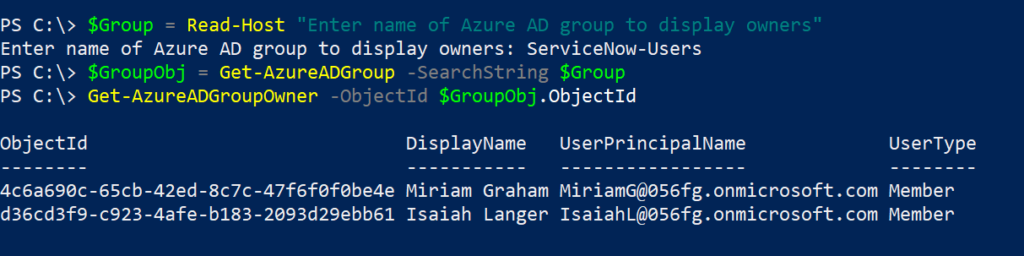
To display owners of a security group:
$Group = Read-Host "Enter name of Azure AD group to display owner(s)"
$GroupObj = Get-AzureADGroup -SearchString $Group
Get-AzureADGroupOwner -ObjectId $GroupObj.ObjectId
To bulk add multiple users to a specific group:
Note: csv file has UserPrincipalName as column header
$Group = Read-Host "Enter name of Azure AD group to add users"
$GroupObj = Get-AzureADGroup -SearchString $Group
$Members = Import-csv "C:\tmp\GroupMembers.csv"
Foreach($Member in $Members) {

$User = $Member.UserPrincipalName
Write-Progress -Activity "Adding user.." -Status $User

Try {
$UserObj = Get-AzureADUser -SearchString $User
Add-AzureADGroupMember -ObjectId $GroupObj.ObjectId -RefObjectId $UserObj.ObjectId
}
catch {
Write-Host "Error occured while adding $User" -ForegroundColor Red
}
}
To bulk add multiple users to multiple groups. This below script checks to see if the user is already part of the Azure AD group and returns an error.
Note: csv file has UserPrincipalName,Group as column headers
$list = Import-csv "C:\tmp\UsersGroups.csv"
Foreach($entry in $list) {

$User = $entry.UserPrincipalName
$Group = $entry.Group
$UserObj = Get-AzureADUser -SearchString $User
$GroupObj = Get-AzureADGroup -SearchString $Group
$GroupMembers = (Get-AzureADGroupMember -ObjectId $GroupObj.ObjectId).UserPrincipalName

If ($User -notin $GroupMembers) {
    Add-AzureADGroupMember -ObjectId $GroupObj.ObjectId -RefObjectId $UserObj.ObjectId
    Write-Host "$User added to $Group" -ForegroundColor Green
    }
    else {
    Write-Host "$User already in $Group" -ForegroundColor Red
    }
}
Hope this was helpful for you in exploring Azure AD security groups.
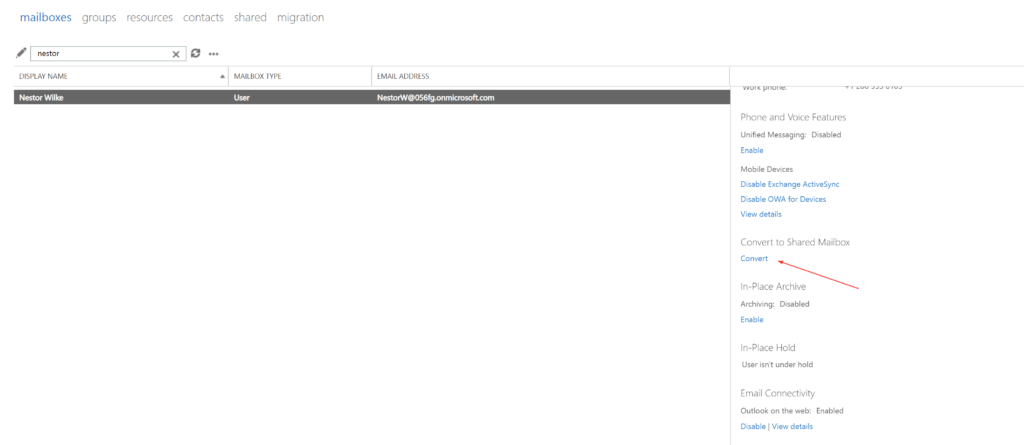
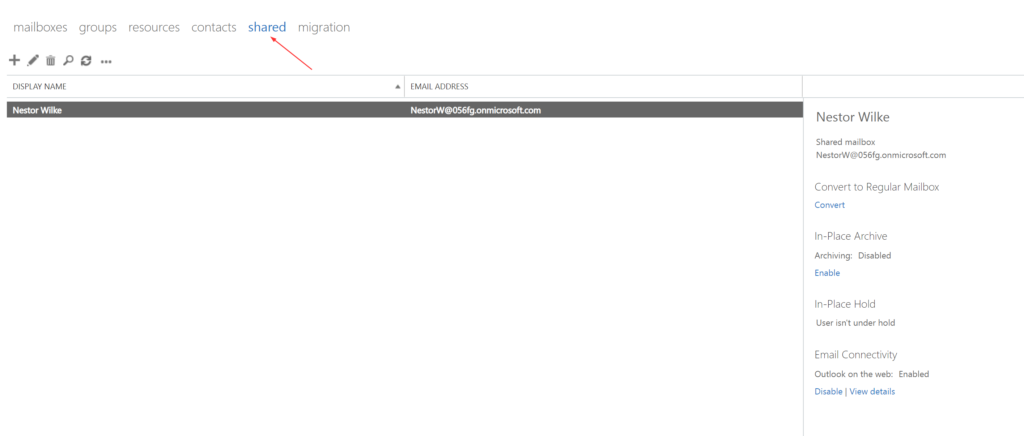
Scenarios are plenty when O365 admins are requested to convert a user mailbox to a shared mailbox.
Here is one that comes up often,
User/Employee leaves the organization and others in the team need access to the user’s mailbox to keep track of the project they were working on
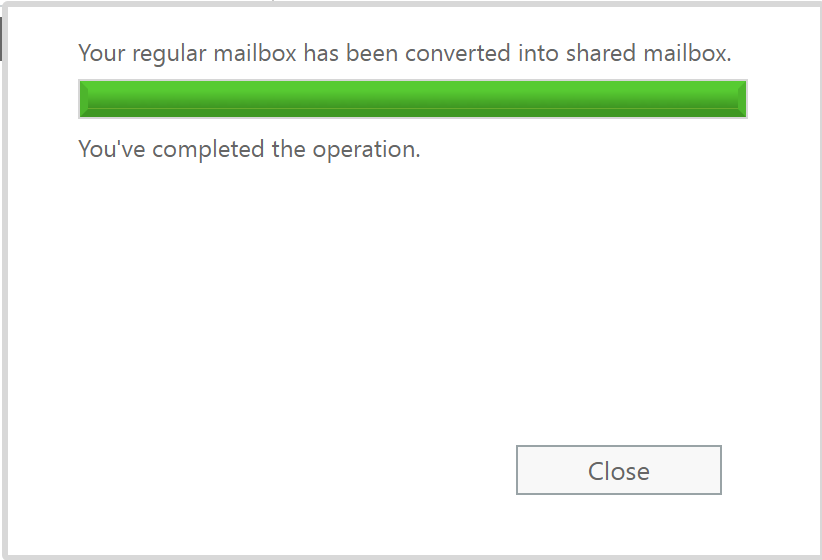
When we convert a user mailbox to a shared mailbox, the mailbox must have a license assigned and after the conversion is complete, we can remove the license.
One little caveat to the licensing part is, without license assigned to the shared mailbox, its size is limited to 50GB. So, before converting, make sure to check the mailbox’s size and to increase the shared mailbox’s size to 100GB, assign a Exchange Online Plan 2 license.
Note: If you are on Exchange hybrid environment, you’ll have to manage your mailboxes using on-premises Exchange management tools.
To convert a user mailbox to Shared mailbox using PowerShell
Before proceeding further make sure you are connected to Exchange Online,