In a O365 tenant I manage, I had rolled out the Azure Information Protection labels from earlier. The recent requirement was to make sure the sensitivity labels will apply to group across services like Outlook, Microsoft Teams and SharePoint online.
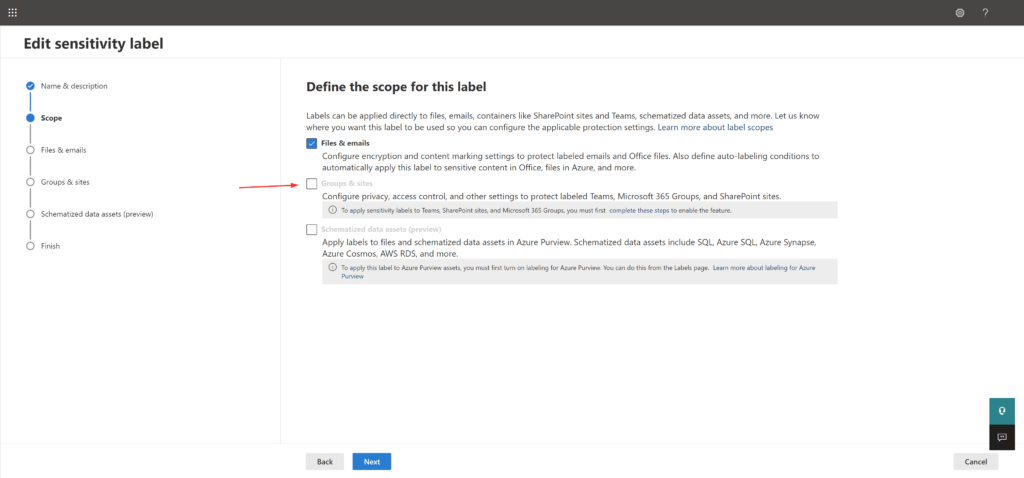
When I checked the sensitivity label, I noticed the ‘Groups and sites’ option greyed out and which lead me to research a bit into this and write my findings below,
Groups & sites greyed out
Enable sensitivity labels for containers in Azure AD
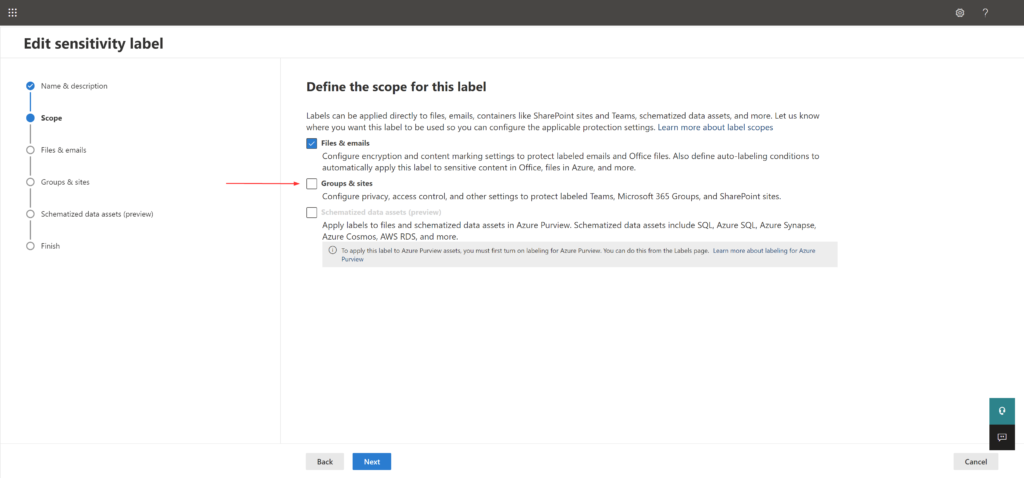
Sensitivity labeling for containers i.e., groups and sites, should enabled before we can configure the settings in the sensitivity labeling wizard. Else, it will be greyed out as in screenshot above.
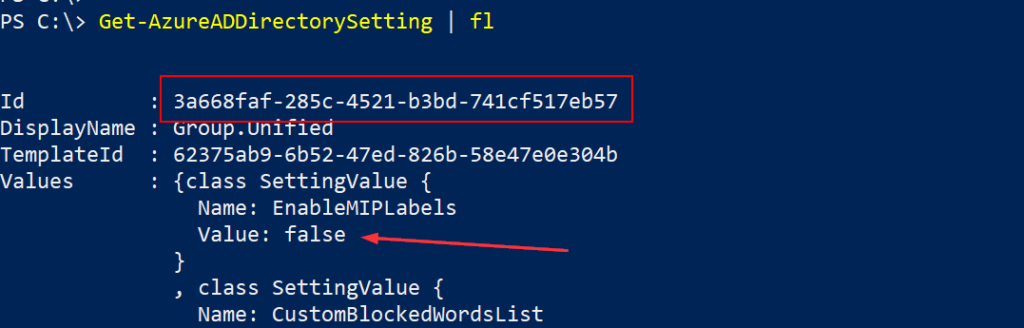
To determine current group settings for your Azure AD organization, use the below cmdlet. If no group settings are defined, this cmdlet won’t return any output value.
Get-AzureADDirectorySetting | fl
In my scenario, I have only one setting and it was easier to see it. But your organization might have more than one setting and in that case, you can use this below cmdlet to search and determine the setting.
Get-AzureADDirectorySetting -Id (Get-AzureADDirectorySetting | where -Property DisplayName -Value "Group.Unified" -EQ).id
EnableMIPLabels = false
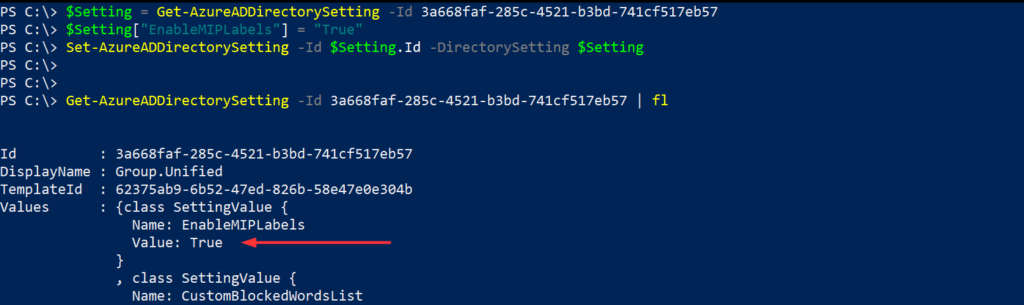
Below, I’m storing the value of the cmdlet’s output into the $Setting variable. And once stored, I’m setting ‘True’ as the value for ‘EnableMIPLabels’. I’m listing out both methods, what I used and what you can potentially use. The second method is much easier.
$Setting = Get-AzureADDirectorySetting -Id <Group.Unified policy's Id from your tenant>
$Setting["EnableMIPLabels"] = "True"
Set-AzureADDirectorySetting -Id $Setting.Id -DirectorySetting $Setting
Recently I worked on implementing password hash synchronization with Azure AD Connect sync in one of the tenants I manage. This interested me on so many levels but especially the lengths that Microsoft has gone to protect this hash sync process fascinated me.
To synchronize a password, Azure AD Connect sync extracts password’s hash from on-premises AD. Extra security processing (meaning, When a user attempts to sign in to Azure AD and enters their password, the password is run through MD4+salt+PBKDF2+HMAC-SHA256 process) is applied to the password hash before it is synchronized to the Azure AD authentication service. Passwords are synchronized on a per-user basis and in chronological order.
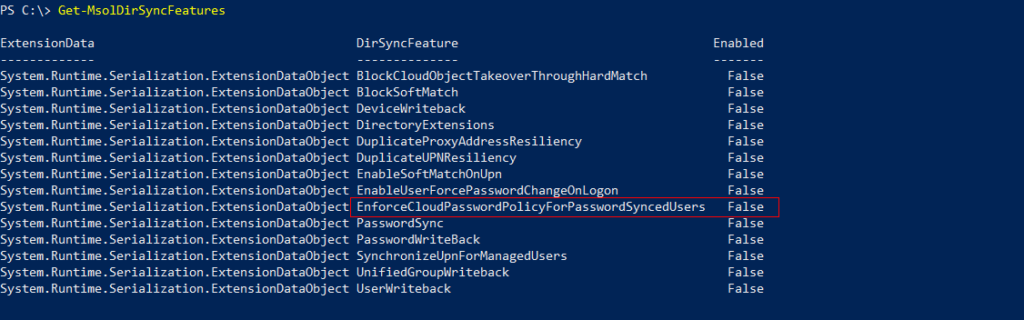
When password hash synchronization is enabled, by default the cloud account password is set to ‘Never Expire’. This is a bit scary because if left in default state, users can still login to applications with their password that is expired in on-premise AD. Also meaning that the on-premise AD password expiration policy is not in sync with Azure AD. Users can be forced to comply with your Azure AD password expiration policy by enabling the EnforceCloudPasswordPolicyForPasswordSyncedUsers feature.
When EnforceCloudPasswordPolicyForPasswordSyncedUsers is disabled (which is the default setting), Azure AD Connect sets the PasswordPolicies attribute of synchronized users to “DisablePasswordExpiration”
Get-MsolDirSyncFeatures
To enable the EnforceCloudPasswordPolicyForPasswordSyncedUsers feature, run the following command using the MSOnline PS module
Once enabled, Azure AD does not go to each synchronized user to remove the “DisablePasswordExpiration” value from the ’PasswordPolicies’ attribute. But waits till the user’s next password change to the “DisablePasswordExpiration” from the ‘PasswordPolicies’ which is when the next password sync happens.
For this reason it is recommended to enable EnforceCloudPasswordPolicyForPasswordSyncedUsers prior to enabling password hash sync, this way the initial sync of password hashes does not add the “DisablePasswordExpiration” value to the ‘PasswordPolicies’ attribute for the users. But if you miss enabling this it is not the end of the world.
Use the below cmdlet to determine a user’s Azure AD password policy,
The issue we need to address are the service accounts that live in on-premise AD with non-expiring password and their identity is synced to Azure AD so these accounts can be used in various applications. So, if you enable EnforceCloudPasswordPolicyForPasswordSyncedUsers feature and then enable password hash sync, your service accounts with non-expiring password will not have any password policy attached to it in Azure AD. These accounts will need the “DisablePasswordExpiration” policy set to them explicitly.
You can set this policy for all the non-expiring password account using the below script,
The Azure AD password policy for these account is empty when it is created in on-premise AD and the administrator creating the account can set the “DisablePasswordExpiration” policy on a per-account basis by running this below,
Another caveat here is, when these account’s password is changed on-premises for whatever reason the ‘PasswordPolicies’ value switched to ‘None’
This can happen when,
You allow helpdesk resets service account passwords
You allow service account owners reset account password
Application admins who use these service accounts quit or change job positions and the password needs to be changed
Administrator creating the service account on-premise forgot to set the password policy by running the Set-AzureADUser
When the ‘PasswordPolicies’ value gets set to ‘None’ as I mentioned earlier, the account sign-ins to Azure AD will fail with error code ‘50055 — InvalidPasswordExpiredPassword — The password is expired’.
To avoid this, you can create a scheduled task on an on-premise server which run the PS script from above maybe once a week. An issue here will be for these script to run the Connect-AzureAD cmdlet needs to be run. There are probably a thousand different ways to accomplish this but for the sake of simplicity, you can consider these two options,
Store your credentials in plan text in the script
Create an encrypted, secure string password file and use it in the script
Store credentials in plain text
This is not recommended practice and never be used but there might be scenarios where you may have to use it for some quick tests. In such a scenario, you can just do something like this,
All this being said, don’t use this method and if you do, please remember to delete the script after testing.
Use secure string password file
This method is far better to securely store password for automation scripts. The idea is, you create password file which has the password stored encrypted. It goes without saying that it is not a good idea to save this file as password.txt.
Keep in mind that you can only use this file on the computer or server where you created it. This happens because of how Windows Data Protection API encrypts the information from current computer or user account. If you try the file on a different computer you’ll get a ‘Key not valid..’ error. I think this is great and adds another layer of security.
Also, this won’t the password being decrypted or from reusing the encrypted password if it falls into wrong hands. The basic idea here is not to store password in plaintext. This method is not foolproof but good enough.
If you need a secure password file that needs to be used in multiple scripts and on different machines, AES encryption algorithm can be used and covering that will take this post way off the Azure AD non-expiring password accounts topic..too late for that..I know. 😁
Hope this helped you setup your environment before those password expired in Azure AD.
A device that has been registered with Azure AD but has not been used to access any cloud apps for a specific timeframe is stale device. In a perfect world, Azure AD registered devices should be unregistered when they aren’t needed anymore..well..duh!
In the environments I manage, most of the times devices are lost, broken, forgotten in trains and taxis or have their OS reinstalled. These numbers grow fairly quickly if a process is not put in place. I had to live and learn this.
Beyond interfering with the device’s general lifecycle, these stale devices can make it hard for identifying the devices associated with the user. Plus it’s ideal to have a clean state of devices to meet various compliance requirements.
Define a policy
Similar to having policies for on-premise AD objects, it is better to define a policy of Azure AD objects.
Define a timeframe – It is better to pick a timeframe that follows your on-premise AD inactive objects
Categorize to better understand your stale device management
MDM-controlled devices – Retire devices in Intune or other MDM solutions before disabling or deleting it
System-managed devices – Don’t delete. These devices are generally devices such as Autopilot. Once deleted, these devices can’t be re-provisioned
Hybrid Azure AD joined devices
Windows 10 – Disable or delete in on-premises AD, and let Azure AD Connect synchronize the changed device status to Azure AD
Windows 7/8 – Disable or delete in on-premises AD, Azure AD Connect can’t be used disable or delete these devices in Azure AD. Instead, these devices must be disabled/deleted in Azure AD.
Azure AD joined devices – Disable or delete in Azure AD
Azure AD registered devices – Disable or delete in Azure AD
What happens when a device is disabled?
Any authentication where a device is being used to authenticate to Azure AD are denied.
Hybrid Azure AD joined device – Users might be able to use the device to sign-in to their on-premises domain. However, they can’t access Azure AD resources such as Microsoft 365 Azure AD joined device – Users can’t use the device to sign in Mobile devices – Users can’t access Azure AD resources such as Microsoft 365
How to remove a registration on the client?
Even after a device is disabled or deleted in the Azure portal or by using Windows PowerShell, the local state on the device will say that it’s still registered.
This operation is by design. In this case, the device doesn’t have access to resources in the cloud. Deleting an Azure AD device does not remove registration on the client. It will only prevent access to resources using device as an identity.
To remove Windows 10 device registration – Go to Settings > Accounts > Access Work or School. Select your account and select Disconnect. Device registration is per user profile
For iOS and Android, Open Microsoft Authenticator, Settings > Device Registration and select Unregister device
Detecting stale devices
The ApproximateLastLogonTimestamp or activity timestamp property in Azure AD comes in handy to detect stale devices. If the difference between now and the value of the activity timestamp exceeds the defined timeframe for active devices, a device is considered to be stale. The evaluation of the activity timestamp is triggered by an authentication attempt of a device.
Cleanup stale devices
The Azure AD portal does allow you to remove stale devices but it is better to use PowerShell. Typical steps are as follows,
Connect to Azure AD using Connect-AzureAD cmdlet
Get list of devices using Get-AzureADDevice (Get-AzureADDevice cmdlet excludes system-managed devices by default)
Disable device using Set-AzureADDevice cmdlet (disable by using -AccountEnabled option)
Define and wait for grace period depending on your environment before deleting devices
Remove device using Remove-AzureADDevice cmdlet
The account updating devices in Azure AD will need one of the following roles assigned:
Global Administrator
Cloud Device Administrator
Intune Service Administrator
To get all devices and store the returned data in a CSV file:
Delete disabled devices that have been inactive the past 120 days. Remove-AzureADDevice will delete devices without prompting. There is no way to recover deleted devices.
Remember that when configured, BitLocker keys for Windows 10 devices are stored on the device object in Azure AD. If you delete a stale device, you also delete the BitLocker keys that are stored on the device. Confirm that your cleanup policy aligns with the actual lifecycle of your device before deleting a stale device.
If you aren’t familiar with Azure AD B2C, it is a customer identity access management (CIAM) solution and is a separate service from Azure Active Directory (Azure AD). It is built on the same technology as Azure AD but for a different purpose. It allows businesses to build customer facing applications, and then allow anyone to sign up into those applications with no restrictions on user account. Azure AD B2C uses standards-based authentication protocols including OpenID Connect, OAuth 2.0, and SAML.
In an earlier post, I detailed steps on how to configure ServiceNow with Azure AD SSO. In this post, I will go through steps on how to integrate Azure AD B2C with ServiceNow.
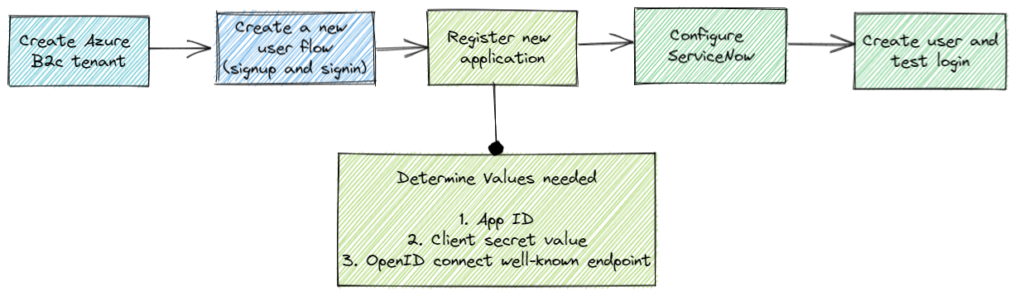
Below is a diagram show the high level implementation steps on how to do this integration,
OpenID Connect (OIDC) is an identity layer built on top of the OAuth protocol, which provides a modern and intuitive Single Sign-on (SSO) experience. ServiceNow supports OIDC to authenticate users in Azure B2C.
I will not cover the Azure AD B2C tenant creation steps in this post.
Create new user flow
A user flow lets us determine how users interact with our application when they do things like sign-in, sign-up, edit a profile, or reset a password.
Sign in to the Azure portal
Make sure you’re using the directory that contains your Azure AD B2C tenant. Select the Directories + subscriptions icon in the portal toolbar
On the Portal settings | Directories + subscriptions page, find your Azure AD B2C directory in the Directory name list, and then select Switch
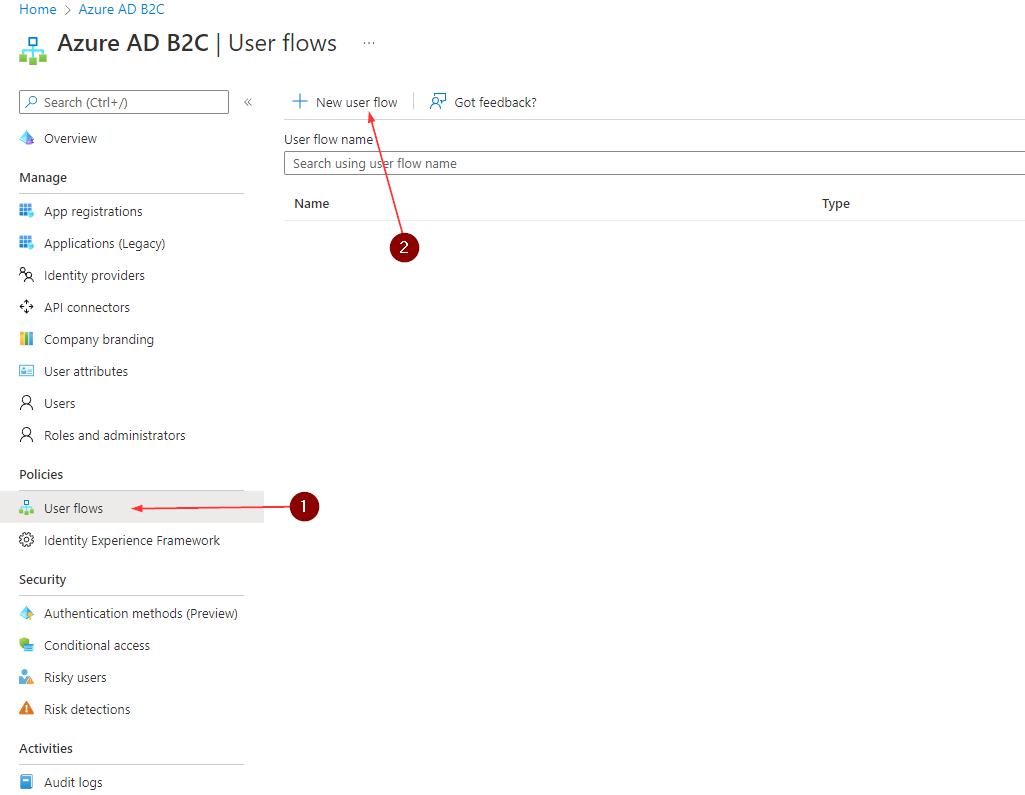
In the Azure portal, search for and select Azure AD B2C
Under Policies, select User flows, and then select New user flow
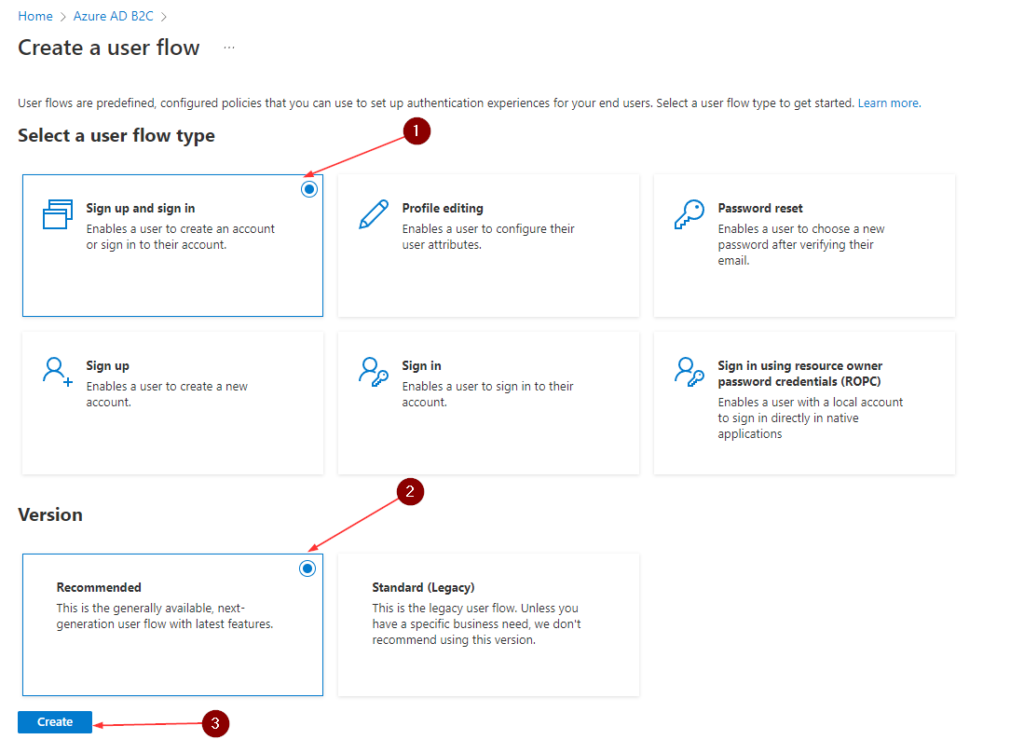
On the Create a user flow page, select the Sign up and sign in user flow
Under version, select Recommended, and then select Create
Enter a Name for the user flow. For example, su_si-1
For Identity providers, select Email signup
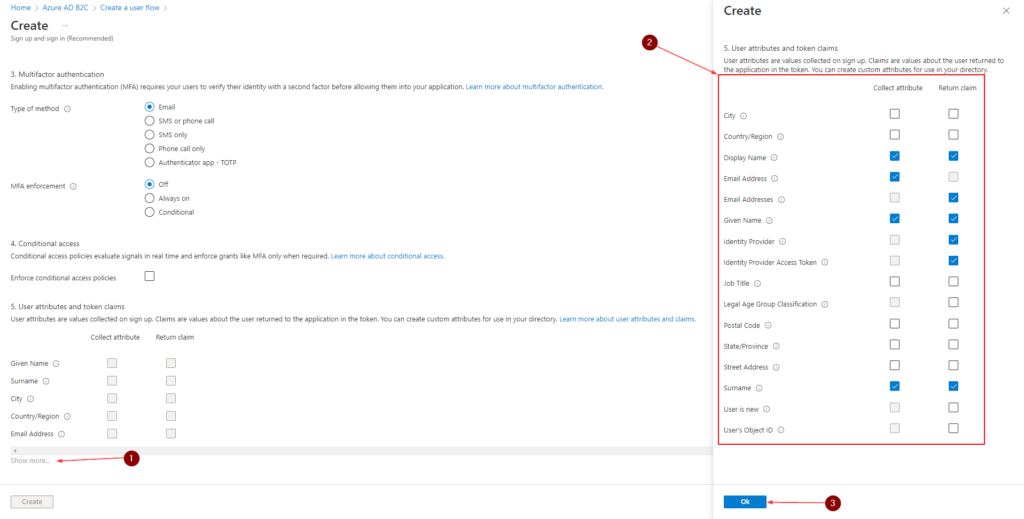
Under User attributes and token claims, choose the claims and attributes to collect and send from the user during sign-up. Select Show more, and then choose attributes and claims. Click OK. Below screenshot shows the attributes I’m collecting but it is up to you. These attributes can be modified in the user flow at any time
Click Create to add the user flow. A prefix of B2C_1_ is automatically prefixed to the name
Create App Registration
Stay logged into the Azure portal
Make sure you are in the B2C directory
In the left navigation menu, under Manage, Click App registrations, and then select New registration
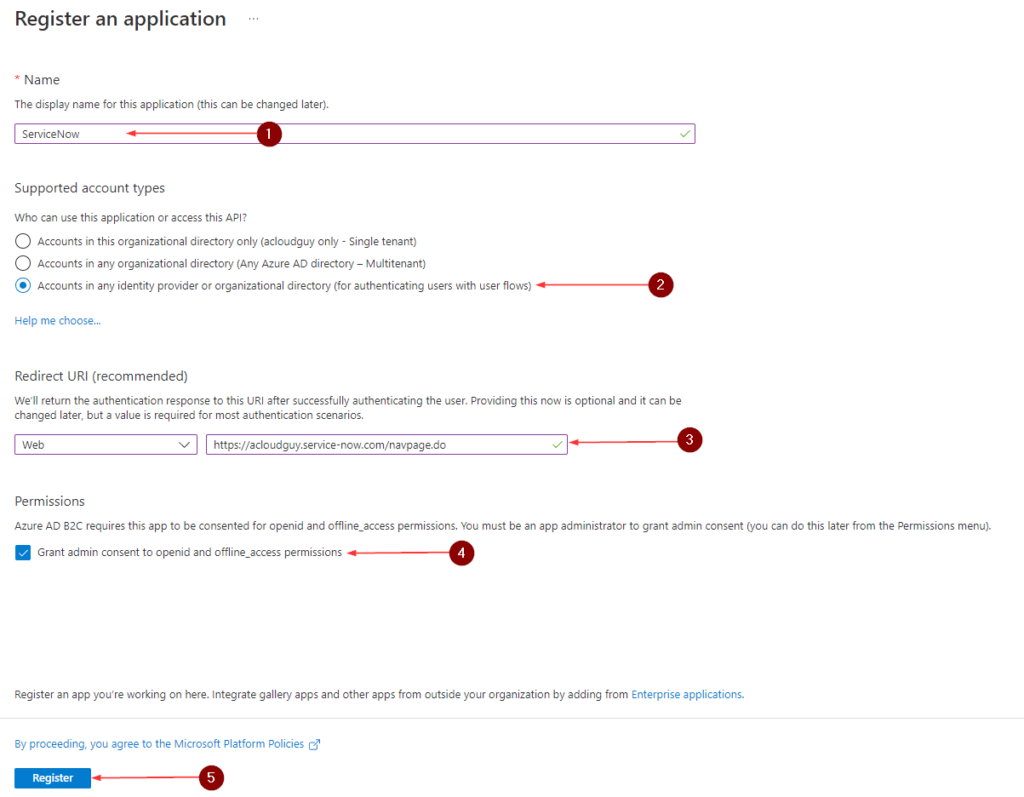
Enter a Name for the application. For example, ServiceNow
Under Supported account types, select Accounts in any identity provider or organizational directory (for authenticating users with user flows)
Under Redirect URI, select Web then enter your ServiceNow instance with /navpage.do in the URL text box
Under Permissions, select the Grant admin consent to openid and offline_access permissions check box
Click Register
Create a client secret
The client secret is also known as an application password. The secret will be used by ServiceNow to exchange an authorization code for an access token
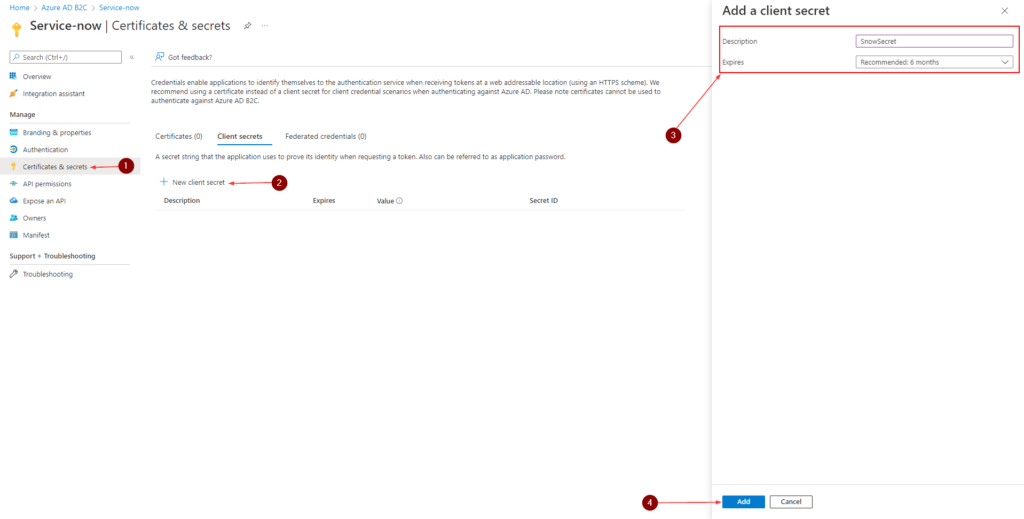
In the left menu, under Manage, select Certificates & secrets
Click New client secret
Enter a description for the client secret in the Description box. For example, SnowSecret
Under Expires, select a duration for which the secret is valid, and then select Add
Note down the secret’s Value for use in ServiceNow. This value is never displayed again after you leave this page
Information needed to configure ServiceNow instance
Click on the Overview, copy the Application (client) ID
Next Click Endpoints
Copy the value in Azure AD B2C OpenID Connect metadata document
Replace with the User flow name we created earlier e.g. B2C_1_su_si-1. Browse to the URL in a Web browser to confirm you have the right URL
You should have these 3 values,
Application (client) ID
Client Secret Value
OIDC well-known endpoint
Configure ServiceNow Instance
Hopefully, you already have SSO enabled in your ServiceNow instance. If not, please refer to this earlier post of mine
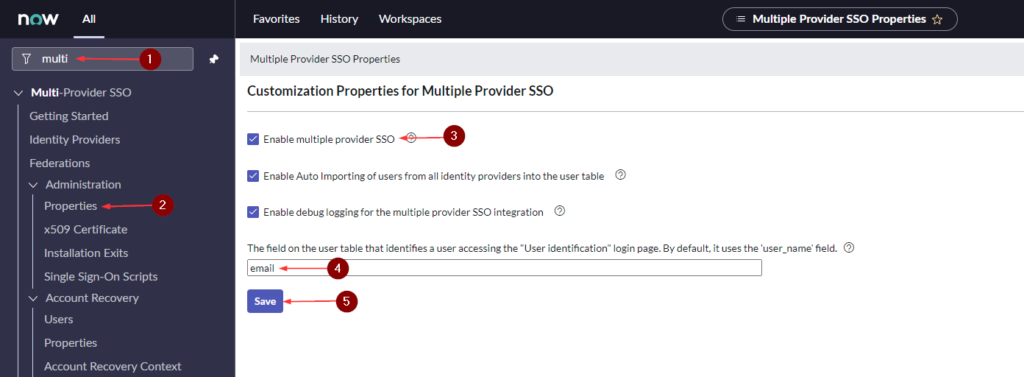
Search for multi-provider sso and click Properties
Enable multiple provider SSO
You’ll be asked to setup a recovery account
Under Multi-Provider SSO and click Identity Providers
Click New
Click OpenID Connect
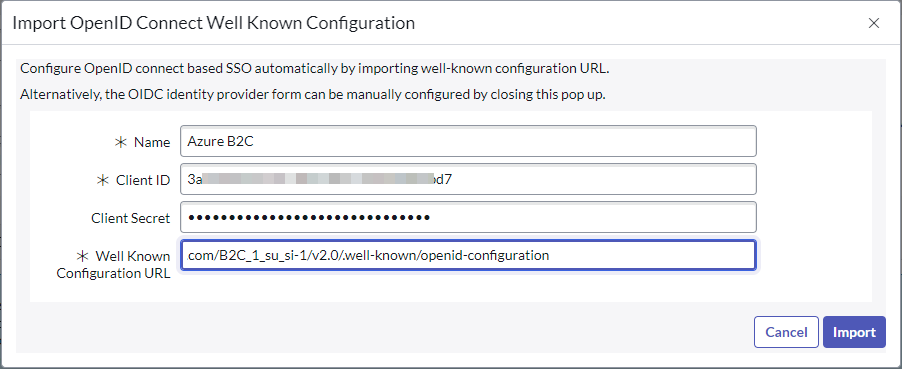
In the Import OpenID Connect Well Known Configuration window, provide following information
Name = Name of the IdP you wish. Example, B2C
Client ID = Application (client) ID from Azure B2C application
Client Secret = Client Secret Value we created earlier in the application
Well Known Configuration URL = URL we constructed earlier with the policy name
Click Import
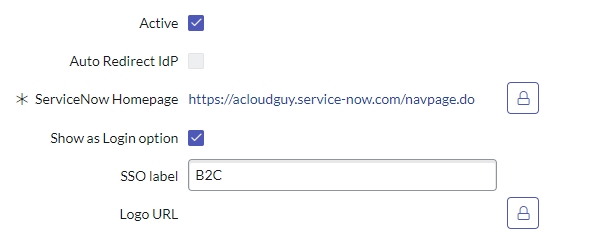
Make sure the new IdP is marked Active and Show as Login option is checked
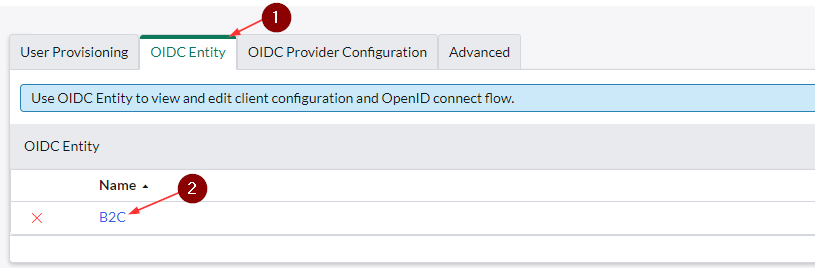
Click on the OIDC Entity tab and click to open the OIDC Entity
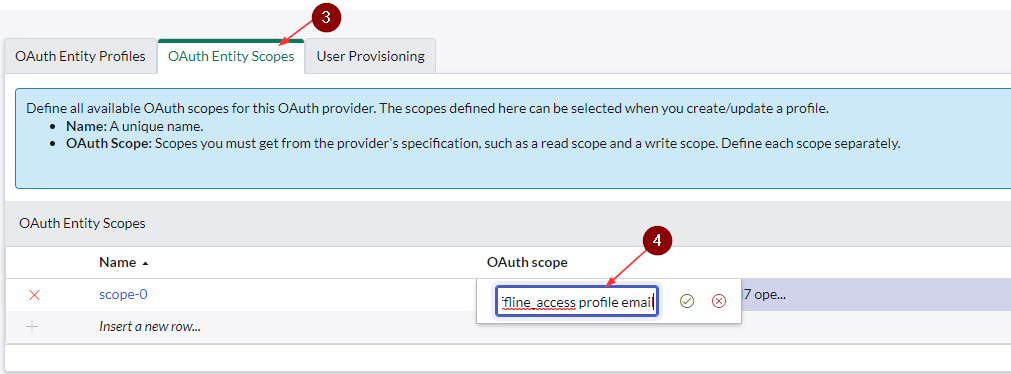
Click on OAuth Entity Scopes, double-click on OAuth scope and replace openid with the below value
Use your Application (client) ID from B2C app registration
This OAuth Scope value is required to generate an access token and without that ServiceNow will error out with a missing parameter. I realized this later on based on my research. I initially left it at openid and searching with the error, lead me to this.
Click Update to save changes
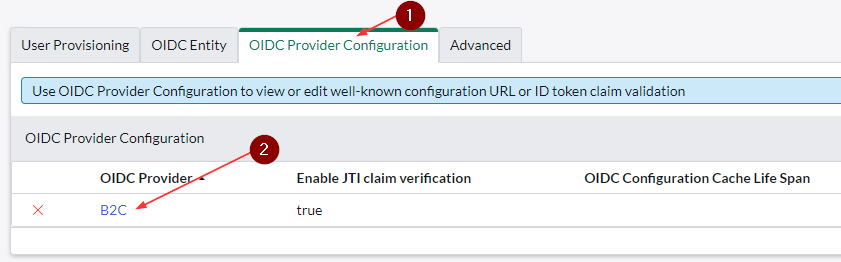
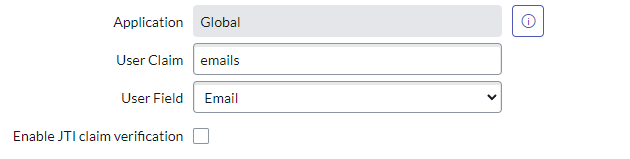
Click on OIDC Provider Configuration
Click on OIDC provider value
Update the User Claim to emails
Click Update
To keep things simple, I’m not enabling the Automatic user provisioning option
You can choose to enable automatic user provisioning during user login. When automatic user provisioning is enabled, a user record is automatically created in the ServiceNow instance if that user record does not exist.
Back in the Identity provider window, Click Update to save the OIDC Identity Provider values
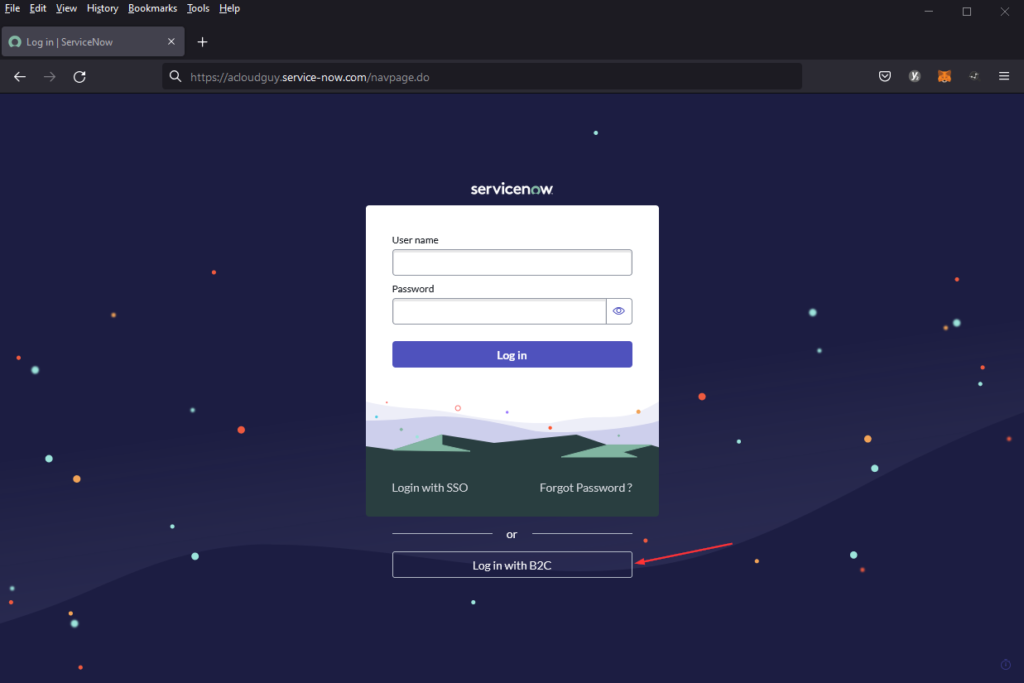
Navigate to the login page of the instance to verify that IdP appears as a login option
Create a test user in ServiceNow and login with the credentials to test if the IdP configuration works
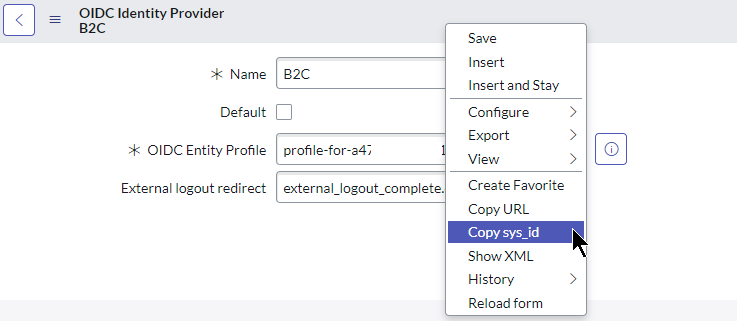
Optionally you can browse to the login page with the URL in following format,
To determine the sys_id, open the OIDC Identity provider we created, right-click on the grey bar and click Copy sys_id
Replace this sys_id in the URL below
This URL will take you directly to the sign-in page
In Azure AD you can create dynamic groups based on user or device properties. Users or devices can be automatically added or removed based on the group’s definition, so you don’t have to maintain the list of users in this group manually.
Whenever any property of a user or device changes, all dynamic group rules in your Azure AD tenant are reevaluated to determine if the user or device should still remain in the group. If a user or device satisfies a rule on a group, they are added as a member and If they no longer satisfy the rule, they are removed.
Manually adding or removing users from dynamic groups is not allowed.
Why use Dynamic Groups?
Simply put, dynamic groups have query-based memberships. This helps in maintaining group membership and application access depending on the query defined. For example, A dynamic group can be defined for all Marketing department users based on the value filled in the ‘department’ attribute. The conditions can also be combined. Following the same example above, a dynamic group of all Marketing department users from New York or a dynamic group with a list of users who report to a specific manager and need access to an application.
In a scenario where you are maintaining user access to applications based on the department, location, this comes in handy.
Note: You need Azure AD P1 and above to be able to create dynamic groups.
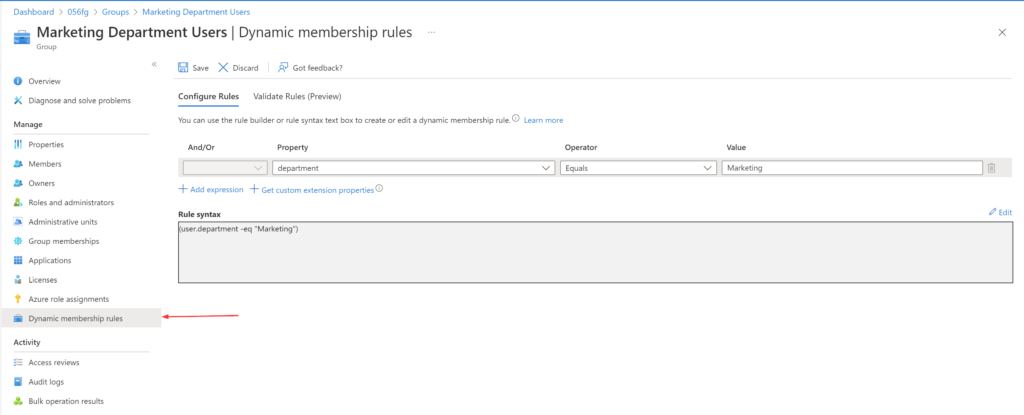
Dynamic Groups in Azure AD
Azure AD admin center provides a rule builder to create and/or update the dynamic group rules.
In the below steps I’ll create a dynamic group in my tenant with users who are in the Marketing department,
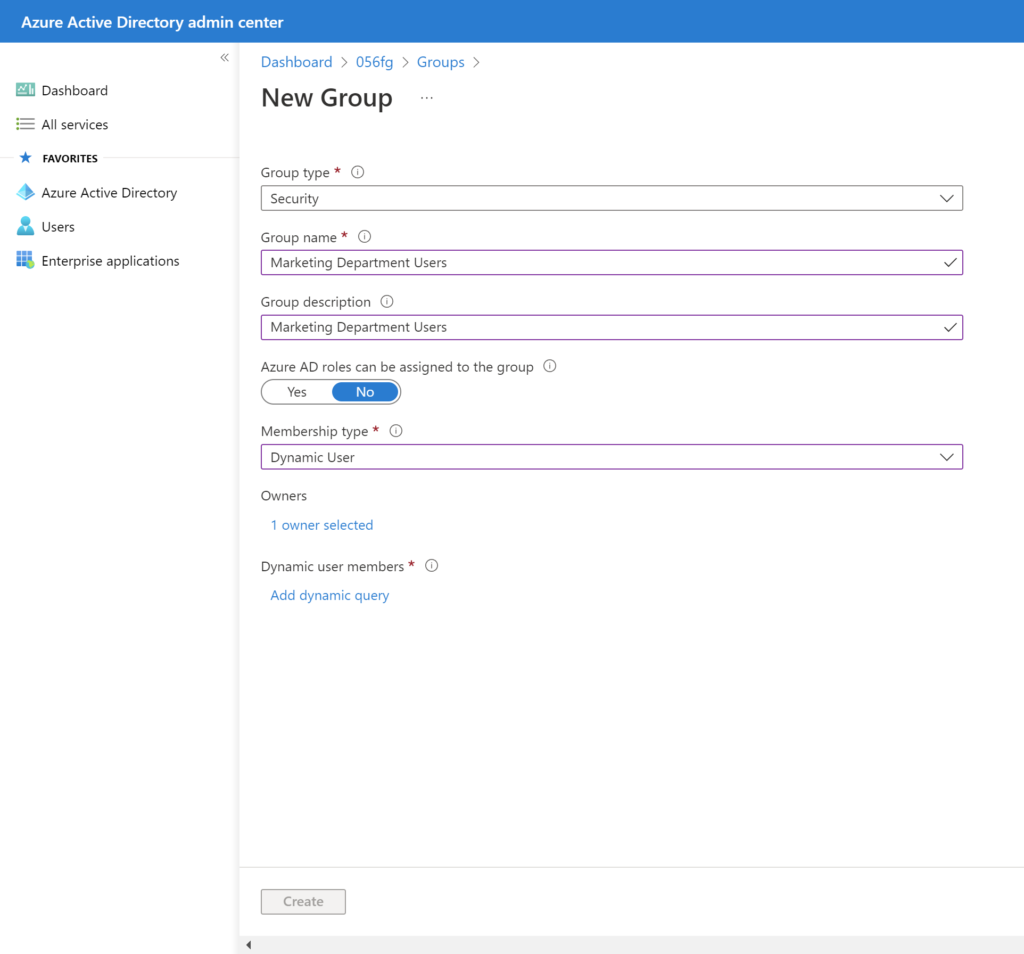
Select Azure Active Directory –> Click on the Groups tab –> New group
In New Group:
Select Security as the group type
Enter ‘Marketing Department Users’ as the name and description for the group
Change Membership type to Dynamic User
Select Owners and in the Add Owners blade search for any desired owners. Click on the desired owners to add to the selection
Click Select to close the Add Owners blade
Click Add dynamic query in the Dynamic user members
Creating new group
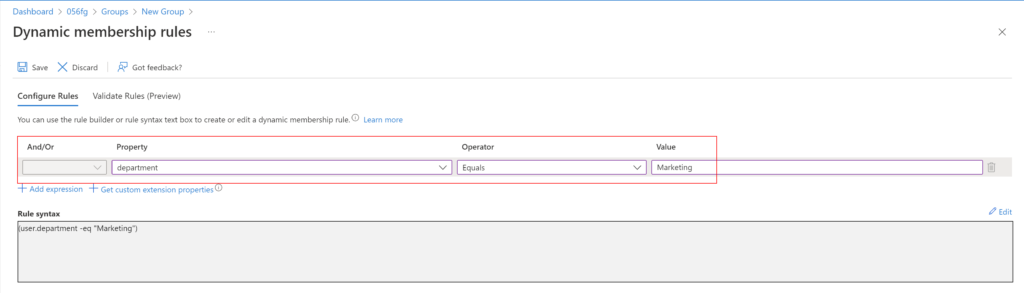
On the Dynamic membership rules blade:
In the Property field, click on the existing value and select department
The Operator field as Equals
Select the Value field and type ‘Marketing Department Users’
membership rules
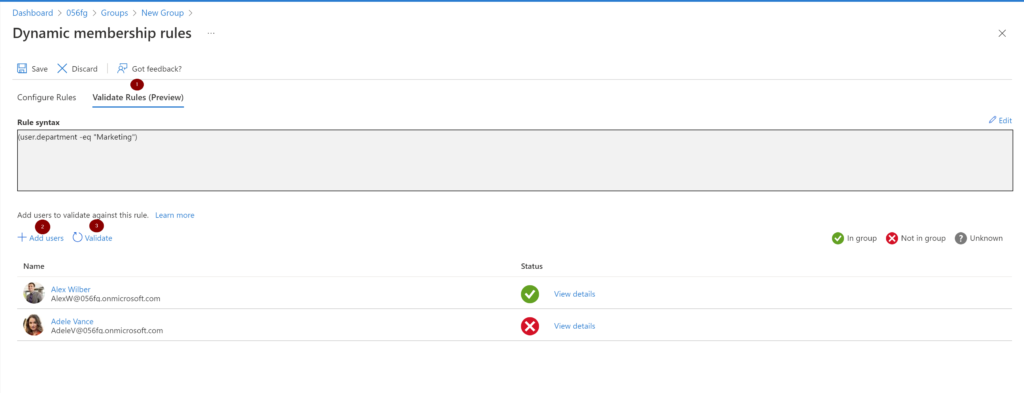
Azure AD now provides an option to validate dynamic group rules. On the Validate rules tab, you can validate your dynamic rule against sample group members to confirm the rule is working as expected. This feature is now in public preview.
validate rules
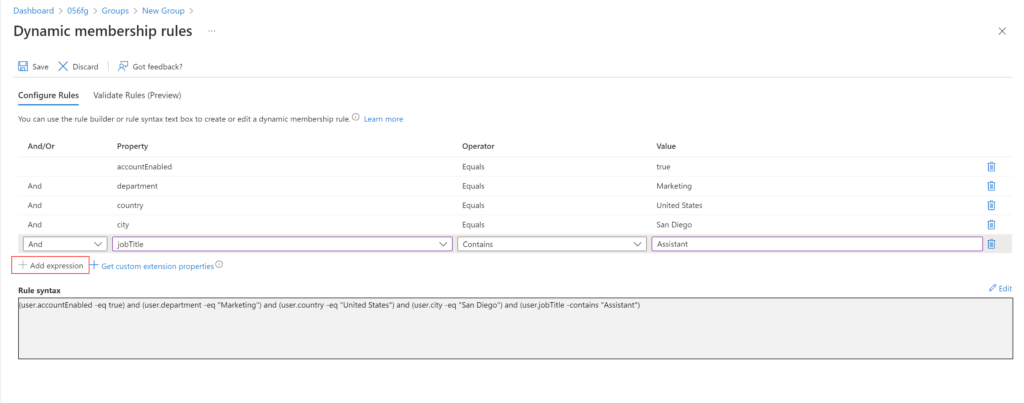
The rule builder supports the construction of up to 5 expressions. You also need to use the text editor for setting operator precedence, and for writing more complex rules. The rule builder can’t be used to reproduce every rule.
‘Add Expression’ disabled after 5 expressions defined
If the rule builder doesn’t support the rule you want to create, the text box can be used. And below are some of the scenarios to use the text box,
Rule with more than 5 expressions
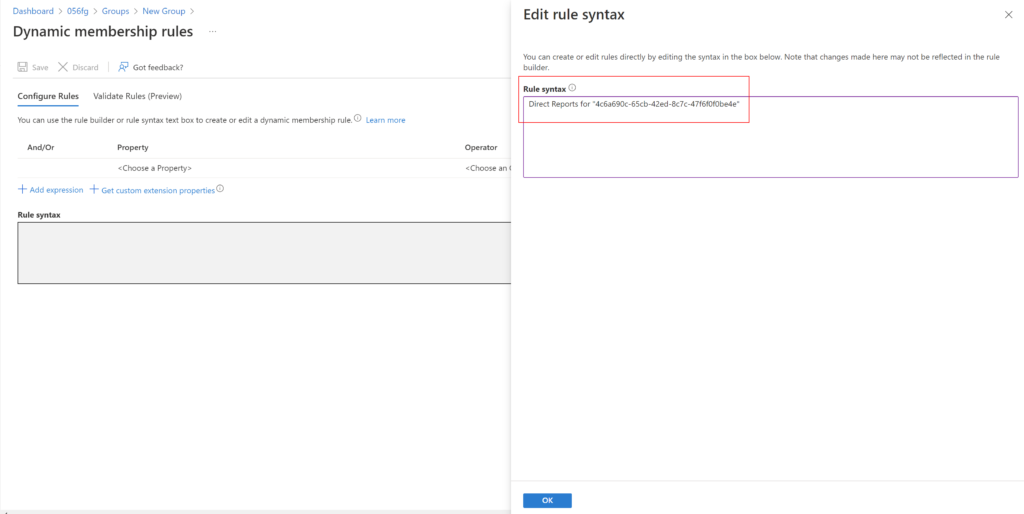
Direct reports rule
For the rule to work, make sure the Manager property is set correctly for users. If you are syncing from your on-premise AD, make sure the Manager attribute is filled
When the manager’s direct reports change in the future, the group’s membership is adjusted automatically
This rule can’t be combined with any other membership rules
Setting operator precedence
All operators are listed below in order of precedence from highest to lowest. Operators on same line are of equal precedence:
Operators can be used with or without the hyphen (-) prefix. Contains operator does partial string matches but not item in a collection matches. Following are the supported operators and their syntax for a single expression,
Syntax
Operator
-ne
Not Equals
-eq
Equals
-notStartsWith
Not Starts With
-startsWith
Starts With
-notContains
Not Contains
-contains
Contains
-notMatch
Not Match
-match
Match
-in
In
-notIn
Not In
Supported values
Values used in an expression can consist of several types, including:
Strings
Boolean = true or false
Numbers
Arrays = number array, string array
To specify a null value in a rule, you can use the null value. The -not operator can’t be used as a comparative operator for null.
Common rules in a typical environment
Below, I will go over some of the rules that are typically used in production environments
“Direct reports” rule
This rule supports only the manager’s direct reports. A group consisting of manager’s direct reports and their reports can’t be created.
Use below syntax. Object ID can be found in the user’s(in this case, the user who is the manager) profile in Azure AD.
Direct Reports for "{objectID_of_manager}"
Direct reports rule
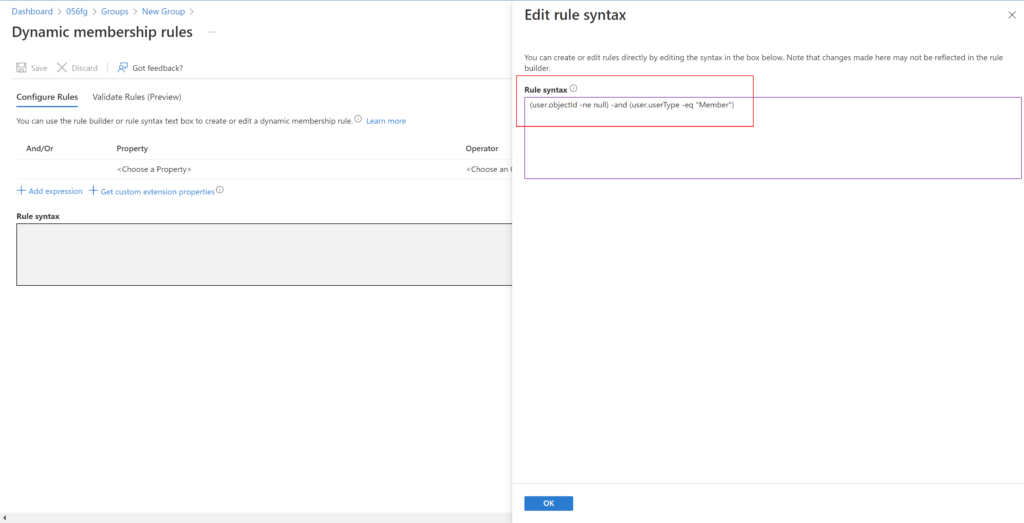
“All users” rule
Include only members of your organization and exclude guest users.
Another interesting part I came across when I was exploring dynamic groups is, I was trying to create a dynamic group of administrators to whom I can assign an Azure AD role. And it turns out, the membership type for role-assignable groups must be Assigned and can’t be an dynamic group. This makes sense as automated population of groups could lead to unwanted access being granted.