O365 – Create Distribution Groups using PowerShell

In this post, I’ll go through the steps to create distribution groups in O365 using PowerShell.

Before proceeding further make sure you are connected to Exchange Online,

$o365cred = Get-Credential
Connect-ExchangeOnline -credential $o365cred

To create a mail-enabled security group named Managers without specifying any members:

$Name = Read-Host "Enter a name for the DistributionGroup"
New-DistributionGroup -Type "Security" -Name $Name -DisplayName $Name -Alias $Name

To create a mail-enabled security group named Managers with members:

Note: -Member is a ‘MultiValuedProperty’ and as we input users comma seperated, we need to split the (comma-separated) string to get an actual array.

$Name = Read-Host "Enter a name for the DistributionGroup"
$Members = Read-Host "Enter email addresses seperated by comma"
$members = $members -split ' *, *'
New-DistributionGroup -Type "Security" -Name $Name -DisplayName $Name -Alias $Name -Members $Members

To add multiple members to an existing Distribution Group:

$Name = Read-Host "Enter DistributionGroup name to add members"
$Members = "user01@domain.onmicrosoft.com","user01@domain.onmicrosoft.com"
$Members | ForEach-Object { Add-DistributionGroupMember -Identity $Name -Member $_}

To import members from a csv and add to an existing Distribution Group:

$Name = Read-Host "Enter DistributionGroup name to add members"
Import-csv "C:\tmp\members.csv" | ForEach-Object {
Add-DistributionGroupMember -Identity $Name -Member $_.member
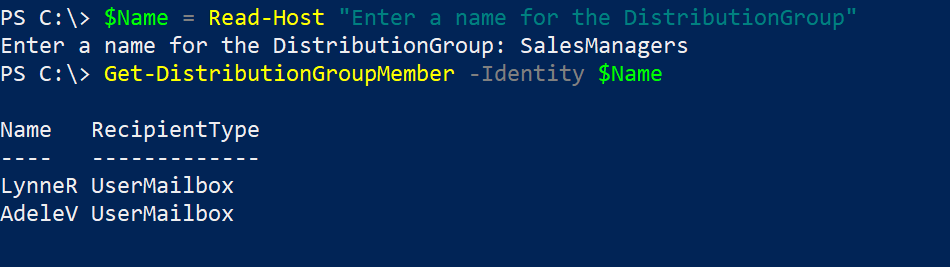
}

To determine existing distribution group members for a distribution group:

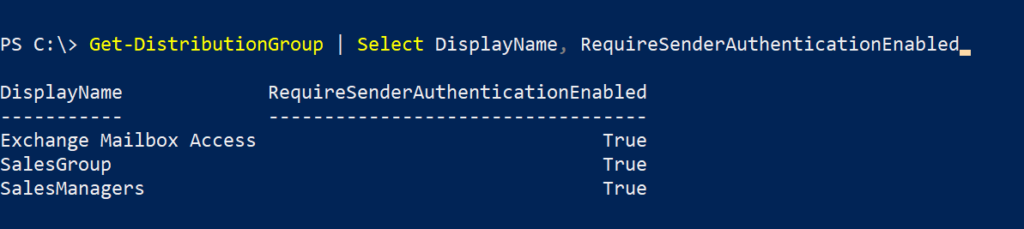
To set distribution group to accept messages from authenticated (internal) and unauthenticated (external) senders.

Note: If you don’t specify this parameter while creating the distribution group, the default value is set to ‘true’ meaning messages from unauthenticated (external) senders are rejected.

$Name = Read-Host "Enter DistributionGroup's name to allow external senders"
Set-DistributionGroup -Identity $Name -RequireSenderAuthenticationEnabled $false

To change an existing distribution group’s name:

$Name = Read-Host "Enter name of existing group to be renamed" 
$NewName = Read-Host "Enter new name" 
Set-DistributionGroup -Identity $Name -Name $NewName -DisplayName $NewName -Alias $NewName

Thank you for stopping by. ✌

O365 – Prevent Users from Signing Up for Trials and Purchasing Their Own Pro license

I’ve updated this post with the newer MSCommerce PowerShell module

Self-service is a great idea in several instances but in my opinion when it comes to users signing up for trials and purchasing licenses, it seems to be causing unexpected issues especially while answering to the purchasing team.

Most organizations these days have procurement processes in place to meet regulatory, security, compliance and governance needs. And the need to ensure that all licenses are approved and managed according to defined processes is very important. And when you take expenses, privacy or security into consideration, it is a good idea to disable self-service sign-up and purchases.

To disable all self-service sign-ups

This can be achieved using the MSOL PowerShell module. Type below command to check current settings:

Get-MsolCompanyInformation | fl AllowAdHocSubscriptions
current settings

To disable all self-service sign-ups,

Set-MsolCompanySettings -AllowAdHocSubscriptions:$false

When users try to sign-up, they’ll see the below message,

Your IT department has turned off signup

Prevent users from purchasing their own Pro license

To install and connect the MSCommerce module, start PowerShell as an administrator to install the module,

Install-Module -Name MSCommerce
Import-Module -Name MSCommerce
Connect-MSCommerce
Get-Command *-mscommerce*

To determine current setting,

Get-MSCommercePolicy -PolicyId AllowSelfServicePurchase
Get-MSCommercePolicy

View a list of all available self-service purchase products and the status,

Get-MSCommerceProductPolicies -PolicyId AllowSelfServicePurchase
Get-MSCommerceProductPolicies

Disable the policy setting for a specific product, Below example: ‘Power BI Pro’

Update-MSCommerceProductPolicy -PolicyId AllowSelfServicePurchase -ProductId CFQ7TTC0L3PB -Enabled $False

Below is an example script on how your can disable AllowSelfServicePurchase by getting the ProductID for ‘Power BI Pro’

$p = Read-Host "Enter product name"
$product = Get-MSCommerceProductPolicies -PolicyId AllowSelfServicePurchase | where {$_.ProductName -match $p }
Update-MSCommerceProductPolicy -PolicyId AllowSelfServicePurchase -ProductId $product.ProductID -Enabled $false
Update-MSCommerceProductPolicy

In scenarios where there are more than one values for the product, Below example: ‘Power Automate’

$p = Read-Host "Enter product name"
$product = Get-MSCommerceProductPolicies -PolicyId AllowSelfServicePurchase | where {$_.ProductName -match $p }
Update-MSCommerceProductPolicy -PolicyId AllowSelfServicePurchase -ProductId $product[0].ProductID -Enabled $false
Update-MSCommerceProductPolicy -PolicyId AllowSelfServicePurchase -ProductId $product[1].ProductID -Enabled $false
Update-MSCommerceProductPolicy # more than one value

To disable AllowSelfServicePurchase for all products,

Get-MSCommerceProductPolicies -PolicyId AllowSelfServicePurchase | ? {$_.PolicyValue -eq "Enabled" } | ForEach {Update-MSCommerceProductPolicy -PolicyId AllowSelfServicePurchase -ProductId $_.ProductId -Enabled $False }
To disable for all products

Thanks for stopping by.✌

O365 – Determine Mailbox Folder Size from Exchange Online using PowerShell

I’m sure all Exchange Online environments have users who are data hoarders in their email environment. Most tenants have policies to limit how big the mailbox can be for various reasons. Users may come back with increasing mailbox sizes so they can hoard more of those outdated data. It is good practice to maintain the folder items. Get-MailboxFolderStatistics helps retrieve information about folders in mailboxes, including number and size of items in the folder and other information.

Before proceeding, make sure you are connected to Exchange Online module,

$credential = Get-Credential
Connect-ExchangeOnline -credential $credential

To determine a folders from a user’s mailbox, the folder size and the number of items in the folders,

$EmailId = Read-Host "Enter user's email address"
Get-MailboxFolderStatistics -Identity $EmailId | Select Name,FolderSize,ItemsinFolder

To determine individual folders and subfolder sizes of a specific user:

$EmailId = Read-Host "Enter user's email address"
Get-MailboxFolderStatistics -Identity $EmailId | Select Name,FolderAndSubfolderSize,ItemsInFolderAndSubfolders

To determine inbox folders statistics of a specific user:

$EmailId = Read-Host "Enter user's email address"
Get-MailboxFolderStatistics -Identity $EmailId -FolderScope Inbox | Format-Table Identity,ItemsInFolderAndSubfolders,FolderAndSubfolderSize -AutoSize

To determine and display inbox folder sizes for all mailboxes in the organization

$All = Get-Mailbox -ResultSize Unlimited
$All | foreach {Get-MailboxFolderStatistics -Identity $_.Identity -FolderScope Inbox} | Select Identity,ItemsInFolderAndSubfolders,FolderAndSubfolderSize | ft -AutoSize

and export to CSV file:

$Allmbx = Get-Mailbox -ResultSize Unlimited
$Allmbx | foreach {Get-MailboxFolderStatistics -Identity $_.Identity -FolderScope Inbox | Select Identity,ItemsInFolderAndSubfolders,FolderAndSubfolderSize | Export-Csv "C:\tmp\Inbox_data.csv" -NoTypeInformation -Append}

Get-MailboxFolderStatistics returns IPM subtree folders. This folder structure consists of messages between recipients(Inbox, Sent Items). In the Exchange Online, the Non-IMP subtree is quite larger, as different O365 applications have been using mailboxes to store and process data. Teams, Delve, MyAnalytics, all have their own folders or folder trees inside the Non-IPM root.

To determine Non-IPM subtree folders and their sizes:

$EmailId = Read-Host "Enter user's email address"
Get-MailboxFolderStatistics -Identity $EmailId -FolderScope NonIpmRoot | Format-Table Identity,ItemsInFolderAndSubfolders,FolderAndSubfolderSize -AutoSize

Thank you for stopping by. ✌

Office 365 – License Reporting using PowerShell – Updated

Reporting on O365 licenses is crucial and is necessary to keep track. I’m sure just like me most administrators get asked to generate reports on how the current license state on the tenant. In this post, I have this script I’ve put together just for this purpose.

The O365 portal does provide few options to export the data but this script generates the below reports,

  • O365 license usage
  • All enabled and licensed users report
  • All unlicensed users report
  • All disabled and licensed users report

This report can also be scheduled to run if you already use a mechanism to store your credentials securely and pass it on to your PS scripts.

I use the ImportExcel PowerShell module for this script,

Install-Module -Name ImportExcel

Before proceeding further, you must first connect to your MS online service. To do so, run the cmdlet Connect-MsolService at the Windows PowerShell command prompt. You will then be prompted for your credentials.

$Msolcred = Get-credential
Connect-MsolService -Credential $MsolCred

$xlsxPath = ".\Office365LicenseReport_$((Get-Date).ToString("MMddyyyy")).xlsx"
$LicNames = Get-Content -raw ".\FriendlyLicenseName.txt" | ConvertFrom-StringData

Get-MsolAccountSku | foreach {
            $ActiveUnits = $_.ActiveUnits
            $ConsumedUnits = $_.ConsumedUnits
            $LicenseItem = $_.AccountSkuId -Split ":" | Select-Object -Last 1
            $FriendlyName = $LicNames[$LicenseItem]

            [PSCustomObject]@{
                    'License' = $FriendlyName;
                    'Active Units' = $ActiveUnits;
                    'Consumed Units' = $ConsumedUnits
            }
} | Export-Excel -Path $xlsxPath -WorksheetName "Licensed_State" -TableStyle Medium16 -AutoSize -Append

Get-MsolUser -All -EnabledFilter EnabledOnly | where {$_.IsLicensed -eq $true} | Select-Object -ExpandProperty Licenses DisplayName,UserPrincipalName,Title,Department,UsageLocation | Select DisplayName,UserPrincipalName,Title,Department,UsageLocation,AccountSkuId | foreach {
            $DisplayName = $_.DisplayName
            $UPN = $_.UserPrincipalName
            $JobTitle = $_.Title
            $Department = $_.Department
            $UsageLoc = $_.UsageLocation
            $LicenseItem = $_.AccountSkuId -Split ":" | Select-Object -Last 1
            $FriendlyName = $LicNames[$LicenseItem]

            [PSCustomObject]@{
                    'Display Name' = $DisplayName;
                    'User Principal Name' = $UPN;
                    'License Plans' = $FriendlyName;
                    'JobTitle' = $JobTitle;
                    'Department' = $Department;
                    'Usage Location' = $UsageLoc
            }
}  | Export-Excel -Path $xlsxPath -WorksheetName "Enabled_Licensed_Users" -TableStyle Medium16 -AutoSize -Append

Get-MsolUser -All -UnlicensedUsersOnly | foreach {
            $DisplayName = $_.DisplayName
            $UPN = $_.UserPrincipalName
            $JobTitle = $_.Title
            $Department = $_.Department

            [PSCustomObject]@{
                    'Display Name' = $DisplayName;
                    'User Principal Name' = $UPN;
                    'JobTitle' = $JobTitle;
                    'Department' = $Department
            }
} | Export-Excel -Path $xlsxPath -WorksheetName "UnLicensed_Users" -TableStyle Medium16 -AutoSize -Append

Get-MsolUser -All -EnabledFilter DisabledOnly | where {$_.IsLicensed -eq $true} | Select-Object -ExpandProperty Licenses DisplayName,UserPrincipalName,Title,Department,UsageLocation | Select DisplayName,UserPrincipalName,Title,Department,UsageLocation,AccountSkuId | foreach {
            $DisplayName = $_.DisplayName
            $UPN = $_.UserPrincipalName
            $JobTitle = $_.Title
            $Department = $_.Department
            $UsageLoc = $_.UsageLocation
            $LicenseItem = $_.AccountSkuId -Split ":" | Select-Object -Last 1
            $FriendlyName = $LicNames[$LicenseItem]

            [PSCustomObject]@{
                    'Display Name' = $DisplayName;
                    'User Principal Name' = $UPN;
                    'License Plans' = $FriendlyName;
                    'JobTitle' = $JobTitle;
                    'Department' = $Department;
                    'Usage Location' = $UsageLoc
            }
} | Export-Excel -Path $xlsxPath -WorksheetName "Disabled_Licensed_Users" -TableStyle Medium16 -AutoSize -Append

I used this link to create a file to do a lookup of the ID which is the output from the AccountSkuId and convert it into a friendly name. This list is subject to change but you can download the ‘FriendlyLicenseName.txt‘ from this below link.

Place this file in the same location as you have the PS script or modify script accordingly.

I found it useful that this script’s output can be readily used to generate Pivot tables or charts. If you wish, you can also generate it straight from the script using -IncludePivotTable

Hope this script was helpful in determining the current license state in your O365 environment.

Thank you for stopping by. ✌

Azure AD – Create Security Groups and Add Members using PowerShell

Azure AD security groups can be used to manage member and computer access to shared resources for a group of users. A security group can have users, devices, groups and SPNs as its members. In this post, I’ll go over steps on how to create a Azure AD security group, add users to one group and also bulk import users to one group and multiple groups.

Make sure you are connected to Azure AD,

$credential = Get-Credential
Connect-AzureAD -credential $credential

To create an Azure AD security group:

$GroupName = Read-Host "Enter name for Azure AD group"
New-AzureADGroup -DisplayName $GroupName -MailEnabled $false -SecurityEnabled $true -MailNickName "NotSet"

To create multiple Azure AD security groups:

Note: csv file has name,description as column headers

$groups = import-csv "C:\tmp\AzureAD Groups\groups.csv"

Foreach($group in $groups) {
New-AzureADGroup -DisplayName $group.name -Description $group.description -MailEnabled $false -SecurityEnabled $true -MailNickName "NotSet"
}

To add an user and an owner to an existing group:

$Group = Read-Host "Enter name of Azure AD group"
$User = Read-Host "Enter username of user to be added"
$Owner = Read-Host "Enter username of group owner"

$GroupObj = Get-AzureADGroup -SearchString $Group
$UserObj = Get-AzureADUser -SearchString $User
$OwnerObj = Get-AzureADUser -SearchString $Owner

Add-AzureADGroupMember -ObjectId $GroupObj.ObjectId -RefObjectId $UserObj.ObjectId
Add-AzureADGroupOwner -ObjectId $GroupObj.ObjectId -RefObjectId $OwnerObj.ObjectId

To display members of a security group:

$Group = Read-Host "Enter name of Azure AD group to display members"
$GroupObj = Get-AzureADGroup -SearchString $Group
Get-AzureADGroupMember -ObjectId $GroupObj.ObjectId

To display owners of a security group:

$Group = Read-Host "Enter name of Azure AD group to display owner(s)"
$GroupObj = Get-AzureADGroup -SearchString $Group
Get-AzureADGroupOwner -ObjectId $GroupObj.ObjectId

To bulk add multiple users to a specific group:

Note: csv file has UserPrincipalName as column header

$Group = Read-Host "Enter name of Azure AD group to add users"
$GroupObj = Get-AzureADGroup -SearchString $Group
$Members = Import-csv "C:\tmp\GroupMembers.csv"
Foreach($Member in $Members) {

$User = $Member.UserPrincipalName
Write-Progress -Activity "Adding user.." -Status $User

Try {
$UserObj = Get-AzureADUser -SearchString $User
Add-AzureADGroupMember -ObjectId $GroupObj.ObjectId -RefObjectId $UserObj.ObjectId
}
catch {
Write-Host "Error occured while adding $User" -ForegroundColor Red
}
}

To bulk add multiple users to multiple groups. This below script checks to see if the user is already part of the Azure AD group and returns an error.

Note: csv file has UserPrincipalName,Group as column headers

$list = Import-csv "C:\tmp\UsersGroups.csv"
Foreach($entry in $list) {

$User = $entry.UserPrincipalName
$Group = $entry.Group
$UserObj = Get-AzureADUser -SearchString $User
$GroupObj = Get-AzureADGroup -SearchString $Group
$GroupMembers = (Get-AzureADGroupMember -ObjectId $GroupObj.ObjectId).UserPrincipalName

If ($User -notin $GroupMembers) {
    Add-AzureADGroupMember -ObjectId $GroupObj.ObjectId -RefObjectId $UserObj.ObjectId
    Write-Host "$User added to $Group" -ForegroundColor Green
    }
    else {
    Write-Host "$User already in $Group" -ForegroundColor Red
    }
}

Hope this was helpful for you in exploring Azure AD security groups.

Thank you for stopping by. ✌