PowerShell – Securely Managing Credentials – Updated

When it comes to automation with PowerShell we come across scenarios where credentials are needed for the script to run and I’ve seen scripts being used by admins where the passwords are there in plain-text. It starts with..’this is only for testing‘,’oh!..that’s just a service account‘ and next thing you know, it is in production and the said service account has more previleged roles attached to it than when it was in testing.

I’ve done it too but I’ve realized that I can spend some time to understand and make it a practice on storing the passwords securely. I went over this issue briefly in a different post when earlier. In this post, I will go over the steps on how to use the Microsoft’s SecretManagement and Secret Store modules to manage passwords securely in a script and interactively.

And yes, there is a long list of 3rd party secret vaults that can be used to accomplish this like HashiCorp Vault, LastPass, KeePass, etc. I’ve started using Azure Key Vault which is great and doesn’t cost a lot. The Azure Key Vault is great for storing and sharing secrets in an organization and also to set a process around it. I will cover this in a future post.

Installing the modules

To start storing and managing passwords from a encrypted vault, we need to install the PowerShell SecretManagement and SecretStore modules. These modules require Windows PowerShell version 5.1 or PowerShell Core 6.x, 7.x

Microsoft.PowerShell.SecretManagement – Provides a convenient way to store and retrieve secrets
Microsoft.PowerShell.SecretStore – Provides local secure store extension vault for Microsoft.PowerShell.SecretManagement module

To install the modules,

  1. Open PowerShell as admin
  2. Set PowerShell’s execution policy to RemoteSigned
Set-ExecutionPolicy RemoteSigned
  1. Run the following command
    • On confirmation prompt, press A to continue
Install-Module -Name Microsoft.PowerShell.SecretManagement, Microsoft.PowerShell.SecretStore
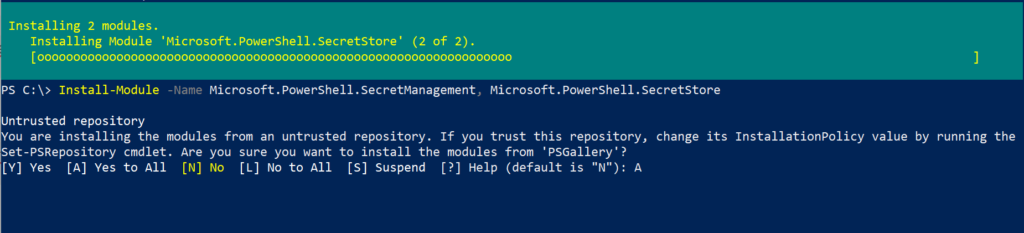
  1. To confirm successful installation,
Get-Module -ListAvailable Microsoft.PowerShell.SecretManagement, Microsoft.PowerShell.SecretStore

and to display all the available cmdlets in both modules,

Get-Command -Module Microsoft.PowerShell.SecretManagement, Microsoft.PowerShell.SecretStore | Sort-Object Source

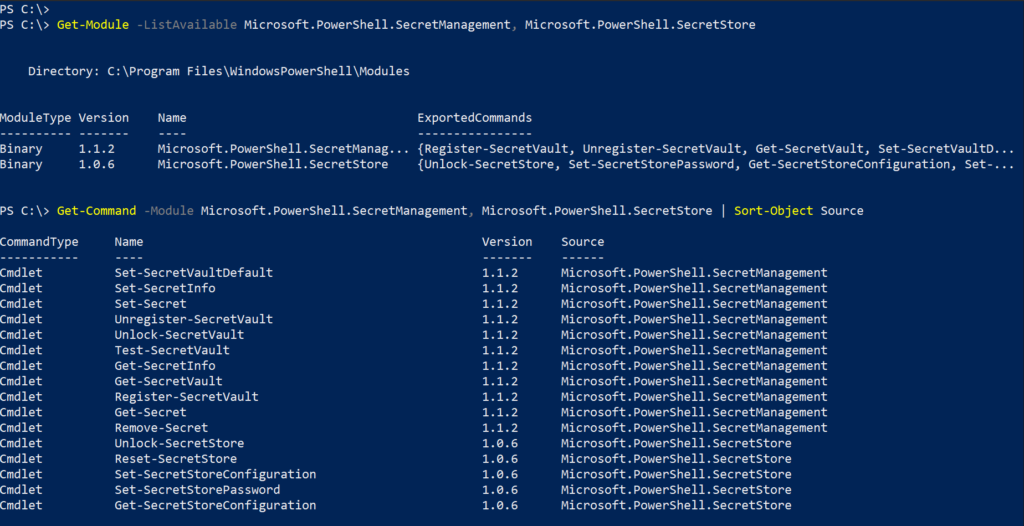
Create a secret store vault

First, we need to create a local secret vault. I will name mine CredsDB

$vaultName = Read-Host "Enter a name for the vault"
$vaultDesc =  Read-Host "Enter vault description"
Register-SecretVault -Name $vaultName -ModuleName Microsoft.PowerShell.SecretStore -Description $vaultDesc

To display the registered vault,

Get-SecretVault

To set a master password to the SecretStore vault

To create a master password to access the SecretStore,

Get-SecretStoreConfiguration

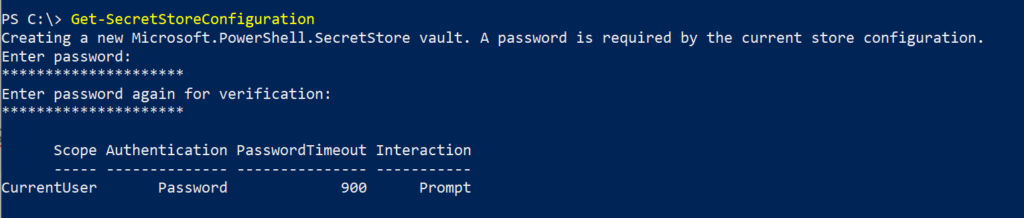
The following settings determine access to the password stores,

  • Scope – The Scope is always CurrentUser. AllUsers Scope is not supported
  • Authentication – Access vault using a master password
  • PasswordTimeout – 900 seconds, duration of the session before we need to enter the master password
  • Interaction – Prompt – to make changes

Note: If you forget the vault master password, you won’t be able to access stored data.

To change master password,

$oldPassword = Read-Host "Enter old password" -AsSecureString
$newPassword = Read-Host "Enter new password" -AsSecureString
Set-SecretStorePassword -NewPassword $newPassword -Password $oldPassword

Storing and updating secrets

Now that we have created a new secret vault, we are ready to start storing sensitive information into it. The secret store accepts the following data types as secrets,

  • Byte[]
  • Hashtable
  • PSCredential
  • SecureString
  • String

To add a new username and password, PSCredential object to the store,

$credential = Get-Credential
Set-Secret -Name Cred1 -Secret $credential

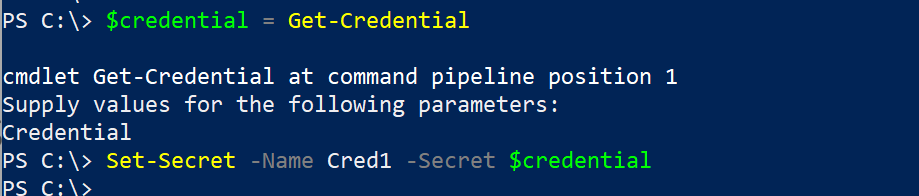
If you missed to set the master password in the earlier step I described, you’ll be prompted to set the master password while running the Set-Secret cmdlet for the first time.

If you need to update the secret at a later point in time, use the same Set-Secret cmdlet to overwrite the existing secret

Retrieving secrets

To retrieve the entries in the vault, we can use the below cmdlet to unlock the vault first. Type the vault’s password and press enter,

Unlock-SecretStore

To display entries in the secret vault,

Get-SecretInfo

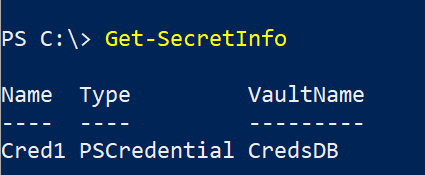
To retrieve a secret’s value shown as System.Security.SecureString,

$Secret = Read-Host "Enter name of the secret"
Get-Secret -Name $Secret

To view the password in plaintext,

$Secret = Read-Host "Enter name of the secret"
(Get-Secret -Name $Secret).GetNetworkCredential() | Select UserName, Password

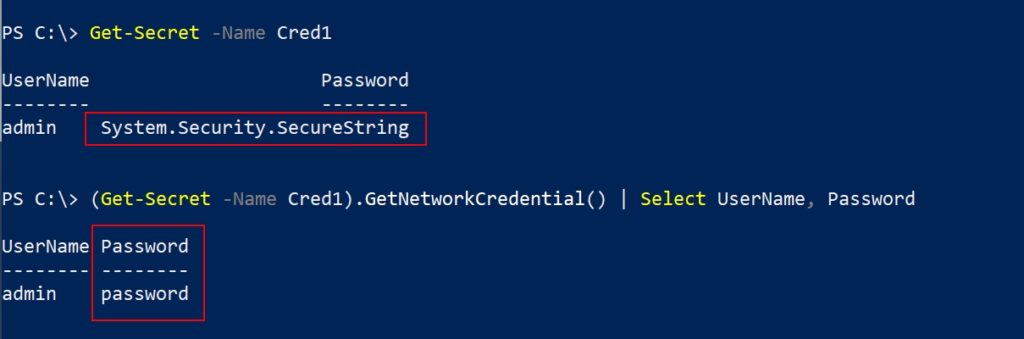
Using secrets in PowerShell automation

We’ve registered, created a new vault and also created a new secret and also retrieved the stored secret in the above steps. The above retrieval process needs manual interaction and in automation we need to avoid that. I know what you are thinking, if there is a master password, we’ll need to type that in anyway to unlock the stored secret.

You might be tempted to disable the request of the master password request to access the secret by using the below cmdlet, but please don’t. This method might be good to do some quick testing but is not recommended in production environments.

Set-SecretStoreConfiguration -Authentication None

There are many options to unlocking the secret store without manually entering the master password while making sure it is not stored anywhere in plain text. One method is to save the master password in an encrypted xml file.

Use the below command to save master password in a CliXml file.

  • The command will prompt for credentials
    • Type any username
    • Type the master password
  • You can name the xml file to your preference
  • It is recommended to store the xml file in a location where you can lock down the permissions
Get-Credential | Export-CliXml c:\scripts\vpd.xml

We can confirm the credential file exists and contains the encrypted master password. The XML file will not display the password in plain text as you can see in the screenshot.

Get-Content c:\scripts\vpd.xml

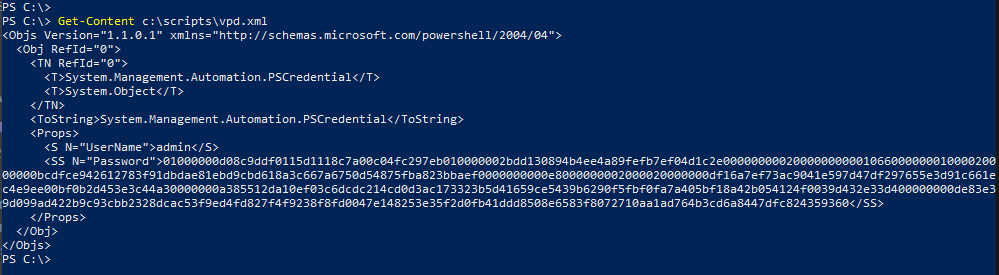
Now we can import the encrypted password from the xml file to a variable

$vpwd = (Import-CliXml c:\scripts\vpd.xml).Password

We can use this above variable to unlock the Secret Store,

Unlock-SecretStore -Password $vpwd

To retrieve the secret,

$Secret = Read-Host "Enter name of the secret"
(Get-Secret -Name $Secret).GetNetworkCredential() | Select Username,Password

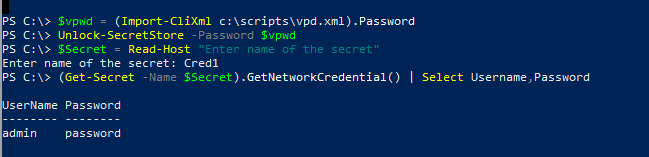
With this in place, to keep things simple you can use the variable and Unlock-SecretStore in PowerShell automation scripts. We can use this to connect to Azure AD tenant or to O365.

Here is how I do it,

$vpwd = (Import-CliXml c:\scripts\vpd.xml).Password
Unlock-SecretStore -Password $vpwd
$credential = Get-Secret -Vault CredsDB -Name Cred1
Connect-AzureAD -Credential $credential
Connect-ExchangeOnline -credential $credential

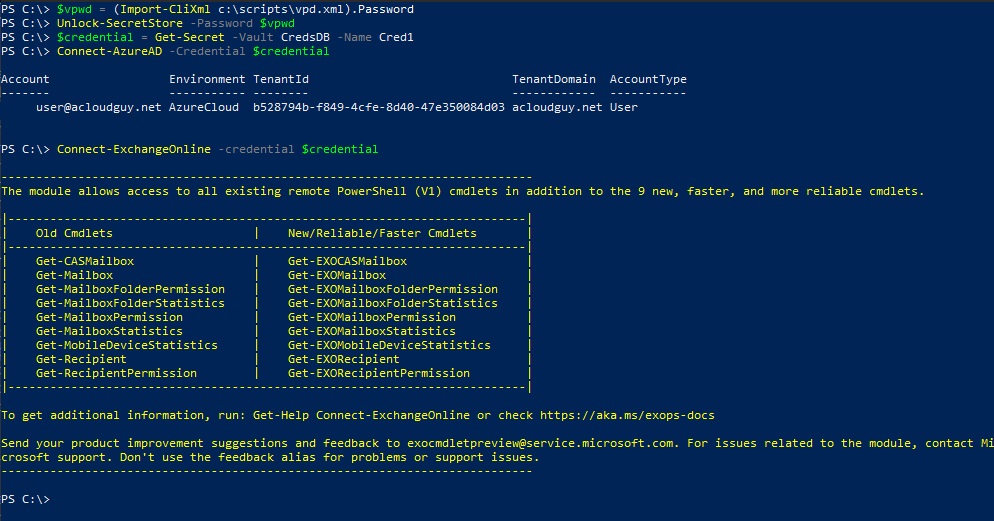
Hope this post helped you in understanding how to store credentials securely with the SecretManagement and Secret Store modules.

Thank you for stopping by.✌

Teams – Enable/Apply Sensitivity Labels

In a O365 tenant I manage, I had rolled out the Azure Information Protection labels from earlier. The recent requirement was to make sure the sensitivity labels will apply to group across services like Outlook, Microsoft Teams and SharePoint online.

When I checked the sensitivity label, I noticed the ‘Groups and sites’ option greyed out and which lead me to research a bit into this and write my findings below,

Groups & sites greyed out

Enable sensitivity labels for containers in Azure AD

Sensitivity labeling for containers i.e., groups and sites, should enabled before we can configure the settings in the sensitivity labeling wizard. Else, it will be greyed out as in screenshot above.

To determine current group settings for your Azure AD organization, use the below cmdlet. If no group settings are defined, this cmdlet won’t return any output value.

Get-AzureADDirectorySetting | fl

In my scenario, I have only one setting and it was easier to see it. But your organization might have more than one setting and in that case, you can use this below cmdlet to search and determine the setting.

Get-AzureADDirectorySetting -Id (Get-AzureADDirectorySetting | where -Property DisplayName -Value "Group.Unified" -EQ).id
EnableMIPLabels = false

Below, I’m storing the value of the cmdlet’s output into the $Setting variable. And once stored, I’m setting ‘True’ as the value for ‘EnableMIPLabels’. I’m listing out both methods, what I used and what you can potentially use. The second method is much easier.

$Setting = Get-AzureADDirectorySetting -Id <Group.Unified policy's Id from your tenant>
$Setting["EnableMIPLabels"] = "True"
Set-AzureADDirectorySetting -Id $Setting.Id -DirectorySetting $Setting

or you can use this,

$Setting = Get-AzureADDirectorySetting -Id (Get-AzureADDirectorySetting | where -Property DisplayName -Value "Group.Unified" -EQ).id
$Setting["EnableMIPLabels"] = "True"
Set-AzureADDirectorySetting -Id $Setting.Id -DirectorySetting $Setting
EnableMIPLabels = true

Synchronize sensitivity labels to Azure AD

  1. Connect to Security & Compliance PowerShell using the Exchange Online PowerShell V2 module
  2. Run Connect-IPPSSession -UserPrincipalName username@tenantdomain.com
  3. Run the following cmdlet to use sensitivity labels in M365 groups,

Note: This is a one-time procedure.

Execute-AzureAdLabelSync

Once enabled, you can configure protection settings for “Groups & sites” and “Files & emails” within a single sensitivity label.

Groups & sites not greyed out

Thank you for stopping by. ✌

Teams – Reports with PowerShell – Updated

It is important to know about the current state of your Teams rollout and this is one of those which can easily get out of control in a blink of an eye. I wanted to understand and determine the current Teams state in a tenant I manage and I had to create reports to present.

The portal does give a few options to export the data but I decided to take a look at the option the Teams PowerShell module offers. I spent some time on creating a script that will output these five reports,

  • All Teams data with Channel type, Channel count, Channel count with types, Teams member count and owners count
  • Teams users data with role information
  • Channel information for each Teams with Channel types
  • Channel user information with user information and role
  • Permissions on each Teams

This report can also be scheduled to run if you already use a mechanism to store your credentials securely and pass it on to your PS scripts.

I use the ImportExcel PowerShell module for this script,

Install-Module -Name ImportExcel

Before proceeding further, make sure you have the Teams PowerShell module installed. You’ll need to run this script with Teams Administrator role.

$TeamsCred = Get-Credential
Connect-MicrosoftTeams -credential $TeamsCred

$xlsxPath = ".\Teams-Report_$((Get-Date).ToString("MMddyyyy")).xlsx"

Get-Team | Select GroupId,DisplayName,MailNickName,Archived,Visibility,Description | foreach {
        $ID = $_.GroupId
        $TeamName = $_.DisplayName
        $NickName = $_.MailNickName
        $Archived = $_.Archived
        $visibility = $_.Visibility
        $Description = $_.Description
        $ch = Get-TeamChannel -GroupId $ID
        $ChannelCount = $ch.count
        $TeamUser = Get-TeamUser -GroupId $ID
        $TeamMemberCount = $TeamUser.Count
        $TeamOwnerCount = ($TeamUser | ?{$_.role -eq "owner"}).count
        $stdchannelCount = ($ch | ?{$_.MembershipType -eq "Standard"}).count
        $privchannelCount = ($ch | ?{$_.MembershipType -eq "Private"}).count

        [PSCustomObject]@{
                  'Teams Name'=$TeamName;
                  'Teams MailNickName'=$NickName;
                  'Teams Type'=$Visibility;
                  'Description'=$Description;
                  'Archived?'=$Archived;
                  'Channel Count'=$ChannelCount;
                  'Standard Channel Count'=$stdchannelCount;
                  'Private Channel Count'=$privchannelCount;
                  'Team Members Count'=$TeamMemberCount;
                  'Team Owners Count'=$TeamOwnerCount} | Export-Excel -Path $xlsxPath -WorksheetName "All Teams Report" -TableStyle Medium16 -AutoSize -Append
}

Get-Team | foreach {
    $ID = $_.GroupId;
    $TeamName = $_.DisplayName;
    $NickName = $_.MailNickName;
    Get-TeamUser -GroupId $ID | Select User,Name,Role |
    Foreach {
		[PSCustomObject]@{
			'Teams ID' = $ID;
			'Teams Name' = $TeamName;
			'Teams MailNickName' = $NickName;
                        'User UPN' = $_.User;
			'User DisplayName' = $_.Name;
			'Role' = $_.Role
		}
    }
} | Export-Excel -Path $xlsxPath -WorksheetName "Teams_users" -TableStyle Medium16 -AutoSize

Get-Team | Foreach {
    $ID = $_.GroupId;
    $TeamName = $_.DisplayName;
    $NickName = $_.MailNickName;
    Get-TeamChannel -GroupId $ID | Select Id, DisplayName, MembershipType |
    Foreach {
		[PSCustomObject]@{
			'Teams ID' = $ID;
			'Teams Name' = $TeamName;
			'Teams MailNickName' = $NickName;
			'Channel Name' = $_.DisplayName;
			'Channel Type' = $_.MembershipType
		}
	}
} | Export-Excel -Path $xlsxPath -WorksheetName "Channels" -TableStyle Medium16  -AutoSize

Get-Team | Foreach {
    $ID = $_.GroupId;
    $TeamName = $_.DisplayName;
    $NickName = $_.MailNickName;
    Get-TeamChannel -GroupId $ID | Select DisplayName | 
            Foreach {
            $chName = $_.DisplayName;
                Get-TeamChannelUser -GroupId $ID -DisplayName $chName | Select User,Name,Role |
                    Foreach {
		                [PSCustomObject]@{
			                'Teams Name' = $TeamName;
			                'Channel Name' = $chName;
                                        'User UPN' = $_.User;
                                        'User DisplayName' = $_.Name;
                                        'User Role' = $_.Role
		    }
        }
    }
} | Export-Excel -Path $xlsxPath -WorksheetName "Channel_Users" -TableStyle Medium16  -AutoSize

Get-Team | foreach {
   $nickName = $_.MailNickName
   Get-Team -MailNickName $nickName | Select -Property * |
	Foreach {
		[PSCustomObject]@{
			'Teams ID' = $_.GroupId;
			'Teams Display Name' = $_.DisplayName;
                        'Teams MailNickName' = $nickName;
                        'Giphy Allowed?' = $_.AllowGiphy;
                        'Giphy Content Rating' = $_.GiphyContentRating;
                        'Allow Stickers And Memes' = $_.AllowStickersAndMemes;
                        'Allow Custom Memes' = $_.AllowCustomMemes;
                        'Allow Guest to Create & Update Channels' = $_.AllowGuestCreateUpdateChannels;
                        'Allow Guest to Delete Channels' = $_.AllowGuestDeleteChannels;
                        'Allow Members to Create & Update Channels' = $_.AllowCreateUpdateChannels;
                        'Allow Members to Create Private Channels' = $_.AllowCreatePrivateChannels;
                        'Allow Members to Delete Channels' = $_.AllowDeleteChannels;
                        'Allow Members to Add & Remove Apps'= $_.AllowAddRemoveApps;
                        'Allow Members to Create Update Remove tabs' = $_.AllowCreateUpdateRemoveTabs;
                        'Allow Members to Create Update Remove Connectors' = $_.AllowCreateUpdateRemoveConnectors;
                        'Allow Members to Edit Messages' = $_.AllowUserEditMessages;
                        'Allow Members to Delete Messages' = $_.AllowUserDeleteMessages;
                        'Allow Owner to Delete Messages' = $_.AllowOwnerDeleteMessages;
                        'Allow Team Mentions' = $_.AllowTeamMentions;
                        'Allow Channel Mentions' = $_.AllowChannelMentions;
                        'Show In Teams Search & Suggestions' = $_.ShowInTeamsSearchAndSuggestions
		}
    }
} | Export-Excel -Path $xlsxPath -WorksheetName "Teams_permissions" -TableStyle Medium16 -AutoSize

Hope this script was helpful in determining the current state of your Teams deployment.

Thank you for stopping by. ✌

O365 – Create Distribution Groups using PowerShell

In this post, I’ll go through the steps to create distribution groups in O365 using PowerShell.

Before proceeding further make sure you are connected to Exchange Online,

$o365cred = Get-Credential
Connect-ExchangeOnline -credential $o365cred

To create a mail-enabled security group named Managers without specifying any members:

$Name = Read-Host "Enter a name for the DistributionGroup"
New-DistributionGroup -Type "Security" -Name $Name -DisplayName $Name -Alias $Name

To create a mail-enabled security group named Managers with members:

Note: -Member is a ‘MultiValuedProperty’ and as we input users comma seperated, we need to split the (comma-separated) string to get an actual array.

$Name = Read-Host "Enter a name for the DistributionGroup"
$Members = Read-Host "Enter email addresses seperated by comma"
$members = $members -split ' *, *'
New-DistributionGroup -Type "Security" -Name $Name -DisplayName $Name -Alias $Name -Members $Members

To add multiple members to an existing Distribution Group:

$Name = Read-Host "Enter DistributionGroup name to add members"
$Members = "user01@domain.onmicrosoft.com","user01@domain.onmicrosoft.com"
$Members | ForEach-Object { Add-DistributionGroupMember -Identity $Name -Member $_}

To import members from a csv and add to an existing Distribution Group:

$Name = Read-Host "Enter DistributionGroup name to add members"
Import-csv "C:\tmp\members.csv" | ForEach-Object {
Add-DistributionGroupMember -Identity $Name -Member $_.member
}

To determine existing distribution group members for a distribution group:

To set distribution group to accept messages from authenticated (internal) and unauthenticated (external) senders.

Note: If you don’t specify this parameter while creating the distribution group, the default value is set to ‘true’ meaning messages from unauthenticated (external) senders are rejected.

$Name = Read-Host "Enter DistributionGroup's name to allow external senders"
Set-DistributionGroup -Identity $Name -RequireSenderAuthenticationEnabled $false

To change an existing distribution group’s name:

$Name = Read-Host "Enter name of existing group to be renamed" 
$NewName = Read-Host "Enter new name" 
Set-DistributionGroup -Identity $Name -Name $NewName -DisplayName $NewName -Alias $NewName

Thank you for stopping by. ✌

O365 – Prevent Users from Signing Up for Trials and Purchasing Their Own Pro license

I’ve updated this post with the newer MSCommerce PowerShell module

Self-service is a great idea in several instances but in my opinion when it comes to users signing up for trials and purchasing licenses, it seems to be causing unexpected issues especially while answering to the purchasing team.

Most organizations these days have procurement processes in place to meet regulatory, security, compliance and governance needs. And the need to ensure that all licenses are approved and managed according to defined processes is very important. And when you take expenses, privacy or security into consideration, it is a good idea to disable self-service sign-up and purchases.

To disable all self-service sign-ups

This can be achieved using the MSOL PowerShell module. Type below command to check current settings:

Get-MsolCompanyInformation | fl AllowAdHocSubscriptions
current settings

To disable all self-service sign-ups,

Set-MsolCompanySettings -AllowAdHocSubscriptions:$false

When users try to sign-up, they’ll see the below message,

Your IT department has turned off signup

Prevent users from purchasing their own Pro license

To install and connect the MSCommerce module, start PowerShell as an administrator to install the module,

Install-Module -Name MSCommerce
Import-Module -Name MSCommerce
Connect-MSCommerce
Get-Command *-mscommerce*

To determine current setting,

Get-MSCommercePolicy -PolicyId AllowSelfServicePurchase
Get-MSCommercePolicy

View a list of all available self-service purchase products and the status,

Get-MSCommerceProductPolicies -PolicyId AllowSelfServicePurchase
Get-MSCommerceProductPolicies

Disable the policy setting for a specific product, Below example: ‘Power BI Pro’

Update-MSCommerceProductPolicy -PolicyId AllowSelfServicePurchase -ProductId CFQ7TTC0L3PB -Enabled $False

Below is an example script on how your can disable AllowSelfServicePurchase by getting the ProductID for ‘Power BI Pro’

$p = Read-Host "Enter product name"
$product = Get-MSCommerceProductPolicies -PolicyId AllowSelfServicePurchase | where {$_.ProductName -match $p }
Update-MSCommerceProductPolicy -PolicyId AllowSelfServicePurchase -ProductId $product.ProductID -Enabled $false
Update-MSCommerceProductPolicy

In scenarios where there are more than one values for the product, Below example: ‘Power Automate’

$p = Read-Host "Enter product name"
$product = Get-MSCommerceProductPolicies -PolicyId AllowSelfServicePurchase | where {$_.ProductName -match $p }
Update-MSCommerceProductPolicy -PolicyId AllowSelfServicePurchase -ProductId $product[0].ProductID -Enabled $false
Update-MSCommerceProductPolicy -PolicyId AllowSelfServicePurchase -ProductId $product[1].ProductID -Enabled $false
Update-MSCommerceProductPolicy # more than one value

To disable AllowSelfServicePurchase for all products,

Get-MSCommerceProductPolicies -PolicyId AllowSelfServicePurchase | ? {$_.PolicyValue -eq "Enabled" } | ForEach {Update-MSCommerceProductPolicy -PolicyId AllowSelfServicePurchase -ProductId $_.ProductId -Enabled $False }
To disable for all products

Thanks for stopping by.✌