Generate Multi-Subscription Azure Cost Reports Using REST API and PowerShell

Managing cloud costs is like trying to diet at a buffet. Tempting services everywhere, and one bad decision can blow your budget wide open. So, I was tasked for a breakdown of Azure usage across 50+ subscriptions for the month of June, I knew this wasn’t going to be a quick Azure Portal copy-paste job.

Instead, I rolled up my sleeves and built a PowerShell script that uses the Azure REST API to automatically:

  • Query all accessible subscriptions
  • Fetch usage-based cost data for a given time range
  • Export it into a clean Excel report

And I made it smart enough to handle throttling too. Here’s how it all came together.

Goals

  • Pull Azure cost data from multiple subscriptions
  • Offer flexible time range selection (this month, last month, custom, etc.)
  • Authenticate securely with Entra ID (Service Principal)
  • Export to Excel in a way leadership can digest (bonus points if it opens without errors)

Authentication with Entra ID

I created a Service Principal and assigned it the “Global Billing Reader” role at the billing account level. The script uses the client_credentials flow to authenticate and obtain an access token.

Yes, I temporarily stored the client secret in a plain text variable $clientSecretPlain = 'ENTER_SECRET' because I was still prototyping. Don’t judge me. But for production? Vault it or a managed identity.

Handling Throttling (429 Errors)

Azure’s APIs like to throw shade when you hit them too hard. I added retry logic with exponential backoff and jitter.

PowerShell Script

# Author: Kumaran Alagesan

# Requires: Az CLI, ImportExcel module (Install-Module -Name ImportExcel)
# Authenticate using Entra Application (Service Principal)

$clientId = 'ENTER_APP_ID'
$tenantId = 'ENTER_Tenant_ID'
$clientSecretPlain = 'ENTER_SECRET'

# Get access token using Service Principal
$body = @{
    grant_type    = "client_credentials"
    client_id     = $clientId
    client_secret = $clientSecretPlain
    scope         = "https://management.azure.com/.default"
}
$tokenResponse = Invoke-RestMethod -Method Post -Uri "https://login.microsoftonline.com/$tenantId/oauth2/v2.0/token" -Body $body -ContentType "application/x-www-form-urlencoded"
if (-not $tokenResponse.access_token) {
    Write-Host "Failed to acquire token. Check credentials." -ForegroundColor Red
    exit 1
}
$token = @{ accessToken = $tokenResponse.access_token }


$selection = $null
while (-not $selection) {
    $selection = Read-Host "Select time range: `n1) This month`n2) Last month`n3) This quarter`n4) Last quarter`n5) This year`n6) Last 6 months`n7) Last 12 months`n8) Custom`nEnter number"
    if ($selection -notmatch '^[1-8]$') {
        Write-Host "Invalid selection. Please enter a number from the list (1-8)." -ForegroundColor Yellow
        $selection = $null
    }
}

$today = Get-Date
switch ($selection) {
    '1' { # This month
        $startDate = Get-Date -Year $today.Year -Month $today.Month -Day 1
        $endDate = $today
    }
    '2' { # Last month
        $lastMonth = $today.AddMonths(-1)
        $startDate = Get-Date -Year $lastMonth.Year -Month $lastMonth.Month -Day 1
        $endDate = (Get-Date -Year $lastMonth.Year -Month $lastMonth.Month -Day 1).AddMonths(1).AddDays(-1)
    }
    '3' { # This quarter
        $quarter = [math]::Ceiling($today.Month / 3)
        $startMonth = (($quarter - 1) * 3) + 1
        $startDate = Get-Date -Year $today.Year -Month $startMonth -Day 1
        $endDate = $today
    }
    '4' { # Last quarter
        $currentQuarter = [math]::Ceiling($today.Month / 3)
        if ($currentQuarter -eq 1) {
            $lastQuarterYear = $today.Year - 1
            $lastQuarter = 4
        } else {
            $lastQuarterYear = $today.Year
            $lastQuarter = $currentQuarter - 1
        }
        $startMonth = (($lastQuarter - 1) * 3) + 1
        $startDate = Get-Date -Year $lastQuarterYear -Month $startMonth -Day 1
        $endDate = (Get-Date -Year $lastQuarterYear -Month $startMonth -Day 1).AddMonths(3).AddDays(-1)
    }
    '5' { # This year
        $startDate = Get-Date -Year $today.Year -Month 1 -Day 1
        $endDate = $today
    }
    '6' { # Last 6 months
        $startDate = $today.AddMonths(-5)
        $startDate = Get-Date -Year $startDate.Year -Month $startDate.Month -Day 1
        $endDate = $today
    }
    '7' { # Last 12 months
        $startDate = $today.AddMonths(-11)
        $startDate = Get-Date -Year $startDate.Year -Month $startDate.Month -Day 1
        $endDate = $today
    }
    '8' { # Custom
        $startDate = Read-Host "Enter start date (yyyy-MM-dd)"
        $endDate = Read-Host "Enter end date (yyyy-MM-dd)"
        try {
            $startDate = [datetime]::ParseExact($startDate, 'yyyy-MM-dd', $null)
            $endDate = [datetime]::ParseExact($endDate, 'yyyy-MM-dd', $null)
        } catch {
            Write-Host "Invalid date format. Exiting." -ForegroundColor Red
            exit 1
        }
    }
}

$startDateStr = $startDate.ToString("yyyy-MM-dd")
$endDateStr = $endDate.ToString("yyyy-MM-dd")

# Set headers for REST calls using the service principal token
$headers = @{
    'Authorization' = "Bearer $($token.accessToken)"
    'Content-Type'  = 'application/json'
}

# Get all subscriptions
$subsUrl = "https://management.azure.com/subscriptions?api-version=2020-01-01"
$subscriptions = Invoke-RestMethod -Uri $subsUrl -Headers $headers -Method Get | Select-Object -ExpandProperty value

Write-Host "Fetching cost data for $($subscriptions.Count) subscriptions: " -NoNewline

$totalCost = 0
$results = @()

foreach ($sub in $subscriptions) {
    $costQueryBody = @{
        type       = "Usage"
        timeframe  = "Custom"
    timePeriod = @{
        from = $startDateStr
        to   = $endDateStr
    }
    dataSet    = @{
        granularity = "None"
        aggregation = @{
            totalCost = @{
                name     = "Cost"
                function = "Sum"
            }
        }
    }
} | ConvertTo-Json -Depth 10

    $costUrl = "https://management.azure.com/subscriptions/$($sub.subscriptionId)/providers/Microsoft.CostManagement/query?api-version=2024-08-01"

    $maxRetries = 7
    $retryDelay = 5
    $attempt = 0
    $success = $false

    while (-not $success -and $attempt -lt $maxRetries) {
        try {
            $costData = Invoke-RestMethod -Uri $costUrl -Headers $headers -Method Post -Body $costQueryBody

            $subscriptionCost = 0
            if ($costData.properties.rows -and $costData.properties.rows.Count -gt 0) {
                $subscriptionCost = $costData.properties.rows[0][0]
            }

            $results += [PSCustomObject]@{
                'Subscription Name' = $sub.displayName
                'Total Cost'        = [math]::Round([double]$subscriptionCost, 2)
            }

            $totalCost += $subscriptionCost
            Write-Host "." -NoNewline
            $success = $true
        }
        catch {
            if ($_.Exception.Response.StatusCode.value__ -eq 429 -and $attempt -lt ($maxRetries - 1)) {
                # Add random jitter to delay
                $jitter = Get-Random -Minimum 1 -Maximum 5
                $sleepTime = $retryDelay + $jitter
                Write-Host "`n429 received, retrying in $sleepTime seconds..." -ForegroundColor Yellow
                Start-Sleep -Seconds $sleepTime
                $retryDelay *= 2
                $attempt++
            }
            else {
                Write-Host "x" -NoNewline
                Write-Host "`nError getting cost for subscription $($sub.displayName): $($_.Exception.Message)" -ForegroundColor Red
                $success = $true
            }
        }
    }
}

# Export results to Excel
$excelPath = Join-Path -Path $PSScriptRoot -ChildPath ("AzureCostReport_{0}_{1}.xlsx" -f $startDateStr, $endDateStr)
if ($results.Count -gt 0) {
    # Do not pre-format 'Total Cost' as string; keep as number for Excel formatting

    # Check if file is locked
    $fileLocked = $false
    if (Test-Path $excelPath) {
        try {
            $stream = [System.IO.File]::Open($excelPath, 'Open', 'ReadWrite', 'None')
            $stream.Close()
        } catch {
            $fileLocked = $true
        }
    }
    if ($fileLocked) {
        Write-Host "Excel file is open or locked: $excelPath. Please close it and run the script again." -ForegroundColor Red
    } else {
        $results | Export-Excel -Path $excelPath -WorksheetName 'CostReport' -AutoSize -TableName 'CostSummary' -Title "Azure Cost Report ($startDateStr to $endDateStr)" -TitleBold -ClearSheet
        Write-Host "Excel report saved to: $excelPath"
        # Optionally open the file
        if ($IsWindows) {
            Start-Sleep -Seconds 2
            Invoke-Item $excelPath
        }
    }
}

If you want to email the output as a table in the body to a mailbox, you can replace the ‘Export results to Excel’ section with the code below. Yup! I know Send-MailMessage is obsolete and ideally I’d run this script with in an Azure automation account and set app permissions for the identity to be able to send emails. I’ll cover it in a later post.

# Prepare HTML table for email
if ($results.Count -gt 0) {
    # Add $ symbol to each Total Cost value
    $resultsWithDollar = $results | ForEach-Object {
        $_ | Add-Member -NotePropertyName 'Total Cost ($)' -NotePropertyValue ('$' + [math]::Round([double]$_.('Total Cost'), 2)) -Force
        $_
    }

    $htmlTable = $resultsWithDollar | Select-Object 'Subscription Name', 'Total Cost ($)' | ConvertTo-Html -Property 'Subscription Name', 'Total Cost ($)' -Head "<style>table{border-collapse:collapse;}th,td{border:1px solid #ccc;padding:5px;}</style>" -Title "Azure Cost Report"
    $htmlBody = @"
<h2>Azure Cost Report ($startDateStr to $endDateStr)</h2>
$htmlTable
<p><b>Total Cost (all subscriptions):</b> $([string]::Format('${0:N2}', [math]::Round([double]$totalCost,2)))</p>
<p style='color:gray;font-size:small;'>This is an automatically generated email - Please do not reply.</p>
"@

    # Email parameters (update these as needed)
    $smtpServer = "smtpserver@domain.com"
    $smtpPort = 587
    $from = "alerts@domain.com"
    $to = "emailaddress@domain.com"
    $subject = "Azure Cost Report ($startDateStr to $endDateStr)"

    Send-MailMessage -From $from -To $to -Subject $subject -Body $htmlBody -BodyAsHtml -SmtpServer $smtpServer -Port $smtpPort
    Write-Host "Cost report sent via email to $to"
} else {
    Write-Host "No results to send."
}

What You’ll Get

The final Excel report displays each subscription’s name alongside its total cost for your chosen time period. Whether you’re reviewing it manually or feeding it into FinOps tools, the format is designed for quick analysis and clean presentation.

Practical Applications

ScenarioHow It Helps
Automation and schedulingSupports routine reporting via scheduled tasks or DevOps flows
Multi-subscription environmentsConsolidates cost data across departments or teams
Governance and FinOpsEnables proactive budget tracking and reporting

With just a PowerShell script and the Azure Cost Management API, you can unlock instant insights into your cloud spend across all Azure subscriptions. Whether you’re part of a DevOps team, driving FinOps initiatives, or simply managing cloud budgets, this automation makes cost visibility one less thing to worry about.

Lessons Learned

  • Azure Cost Management API is powerful, but throttling is real.
  • Microsoft will be retiring the Consumption Usage Details API at some point in the future and does not recommend that you take a new dependency on this API.
  • Export-Excel is a lifesaver, especially when you want your report to actually be readable.

Room for Improvement

  • Add Azure MeterCategory per subscription in the email report to give a better idea of where the cost usage is
  • Move secrets to Azure Key Vault or use Managed Identity
  • Add monthly trend analysis and forecasting
  • Push the data to Power BI for richer dashboards

Final Thoughts

This script is now my go-to tool for quickly generating Azure cost reports across environments. It’s flexible, reliable, and gives my leadership team the visibility they need to make informed decisions, without logging into the portal.

Because let’s face it: if you’re managing Azure at scale, you shouldn’t be clicking through billing blades. You should be scripting your way to clarity.

Keep those costs in check, one API call at a time.

Thanks for stopping by. ✌
How to Automatically Download and Use Azure Public IP Ranges with PowerShell

If you work with firewalls, proxies, or any system that restricts traffic based on IP addresses, you’re likely familiar with the challenges of maintaining access to dynamic cloud infrastructure. Microsoft understands this, which is why they publish the Azure IP Ranges and Service Tags – Public Cloud dataset — a JSON file containing up-to-date IP address ranges used by Azure services.

Why Microsoft Publishes Azure IP Ranges

Microsoft Azure’s cloud infrastructure spans global data centers, with thousands of services running behind constantly shifting sets of IP addresses. To help organizations:

  • Configure firewalls and security appliances
  • Whitelist Azure service IPs
  • Meet compliance or policy needs
  • Route traffic appropriately

…Microsoft provides this public JSON file that includes IP ranges tied to Service Tags like Storage, Sql, AppService, and many others, broken down by region.

If you are using Azure Firewall, then you can use these service tags directly in your firewall rules. More information can be found here. If you are using some other firewall, then you need to check if they support service tags directly e.g., Palo Alto Networks & External Dynamic Lists (EDL).

If you don’t have support for service tags in your firewall, then you need to use IP address prefixes directly. This is not ideal, since you need to update your firewall rules every time when new IP address prefixes are added or removed. This is why automating this process is important.


How Often Is the Data Updated?

Microsoft typically updates the Azure IP Ranges and Service Tags – Public Cloud file weekly, usually every Monday. Updates can reflect:

  • New IPs added for expanding infrastructure
  • Old ranges removed or reallocated
  • Changes to service or region mappings

Each release includes a "changeNumber" field and a "version" field to help you detect updates. Automation is key here — hence the script!


Changes, Changes…

Azure public IP addresses can change weekly! What does that mean for us?

Every week, there may be new IP addresses added to the list. Others may be removed if they’re no longer in use by Azure.

Why does that matter?

Let’s say an on-prem application needs access to an AzureSQL database, you previously added its IPs to your firewall allow-list. Then Azure updates its IP ranges, and the on-prem application keeps using the same IP or IP ranges that’s not in your allow-list. Boom — access denied. Not because you intended to block it, but because you didn’t know about the change.

It’s not just about adding the new IPs. You also need to handle removals to prevent your allow-lists from becoming bloated and insecure.

This isn’t a new problem in networking. But in Azure, the pace of change is faster — often weekly — and automation becomes essential.


How Is the JSON File Structured?

The JSON file is well-organized and structured to support automation. Here’s what it generally looks like:

jsonCopyEdit{
  "changeNumber": 20250401,
  "cloud": "Public",
  "values": [
    {
      "name": "AppService.WestUS",
      "id": "AppService.WestUS",
      "properties": {
        "region": "westus",
        "platform": "Azure",
        "systemService": "AppService",
        "addressPrefixes": [
          "13.64.0.0/18",
          "40.112.0.0/16"
        ]
      }
    },
    ...
  ]
}

Key fields:

  • values: Array of service tag entries
  • name / id: Service and region
  • properties.addressPrefixes: List of IP ranges (in CIDR format)

You can easily filter entries by region, service tag, or even specific prefixes depending on your needs.


Common Use Cases for Downloading Azure IPs

There are many real-world situations where access to this list is helpful:

  • Firewall Whitelisting: Allow only Azure Storage or Sql service traffic from a specific region.
  • Cloud Egress Policies: Identify what your workloads are connecting to by cross-referencing logs with Azure-owned IPs.
  • Network Audits & Compliance: Ensure your infrastructure is only communicating with approved external services.
  • CDN or WAF Configurations: Enable access to Azure Front Door, App Service, or other endpoints behind the scenes.
  • Automation Pipelines: Pull the list programmatically during CI/CD to dynamically configure network security settings.

PowerShell Script to Download the File

To help automate this process, I wrote a PowerShell script that downloads the latest Azure IP Ranges JSON file:

What this script does,

  • Fetches the HTML content of the page https://www.microsoft.com/en-us/download/details.aspx?id=56519 using Invoke-WebRequest.
  • Extracts the JSON file URL from the page content using a regex match.
  • Creates a folder named json_files if it does not already exist.
  • Extracts the JSON file name from the URL and constructs the file path within the json_files folder.
  • Checks if the JSON file already exists:
    • If it exists, skips the download.
    • If it does not exist, downloads the JSON file to the json_files folder.
  • Parses the downloaded JSON file into a PowerShell object using ConvertFrom-Json.
  • Creates a timestamped folder named AzureServicetags_<timestamp> in the directory called ‘AzureServicetags’ in the current directory.
  • Creates three subfolders within the timestamped folder:
    • All_IPs for all IP addresses.
    • IPv4_IPs for IPv4 addresses.
    • IPv6_IPs for IPv6 addresses.
  • Iterates through each service tag in the JSON content:
    • Extracts the service name and its associated IP address prefixes.
    • Separates the IP addresses into IPv4 and IPv6 categories using regex matching.
    • Creates text files for:
      • All IP addresses.
      • IPv4 addresses.
      • IPv6 addresses.
    • Writes the respective IP addresses into the corresponding text files.
    • Outputs a message indicating the creation of files for each service.
  • Skips services that do not have valid address prefixes and outputs a warning message.
  • Outputs a message if the JSON URL is not found.
# Define the URL of the download page
$pageUrl = "https://www.microsoft.com/en-us/download/details.aspx?id=56519"

# Fetch the page source
$response = Invoke-WebRequest -Uri $pageUrl -UseBasicParsing

# Extract the JSON URL for 'url'
$jsonUrl = ($response.Content -match '"url":"(https://download\.microsoft\.com/download/[^"]+)"') | Out-Null
$jsonUrl = $matches[1]

# Output the JSON URL
if ($jsonUrl) {
    Write-Output "JSON URL: $jsonUrl"

    # Create the folder 'json_files' if it doesn't exist
    $jsonFolder = "json_files"
    if (-not (Test-Path -Path $jsonFolder)) {
        New-Item -ItemType Directory -Path $jsonFolder | Out-Null
    }

    # Extract the file name from the JSON URL
    $jsonFileName = $jsonUrl.Split("/")[-1]
    $jsonFilePath = Join-Path -Path $jsonFolder -ChildPath $jsonFileName

    # Check if the JSON file already exists
    if (Test-Path -Path $jsonFilePath) {
        Write-Output "File '$jsonFileName' already exists. Skipping download."
    }
    else {
        # Download the JSON file into the 'json_files' folder
        Invoke-WebRequest -Uri $jsonUrl -OutFile $jsonFilePath
        Write-Output "Downloaded JSON file: $jsonFileName"
    }

    # Parse the JSON file
    $jsonContent = Get-Content -Path $jsonFilePath -Raw | ConvertFrom-Json

    # Create a folder with the current date and time stamp
    $timestamp = Get-Date -Format "yyyy-MM-dd_HH-mm"
    $folderName = ".\AzureServicetags\AzureServicetags_$timestamp"
    New-Item -ItemType Directory -Path $folderName | Out-Null

    # Create subfolders for All_IPs, IPv4_IPs, and IPv6_IPs
    $allIPsFolder = Join-Path -Path $folderName -ChildPath "All_IPs"
    $ipv4Folder = Join-Path -Path $folderName -ChildPath "IPv4_IPs"
    $ipv6Folder = Join-Path -Path $folderName -ChildPath "IPv6_IPs"

    foreach ($subFolder in @($allIPsFolder, $ipv4Folder, $ipv6Folder)) {
        if (-not (Test-Path -Path $subFolder)) {
            New-Item -ItemType Directory -Path $subFolder | Out-Null
        }
    }

    # Iterate through each service tag and create text files
    foreach ($service in $jsonContent.values) {
        $serviceName = $service.name

        if ($service -and $service.properties -and $service.properties.addressPrefixes) {
            $ipAddresses = $service.properties.addressPrefixes
            $ipv4Addresses = $ipAddresses | Where-Object { $_ -match '\.' -and $_ -notmatch '\:' }
            $ipv6Addresses = $ipAddresses | Where-Object { $_ -match '\:' }

            # Create files for all IPs, IPv4 IPs, and IPv6 IPs
            $allIPsFilePath = Join-Path -Path $allIPsFolder -ChildPath "$serviceName`_all_IPs.txt"
            $ipv4FilePath = Join-Path -Path $ipv4Folder -ChildPath "$serviceName`_v4_IPs.txt"
            $ipv6FilePath = Join-Path -Path $ipv6Folder -ChildPath "$serviceName`_v6_IPs.txt"

            $ipAddresses | Out-File -FilePath $allIPsFilePath -Encoding UTF8
            $ipv4Addresses | Out-File -FilePath $ipv4FilePath -Encoding UTF8
            $ipv6Addresses | Out-File -FilePath $ipv6FilePath -Encoding UTF8

            Write-Output "Created files for service: $serviceName"
        }
        else {
            Write-Warning "Service '$serviceName' does not have valid address prefixes. Skipping."
        }
    }
}
else {
    Write-Output "JSON URL not found."
}

Thanks for stopping by. ✌

Power BI – Restore Datasets to new on-premise Gateway when old Gateway has failed or Recovery Key is lost

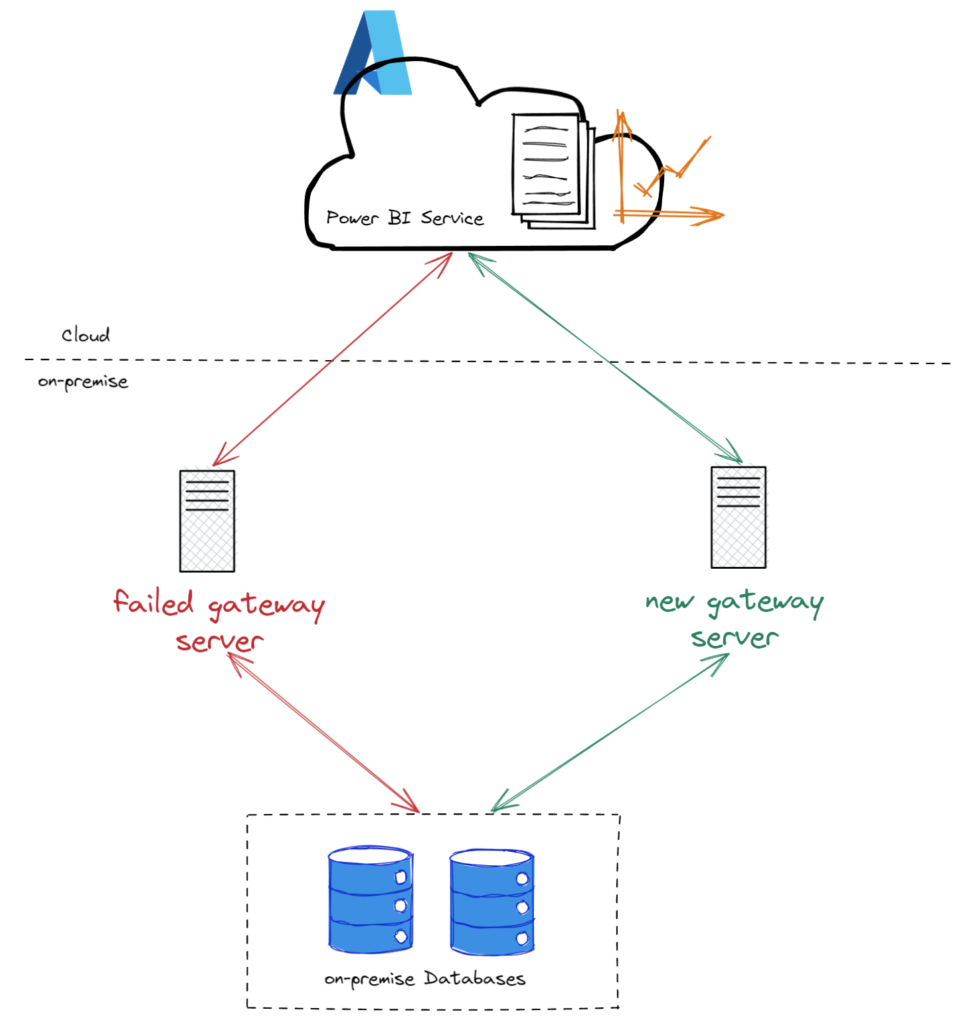
Power BI on-premises data gateway is a service running on a Windows server working as a connecting platform between the Power BI cloud service and the on-premise data sources.

Setting up a data gateway on-premise is fairly a straightforward process. There can be instances where your on-premise gateway fails because of a hardware failure, issues due to updates or you may want to move the gateway instance to a new server then you realize you need the recovery key which is no where to be found.

Without a functioning gateway, the reports and dashboard in the Power BI cloud service with datasets that are connected to on-premise data sources will fail resulting in data to become stale. I’ll elaborate more on this issue in this post on how to restore datasets from an old or failed on-premise gateway to a new gateway.

I faced a similar scenario recently and it was a great learning experience. There are few methods using which you can resolve this issue. I’ll try to cover them all in as much detail as possible.

Manual Method

Well.. If you don’t have too many data sources on-premise or if you are just planning for a quick fix maybe because someone important in your organization needs this fixed and they notified you like an hour before their big meeting.

Here are the high-level steps,

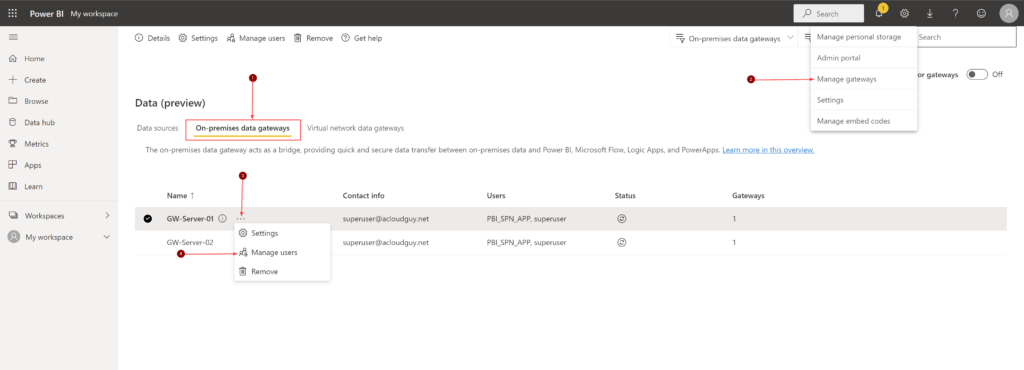
Once you install and configure the data gateway, you can see and manage both the old and new instances from the Power BI portal.

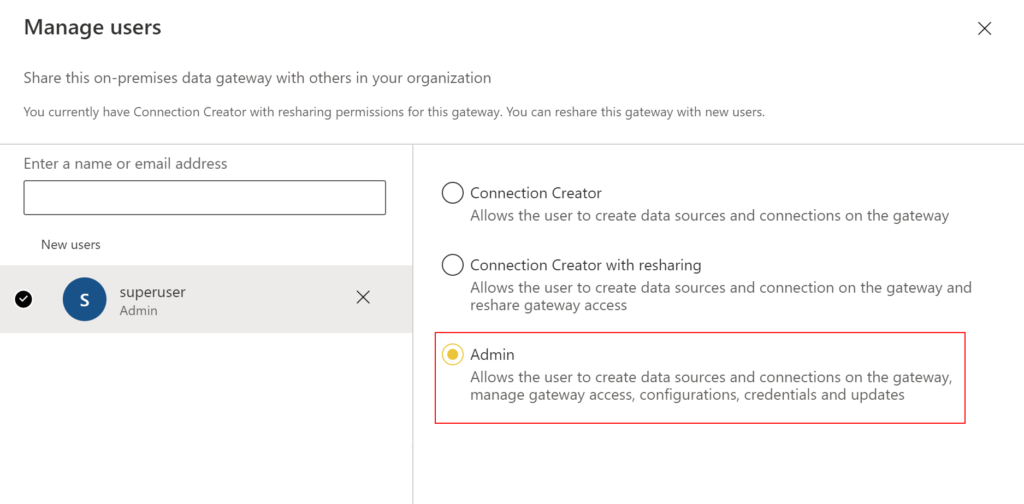
To add a user as admin to the gateway in the portal, follow below steps.

This image has an empty alt attribute; its file name is image-15-1024x370.png

Search user using username or email address, select Admin and click Share.

This image has an empty alt attribute; its file name is image-16-1024x504.png

Now to add a new data source, from the page header in the Power BI service, select Settings gear icon > Manage gateways.

I have highlighted my failed gateway and the new gateway server in my case.

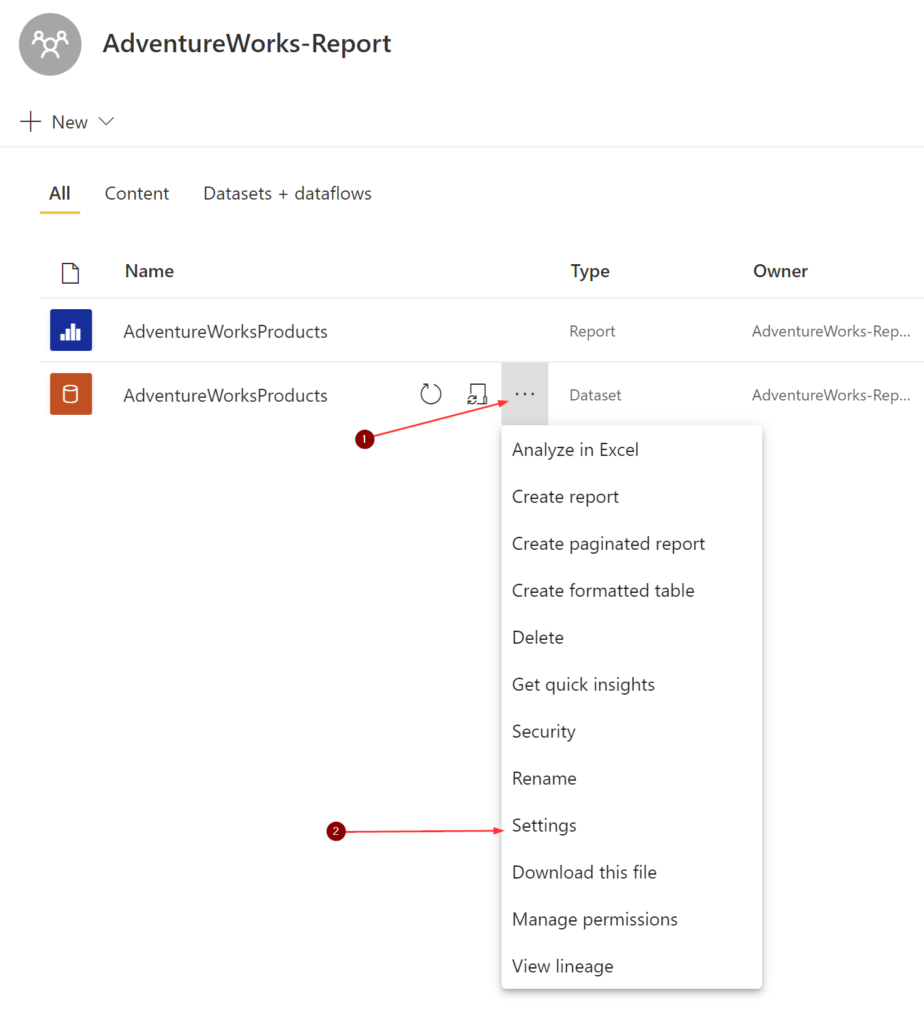
Your next step is to determine the data source of the affected dataset. To get this information, you’ll need access to the workspace. As you can see, I have a report named ‘AdventureWorksProducts‘ and the underlying dataset with the same name.

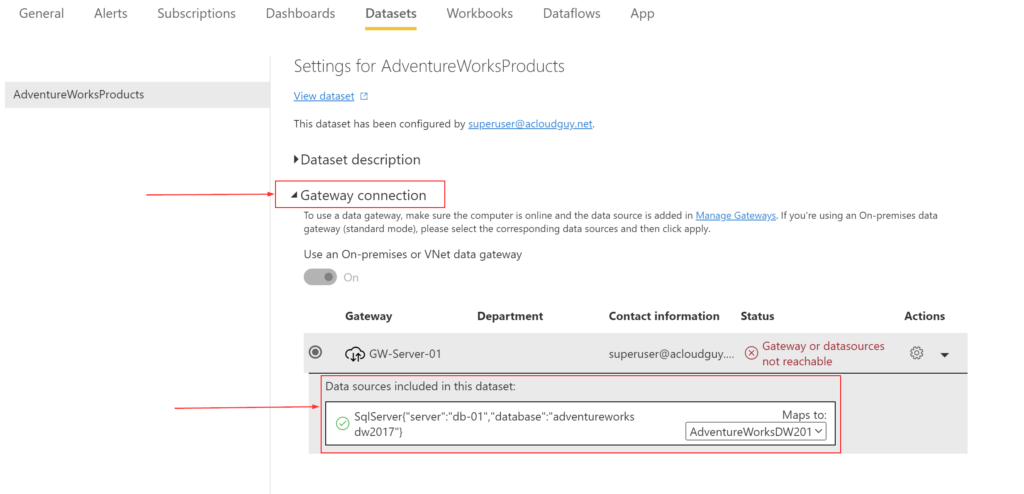
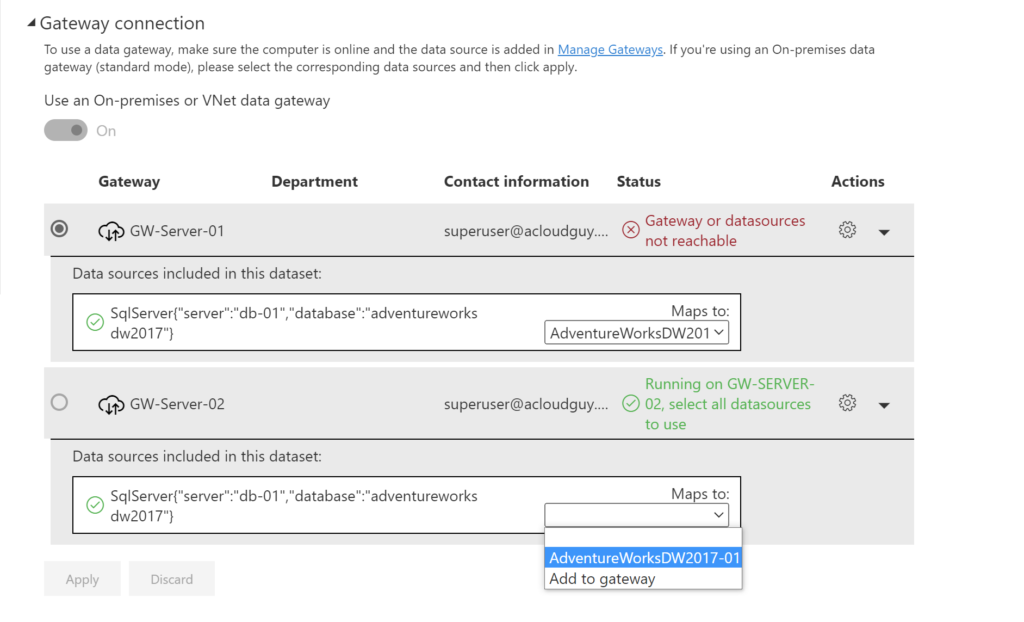
Under the Gateway connection section, you’ll find the necessary information to setup the data source in the new gateway.

Back in the Manage Gateways page and in the Data sources tab, Click on New

Choose the new gateway to create the connection on, then select the Data source type. In my scenario, I picked SQL Server.

Once you provide all the information, Select Create. You see Created New data source if the process succeeds and a new data source entry like in screenshot below.

If you’ve made it this far, you are almost at the end of this method. Now back to the dataset’s settings like we did earlier and on to the Gateway connection section. As a reminder, you’ll need access(Admin, Member or Contributor) to the workspace and to the dataset, also keep in mind that you also need admin permissions on the gateway.

You should see the new data source we created listed. Select it from the drop-down and click Apply

That should take care of the connection and to confirm, you can refresh your dataset to make sure the connection works ok.

Like I said earlier, this method should be good in a small environment or if you are in a hurry to get it fixed and worry about the bulk of things later. I’ll cover the semi-automated way in the coming sections. I use the word automated loosely here but it’s more like less clicks and not moving around in the BI portal as much.

Using a Service Account

In this method, I’m using a service account or in other words a regular user account without any roles assigned to it. This can be an AD synced account or a Azure AD cloud only account. This account will need a Power BI Pro license assigned to it.

Here are the high-level steps,

I’ve already covered the adding data source part to the gateway in the earlier section and the process is same for this method too. You can do it with PowerShell or REST APIs but I don’t believe there is a method to copy the data sources from one gateway to another.

Permissions

In this method, I’m using a service account which was granted Admin permissions for the gateways and set as Owner on the data source. You should be able to get away with just having the account set as user on the data source. This service account is also set as Admin on the workspace but Member or Contributor should do the trick.

You can grant the gateway admin permission in the portal which I’ve covered in the earlier method or use the below script to add the user as admin.

Connect-AzureAD
Connect-DataGatewayServiceAccount
Get-DataGatewayAccessToken

Get-DataGatewayCluster
$gw = Read-Host "Enter Gateway ID"
$user = Read-Host "Enter username to be added as gateway admin"
$userToAdd = (Get-AzureADUser -Filter "userPrincipalName eq '$user'").ObjectId
Get-DataGatewayRegion
$Region = Read-Host "Enter region value where IsDefaultPowerBIRegion is set to true"
Add-DataGatewayClusterUser -GatewayClusterId $gw -PrincipalObjectId $userToAdd -AllowedDataSourceTypes $null -Role Admin -RegionKey $Region

With all these permissions, the service account still needs to take ownership of the dataset to finish rebinding the data source to the new gateway. You won’t have to manually take ownership of the dataset, the script below will do it for you on the dataset you specify.

Rebind dataset

Before proceeding further make sure you have the Microsoft Power BI Cmdlets for PS installed and logged in to the Power BI service using PowerShell,

Connect-PowerBIServiceAccount
Get-PowerBIAccessToken

I don’t do Power BI administration on a daily basis and there was a learning curve for me to understand the inner workings. Here is the thought process that went into building this script.

  1. Get all the gateways the service account has access to
    • Using the output, determine and copy the new gateway ID and store it in a variable
  2. Using the variable from earlier step, return a list of data sources from the new gateway
    • Using the output, determine and copy the data source ID where the affected dataset should be mapped to and store it in a variable
  3. Returns a list of workspaces the user has access to
    • Using the output, determine and copy the workspace ID which has the affected dataset
  4. Using the variable from earlier step, return list of datasets from the specified workspace
    • Using the output, determine and copy the affected dataset’s ID
  5. Using the variable from step 3 and step 4, transfer ownership over the specified dataset to the service account
  6. Using variable from steps 1, 2, 3 and 4, bind the specified dataset from the specified workspace to the new gateway
$gateways = Invoke-PowerBIRestMethod -Url "gateways" -Method Get | ConvertFrom-Json
$gateways.value
Write-Host "Please copy the new Gateway ID from above output" -ForegroundColor Red
$newGWID = Read-Host "Please paste the new Gateway ID"

$GWdatasources = Invoke-PowerBIRestMethod -Url "gateways/$($newGWID)/datasources" -Method Get | ConvertFrom-Json
$GWdatasources.value
Write-Host "Please note down the Data Source ID used by the dataset that needs to be migrated from above output" -ForegroundColor Red
$datasourceObjectIds = Read-Host "Please paste the Data source ID"

$ws = Invoke-PowerBIRestMethod -Url 'groups' -Method Get | ConvertFrom-Json
$ws.value
Write-Host "Please note down the Workspace ID which has the dataset that needs to be migrated from above output" -ForegroundColor Red
$wsID = Read-Host "Please paste the Workspace ID"

$dataset = Invoke-PowerBIRestMethod -Url "groups/$($wsID)/datasets" -Method Get | ConvertFrom-Json
$dataset.value
Write-Host "Please note down the dataset ID that needs to be migrated from above output" -ForegroundColor Red
$dsID = Read-Host "Please paste the dataset ID"

#This below line is not needed if the service account already has ownership of the dataset and is safe to comment out
Invoke-PowerBIRestMethod -Url "https://api.powerbi.com/v1.0/myorg/groups/$($wsID)/datasets/$($dsID)/Default.TakeOver" -Method POST

try { $body = "{
  'gatewayObjectId': '$newGWID',
  'datasourceObjectIds': [
    '$datasourceObjectIds'
  ]
}"

Invoke-PowerBIRestMethod -Url "https://api.powerbi.com/v1.0/myorg/groups/$($wsID)/datasets/$($dsID)/Default.BindToGateway" -Body $body -Method POST
Write-Host "Dataset updated" }

catch {
  Write-Host "An error occurred"
}

You can adjust this script according to your needs as in some instances, your gateway ID, new data source ID and workspace ID will be the same, only the affected dataset ID will vary.

Using a Service Principal

In this method, I’m using a service principal to accomplish the same as above. One added advantage of using this method is, the Power BI Dataset can be setup to refresh without an actual user account. This would be great from an automation point of view and to avoid being tied to a specific user.

Here are the high-level steps,

Create SPN

The az ad app is part of Azure CLI and not a PS cmdlet. You’ll need to have Azure CLI installed and do az login as well before running this.

Connect-AzureAD 
Connect-AzAccount
az login

You can create an Azure AD application which will be the service principal from the portal and grant the and grant the ‘Dataset.ReadWrite.All’ API permission or use the below lines to create it. I’ve detailed how to determine the API ID and Permission ID in this blog post here.

A new Azure AD group is also needed and the Azure AD application has be made a member of this group. The below lines will accomplish that and if you have an existing group you have in mind, you can use that too. I’ll go over the reason for creating this group later in this section.

$appname = Read-Host "Enter a name Azure AD Application's Display Name"
$ObjID = New-AzureADApplication -DisplayName $appname | Select ObjectId
Add-AzADAppPermission -ObjectId $ObjID.ObjectId -ApiId 00000009-0000-0000-c000-000000000000 -PermissionId 322b68b2-0804-416e-86a5-d772c567b6e6 -Type Scope
Start-Sleep -Seconds 60
az ad app permission admin-consent --id $ObjID.ObjectId
Get-AzureADApplication -Filter "DisplayName eq '$appname'" | fl

$grpName = Read-Host "Enter a name for new Azure AD group"
$grpID = (New-AzureADGroup -DisplayName $grpName -MailEnabled $false -SecurityEnabled $true -MailNickName "NotSet").ObjectId
Get-AzureADGroup -ObjectId $grpID
Add-AzureADGroupMember -ObjectId $grpID -RefObjectId $spnToAdd
Get-AzureADGroupMember -ObjectId $grpID

The Get-AzureADApplication cmdlet will list the API permissions we applied. This can be verified in the ‘App registrations‘ blade from the Azure AD portal too.

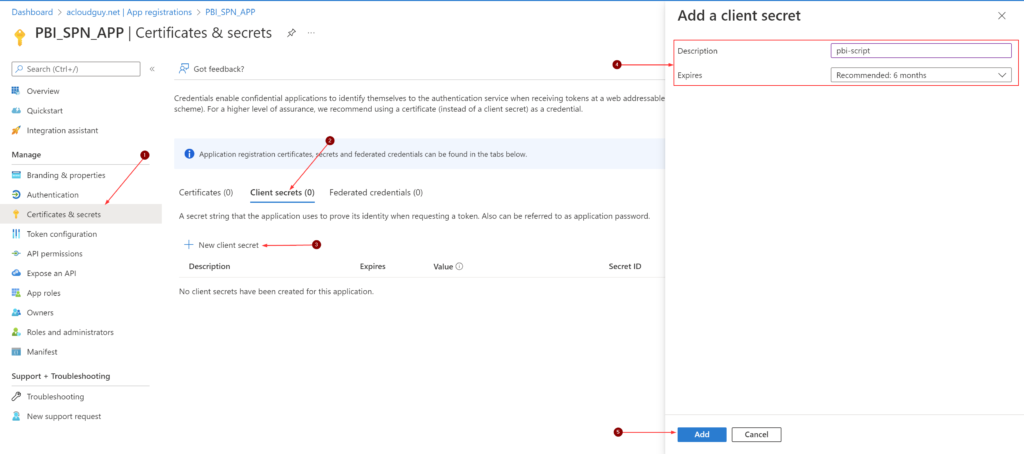
Create a new Secret in this Azure AD application. You can also achieve this by using PowerShell. This secret value is needed for authentication while running the script later this section.

Remember to copy the secret value as it’ll be masked forever.

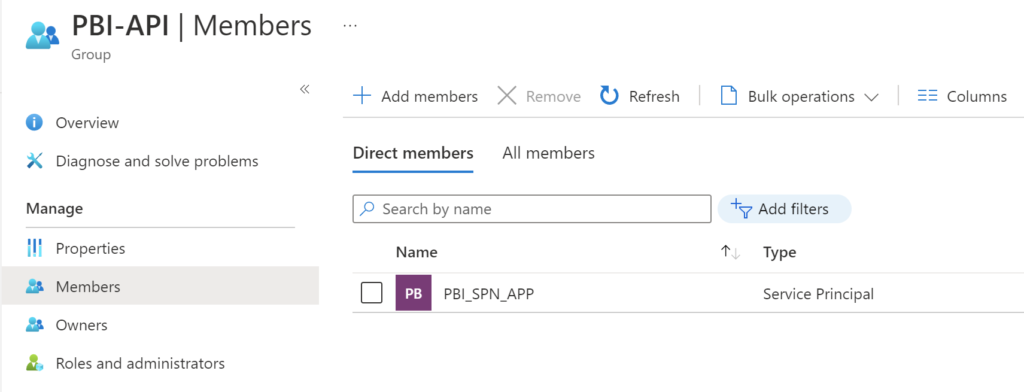
And we can also make sure of the group we created and it’s membership. I named the group, ‘PBI-API‘ in Azure AD.

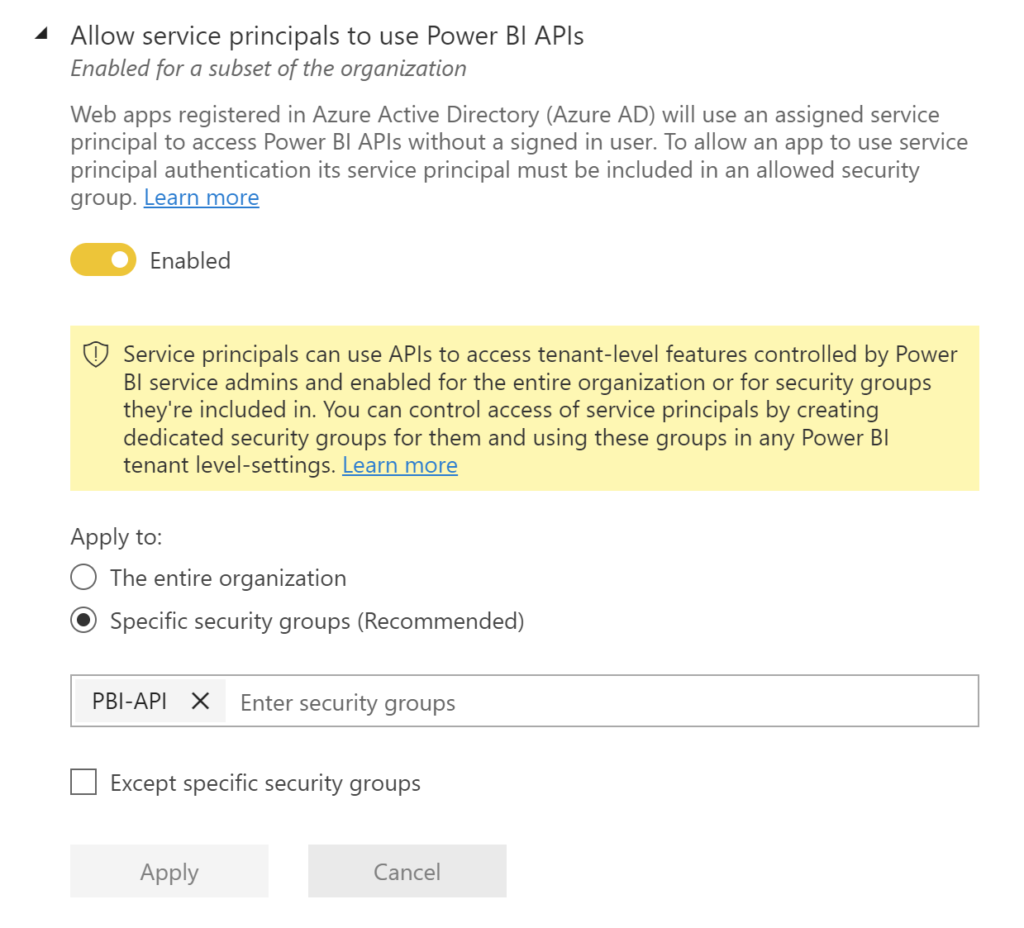
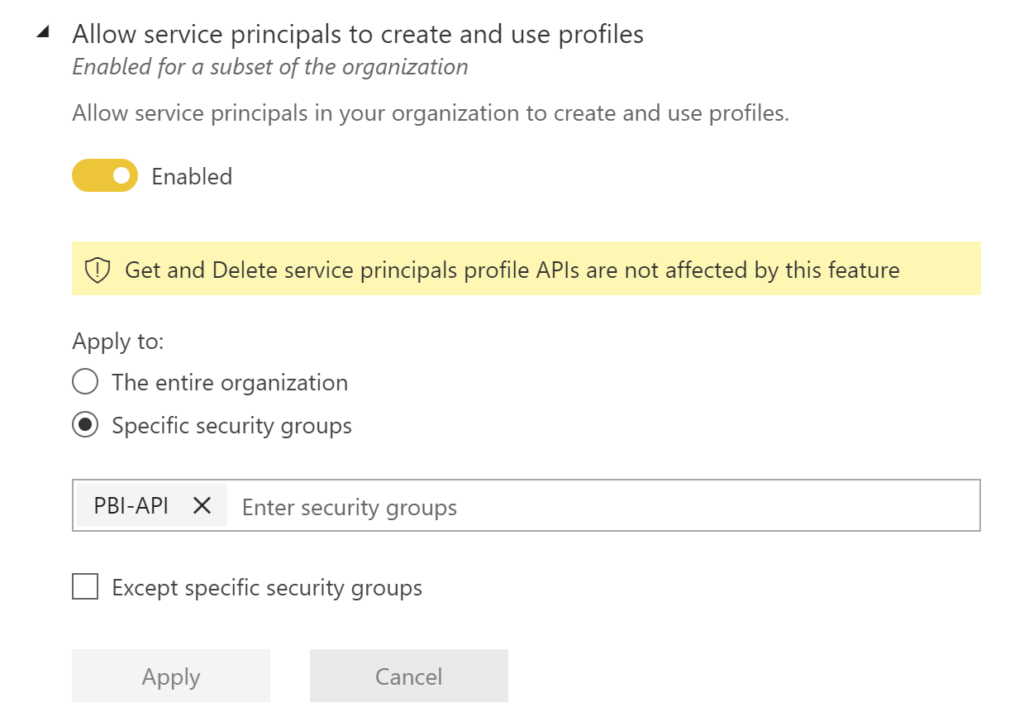
For an Azure AD app to be able to access the Power BI content and APIs, the following settings need to be enabled in Azure AD portal. This is where the Azure AD group comes into play.

Go to Tenant settings in the Power BI Admin portal, and scroll down to Developer settings

  • Enable the Allow service principals to use Power BI APIs
  • Enable the Allow service principals to create and use profiles

Create SPN profile

I noticed that the SPN way of doing things worked in one instance without having a service principal profile created by the service principal. Profiles can be created using Profiles REST API. I’ve included the below lines which will create a profile for the SPN.

$prof = Read-Host "Enter a name for SPN's profile"

$body = "{
    'displayName' : '$prof'
}"

Invoke-PowerBIRestMethod -Url 'https://api.powerbi.com/v1.0/myorg/profiles' -Body $body -Method POST

A service principal can also call GET Profiles REST API to get a list of its profiles.

Invoke-PowerBIRestMethod -Url 'profiles' -Method Get

Permissions

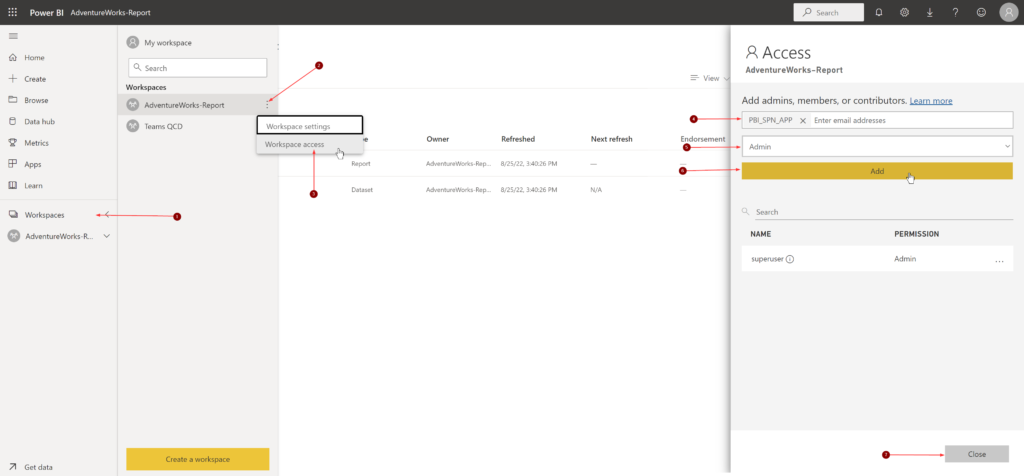
Next, the service principal needs permissions on the dataset. We can achieve this by granting permissions to the service principal on the workspace.

Note: Adding the Azure AD group that has SPN as members doesn’t work

This next step is kind of where things get tricky.

What are we trying to achieve here?

  • Grant the service principal, admin permissions on the new gateway
  • Grant the service principal, user permissions on the gateway data source

Reason why it is tricky is, I first tried adding the Azure AD group the above permissions and it allowed me to add it but the script which comes later in this section didn’t work as expected. Based on further research, I realized that the SPN needs to be granted the above access directly instead of using the Azure AD group. Also, at the time of writing this post, adding SPN the above permissions using the portal is not supported. Hence, we’ll have to use PowerShell cmdlets,

Before proceeding further, please connect to the AzAccount and PowerBIService using the below cmdlets,

Connect-AzAccount
Connect-PowerBIServiceAccount
Get-PowerBIAccessToken

The below script will add the permissions I mentioned above and display the same at the end of executing the cmdlets. One good thing about the part where you add permissions to the gateway, data sources and workspaces is, it is a one-time deal.

Get-DataGatewayCluster
$gw = Read-Host "Enter Gateway ID"
$spn = Read-Host "Enter App name to be added as gateway admin"
$spnToAdd = (Get-AzADServicePrincipal -DisplayName $spn).Id
Get-DataGatewayRegion
$Region = Read-Host "Enter region value where IsDefaultPowerBIRegion is set to true"
Add-DataGatewayClusterUser -GatewayClusterId $gw -PrincipalObjectId $spnToAdd -AllowedDataSourceTypes $null -Role Admin -RegionKey $Region
Get-DataGatewayCluster -GatewayClusterId $gw | Select -ExpandProperty Permissions | ft
Get-DataGatewayClusterDatasource -GatewayClusterId $gw
$gwDSID = Read-Host "Enter Gateway Cluster DatasourceId"
Add-DataGatewayClusterDatasourceUser -GatewayClusterId $gw -GatewayClusterDatasourceId $gwDSID -DatasourceUserAccessRight Read -Identifier $spnToAdd
Get-DataGatewayClusterDatasourceUser -GatewayClusterId $gw -GatewayClusterDatasourceId $gwDSID

With all the permissions for the SPN now in place, we are ready to take ownership of the affected datasets in the workspaces and bind it with the new data source on the new gateway

Rebind dataset

In this SPN method, Instead of logging in with a username and password, you’ll have to login with the Application ID and secret

$Tenant = Read-Host "Enter Azure AD Tenant ID"
Connect-PowerBIServiceAccount -Tenant $Tenant -ServicePrincipal -Credential (Get-Credential) #user = Application (client) ID | Password is the secret value we created earlier in this section
Get-PowerBIAccessToken

The script is pretty much the same as in earlier section but only runs in the SPN context.

$gateways = Invoke-PowerBIRestMethod -Url "gateways" -Method Get | ConvertFrom-Json
$gateways.value
Write-Host "Please copy the new Gateway ID from above output" -ForegroundColor Red
$newGWID = Read-Host "Please paste the new Gateway ID"

$GWdatasources = Invoke-PowerBIRestMethod -Url "gateways/$($newGWID)/datasources" -Method Get | ConvertFrom-Json
$GWdatasources.value
Write-Host "Please note down the Data Source ID used by the dataset that needs to be migrated from above output" -ForegroundColor Red
$datasourceObjectIds = Read-Host "Please paste the Data source ID"

$ws = Invoke-PowerBIRestMethod -Url 'groups' -Method Get | ConvertFrom-Json
$ws.value
Write-Host "Please note down the Workspace ID which has the dataset that needs to be migrated from above output" -ForegroundColor Red
$wsID = Read-Host "Please paste the Workspace ID"

$dataset = Invoke-PowerBIRestMethod -Url "groups/$($wsID)/datasets" -Method Get | ConvertFrom-Json
$dataset.value
Write-Host "Please note down the dataset ID that needs to be migrated from above output" -ForegroundColor Red
$dsID = Read-Host "Please paste the dataset ID"

Invoke-PowerBIRestMethod -Url "https://api.powerbi.com/v1.0/myorg/groups/$($wsID)/datasets/$($dsID)/Default.TakeOver" -Method POST

try { $body = "{
  'gatewayObjectId': '$newGWID',
  'datasourceObjectIds': [
    '$datasourceObjectIds'
  ]
}"

Invoke-PowerBIRestMethod -Url "https://api.powerbi.com/v1.0/myorg/groups/$($wsID)/datasets/$($dsID)/Default.BindToGateway" -Body $body -Method POST
Write-Host "Dataset updated" }

catch {
  Write-Host "An error occurred"
}

Similar to the earlier section, you can adjust this script according to your needs as in some instances, your gateway ID, new data source ID and workspace ID will be the same, only the affected dataset ID will vary.

Needless to say, you can test if this was successful by doing a ‘Refresh now‘ on the dataset.

Issues you may encounter and How to fix it

Issue: You may encounter below status codes while running the Invoke-PowerBIRestMethod

Response status code : 404 (Not Found)
Response status code : 400 (Bad Request)

Fix or workaround: Well.. If you’ve already browsed though community.powerbi.com, then might have already realized that you are not alone dealing with these error codes. Usually this means you are requesting the Power BI REST API endpoints for data that doesn’t exist or you or the SPN that’s requesting the resource doesn’t have the necessary permissions to it. These best way to troubleshoot is to run these requests one at a time to determine where you it is failing or understand which resource you don’t have permissions to.

Issue: Applied permissions don’t reflect in the portal

Fix or workaround: I noticed that some of the changes takes time. Give it a few minutes before you go changing more things and you lose track of all the things you’ve changed in the process. If the permissions still didn’t show up for a while, use PowerShell cmdlets to verify if the permissions you’ve set was applied or not.

I’ll keep experimenting other scenarios and I’ll update the issues I come across later on.

This was one of those really lengthy posts but hey..as long as there is a solution at the end..Hopefully..am I right?..😁🤷‍♂️

Thank you for stopping by.✌

Azure AD – Assign Groups and Users to an application

Azure AD allows granting access to resources by providing access rights to a single user or to an entire Azure AD group. Using groups let the application or the resource owner to assign a set of permissions to all the members of a group. Management rights can be granted to other roles, like example., Helpdesk administrators to add or remove members from the group.

When a group is assigned to an application, only users in the group will have access. Also, if the application exposes role, roles can also be assigned to groups or users.

When I was working on integrating Salesforce with Azure AD for SSO, I needed to assign groups to the roles that Salesforce exposed and I figured I’d document the process I went though here.

Bulk create Azure AD groups

This section describes how to create multiple groups in Azure AD. This is not needed if your organization already has groups created.

Use below script to create multiple Azure AD groups that are listed in a csv file,

Connect-AzureAD
$groups = import-csv "C:\tmp\AzureAD Groups\groups.csv"

Foreach($group in $groups) {

New-AzureADGroup -DisplayName $group.name -Description $group.description -MailEnabled $false -SecurityEnabled $true -MailNickName "NotSet"

}

csv file input,

csv file

PowerShell output,

output

Assign Groups and Users to an app using PowerShell

Assigning groups or users can be done from the Azure AD admin portal by clicking on the Users and groups tab in the application which you are granting access to.

My plan here is to create Azure AD groups that corresponds to the name of the role that Salesforce exposes and then add users to those groups which provides them with appropriate access to the application.

Determine the roles available for the application

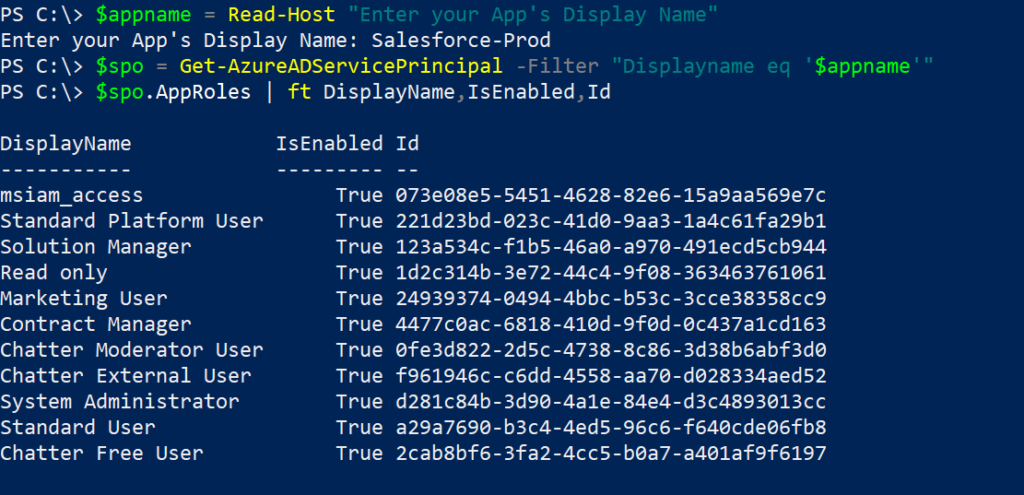
To determine the roles that the application exposes, use the cmdlet below.

$appname = Read-Host "Enter your App's Display Name"
$spo = Get-AzureADServicePrincipal -Filter "Displayname eq '$appname'"
$spo.AppRoles | ft DisplayName,IsEnabled,Id
AppRoles Output

Assign Groups to Roles in Application

Use below script to assign the application’s roles to groups. If you notice the csv file, I’m using the groups created in the previous step to the roles. This way, it is easier to manage. The New-AzureADGroupAppRoleAssignment cmdlet can be used to achieve this.

$appname = Read-Host "Enter your App's Display Name"
$spo = Get-AzureADServicePrincipal -Filter "Displayname eq '$appname'"
$groups = import-csv "C:\tmp\Salesforce_Asgn\groups.csv"

Foreach($group in $groups) {
	$id = Get-AzureADGroup -SearchString $group.name
	$app_role_name = $group.role
	$app_role = $spo.AppRoles | Where-Object { $_.DisplayName -eq $app_role_name }
	New-AzureADGroupAppRoleAssignment -ObjectId $id.ObjectId -PrincipalId $id.ObjectId -ResourceId $spo.ObjectId -Id $app_role.Id
	
}
csv input
PowerShell output

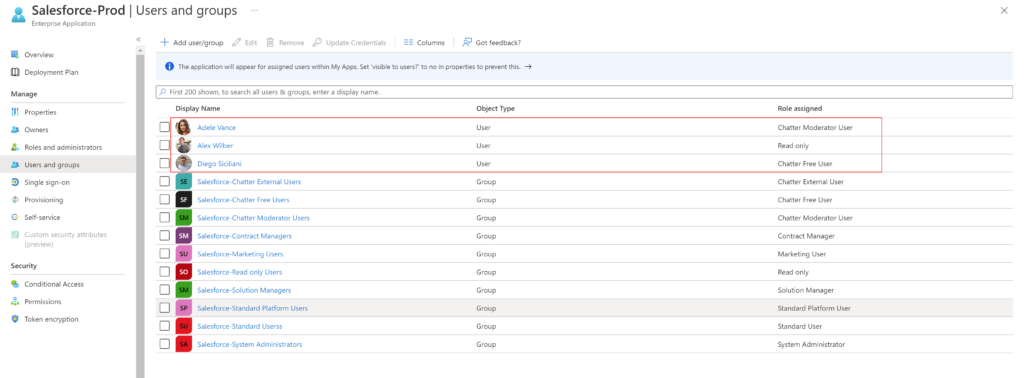
This below is how the application looks like in the Azure AD admin portal after running the above script,

Application Users and groups tab

Assign Users to Roles in Application

Use below script to assign the application’s roles to users. This can be achieved using the New-AzureADUserAppRoleAssignment cmdlet. Use the below script,

$appname = Read-Host "Enter your App's Display Name"
$spo = Get-AzureADServicePrincipal -Filter "Displayname eq '$appname'"
$users = import-csv "C:\tmp\Salesforce_Asgn\users.csv"

Foreach($user in $users) {
	$id = Get-AzureADUser -ObjectId $user.name
	$app_role_name = $user.role
	$app_role = $spo.AppRoles | Where-Object { $_.DisplayName -eq $app_role_name }
	New-AzureADUserAppRoleAssignment -ObjectId $id.ObjectId -PrincipalId $id.ObjectId -ResourceId $spo.ObjectId -Id $app_role.Id
	
}
PowerShell Output
Application Users and groups tab

Get all role assignments to an application using PowerShell

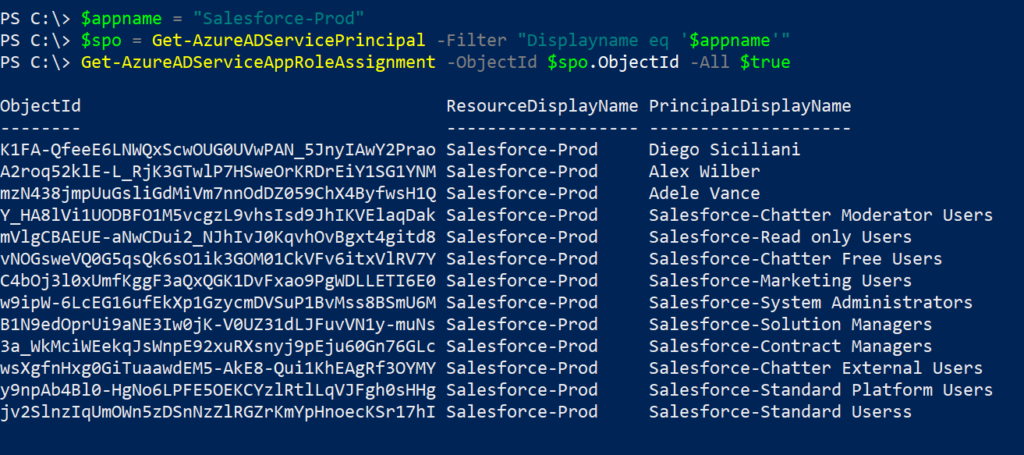
Get-AzureADServiceAppRoleAssignment cmdlet can be used to determine all role assignments to an application,

$appname = Read-Host "Enter your App's Display Name"
$spo = Get-AzureADServicePrincipal -Filter "Displayname eq '$appname'"
Get-AzureADServiceAppRoleAssignment -ObjectId $spo.ObjectId -All $true
PowerShell Output

Remove All Groups and Users assigned to an application

To remove all assigned groups and users from an application, Remove-AzureADServiceAppRoleAssignment cmdlet can be used,

$appname = Read-Host "Enter your App's Display Name"
$spo = Get-AzureADServicePrincipal -Filter "Displayname eq '$appname'"
$app_assignments = Get-AzureADServiceAppRoleAssignment -ObjectId $spo.ObjectId -All $true
$app_assignments | ForEach-Object {
	if ($_.PrincipalType -eq "user") {
		Remove-AzureADUserAppRoleAssignment -ObjectId $_.PrincipalId -AppRoleAssignmentId $_.ObjectId
	} elseif ($_.PrincipalType -eq "Group") {
		Remove-AzureADGroupAppRoleAssignment -ObjectId $_.PrincipalId -AppRoleAssignmentId $_.ObjectId
	}
}

It should go without saying that removing all permissions will disable user’s access to the application. Don’t try this as a first step in a production environment, unless you are absolutely sure of it.

Thank you for stopping by.✌

Office 365 – Export Email Addresses and UPN of O365 users with PowerShell

I will go over steps on how to export the list of users with their UPN, Object ID, primary SMTP address and Alias email address.

The Get-AzureADUser cmdlet comes in handy to pull all the user details in this scenario. The Mail attribute contains the Primary SMTP address of the user and the Primary SMTP address and Alias email address are stored in the ProxyAddresses attribute in Azure AD. The ProxyAddresses attribute is a multi-value property. The Primary SMTP address can be easily identified as it is in this format, SMTP:user@emaple.com The upper-case SMTP denotes that it the primary email address.

When an object is synced from on-premise Active Directory to Azure AD, the values in the proxyAddresses attribute in AD are compared with Azure AD rules and then populated in Azure AD. So, the values of the proxyAddresses attribute in AD may not match the ProxyAddresses attribute in AzureAD.

Export all users to csv file

The below script will pull all Azure AD users,

Connect-AzureAD

$Output = @() #create an empty array

$AzureADUsers = Get-AzureADUser -All $true | Select DisplayName,UserprincipalName,ObjectId,Mail,ProxyAddresses #Get all Azure AD users

ForEach ($User in $AzureADUsers)
{
	$Output += New-Object PSObject -property $([ordered]@{ #fetch user detail and add to $output
		UserName = $User.DisplayName
		UserprincipalName = $User.UserprincipalName
		UserId = $User.objectId
		SMTPAddress = $User.Mail
		AliasSMTPAddresses = ($User.ProxyAddresses | Where-object {$_ -clike 'smtp:*'} | ForEach-Object {$_ -replace 'smtp:',''}) -join ','
		
	})
}
$Output | Export-csv "C:\tmp\O365Users_$((Get-Date).ToString("MMddyyyy_HHmmss")).csv" -NoTypeInformation -Encoding UTF8 #Export users to csv file

Output file,

csv output

Thank you for stopping by.✌