Active Directory – Set ‘Manager Can Update Membership List’ with PowerShell

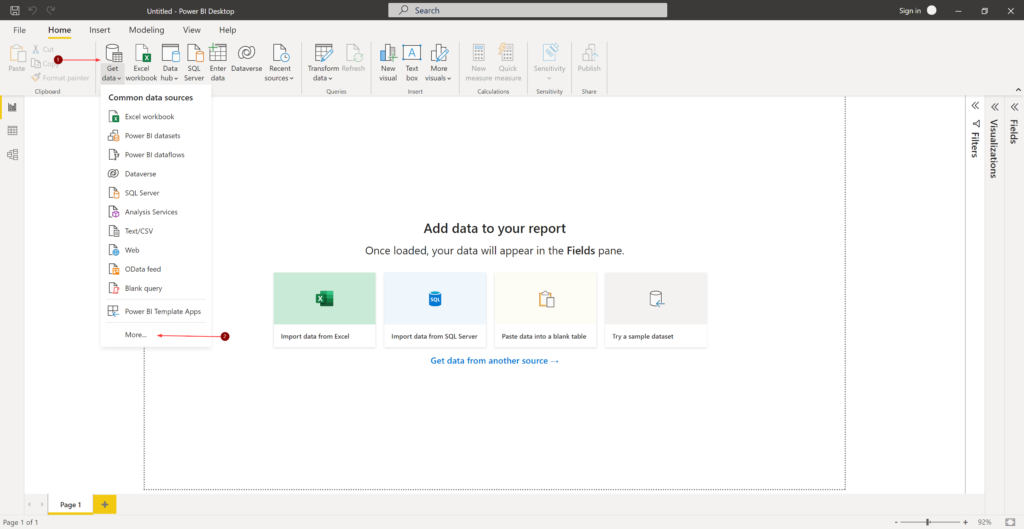
AD group management usually is delegated in most organizations. Usually one of helpdesk’s responsibility or sometime a department manager decides who is member of her or his team at any given time. These users can be non-IT users in several situations.

To serve this purpose, a user can be designated as manager in the Managed By tab of the security group using Active Directory Users and Computers (ADUC) console. Placing a checkmark next to Manager can update membership list allows the user to update the group member by adding or removing users from the security group.

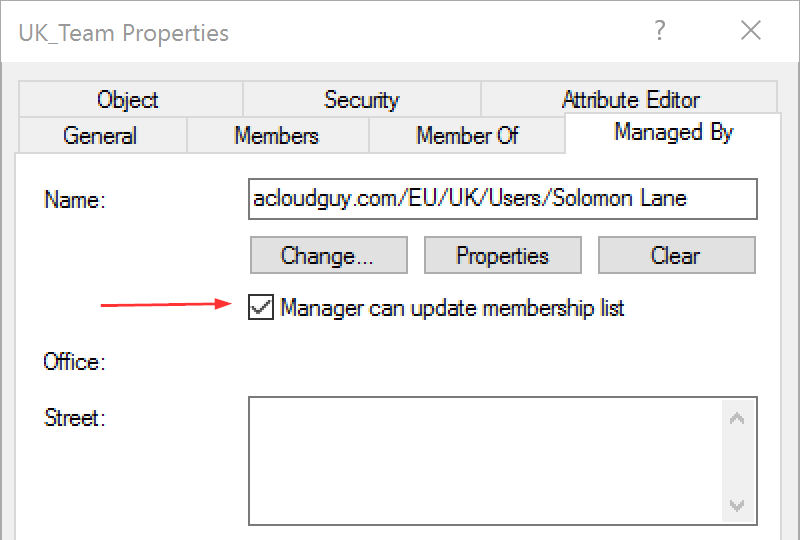
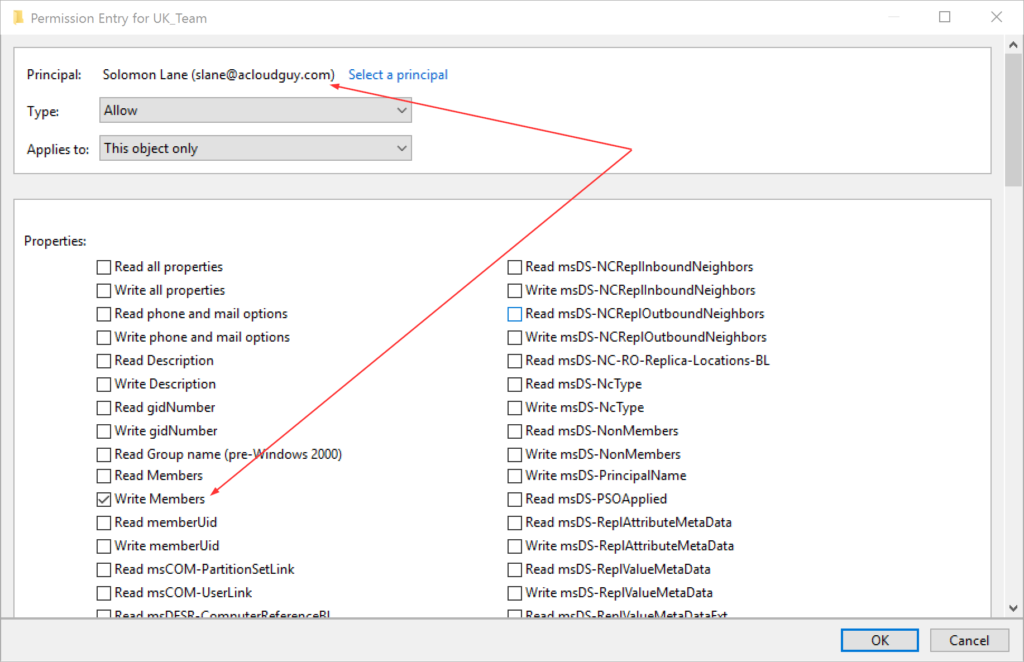
The Manager can update membership list option modifies the Access Control List (ACL) of the security group which we can see in the Security tab, in Advanced.

Setting the Managed by is fairly straight-forward. We can use the Set-ADGroup cmdlet to update the value. We can use the below code to update manager for a group:

$grpname = Read-Host "Enter AD Group's name"
$Managername = Read-Host "Enter AD user's name"
Get-ADGroup -Identity $grpname | Set-ADGroup -ManagedBy "$Managername"

But this doesn’t enable the Manager can update membership list option. To allow this user who is set as this group’s manager, we need to add an AccessRule for this user to the ACL of the group. I’m using this below process to put together a script,

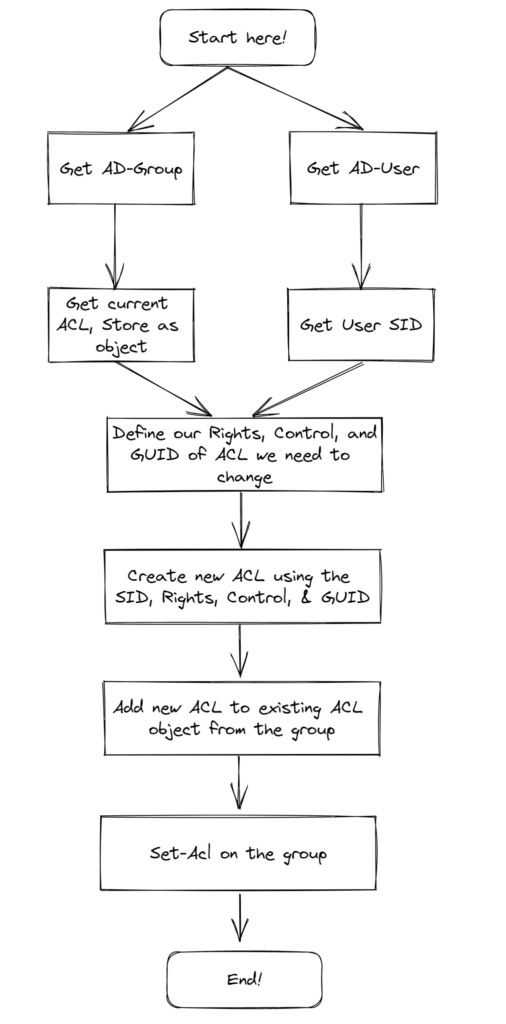
In this below script, We get the user and current ACL of the group. And then the user who will be the manager. And to build the new ACL, we obtain the SID string, then set control type and AD permission. We also need to specify the System ID GUID of the Member attribute and this ACL need to be applied to this specific attribute (Member). Use all the variables to build a new rule, add the rule to the existing rule. And finally use Set-Acl cmdlet to apply new ACL to the Group. Yup!.. that easy!! 🤷‍♂️

$grpname = Read-Host "Enter AD Group's name"
$Grp = Get-ADGroup -Identity $grpname
$GroupACL = Get-Acl AD:\$Grp

$Managername = Read-Host "Enter AD user's name"
$Manager = Get-ADUser -Identity $Managername
$UserSid = New-Object System.Security.Principal.NTAccount ($Manager.SamAccountName)

$Rights = [System.DirectoryServices.ActiveDirectoryRights]::WriteProperty
$Control = [System.Security.AccessControl.AccessControlType]::Allow
$Guid = [guid]"bf9679c0-0de6-11d0-a285-00aa003049e2"
$Rule = New-Object System.DirectoryServices.ActiveDirectoryAccessRule ($UserSid, $Rights, $Control, $Guid)
$GroupACL.AddAccessRule($Rule)
Set-Acl -AclObject $GroupACL -path AD:\$Grp
Get-ADGroup -Identity $Grp | Set-ADGroup -ManagedBy "$Manager"
Write-Host $Manager.Name set as manager on $group.groupname

What if you have to update multiple groups with a user as manager to each. I didn’t have enough time to make a detailed one and the below script will serve the purpose. I’d probably include checks to make sure the group and the user exists in AD.

Note: csv file has groupname,managerSamname as column headers

$groups = import-csv "C:\Scripts\list.csv"

foreach ($group in $groups){
        $Grp = Get-ADGroup -Identity $group.groupname
        $GroupACL = Get-Acl AD:\$Grp
        $Manager = Get-ADUser -Identity $group.managerSamname
        $UserSid = New-Object System.Security.Principal.NTAccount ($Manager.SamAccountName)
        $Rights = [System.DirectoryServices.ActiveDirectoryRights]::WriteProperty
        $Control = [System.Security.AccessControl.AccessControlType]::Allow
        $Guid = [guid]"bf9679c0-0de6-11d0-a285-00aa003049e2"
        $Rule = New-Object System.DirectoryServices.ActiveDirectoryAccessRule ($UserSid, $Rights, $Control, $Guid)
        $GroupACL.AddAccessRule($Rule)
        Set-Acl -AclObject $GroupACL -path AD:\$Grp
        Get-ADGroup -Identity $Grp | Set-ADGroup -ManagedBy "$Manager"
        Write-Host $Manager.Name set as manager on $group.groupname
}

Hope this post helped you in bulk setting group managers in AD.

Thank you for stopping by.✌

Power BI – Create Visualizations with data from Active Directory

Power BI provides a wide variety of options to connect, analyze and visualize data from various sources. There were many instances where I’ve been asked to get a count of all users in the domain while in meetings and if possible a country-wise breakdown. Well..I don’t have that ready but would be nice to know if this information was needed earlier. As the user count is a moving target, I figured it’d be nice to have a PBI viz to help me answer this whenever asked.

There are several different ways to get this information and PBI viz is one of those.

In this post, I’ll go over steps on creating a visualization that I find useful to get a breakdown of users in the domain by country.

This should give you an idea on how to connect Power BI to AD and pull data to built visualizations.

To proceed further, make sure you have the Power BI desktop App downloaded and installed on your machine.

Launch Power BI Desktop,

  1. Click Get data and Click More…
  2. In the Get Data window, Click Other and Active Directory
  3. Click Connect
  1. Enter your Domain name under Domain then click OK
Enter domain name
  1. Enter credentials which has permissions to read attributes from AD and click Connect
Enter credentials
  1. The Navigator window shows all the tables available. In this post, I’m only going to use the data from user table
  2. Place a check mark next to user and click Transform Data
  1. In the Power Query Editor window, we can select the values we’ll be working with. As we can see, the query editor has detected what is known as Complex columns. The reason they are complex is that they actually contain an object, not just a simple value like a single line of text column.
  2. Click on Expand column icon
  3. Place a checkmark next to co
    • I’m also selecting c and countryCode for the sake of it, because why not! 😉
  4. I’m also leaving the Use original column name as prefix checked
  5. Click OK
  1. I’m repeating the same steps for other columns as well to pick values I need
    • I’d need the UPN for unique values, so I’m picking that
Expand user
  1. Below screenshots shows all the columns I’ve selected to be loaded using Choose Columns, unselecting the columns I don’t need
  2. Once satisfied with the data, Click Close & Apply
  1. Data gets loaded into the model and depending on how many users you have in your domain and the hardware specs of the machine running PBI desktop, this can take a while

Below I have created a basic visualization which shows a pie chart with user breakdown by country name,

I did some formatting of the title, the legend and such to make it look pretty. If the data changes in AD, you can click on Refresh to get the updated information populated in the visualizations you create.

Here is another basic stacked column chart I created with UAC status of users per country. I created a UAC table which has the values for the UAC codes in AD and I merged those queries. I keep saying these are basic because by no means I’m a PBI expert but I’m very interested in learning and improving my skills in it every chance I get.

You can incorporate the visualizations you create, in a AD dashboard in PBI and If you have an on-premise PBI report server you can publish this report there or to PBI web.

Hope this post helped you in your AD visualizations journey.

Thank you for stopping by✌

Active Directory – Decoding UserAccountControl Attribute Values

In Active Directory, When we open properties of an user account, click the Account tab, and then either check or uncheck boxes in the Account options dialog box, numerical values are assigned to the UserAccountControl attribute. This UserAccountControl attribute determines the state of an account in the AD domain: active or locked, Password change at the next logon is enabled or not, if users can change their passwords and other options.

UserAccountControl Attribute in AD

To view user accounts,

  1. Click Start –> Programs
  2. Open Administrative Tools
  3. Click Active Directory Users and Computers
    • Or run dsa.msc from run window
  4. Search for a user and right-click and select Properties
  5. Click on Account tab

The Account Options section has the following options,

  • User must change password at next logon
  • User cannot change password
  • Password never expires
  • Store password using reversible encryption
  • Account is disabled
  • Smart card is required for interactive logon
  • Account is sensitive and cannot be delegated
  • User Kerberos DES encryption types for this account
  • This account supports Kerberos AES 128 bit encryption
  • This account supports Kerberos AES 256 bit encryption
  • Do not require Kerberos preauthentication

Each of these user account options is 1 (True) or 0 (False) and are not stored as separate AD attributes, instead the UserAccountControl attribute is used. The flags are cumulative. The total value of all options are stored in the value of UserAccountControl attribute.

To determine the current value of the attribute,

Using PowerShell,

$user = Read-Host "Enter user's logon"
Get-ADuser $user -properties * | Select name, UserAccountControl | ft

Using dsa.msc,

  1. dsa.msc from Run window
  2. Search for a user and right-click and select Properties
  3. Click on Attribute Editor tab
    • If you are missing this tab, Click View in the Active Directory Users and Computers window and select Advanced Features

In this example, the value of the attribute is 0x200 (decimal value is 512).

The following table lists possible flags that can be assigned to an account. Each flag corresponds to a certain UserAccountControl bit, and UserAccountControl value equals the sum of all flags.

UserAccountControl FlagHexadecimal ValueDecimal Value
SCRIPT0x00011
ACCOUNTDISABLE0x00022
HOMEDIR_REQUIRED0x00088
LOCKOUT0x001016
PASSWD_NOTREQD0x002032
PASSWD_CANT_CHANGE0x004064
ENCRYPTED_TEXT_PWD_ALLOWED0x0080128
TEMP_DUPLICATE_ACCOUNT0x0100256
NORMAL_ACCOUNT0x0200512
INTERDOMAIN_TRUST_ACCOUNT0x08002048
WORKSTATION_TRUST_ACCOUNT0x10004096
SERVER_TRUST_ACCOUNT0x20008192
DONT_EXPIRE_PASSWORD0x1000065536
MNS_LOGON_ACCOUNT0x20000131072
SMARTCARD_REQUIRED0x40000262144
TRUSTED_FOR_DELEGATION0x80000524288
NOT_DELEGATED0x1000001048576
USE_DES_KEY_ONLY0x2000002097152
DONT_REQ_PREAUTH0x4000004194304
PASSWORD_EXPIRED0x8000008388608
TRUSTED_TO_AUTH_FOR_DELEGATION0x100000016777216
PARTIAL_SECRETS_ACCOUNT0x0400000067108864

The userAccountControl value is calculated as,

NORMAL_ACCOUNT (512) + ACCOUNTDISABLE (2) = 514

NORMAL_ACCOUNT (512) + DONT_EXPIRE_PASSWORD (65536) + ACCOUNTDISABLE (2) = 66050

To list all active users,

Get-ADUser -Properties * -ldapFilter "(useraccountcontrol=512)" | Select UserPrincipalName,userAccountControl | ft

To list all disabled user accounts,

Get-ADUser -Properties * -ldapFilter "(useraccountcontrol=514)" | Select UserPrincipalName,userAccountControl | ft

To list accounts with a non-expiring password,

Get-ADUser -Properties * -ldapFilter "(useraccountcontrol=66048)" | Select UserPrincipalName,userAccountControl | ft

Here are the default UserAccountControl values for the certain objects:

  • Typical user: 0x200 (512)
  • Domain controller: 0x82000 (532480)
  • Workstation/server: 0x1000 (4096)

Decode UserAccountControl Values

To fully decode UserAccountControl bit field we can use this PowerShell script,

Add-Type -TypeDefinition @'
[System.Flags]
public enum UserAccountControl{
	SCRIPT = 1,
	ACCOUNTDISABLE = 2,
	BIT_02 =  4,
	HOMEDIR_REQUIRED = 8,
	LOCKEDOUT = 16,
	PASSWD_NOTREQD = 32,
	PASSWD_CANT_CHANGE = 64,
	ENCRYPTED_TEXT_PWD_ALLOWED = 128,
	TEMP_DUPLICATE_ACCOUNT = 256,
	NORMAL_ACCOUNT = 512,
	BIT_10 = 1024,
	INTERDOMAIN_TRUST_ACCOUNT = 2048,
	WORKSTATION_TRUST_ACCOUNT = 4096,
	SERVER_TRUST_ACCOUNT = 8192,
	BIT_14 = 16384,
	BIT_15 = 32768,
	DONT_EXPIRE_PASSWORD = 65536,
	MNS_LOGON_ACCOUNT = 131072,
	SMARTCARD_REQUIRED = 262144,
	TRUSTED_FOR_DELEGATION = 524288,
	NOT_DELEGATED = 1048576,
	USE_DES_KEY_ONLY = 2097152,
	DONT_REQ_PREAUTH = 4194304,
	PASSWORD_EXPIRED = 8388608,
	TRUSTED_TO_AUTH_FOR_DELEGATION = 16777216,
	PARTIAL_SECRETS_ACCOUNT = 67108864
}
'@

Which can be used like this to decode the bits,

If you want to display all flags that are set in UAC,

Get-AdUser -Filter * -Properties UserAccountControl | select name, @{n='UAC';e={[UserAccountControl]$_.UserAccountControl}}

This script can also be used to determine UserAccountControl value for specific AD accounts,

$user = Read-Host "Enter user's logon"
Get-ADuser $user -properties * | select name,UserPrincipalName, @{n='UAC';e={[UserAccountControl]$_.UserAccountControl}}

Update UserAccoutControl Attribute in AD using PowerShell

To change UserAccountControl attribute in AD using PowerShell, we can use Set-ADUser, Set-ADComputer and Set-ADAccountControl cmdlets,

$user = Read-Host "Enter user's logon"
Set-ADAccountControl -Identity $user –CannotChangePassword:$true -PasswordNeverExpires:$true

or

$user = Read-Host "Enter user's logon"
Set-ADUser -Identity $user –CannotChangePassword:$true -PasswordNeverExpires:$true

Set a specified computer to be trusted for delegation,

$Computer = Read-Host "Enter computer or server name"
Set-ADAccountControl -Identity $Computer -TrustedForDelegation $True

or

$Computer = Read-Host "Enter computer or server name"
Set-ADComputer -Identity $Computer -TrustedForDelegation $True

The user account attribute can also be updated using the Set-ADUser cmdlet. In this below example, I’m enabling user account,

$user = Read-Host "Enter user's logon"
Set-ADUser $user -Replace @{UserAccountControl = 512}

Hope this post helped you get a better understanding of the UserAccountControl attribute.

Thank you for stopping by ✌

PowerShell – Generate and email list of new users created in AD – Updated

If you don’t have an AD user provisioning tool implemented in your environment, I’m sure most of your user provisioning and de-provisioning is done using PowerShell scripts which helps in reducing the amount of time consumed in this process.

You probably are bombarded with requests from various departments in your organization to provide them with a list of new users who were created for various reasons.

This script can be automated by securely storing the credentials and running a scheduled task that runs on a specific day. Don’t store your admin or any credentials in any of your scripts.

You can use ConvertFrom-SecureString command to get an encrypted standard string and ConvertTo-SecureString to simply reverse the process by importing the data from your file and then create a PSCredential object.

(Get-Credential).Password | ConvertFrom-SecureString | Out-File "C:\Temp\Password.txt"

$User = "AdminUser@acme.com"
$File = "C:\Temp\Password.txt"
$MyCredential=New-Object -TypeName System.Management.Automation.PSCredential -ArgumentList $User, (Get-Content $File | ConvertTo-SecureString)

In this above method, the point of converting password to a SecureString and storing it in a file is to keep it out of plain text in PS scripts so that it’s not as easily discovered. This can be easily decrypted and not recommended.

You can use the Microsoft.PowerShell.SecretManagement and Microsoft.PowerShell.SecretStore PS modules which I’ve covered in a later post.

​$Days = -7
$Maxdate = (Get-Date).addDays($Days) 
$CurrentWeekNumber = Get-Date -UFormat %V

$dateformat = "dddd MM/dd/yyyy"
$subjDate = Get-Date $Maxdate -Format $dateformat

$NewUsers = Get-ADUser -filter { whencreated -ge $Maxdate} -Properties EmailAddress, co, Description | Select-Object -Property GivenName, SurName, DisplayName, Description, co, EmailAddress # Gathering recent New AD Users

if ($NewUsers) # If there are more than one new user created in last $Days, prepare to send a mail
    {
    $MailBody = $NewUsers | ConvertTo-Html -Fragment
    
            $MailParams = @{Body       = $mailBody | Out-String
                            BodyAsHtml = $true
                            From       = "AD-Admin@acme.com"
                            To         = "jsmith@acme.com" # separate with comma for multiple users. "jdoe@acme.com", "jroe@acme.com"
                            SmtpServer = "smtp.acme.com"
                            Subject    = "New users for the week : $CurrentWeekNumber | Week Starting - $subjDate"
                            Encoding   = "UTF8"
                            Priority   = "Normal" # Accepted values: Normal, High, Low
                            #Port      = xxxx #If not 25
                            Credential = $(Get-Credential)
                            }
    Send-MailMessage @MailParams
    }

Hope this script was useful is generating weekly reports of newly created AD users.

Thank you for stopping by. ✌