Plus addressing or subaddressing is available in Exchange Online. Plus addressing is using a unique, dynamically created receive-only email addresses for mailboxes.
Basic syntax of an SMTP email address: @. Example, JohnD@domain.com
Plus addressing syntax: +@. Example, JohnD+statements@domain.com
The original email address must be valid one. The +tag value is arbitrary, although regular character restrictions for SMTP email addresses apply.
Here is a scenario, Let’s say the users’ email address is JohnD@domain.com. User can use plus addresses as unique addresses for services that you sign up for, right after the local part (JohnD) and add (string) of choice. So for instance, to receive all bank statement, the user can end up with something like this: JohnD+statements@domain.com
Plus addressing Limitations
When using plus addressing, there are a few things to keep in mind:
Plus addresses aren’t aliases in Exchange Online
Hence, it can be used only to receive messages and not send them
It does not resolve to a user’s name in Outlook clients, so it is easily identifiable in the To and CC fields
In a Hybrid environment, plus addressing won’t work for on-premises mailboxes that do not resolve in Exchange Online
Web Developers are aware of plus addresses and some online forms/services won’t accept a plus sign in the email field
Some subscription services require the user use the original email address that they subscribed with
Select Turn on plus addressing for your organization, and then select Save
Note: After the plus addressing is turned on by default in April 2022, you will see the option Turn off plus addressing for your organization if you are following the above steps. Which will be unchecked meaning it is turned on. So placing a checkmark will turn off plus addressing. See screenshot below.
Enable using Exchange Online PowerShell
Before proceeding further make sure you are connected to Exchange Online,
This setting will be effective only after plus addressing is turned on by default in all organizations starting in late April 2022. Before that happens, plus addressing can be disabled in the O365 tenant by using the AllowPlusAddressInRecipients parameter I described earlier with the value $false value. This can also be proactively set, you don’t have to wait for it to be turned on by default.
It is important to know about the current state of your Teams rollout and this is one of those which can easily get out of control in a blink of an eye. I wanted to understand and determine the current Teams state in a tenant I manage and I had to create reports to present.
The portal does give a few options to export the data but I decided to take a look at the option the Teams PowerShell module offers. I spent some time on creating a script that will output these five reports,
All Teams data with Channel type, Channel count, Channel count with types, Teams member count and owners count
Teams users data with role information
Channel information for each Teams with Channel types
Channel user information with user information and role
Permissions on each Teams
This report can also be scheduled to run if you already use a mechanism to store your credentials securely and pass it on to your PS scripts.
I use the ImportExcel PowerShell module for this script,
Install-Module -Name ImportExcel
Before proceeding further, make sure you have the Teams PowerShell module installed. You’ll need to run this script with Teams Administrator role.
This one took me a while to understand what is happening and how to resolve it. The Teams audio and calling functions are not something I deal with on a daily basis but it was good learning experience.
One of the Teams tenant I manage kept running out of pooled minutes really quickly. I wasn’t actively monitoring the usage but I did notice the emails from Microsoft that were warning us that the minutes are almost used up and users won’t be able to use the PSTN conferencing services for the rest of the calendar month unless more communication credits were added.
What is the deal here exactly?
Each user assigned an ‘Audio Conferencing’ license which provides a dial-in phone number when they schedule a meeting, is given 60 minutes per month of pooled minutes that can be used for inbound or outbound PSTN dialing for meetings. This ‘Audio Conferencing’ license is only needed for users scheduling the meetings. Meeting attendees who dial in don’t need this license. Depending on how you have deployed Teams in your organization, whether as a full blown phone system or used specifically for meetings, this pooling minutes is only for meetings and is separate from other dial plans(domestic or international) that you may have.
Users with ‘Audio Conferencing’ license are given a default invite number in the same country as what their O365 account’s usage location is set to.
In a example scenario where an organization has 100 users that have ‘Audio Conferencing’ license, 100 X 60 minutes and you get 6000 pooled minutes for your tenant to PSTN dial-in and dial-out of meetings. One the 6000 minutes are consumed users will no longer be able to dial-in or dial-out of the meetings using the number provided in the meetings.
Note: Users can still participate using the Teams meeting clients(Desktop or phone app).
Why users use the PSTN dial-in numbers for Teams online meetings
Personally I love the Teams app, both on the desktop and the phone. And I can tell Microsoft is adding new functionalities over time. I also like it how I can use the phone app for voice and also launch Teams on my desktop and I get an option to ‘add the device’ to the ongoing call on the phone. This way, I can present using the desktop.
Using this VOIP features via the Teams app(phone or desktop) doesn’t incur additional cost to the organization but there are some scenarios where including a dial-in number to meetings makes sense,
Poor or limited internet connectivity
Users moving in and out of limited data coverage where voice quality may be better
Users having issues with VOIP on their PC and phone app
Users are used to the old ways
Users lack training in Teams clients(Desktop or phone app)
Determine pooled minutes and usage
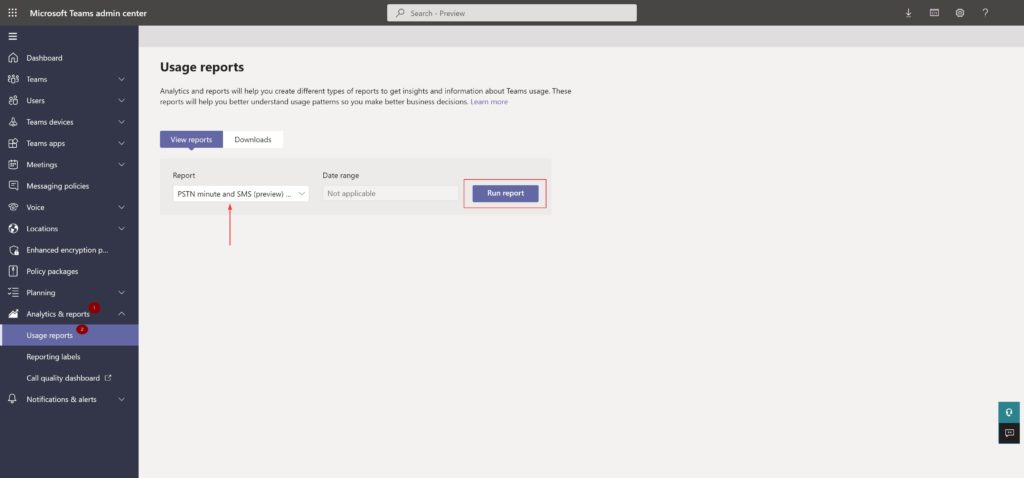
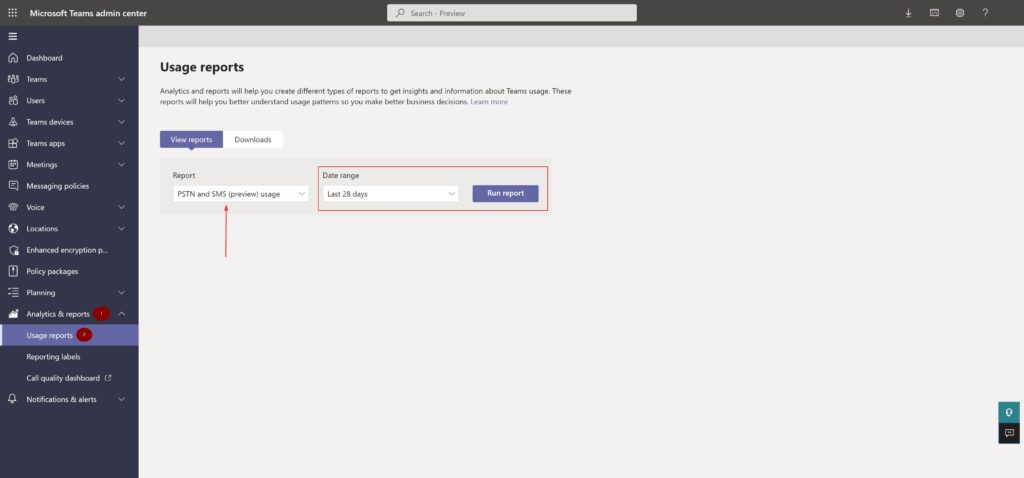
To check your PSTN pooled minutes, you can run usage reports in the Teams admin center,
Teams Admin Center –> Analytics & reports –> Usage reports
PSTN minute and SMS(preview) pools
PSTN and SMS(preview) usage
PSTN minute and SMS(preview) pools
PSTN and SMS(preview) usage
What is burning precious PSTN minutes
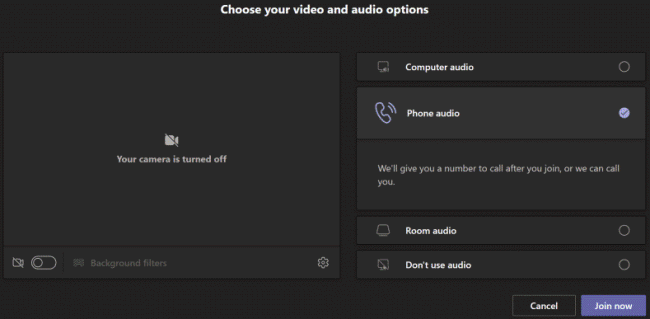
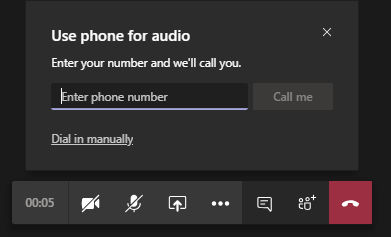
Based on the reports and further reading I realized the ‘Call me‘ feature in Teams is apparently a well known and heavily used user loved feature which seems to be a behavior that followed users from using other conferencing tools.
Users can join a meeting and have the meeting call and join them or dial in manually to the meeting.
As I mentioned earlier, the users using this feature didn’t realize they can use their computer audio or the Teams app on their phone. There were others who thought this was a handy feature and more convenient. Well, what they didn’t know or didn’t care is, the outbound calls were eating those pooled PSTN minutes and affecting the entire organization for users who would really need it.
What is the fix?
This can be fixed by educating the users about the VOIP options, using the computer or phone Teams app. And yes, obviously by putting policies in the tenant.
In the Teams admin center, the dial-out from meeting can be controlled on a per-user basis
In the left navigation, select Users, and then select the display name of the user from the list of available users
Under Audio Conferencing, select Edit
Under Dial-out from meetings, select the dial-out restriction option you desire
Select Save
This may resolve the issue by assigning ‘Don’t allow’ policy for the users who are the heavy hitters of the ‘Call me’ feature but more users might start using this feature and you’ll have to constantly monitor the usage.
To prevent this, you can set a tenant level policy based on your requirements and organizational needs. Once the global policy is in place, you can assign a policy on a per-user level.
The following table provides an overview of each policy.
PowerShell cmdlet
Description
DialoutCPCandPSTNInternational
User in the conference can dial out to international and domestic numbers, and this user can also make outbound calls to international and domestic numbers.
DialoutCPCDomesticPSTNInternational
User in the conference can only dial out to domestic numbers, and this user can make outbound calls to international and domestic numbers.
DialoutCPCDisabledPSTNInternational
User in the conference can’t dial out. This user can make outbound calls to international and domestic numbers.
DialoutCPCInternationalPSTNDomestic
User in the conference can dial out to international and domestic numbers, and this user can only make outbound calls to domestic PSTN number.
DialoutCPCInternationalPSTNDisabled
User in the conference can dial out to international and domestic numbers, and this user cannot make any outbound calls to PSTN number besides emergency numbers.
DialoutCPCandPSTNDomestic
User in the conference can only dial out to domestic numbers, and this user can only make outbound call to domestic PSTN numbers.
DialoutCPCDomesticPSTNDisabled
User in the conference can only dial out to domestic numbers, and this user cannot make any outbound calls to PSTN number besides emergency numbers.
DialoutCPCDisabledPSTNDomestic
User in the conference can’t dial out, and this user can only make outbound call to domestic PSTN numbers.
DialoutCPCandPSTNDisabled
User in the conference can’t dial out, and this user can’t make any outbound calls to PSTN number besides emergency numbers.
DialoutCPCZoneAPSTNInternational
User in the conference can only dial out to Zone A countries and regions, and this user can make outbound calls to international and domestic numbers.
DialoutCPCZoneAPSTNDomestic
User in the conference can only dial out to Zone A countries and regions, and this user can only make outbound calls to domestic PSTN number.
DialoutCPCZoneAPSTNDisabled
User in the conference can only dial out to Zone A countries and regions, and this user can’t make any outbound calls to PSTN number besides emergency numbers.
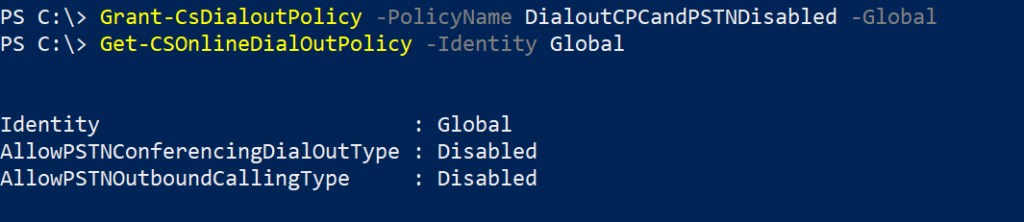
To set the policy on the tenant level, use following cmdlet. Use the pre-defined policy from the table above for the ‘policy name’
In my scenario, my plan is to set the global dial-out from meetings policy to DialoutCPCandPSTNDisabled. And assign per-user policy based on their needs.
Tenant-level policy
Note: All users of the tenant who don’t have any dial-out policy assigned will get the global policy.
You can set what is allowed per-user using the Teams admin center as covered earlier or you can use PowerShell to assign a policy to a list of users using this below script.
#Connect-MicrosoftTeams
$list=import-csv "c:\tmp\user.csv"

Foreach($user in $list){

Grant-CsDialoutPolicy -identity $user.UserId -PolicyName "DialoutCPCandPSTNDomestic" #Setting 'DialoutCPCandPSTNDomestic' policy to the users
}
You can also export a report of users and their Dial-Out policy assigned to them,
Teams and its audio services are a much more detailed topic and I covered what applied to the issue I faced. Hope you’d be able to as well if you encounter this.
All users can create M365 groups, this is the option enabled by default. Microsoft probably took this approach so as to make sure users can collaborate without any IT assistance.
This is good but when it comes to start managing Teams and the related resources that get created, it can easily become an IT data governance nightmare. If your organization is in its initial phases of Teams rollout, IMO it is better to disable group creation ability for the masses and preferable do a phased approach.
When we disable M365 group creation, it affects all services that rely on groups for access, including:
Outlook
SharePoint
Microsoft Teams
Microsoft Stream
Yammer
Planner
Power BI (classic)
Project for the web
To have a solution that is sort of a best of both worlds scenario, we can designate an Azure AD group with specific users who have the permissions to create M365 groups.
Create an Azure AD Group
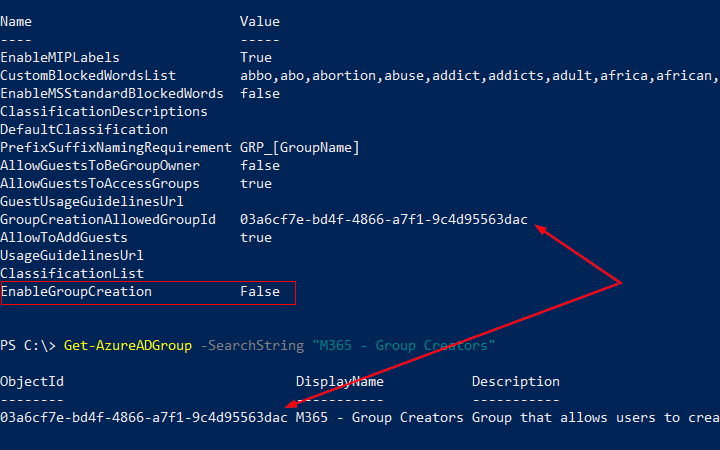
To create a new Azure AD group, the New-AzureADGroup cmdlet can be used or can also be created from the Azure AD admin portal. I’m naming the group ‘M365 – Group Creators’
New-AzureADGroup -DisplayName "M365 - Group Creators" -Description "Group that allows users to create M365 groups" -MailEnabled $false -SecurityEnabled $true -MailNickName "NotSet"
New Azure AD group
Keep in mind this doesn’t prevent users with Azure AD admin roles which has group creation capabilities from creating new groups.
Set Group Creators
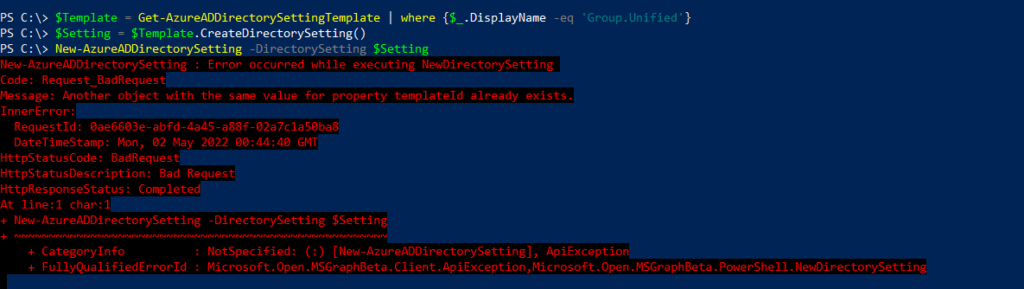
The following needs to be run from PowerShell. Make sure AzureADPreview is installed and connected.
To determine if the group is allowed to create to groups,
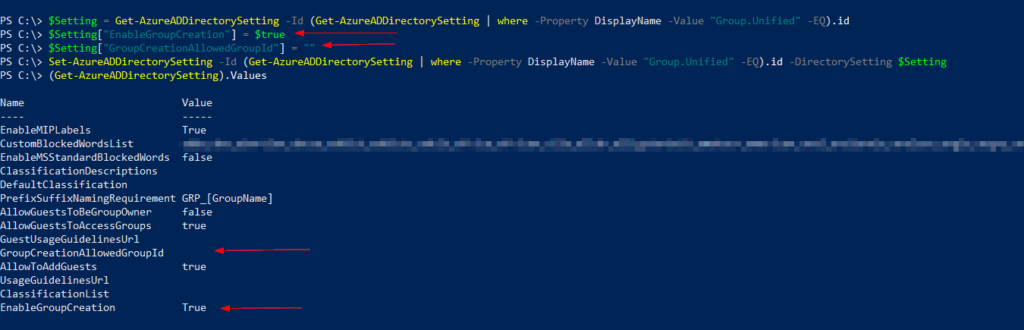
(Get-AzureADDirectorySetting).Values
verify settings
Only one group can be used to control the ability to create Microsoft 365 Groups. But, other groups can be nested as members of this group.
In case your organization wants to revert back this setting in the future, you can do so by changing $AllowGroupCreation to “True” and the group value to “”
Usually the settings takes 30ish minutes to take effect. You can verify this by trying to create a group with a user who is a non-member of the allowed Azure AD group.
If a user who is part of the group creators can’t create a M365 group, it’s worth checking the OWA policy. The Get-OwaMailboxPolicy can be used to check this,
To import members from a csv and add to an existing Distribution Group:
$Name = Read-Host "Enter DistributionGroup name to add members"
Import-csv "C:\tmp\members.csv" | ForEach-Object {
Add-DistributionGroupMember -Identity $Name -Member $_.member
}
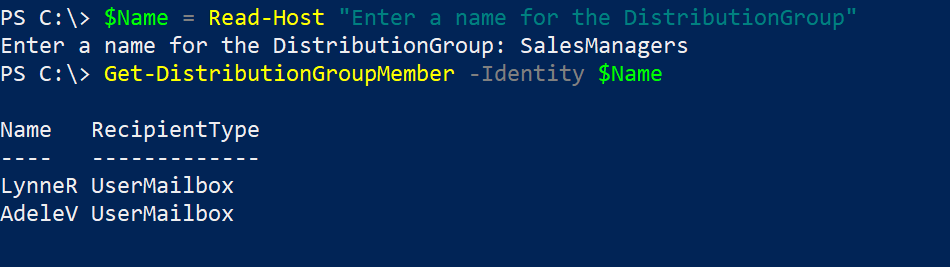
To determine existing distribution group members for a distribution group:
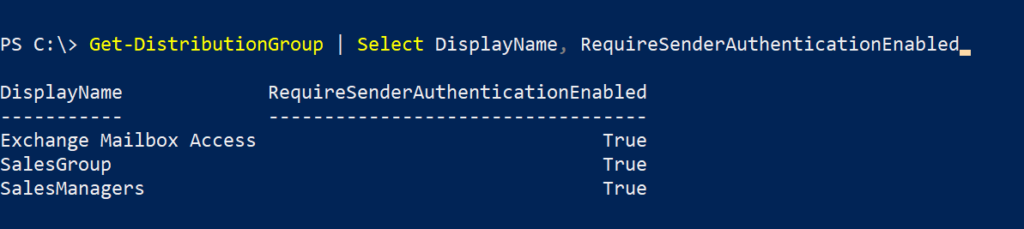
To set distribution group to accept messages from authenticated (internal) and unauthenticated (external) senders.
Note: If you don’t specify this parameter while creating the distribution group, the default value is set to ‘true’ meaning messages from unauthenticated (external) senders are rejected.
$Name = Read-Host "Enter DistributionGroup's name to allow external senders"
Set-DistributionGroup -Identity $Name -RequireSenderAuthenticationEnabled $false
To change an existing distribution group’s name:
$Name = Read-Host "Enter name of existing group to be renamed"
$NewName = Read-Host "Enter new name"
Set-DistributionGroup -Identity $Name -Name $NewName -DisplayName $NewName -Alias $NewName